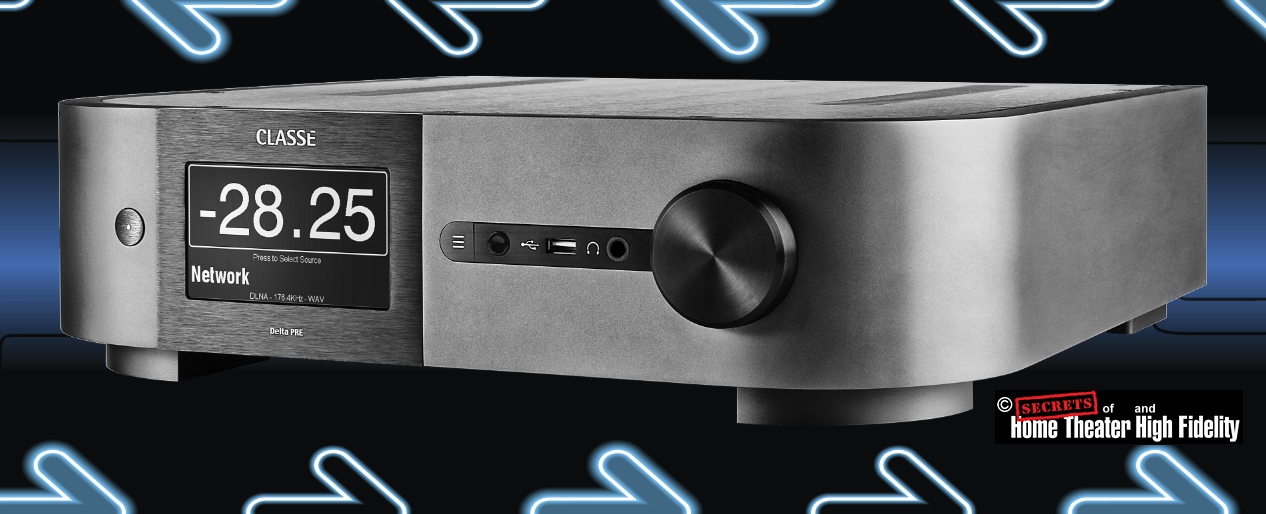
I have had several in my list of reference components. Their Delta PRE Preamplifier and STEREO Power Amplifier represent their latest entries. The preamplifier is one of the new types called a digital preamplifier meaning that you can choose to pass an analog input signal through an ADC and DAC to add digital tone controls as well as EQ bands and subwoofer low-pass.
I found them to perform in an exemplary manner, with the preamplifier having some of the lowest distortion and noise I have ever seen. This results in a very clean, detailed sound.
The on-board DAC has a re-clocking circuit that completely rejects jitter, and the phono preamplifier has both MM and MC capability.
The stereo power amplifier is very heavy, and heavy is good. It delivers 250 watts of low-distortion power per channel into 8 Ohms.
There are inputs for every source known to audio, and the unit I received had the optional four HDMI input, one HDMI output PC card which allows the user to connect all of their HDMI sources with just one HDMI cable connected to a TV.
Classé Delta PRE Preamplifier and Delta STEREO Power Amplifier
- The preamplifier had incredibly low distortion and noise.
- DAC has a re-clocking circuit that rejects all jitter.
- Inputs for every type of audio source.
- The power amplifier has massive build quality, including huge speaker connectors.
- Wattage output meters.
Classé, whose products are made in Japan, is a high-end audio manufacturer that has been around for a long time. I have had several of their products in my reference kit, and still have some of them.
The quality has always been very high, and their current offerings, the Delta PRE Stereo Preamplifier and Delta STEREO Power Amplifiers are reviewed here.
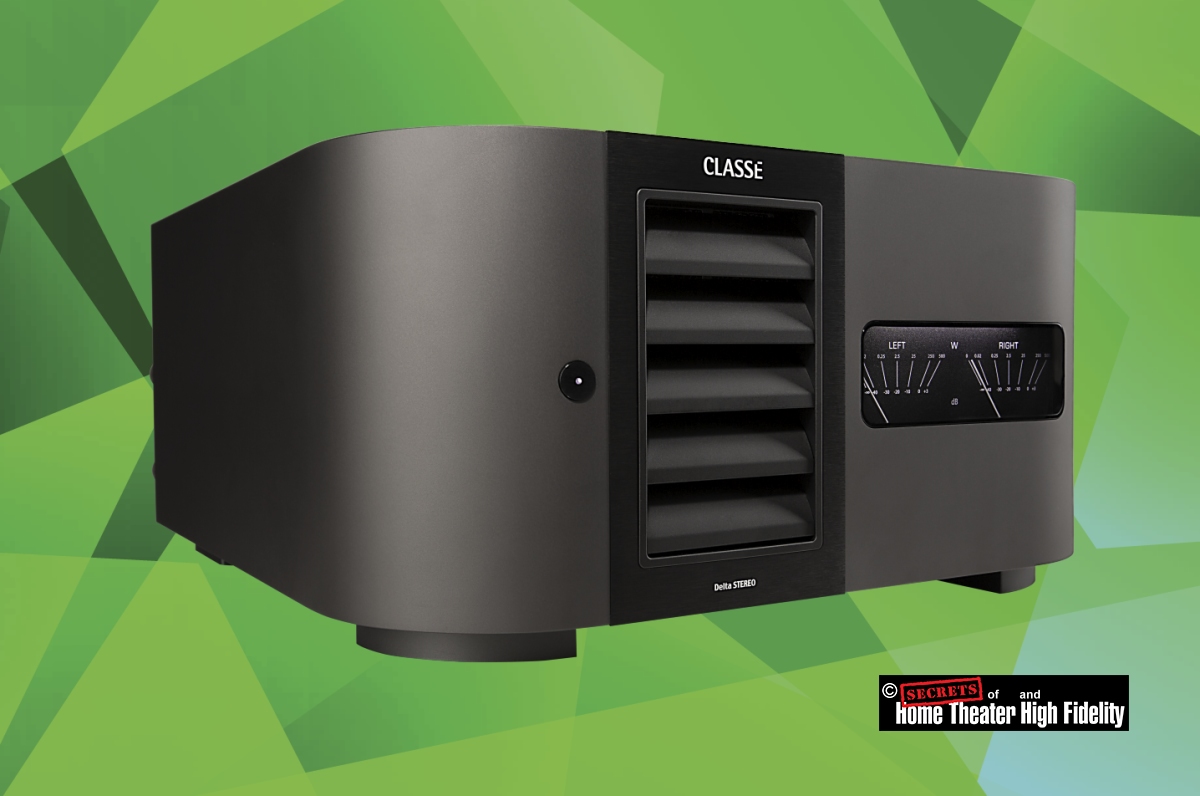
You can see from the photos below that both items are very attractive with a combination of gray and black. They have displays on the front for volume and menu on the preamplifier and output wattage meters on the power amplifier.
The power amplifier has vents on the front that serve a rectangular tunnel inside the chassis with a fan on the rear to pull air through. The output transistors are mounted on the outer surface of the tunnel, and this serves to keep them cool. This is quite unique.
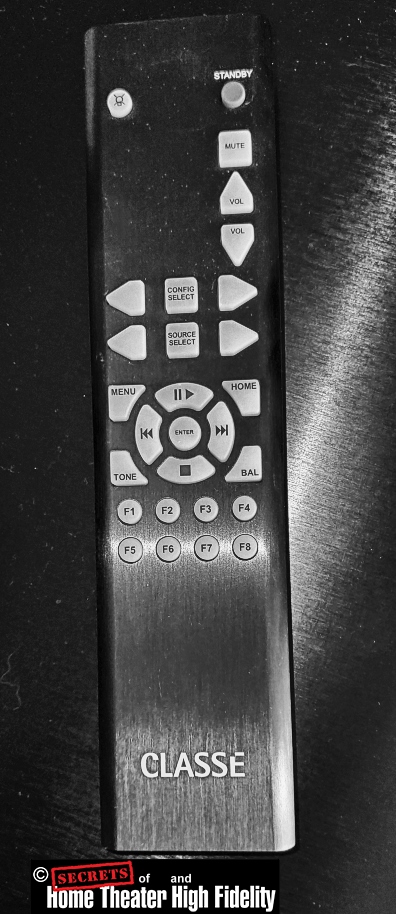
The included remote control is styled in the same way and has a plethora of buttons to keep you busy.
You can also download an app that will let you use your phone or tablet to control both the preamplifier and power amplifier. To do this, you need to connect the CAN-BUS jack on the rear panel of the two components together (an Ethernet cable works for this) and connect the ETHERNET jack on the preamplifier to your home network. If you need wireless connectivity, use a wireless bridge to convert a wi-fi connection into a LAN connection for the preamp.
Classé Delta PRE Stereo Preamplifier
GAIN:
–93 dB – +14 dB
INPUT IMPEDANCE:
50 kOhms
OUTPUT IMPEDANCE:
50 Ohms
MAXIMUM OUTPUT:
9 V RCA, 18 V XLR
FREQUENCY RESPONSE:
5 Hz – 90 kHz (2 MHz when in Bypass Mode)
HARMONIC DISTORTION:
0.0015%, 20 Hz – 20 kHz (0.0004% when in Bypass Mode)
IM:
0.002% (0.001% when in Bypass Mode)
SIGNAL-TO-NOISE RATIO:
125 dB
PHONO:
MM and MC (0.5 mV)
DAC:
32 bit/ 384 kHz Capable Input
TONE:
0.5 Db Steps
EQ:
Five bands/channel
HEADPHONE OUTPUT:
540 mWatts, 5.6 Ohms Output Impedance
DIMENSIONS:
Width: 17.5” (44.5 cm), Length: 17.5” (44.9 mm) (including connectors), Height: 4.75” (12.1 mm)
WEIGHT:
29.8 pounds (13.5 kg)
MSRP:
$9,999.00 USD
Classé Delta STEREO Power Amplifier
CONTINUOUS POWER OUTPUT PER CHANNEL (0.1% THD+N 1 kHz):
12.5W / 8Ω delivered in pure class A operation
250W / 8Ω
500W / 4Ω
350W / 2Ω
FREQUENCY RESPONSE:
1 Hz – 650 kHz, Minus 3 dB
HARMONIC DISTORTION (500 kHz Bandwidth, 25 V):
<0.0016% at 1 kHz
<0.002% at 10 kHz
<0.003% at 20 kHz
INPUT IMPEDANCE:
82 kOhms
INTERMODULATION DISTORTION (IM):
<0.0018%
DIMENSIONS:
Width: 17.50 in (44.4 cm)
Depth: 19.37 in (49.2 cm)
Height: 8.74 in (22.2 cm)
WEIGHT:
102.3 Pounds (46.4 kg)
MSRP:
$12,999.00 USD
Website:
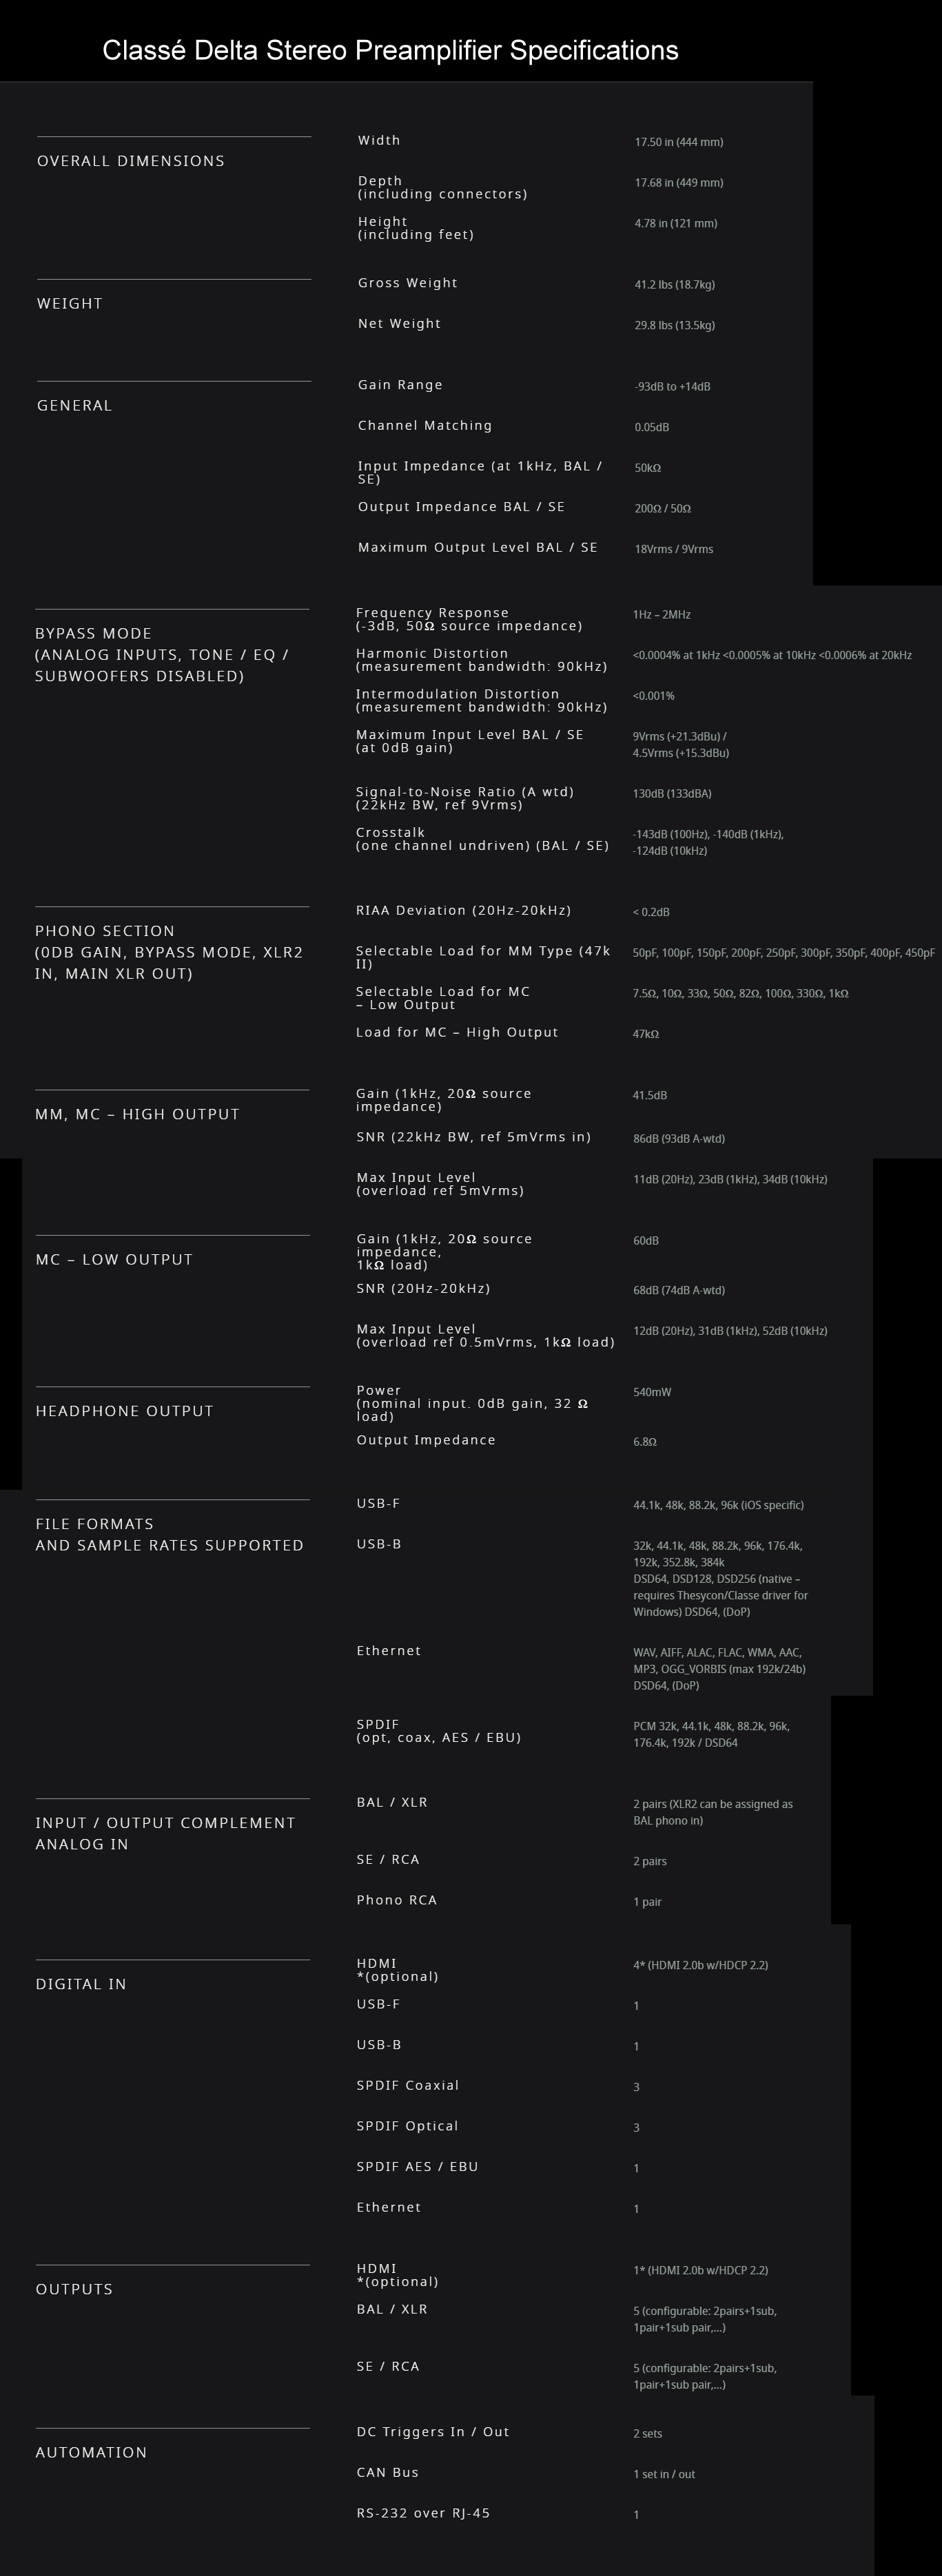
Complete Specifications for the Preamplifier (click on photo to see larger version)
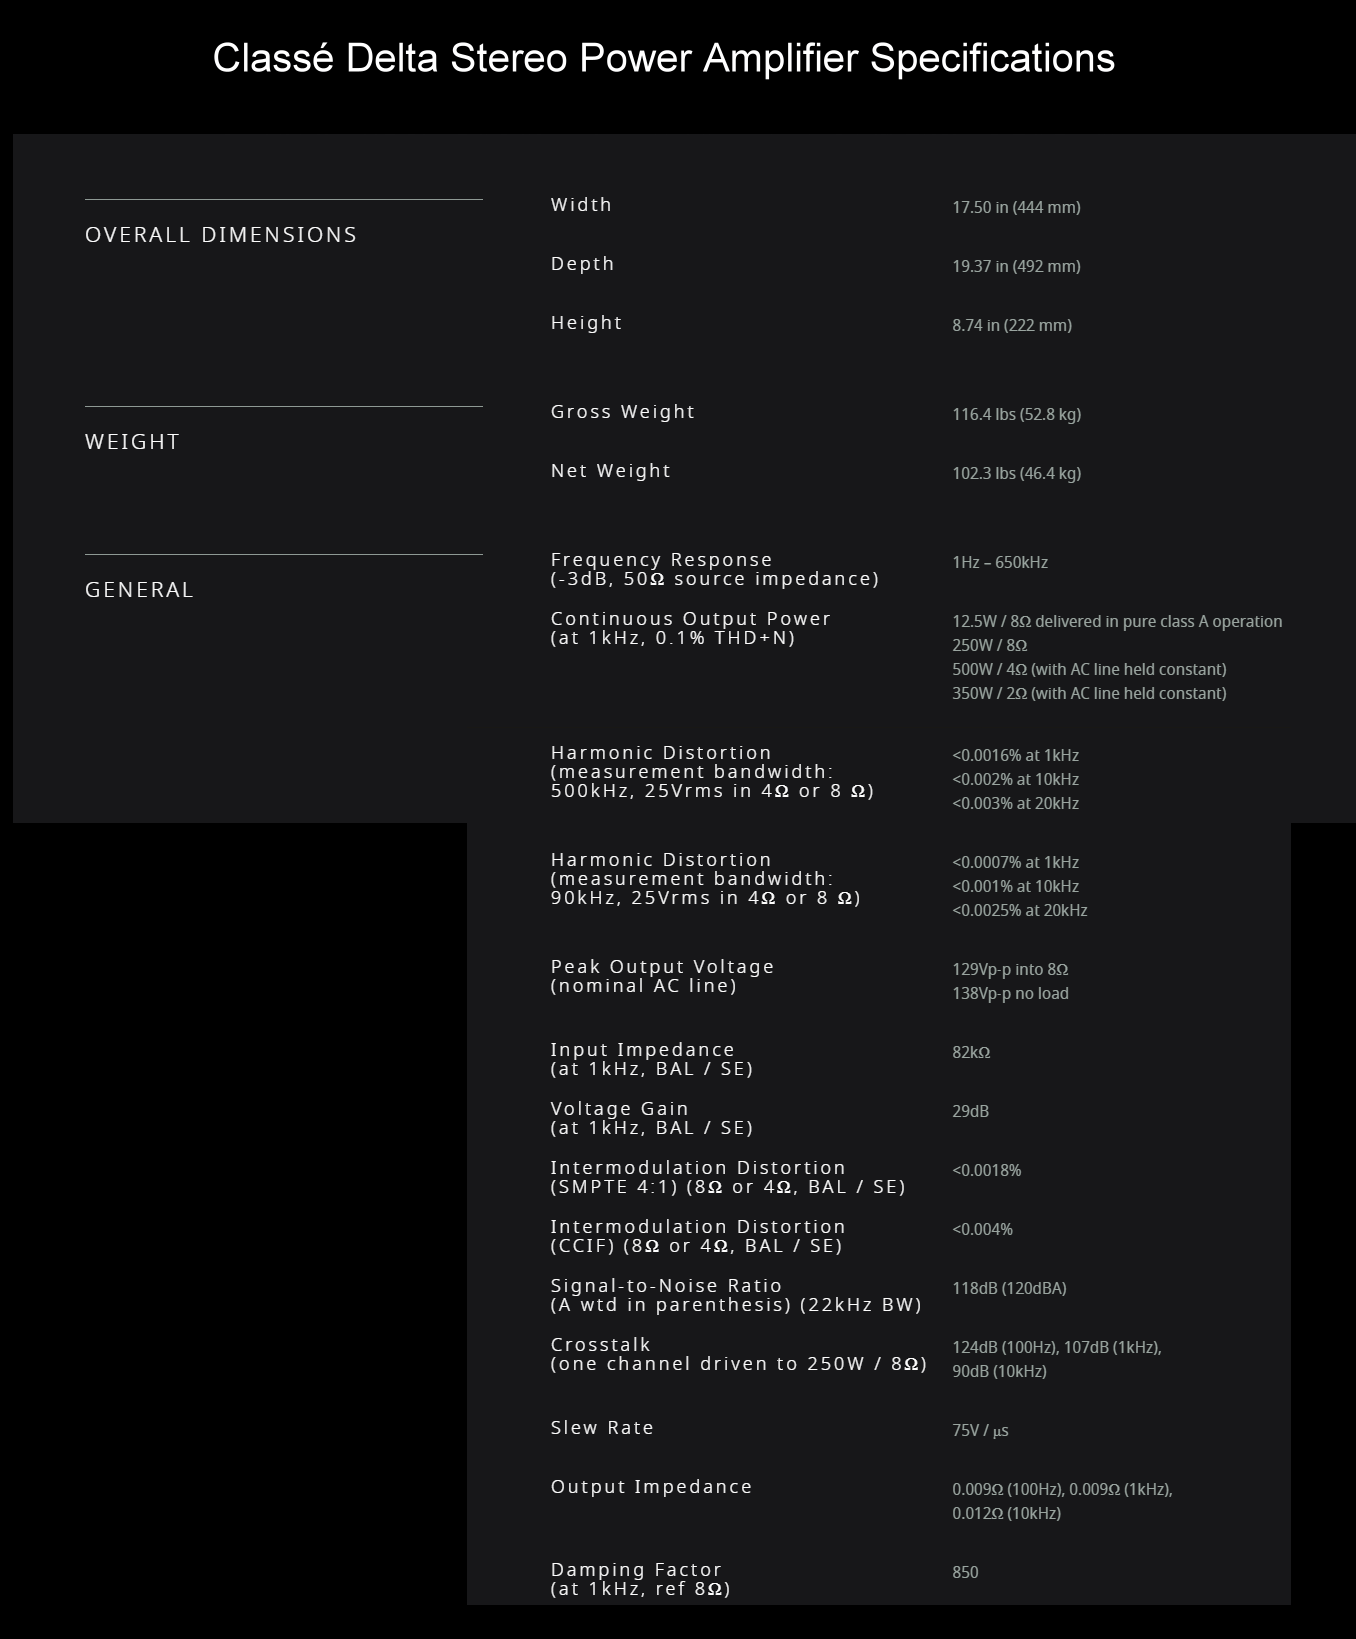
Complete Specifications for the Power Amplifier (click on photo to see larger version)
The Classé Delta PRE Stereo Preamplifier and Delta STEREO Power Amplifier are fully balanced, with the preamplifier being a Pure Class A design at all output levels. They are balanced from input to output, and even if you use one of the RCA unbalanced inputs, the signal is converted to balanced for the complete signal path.
The power amplifier has 12.5 watts of Class A bias, with the remainder being Class A/B. Twelve watts is in the range of normal listening levels.
The internal structure of the preamp has an input buffer followed by a volume control stage that is equally a Class A output stage. Depending on the input selected, the input buffer is replaced by a phono stage or by the DAC if the source is digital. Therefore, a minimal number of stages are in the signal path. Analog input signals that have the tone controls and/or EQ bands added, use a buffer and ADC in the signal path.
The driver and output stages in the power amplifier are push-pull with 16 Lateral MOSFET output devices per channel (8 per push-pull leg). The power supply has several hundred thousand µF of capacitance, and that is very important to the dynamic range performance.
In the preamplifier, an ASRC (Asynchronous Sampling Rate Converter) upsamples the incoming digital data to either a 44.1k or 48k multiple. Jitter is reduced through the intrinsic workings of the ASRC. However, due to the fact that the digital data may pass through other switches and digital processing, such as Sigma DSPs and delay lines, Classé decided to use a re-clocking circuit right before the data enter the DAC. The DAC consists of eight DAC chips in a quad-balanced configuration in the analog output stages.
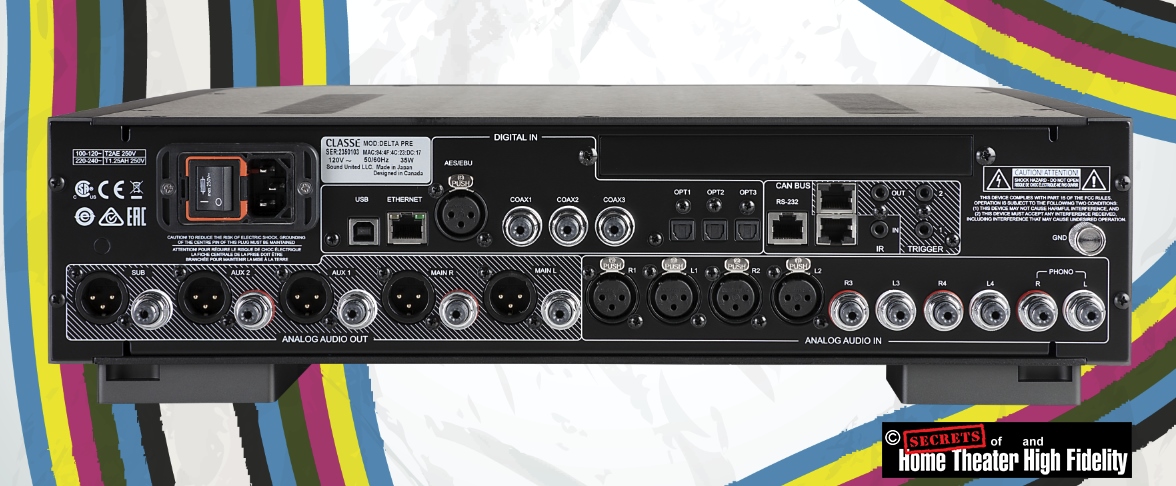
The rear panel of the preamplifier is shown below. Click on it to see a larger version so you can observe all the inputs and outputs. Everything you might need is there.
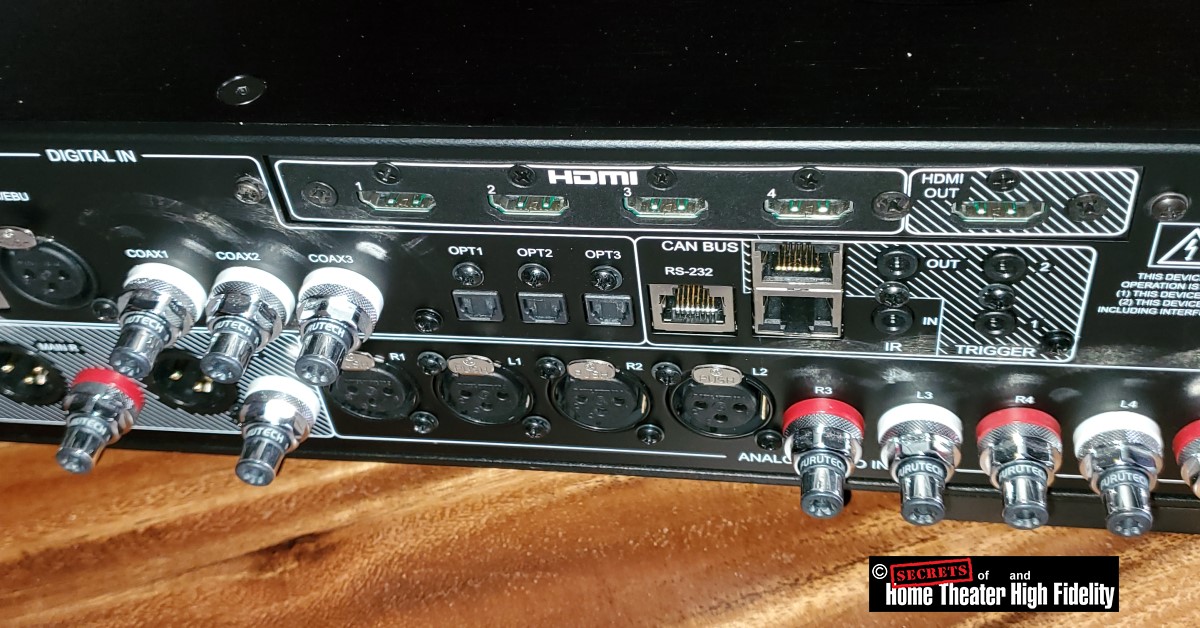
Here is a closeup of the optional HDMI card that was on my review unit.
It has four HDMI inputs that are capable of passing 4K video. There is one HDMI output that you connect to your TV. For me, the inputs go to my cable TV box, a ROKU streamer (for streaming from sources like Netflix, Disney, Hulu, Tubi, Peacock, etc.), a Google Chromecast box (lets me send video on my phone to my TV wirelessly), and my 4K disc player. This simplifies things a great deal since the TV just works with the one HDMI input cable. A future hardware update will let you pass 8K.
The DAC is capable of processing up to 32 bit, 384 kHz sampling digital input signals.
The phono input is MM and low-voltage MC-capable with picofarad and Ohm settings for the load. MC and loading are rare in preamplifiers. You usually find these only in stand-alone phono preamps.
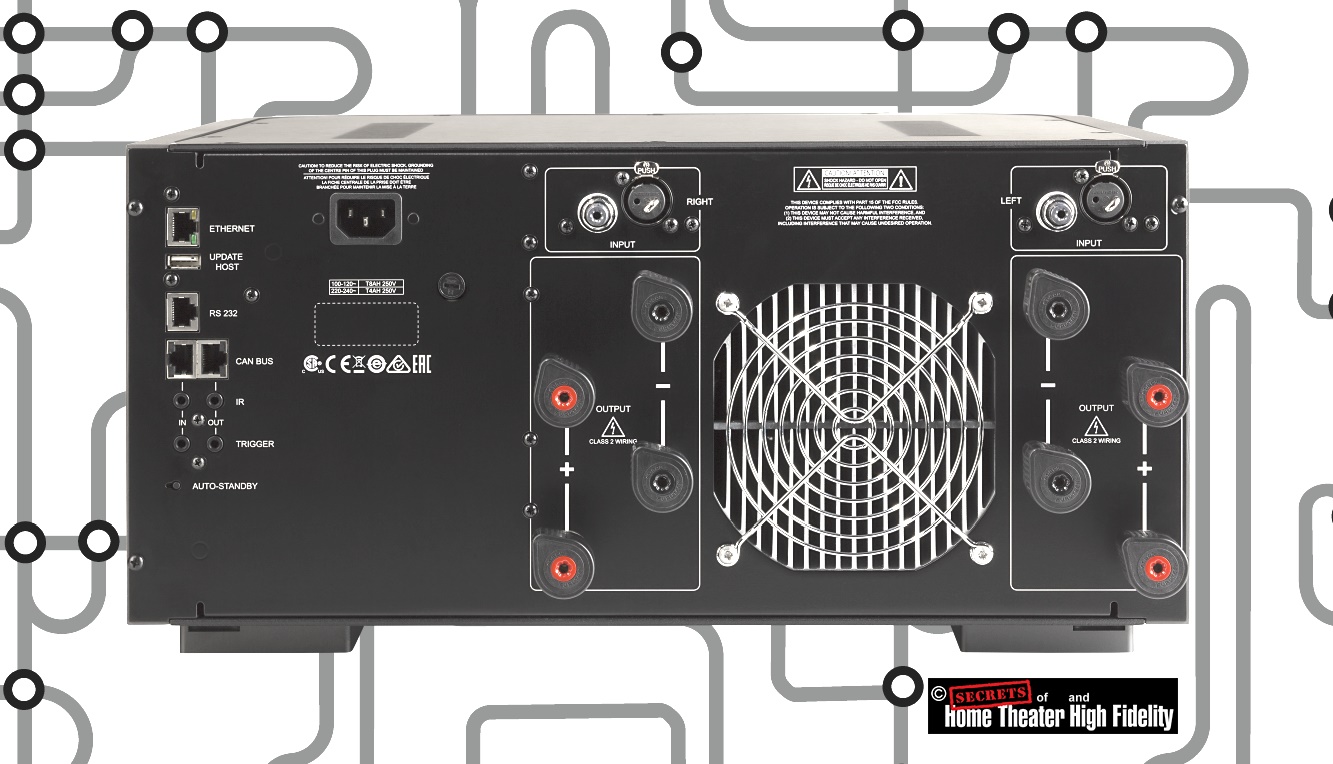
The rear panel of the power amplifier is shown below.
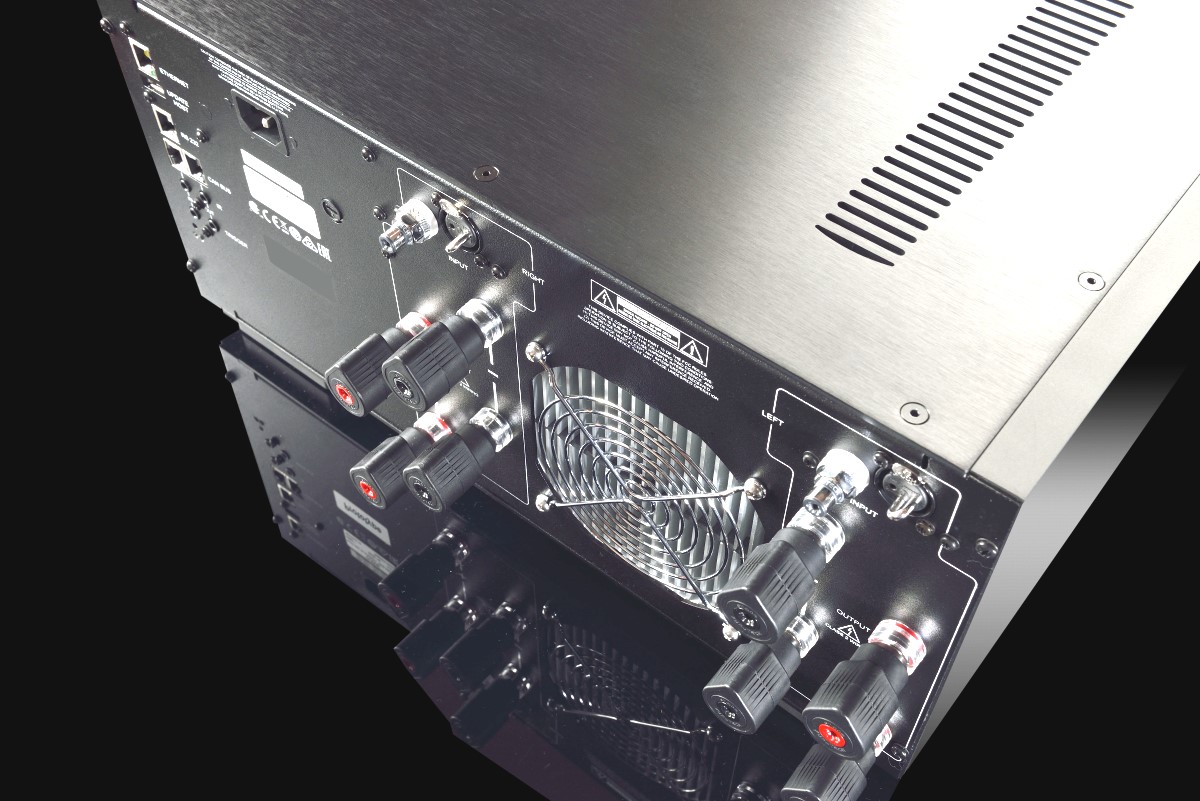
You can see that the speaker binding posts are huge. There are two pairs per channel which let you bi-wire if you choose. There is also an Ethernet connector and trigger jack which lets you automatically power on the amplifier.
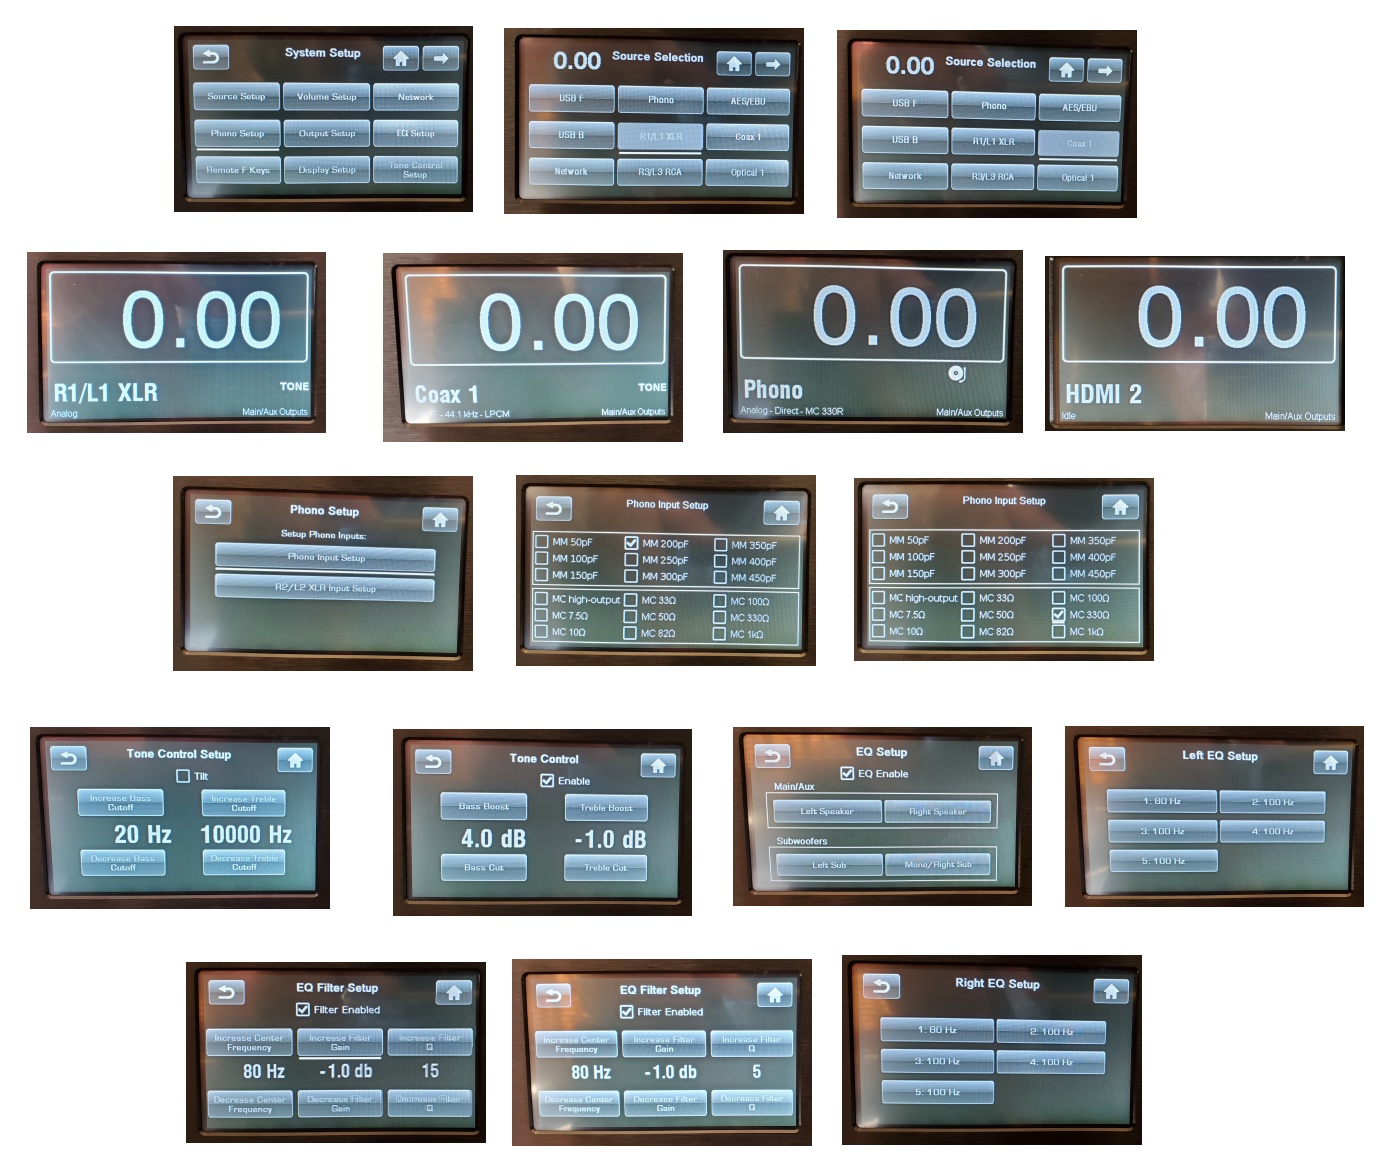
Here are some screenshots of the front panel where the menus are shown (click on it to see a large version).
There are some features that I have not touched upon, and you can see them described in the downloadable user’s manual.
For this review, I utilized a VPI HRX turntable, Sumiko Starling phono cartridge, Otari MX-5050B-III-2 Reel-to-Reel Tape Deck, AURALiC ALTAIR G1 Digital Audio Streamer, OPPO BDP-105 Disc Player, Sennheiser HD 660 Headphones, and Sonus faber Lilium Speakers. Also in use were Clarus Crimson Audio Cables, and a Clarus Concerto Power Conditioner with Crimson Power Cable.
Secrets Sponsor
Complete List of Reference Components: OPPO BDP-105 Universal Player (4), OPPO UDP-205 Universal Player (2), VPI-HR-X Turntable with Sumiko Starling and Palos Santos MC Cartridges, Otari MX-5050B-III-2 Reel-to-Reel Tape Deck, AURALiC ALTAIR G1 Digital Audio Streamer, Manley Labs Steelhead Tube Phono Preamplifier (2), Balanced Audio Technology VK-5i Pure Class A Triode (Tube) Stereo Preamplifier (2) (Fully Balanced), Balanced Audio Technology VK-500 Solid State Stereo Power Amplifier (Fully Balanced) (250 Watts per Channel), Pass Labs Xs Stereo Preamplifier, Pass Labs XP-20 Stereo Preamplifier, Pass Labs XP-27 Phono Preamplifier, Pass Labs Xs 300 Monoblock Pure Class A Power Amplifiers (2) (300 Watts/each), Parasound JC 1+ Monoblock Power Amplifiers (2), Lamm LL1 Signature Stereo Pure Class A Triode (Tube) Preamplifier, MartinLogan CLX Full-Range Electrostatic Speakers (2), Sonus faber Lilium Speakers (2), Paradigm Reference Signature SUB 2 Subwoofers (2), Custom-Built Computer for Audio Analysis, Accupel HDG-3000 Digital Color Signal Generator (1080i capable), Component Video and DVI Output, ColorFacts Pro Video Test and Calibration Software, Version 6.0, Spyder Sensor, SpectraPlus Audio Analysis Software, Audio Precision SYS-2722 Spectrum Analyzer, Staco 3PN2210B-DVM 22 Ampere Variable Transformer (for adjusting line voltage to 120 volts during amplifier power output tests), Classé SSP-800 Surround Sound Processor, Emotiva XMC-1 Surround Sound Processor, Classé CA-5200 Five-Channel Power Amplifier (200 Watts per Channel), Pass Labs X600.8 Power Amplifiers (4) (600 Watts/Each), Audio Control Phase Coupled Activator (Sub-Harmonic Generator), Carver Platinum Mark IV Ribbon Speakers (2), MartinLogan Summit X Hybrid Electrostatic Speakers (2) (Rear Left/Right), MartinLogan Stage X Hybrid Electrostatic Speakers (3) (Center and Sides Left/Right), MartinLogan Balanced Force 212 Subwoofer, Velodyne DD-18+ Subwoofer (3), HiFiMAN HE1000 Planar Magnetic Headphones, OPPO PM-1 Planar Magnetic Headphones, Sennheiser HD 660S Headphones, OPPO HA-1 Headphone Amplifier, Bryston BUC-1 USB Converter, Sony VPL-HW55ES 1,920 x 1,080p Digital Projector, 90″ (Diagonal) Stewart Grayhawk Projection Screen, Sony 75″ UHD (4K) Flat Panel Display, Clarus Audio Cables, Clarus Concerto Power Conditioner with Crimson Power Cable.

Music – Art Pepper meets The Rhythm Section – Vinyl
This has become one of my go-to albums for audio component reviews because it is my favorite classical jazz album. I have it in vinyl re-issue, CD, DSD, and streaming. I used the vinyl here.
I immediately noticed incredible detail that the Delta components delivered. This is due to distortion being so low. Sometimes there can be too much detail with a component, which usually means there is a bit of noticeable distortion with leading-edge transients. That is not the case with the Deltas. It was just detail, pure and clean. The sound was also very warm, and I thought that perhaps there might be some even-ordered harmonics in the main preamplifier or phono preamplifier, but the bench tests proved otherwise.

Music – Alessandro Piccinini Lute Music – Streaming
Another good album to test the presence of detail, Mónica Pustilnik plays the lute with a great but tender expression and is hugely musical and entertaining. Here, as with the Art Pepper album, detail was not obscured with edginess but was very clean. The leading edges of the plucking of the strings were crisp but not unpleasant. I continue to be very impressed with the quality of digital music from streaming over the Internet. It certainly seems to be the future of music, vinyl and reel-to-reel resurgence notwithstanding.

Music – Norah Jones: Come Away with Me – CD
This is one of my wife’s favorite albums, and it is certainly a good one for listening to the human voice. I would like to get it on the reel-to-reel tape version, but it is too expensive for me ($450).
Norah sounds great on any source version, and through the Classé Deltas, she sounds magical. Warm, sweet, compelling. I had to get up and fix myself a hot chocolate while this was playing. Too good to just sit and listen.
Music – Stan Getz Quintet – Reel-to-Reel Tape – International Phonograph, Inc. – IEC EQ
I used the XLR line outputs from my Otari MX-5050B-III-2 deck into XLR inputs on the Delta preamp.
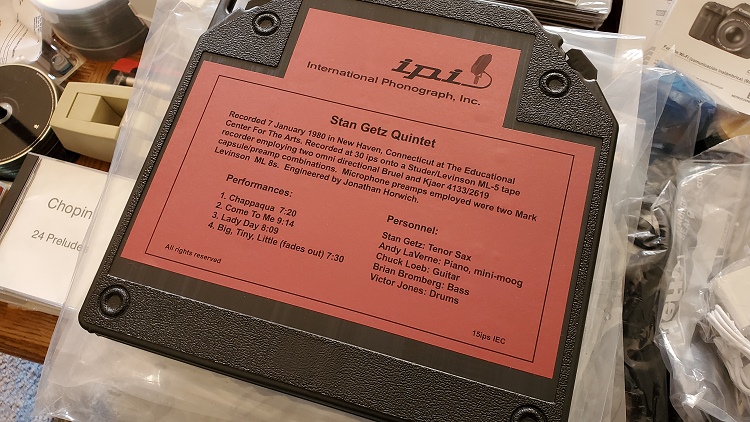
This is my first product review where I used Reel-to-Reel (RTR) tape as a music source. It was recorded by International Phonograph, Inc originally, and the consumer tapes are made by copying a copy of the original master at 15 IPS. There is no digital intermediate step. Analog all the way. Some tapes are made with digital intermediates, and some are made from digital masters, usually DSD. To me, having digital in the signal path somewhere between the master and the consumer tape negates the reason for listening to tape. If I want digital in there, I will buy a CD or DSD download. Digital adds artifacts that cannot be removed. Even though these artifacts might not be very noticeable, there are there and not acceptable to me as a reel-to-reel enthusiast.
Stan Getz may be the most recognized name in classical jazz, regardless of the instrument, which in his case, is tenor sax.
Analog tape sounds very different from digital recordings, and even vinyl that has been cut from analog tape. It is very warm and rich, with fine detail that seems to be missing from digital music.
So, for the low-distortion, low-noise Classé Deltas, tape sounded glorious. Listening with headphones, that fine detail was very apparent. Less so with speakers across the room, but the warmth and intimacy were still there. I plugged my Sennheiser HD 660S headphones into the headphone output jack on the Delta PRE Preamplifier to compare it to the headphone output on the tape deck. They sounded similar. From speakers, Getz’s sax was not quite the same as with headphones, but it still is superior to digital versions.
I think that to appreciate what analog tape can really sound like, you do need components with low distortion and noise. The Deltas deliver that.
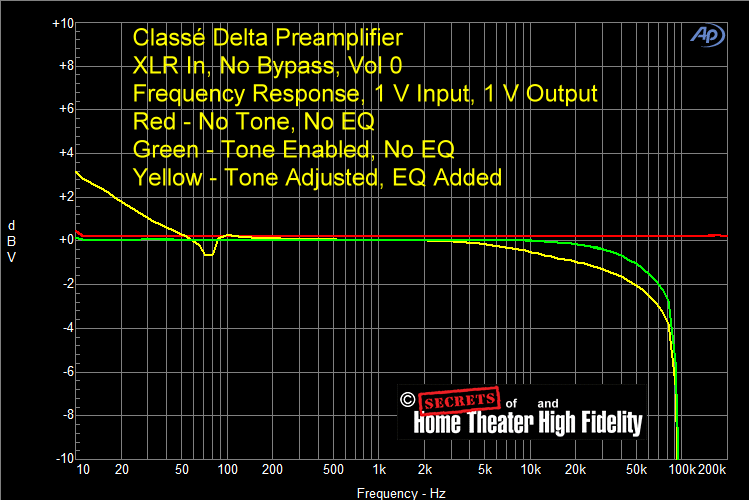
After I wrote my notes on the subjective listening, I performed the bench tests, and I added some Tone Control and EQ. Shown below is the frequency response using no DSP which meant that the signal path was analog from input to output (red line). The frequency response with the tone control enabled, but without any adjustment of tones is shown in green. In this case, the signal goes through an ADC/DAC cycle and is rolled off about 0.2 dB above 10 kHz. Also seen are the frequency response using tone controls to add deep bass response below 60 Hz and attenuate high frequencies above 3 kHz to adjust for when playing an IEC tape using NAB EQ (yellow line). This would be the case for tape decks in the USA which only have NAB. My deck has a switch for both NAB and IEC.
Listening to an IEC tape with NAB EQ results in a lack of deep bass and a bit too much high frequencies. This is because the Post-emphasis EQ curve for IEC increases the deep bass and lowers the high frequencies more than is done with the NAB Post-emphasis. This is explained in more detail in my last RTR music tape reviews. I applied a small amount of EQ in between 70 Hz and 80 Hz to lower some resonance that I have experienced with my speakers. I don’t know (yet) if it is due to the speakers sitting on our hardwood floor or perhaps due to their being in corners of the room. The difference in sound that the Tone and EQ that I added masks any difference that the ADC/DAC added on its own, compared to having no ADC/DAC in the signal path. Adding EQ requires addressing the EQ menu and selecting one of the five available EQ bands, selecting a frequency, amount of emphasis or attenuation, and the Q. A high Q will make the tip of the EQ curve sharp, while a lower Q makes the tip flat side-to-side as seen in the 70 Hz EQ trough shown below. You can see the selections for this in one of the menu screen shots shown above, just before the beginning of the In Use section.
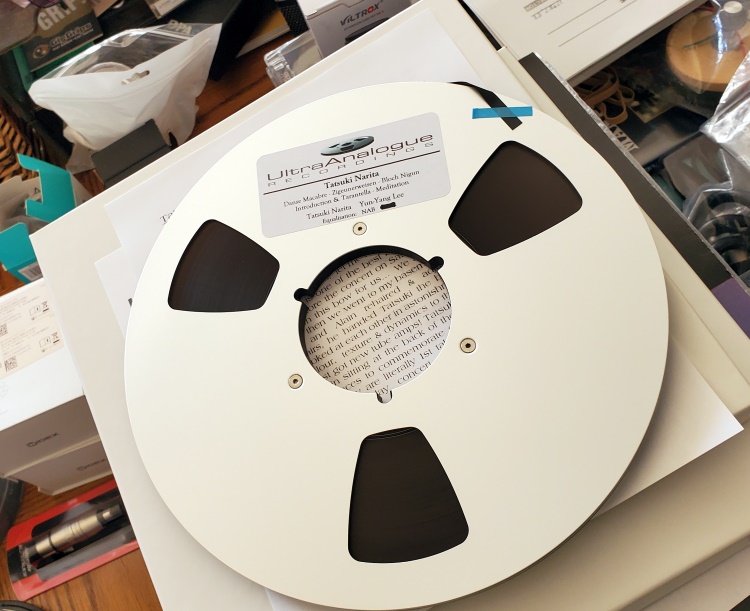
Music – Narita – Tatsukin Narita, Violin, Yun-Yang Lee, Piano, UltraAnalogue Recordings – NAB EQ
This RTR tape has piano and violin. Violin is particularly edgy when there is harmonic distortion in the amplification signal path. The Deltas have very low distortion, so the violin sounded fabulous here, i.e., smooth but detailed. This smoothness can result from having low distortion but also from a rolled off high frequency response. The bench test results in this review show the reason.
The five tracks on this tape are “Danse Macabre” by Camille Saint-Saens, “Zigeunerweisen” by Pablo de Sarasate, “Bloch Nigun” by Bloch, “Introduction & Tarantella” by Pablo de Sarasate, and “Meditation” by Jules Massenet, all composed in the late 1800s and early 1900s.
Again, the tape was recorded by UltraAnalogue Recordings, and it is a modern recording, not an old tape from the 1950s or 1960s. It is a copy of a copy of the original master tape. The owner of the recording company builds violins as his main business and records various classical musicians himself. He made the bow for the violinist in this recording.
I am more of a fan of the piano than the violin, but this paring is certainly wonderful. However, the violin “Meditation” track by Massenet is one of my favorite compositions.
Low-level detail is present in this tape as in the IPI tape reviewed above. This detail includes the rustling of clothing. It really adds ambiance that is just not there in digital recordings. This is what I wanted to hear with the Deltas, and it was there.
I bench tested the Delta PRE Preamplifier and Delta STEREO Power Amplifier separately, using XLR inputs where possible, XLR outputs on the preamplifier, and of course, the speaker outputs on the power amplifier.
First, the preamplifier.
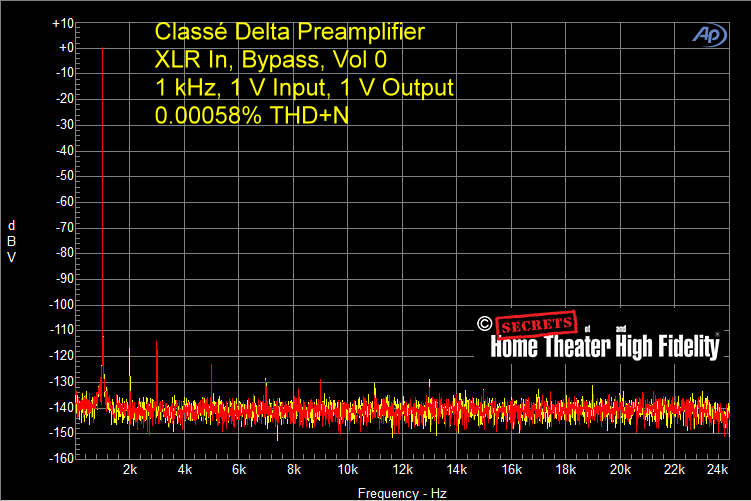
I used the default configuration setting which allows tone control and EQ, and I label it No Bypass, meaning that it is not the Bypass configuration setting that does not have tone or EQ capabilities. Except where indicated, I set the Volume control to 0.
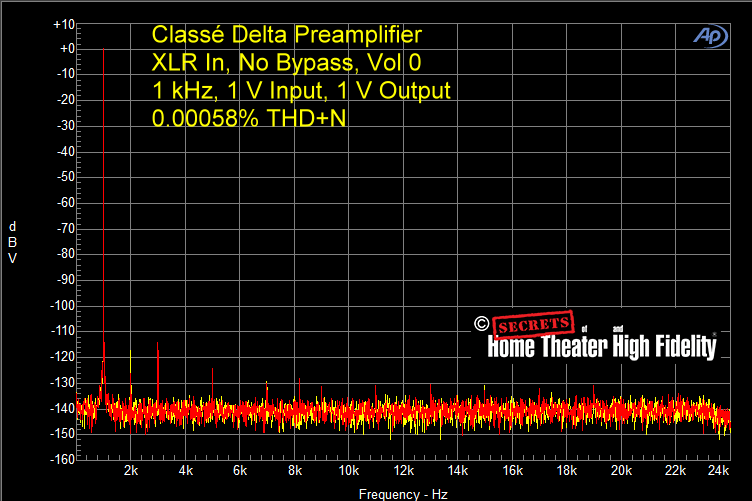
At 1 kHz, 1 Volt input, and 1 Volt output, distortion was 0.00058%. One Volt represents 0 dBV, which is shown on the Y-axis. This is extremely low distortion, among the very lowest I have ever measured in a preamplifier. The highest distortion peak was at -115 dBV. The noise floor is at about -138 dBV.
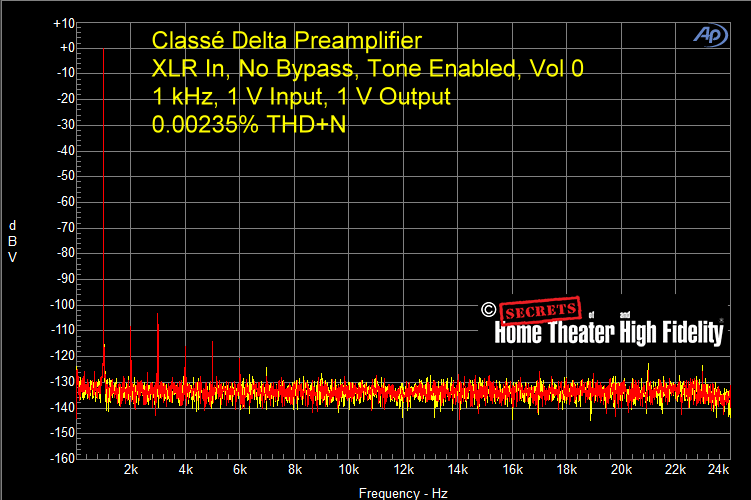
With the tone control enabled, but no tone adjustments added, the ADC/DAC circuit was active, shown below. The noise floor was increased to -127 dBV, and the distortion peaks were about 10 dB higher. Peaks above 7 kHz were buried in the noise floor.
As shown above, the use of the ADC/DAC in the signal path did increase the distortion, but it was still so low as to be inaudible, or nearly so.
Secrets Sponsor
Switching to the Bypass configuration, shown below, the spectrum looks exactly like the Default configuration with no tone or EQ enabled. Therefore, you could use the Default configuration with tone and EQ for certain types of music or particular source, and then choose the Bypass configuration from the remote control when you want a pure analog signal path.
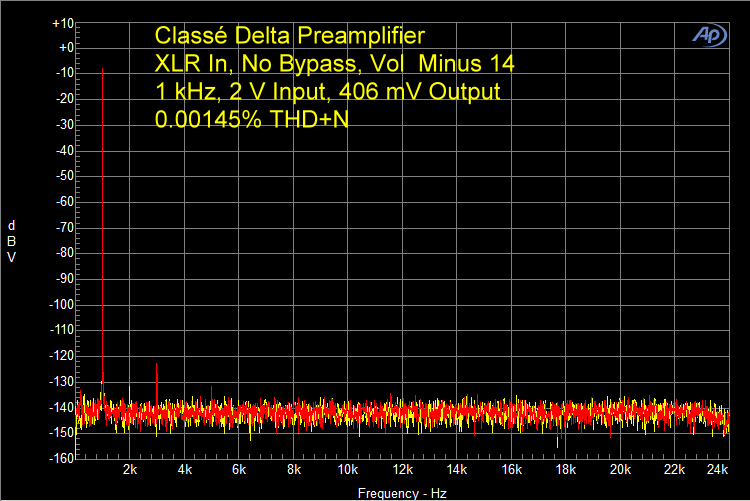
Below is a test using 2 Volts input and the volume control set to minus 14 dB so that the output was 406 mV which is a typical listening level with the standard 2 Volts output from a CD player. This is within the 12.5 Watts of Class A bias. Distortion is low.
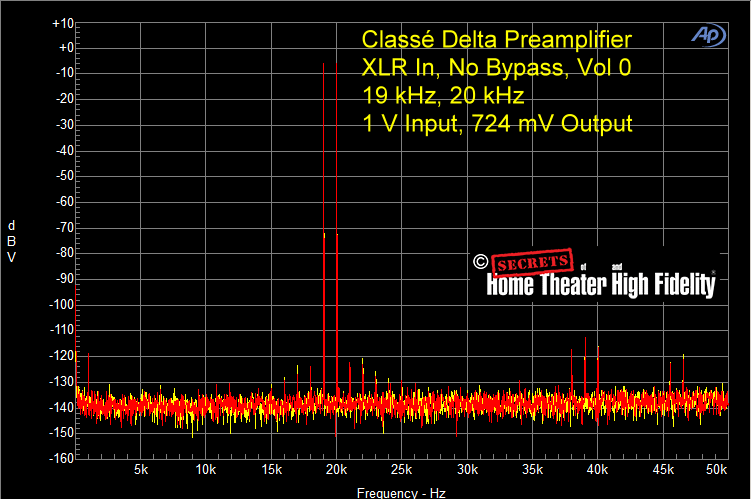
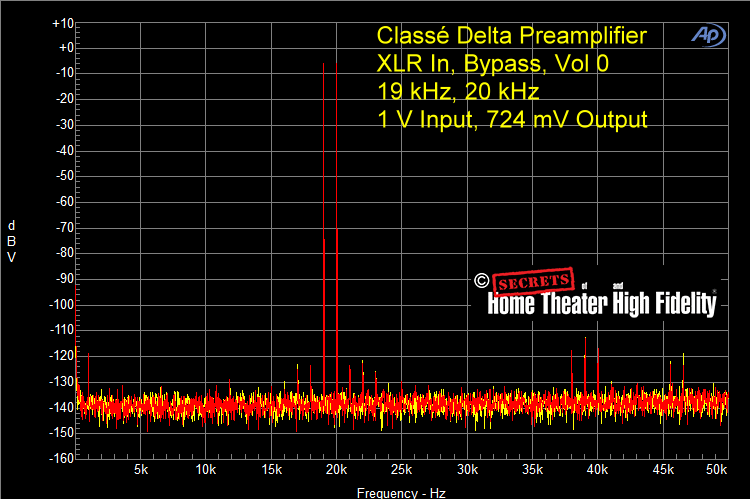
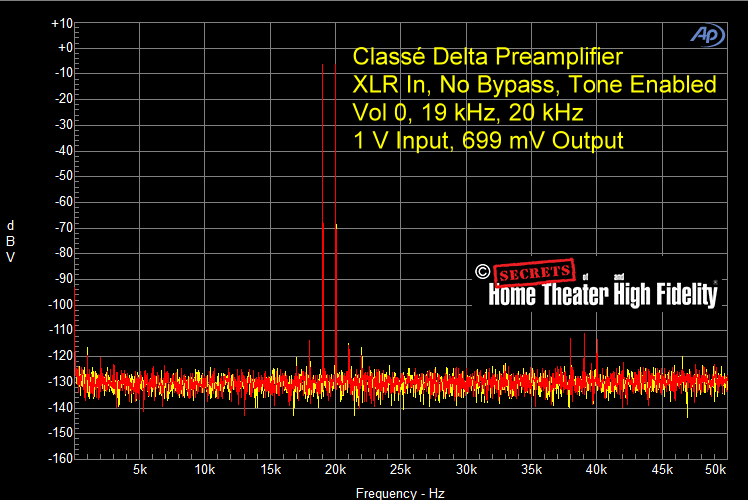
Moving on to the 19 kHz, 20 kHz test, shown below, with 1 Volt input, the output drops a bit to 724 mV. The IM peaks on either side of the 19 kHz and 20 kHz peaks are very small.
Enabling Tone adds the ADC/DAC, shown below. The peaks on either side of the 19 kHz, 20 kHz peaks are about 8 dB higher, but the peaks out at around 38 kHz and 46 kHz are the same height. The noise floor is about 10 dB higher.
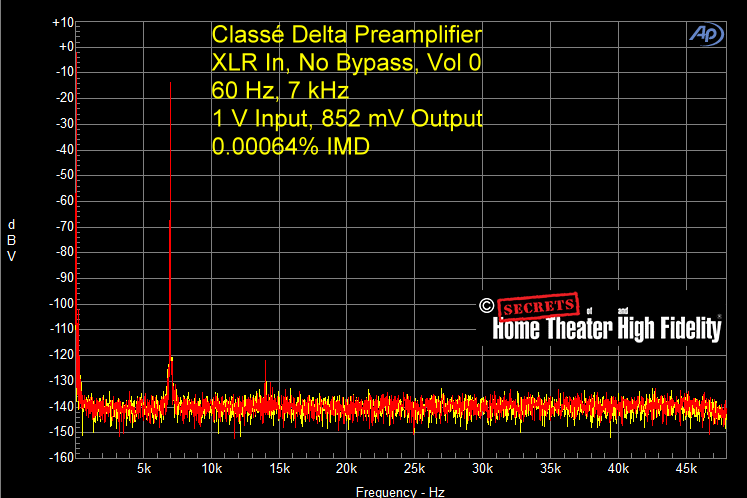
For the standard IM (Intermodulation Distortion) test using 60 Hz and 7 kHz sine waves, shown below, IM was 0.00064% with 1 Volt in and 852 mV out. This is extremely low and a superb result.
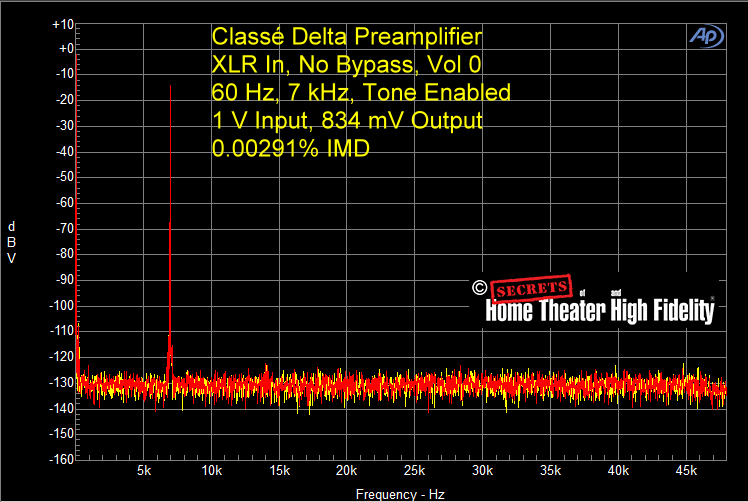
With Tone enabled but no actual tone adjustments made, the noise floor went up as expected, and the measured IM increased to 0.00291% which is still an excellent result.
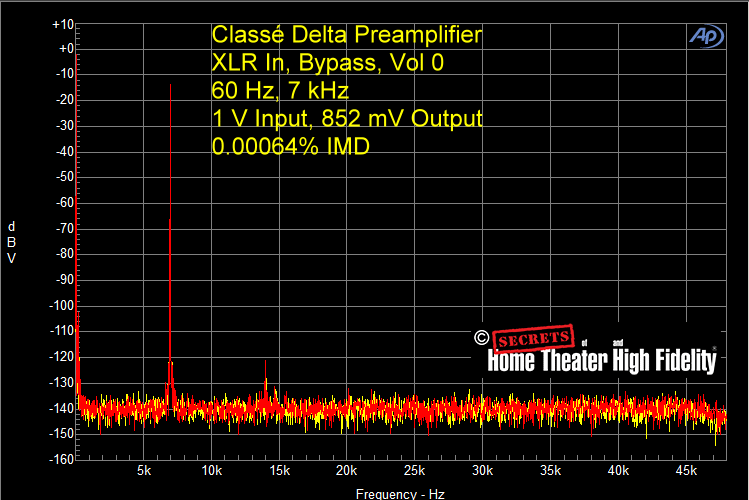
In the Bypass configuration, the result was identical to the Default configuration with no Tone enabled.
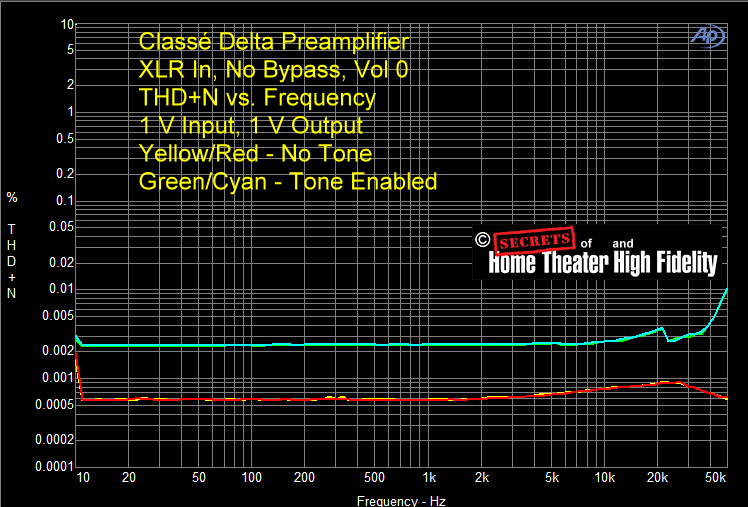
Let’s look at THD+N vs. Frequency, using 1 Volt in and 1 Volt out, shown below. The red line is the result with no Tone enabled, and the green line is with Tone enabled. With no Tone, distortion stays below 0.001% all the way up to 50 kHz, while with Tone enabled, it is below 0.004% up to 20 kHz.
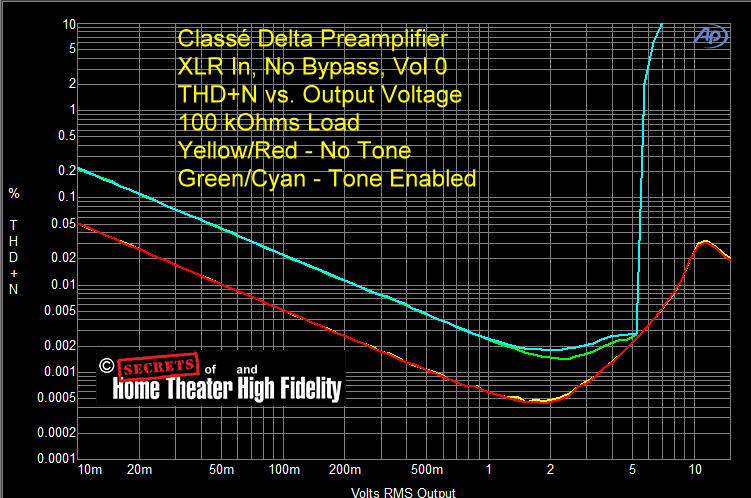
THD+N vs. Output Voltage is shown below, no Tone enabled in red and Tone enabled in green. Distortion is higher at very low voltages due to the noise floor remaining the same, which makes the measurement value higher. It is best at about 2 Volts output. Clipping occurs with the ADC/DAC enabled (Tone enabled) at 5.7 Volts output.
The spectrum shown below is the same one I showed in the In Use section. It indicates the effect of Tone and EQ adjustments that I made, which activated the ADC/DAC. This was for the purpose of listening to IEC EQ tapes using a deck that has NAB EQ. However, I would have to put aside my rejection of any digital signal processing in the audio path from the tape mastering to the speakers when using this Tone and EQ configuration. It is an alternative. In the mood: turn it on. In a purist mood, turn it off. Having the choice makes it more palatable. One can save the “Tape with DSP” as a configuration and just select it when desired.
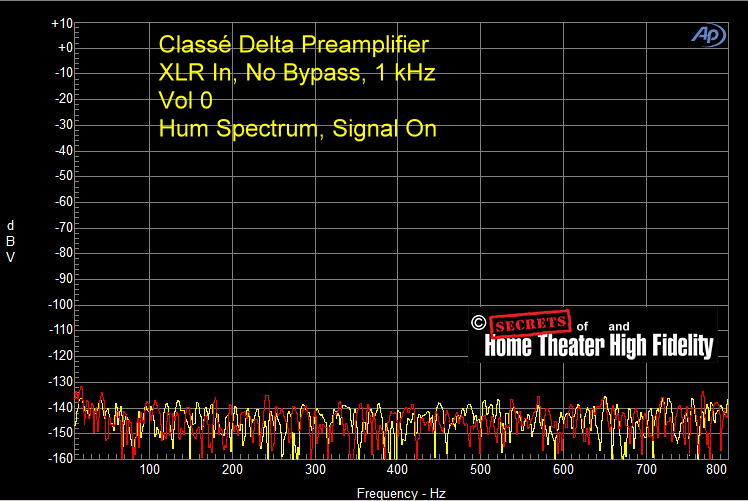
A Hum Spectrum is shown below with the test signal (1 kHz sine wave) on. There are no 60 Hz and its harmonics peaks.
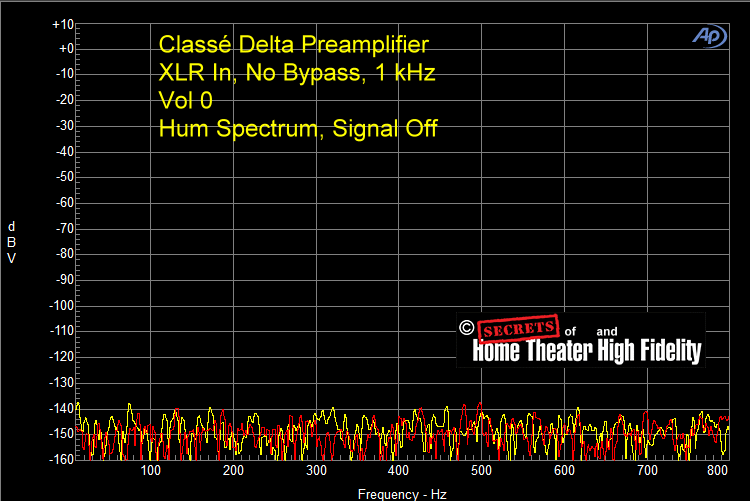
With the test signal off, shown below, the noise floor dropped below -140 dBV. Superb.
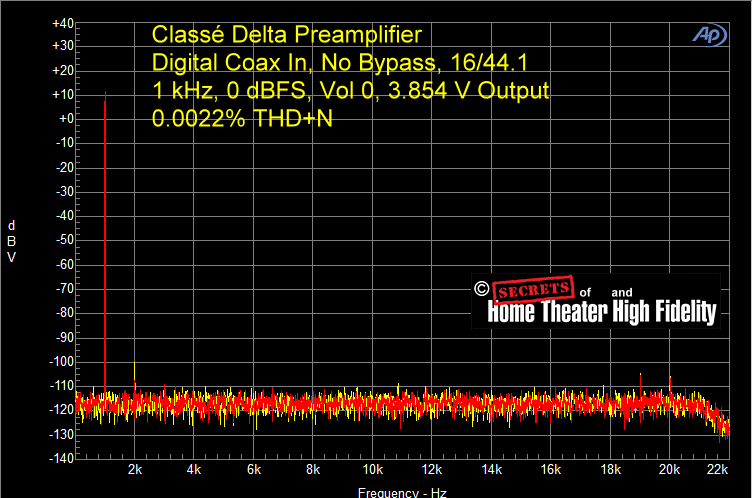
Here we begin the tests on the Delta PRE Preamplifier’s DAC. I used the digital coax input. First, 1 kHz at 0 dBFS. 16/44.1 sampling. Output was nearly 4 Volts. Distortion was a low 0.0022%.
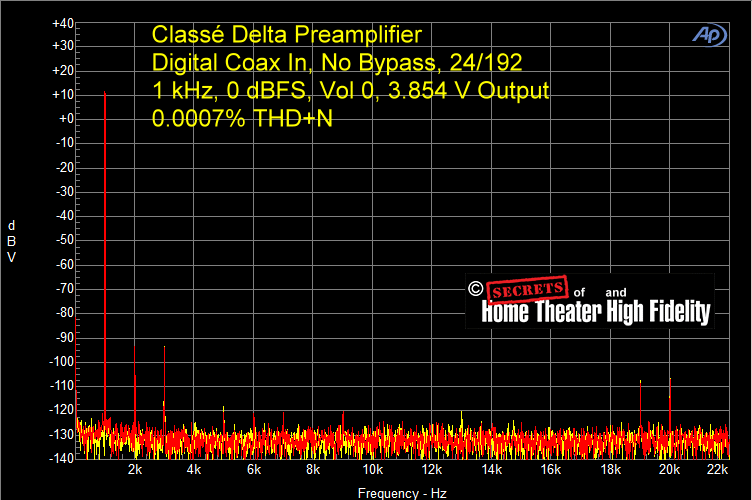
With 24/192 sampling, the distortion peaks are somewhat higher, but the measured value, which includes the lower noise floor, is 0.0007%.
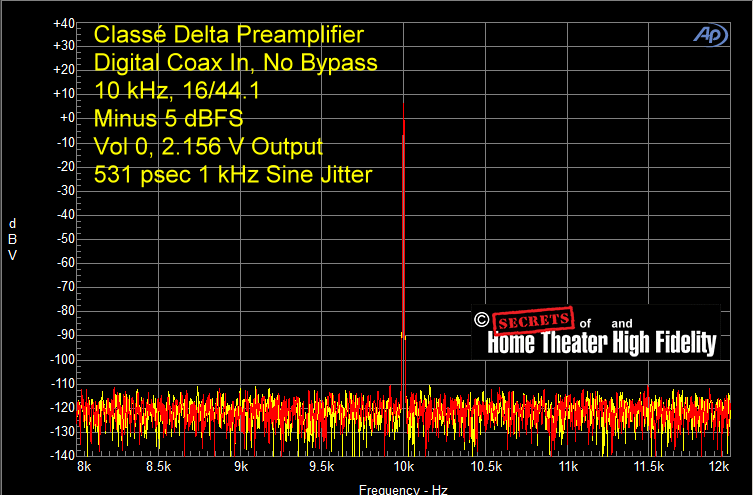
In the figure below, I added 532 psec (picoseconds) of 1 kHz sine jitter to a 10 kHz sine wave test signal. As you can see, there are no jitter peaks at 9 kHz or 11 kHz. This means the Delta PRE Preamplifier’s DAC rejects jitter. I asked Classé if the DAC uses a re-clocking circuit, and they said yes. What this means is that with the USB digital input from a computer, which normally has a lot of jitter, that jitter will be removed.
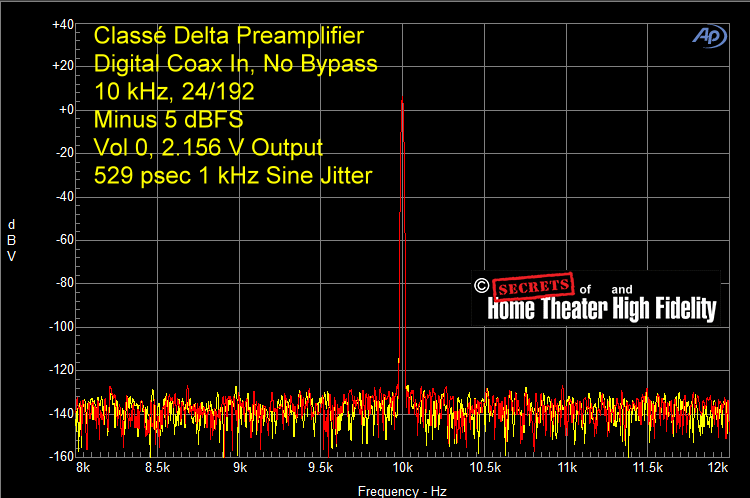
The same thing occurs with 24/192 sampling, shown below. So, the Delta PRE Preamplfier’s DAC is really excellent. Definitely Audiophile-Grade. The DAC does have its own inherent jitter as every DAC does, but it is only 50 psec which would be buried in the noise floor.
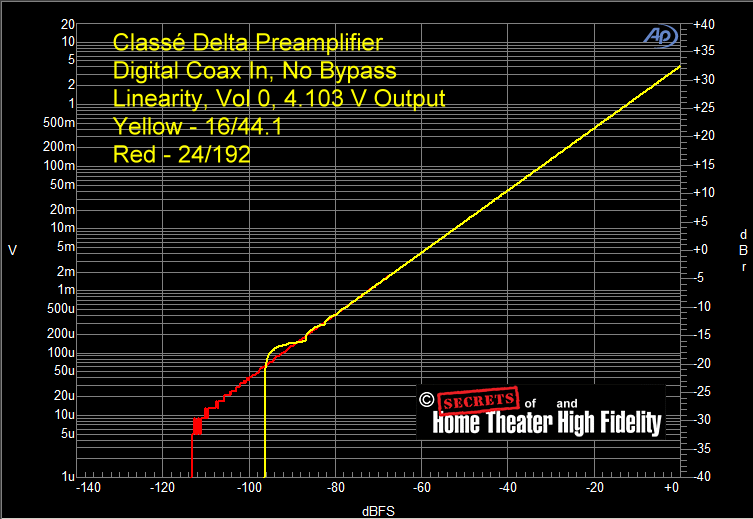
Here is the DAC’s linearity test. At 16/44.1 sampling, it is linear to -97 dBFS, while at 24/192 sampling, it is linear to -114 dBFS.
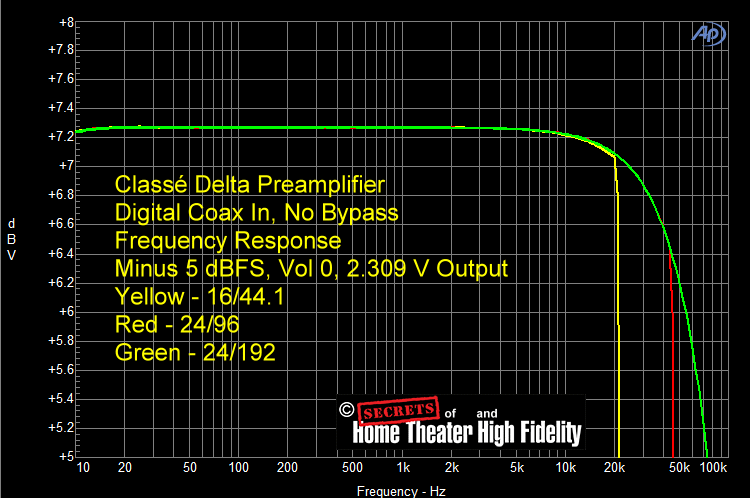
Here is the Frequency Response, shown at 16/44.1, 24/96, and 24/192 sampling, -5 dBFS input, 2.31 Volts output. In all cases, the response begins to drop off at 5 kHz and is down 0.2 dB at 20 kHz. At 50 kHz, the response is down 0.9 dB. The smoothness in sound quality that I mentioned in the In Use section is a result of low distortion rather than a rolled off high frequency response since being down only 0.2 dB at 20 kHz would not be enough to smooth out the sound.
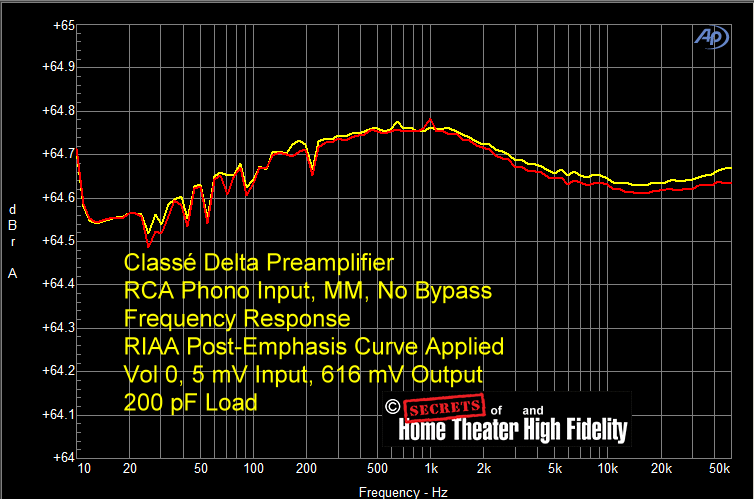
Back to analog signals, here is the phono preamplifier performance. First, the Frequency Response using the MM input with a 200 pF (pico-Farads) load. The response is within 0.3 dBr from 20 Hz to 50 kHz.
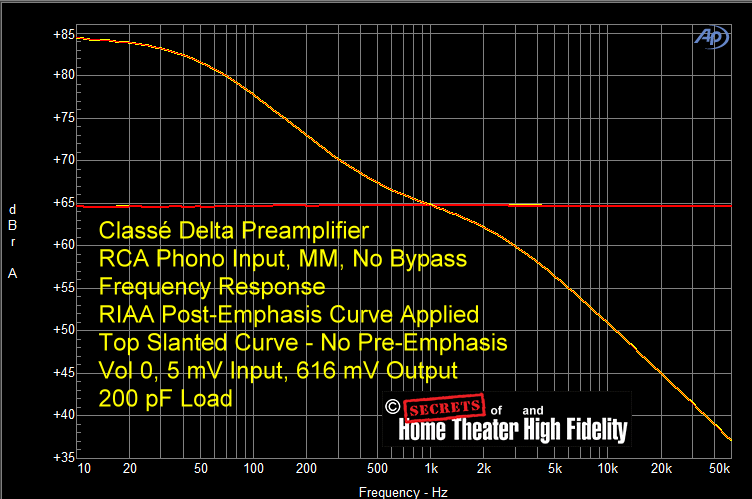
Below is shown the spectrum with a compressed Y-axis, and the response with (flat line) and without (curved line) Pre-Emphasis RIAA curve applied. You can see that the Post-Emphasis curve which the Delta PRE Preamplifier applies is exactly as it should be, 20 dB increased at 20 Hz, and 20 dB attenuated at 20 kHz.
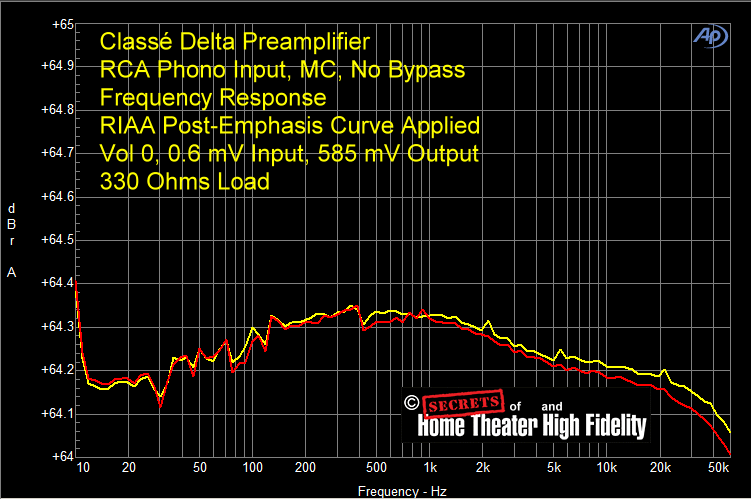
Using the MC input configuration with a 330 Ohms load, the response is again within 0.3 dB out to 50 kHz.
Notice that the response is higher in the midrange than at either end. This is what gives the warm vinyl sound that I heard.
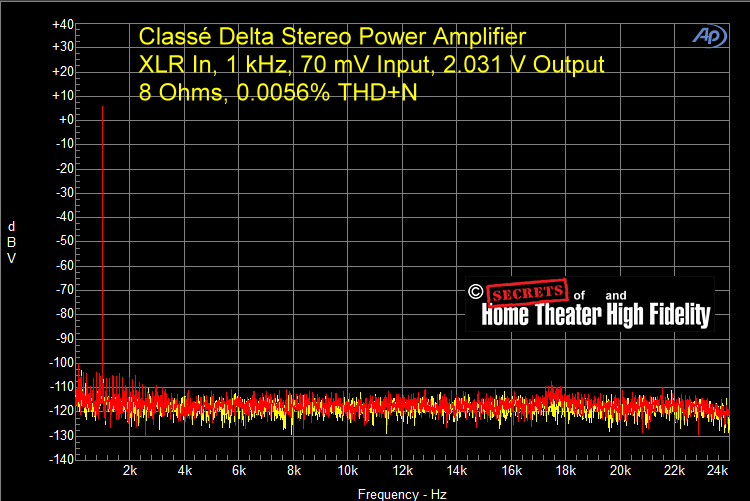
OK, let’s go to the Delta STEREO Power amplifier, and start with 1 kHz and 2 Volts output. Distortion was 0.0056%.
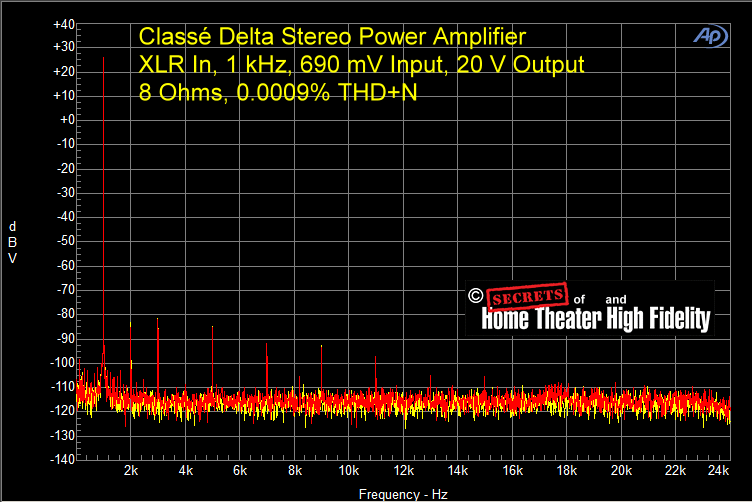
Increasing the output to 20 Volts, THD+N was still very low, at 0.0009%. This is at 8 Ohms load (50 Watts). Some of the lowest I have ever tested. Combine this with the low distortion of the Delta PRE Preamplifier, and you get superb detail and clarity, which is exactly what I heard in the listening tests.
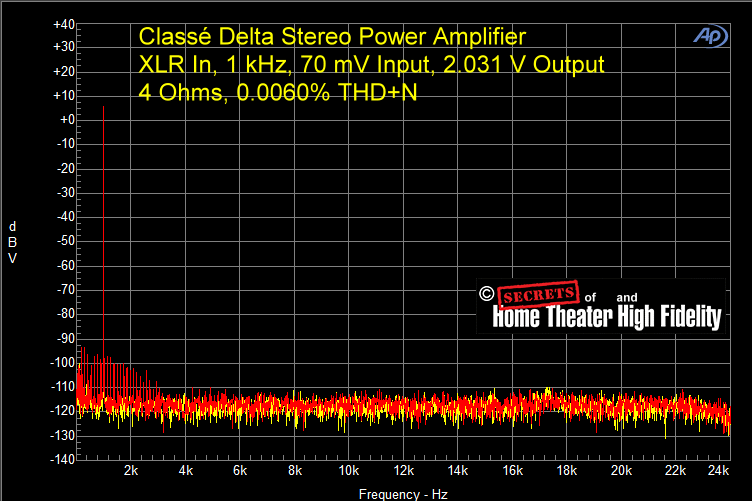
With a 4 Ohms load, 2 Volts output yielded 0.006% THD+N.
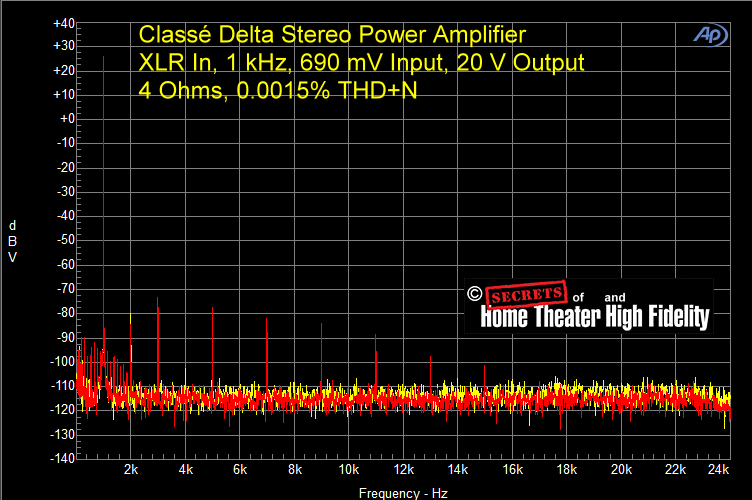
And at 20 Volts output with the 4 Ohms load, 0.0015% THD+N. Very low.
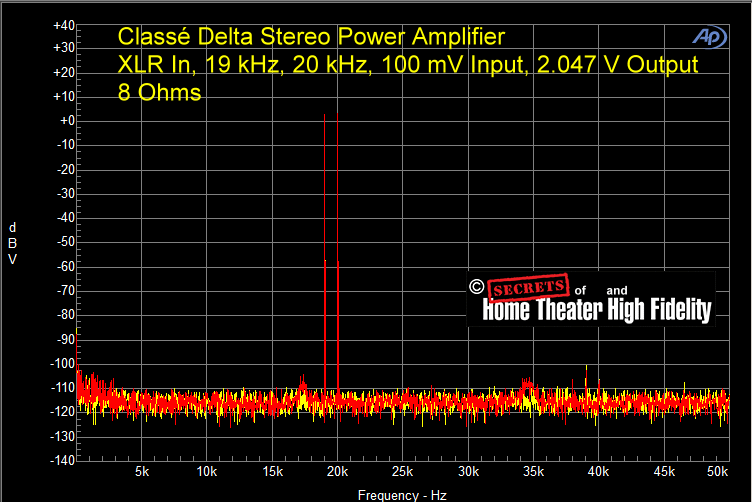
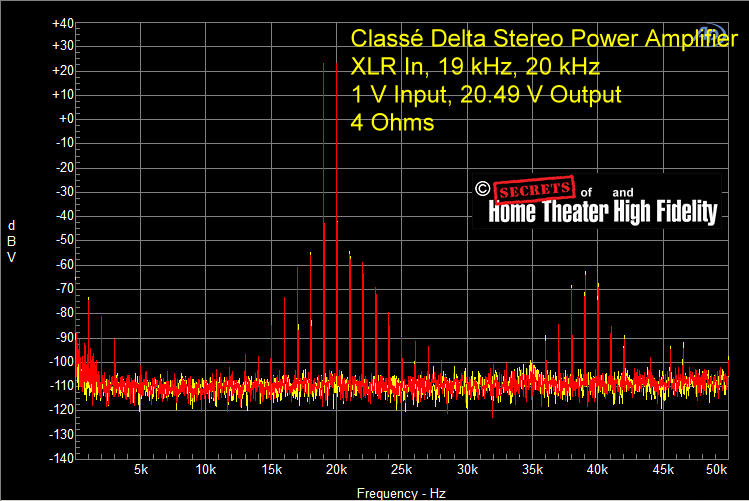
The 19 kHz, 20 kHz test also yielded excellent results, first at 2 Volts output into 8 Ohms
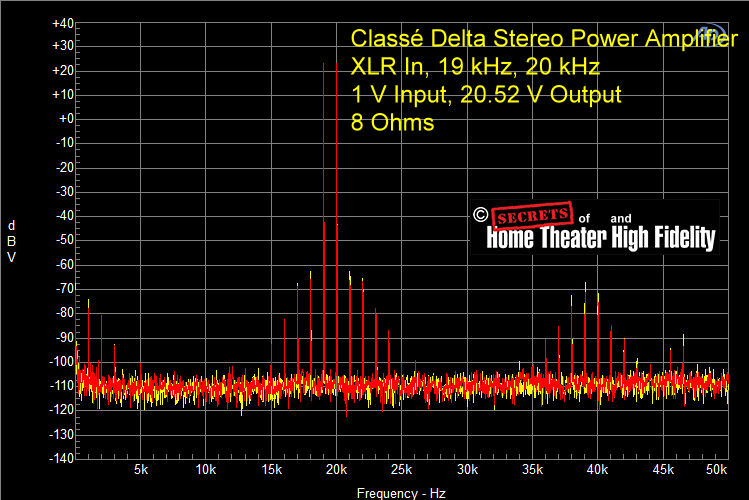
… and at 20 Volts output into 8 Ohms. There are only four side peaks on either side of the 19 kHz and 20 kHz test signal peaks.
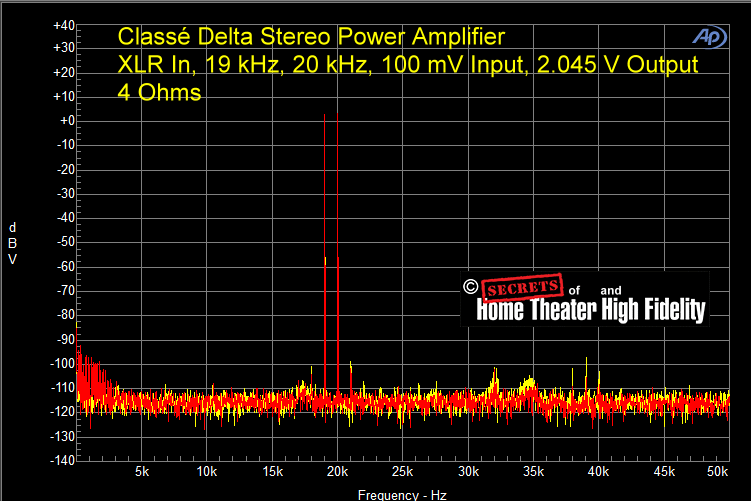
Using a 4 Ohms load and 2 Volts output, side peaks are few.
At 20 Volts output into 4 Ohms, side peaks increased to seven.
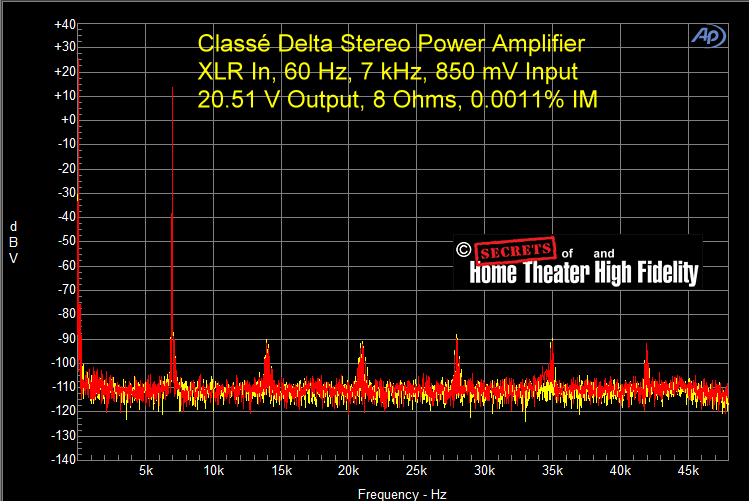
Here is the standard IM test at 2 Volts output into 8 Ohms. IM was 0.0023%. Excellent.
At 20.5 Volts output into 8 Ohms, there are more peaks, but the total measurement is lower, at 0.0011%. This is because the measurement is logarithmic, meaning the IM peaks at -90 dBV are less, compared to the dBV Voltage at 20.5 Volts than the peaks at 2 Volts output.
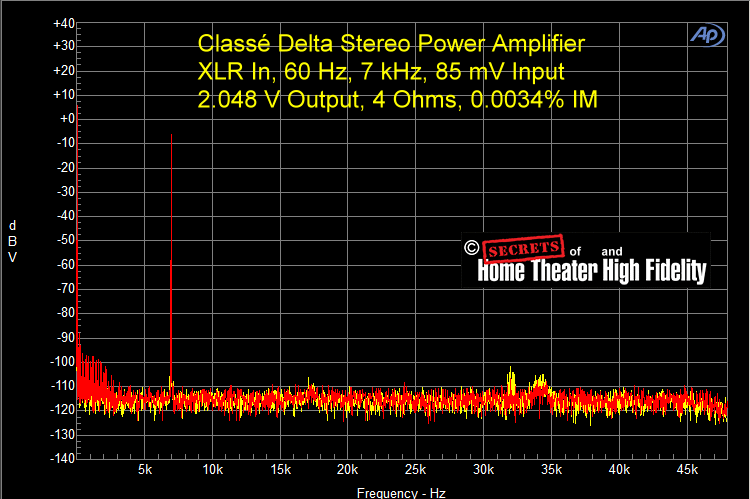
With a 4 Ohms load and 2 Volts output, shown below, IM was 0.0034%, a bit higher than at an 8 Ohms load.
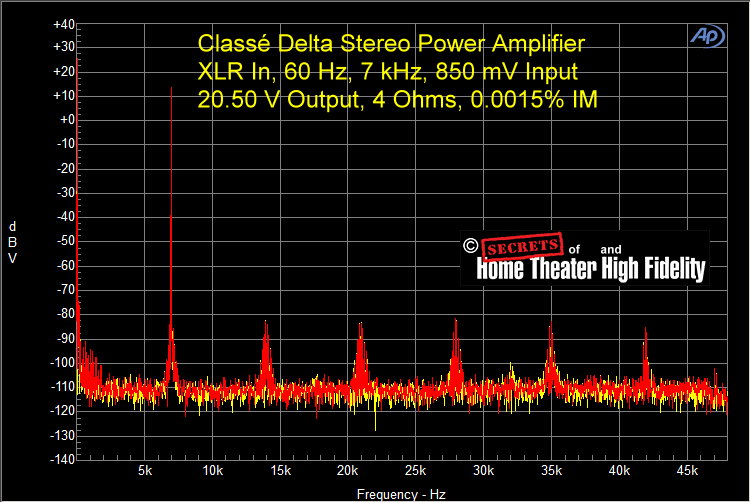
And at 20.5 Volts output into 4 Ohms, IM was 0.0015%.
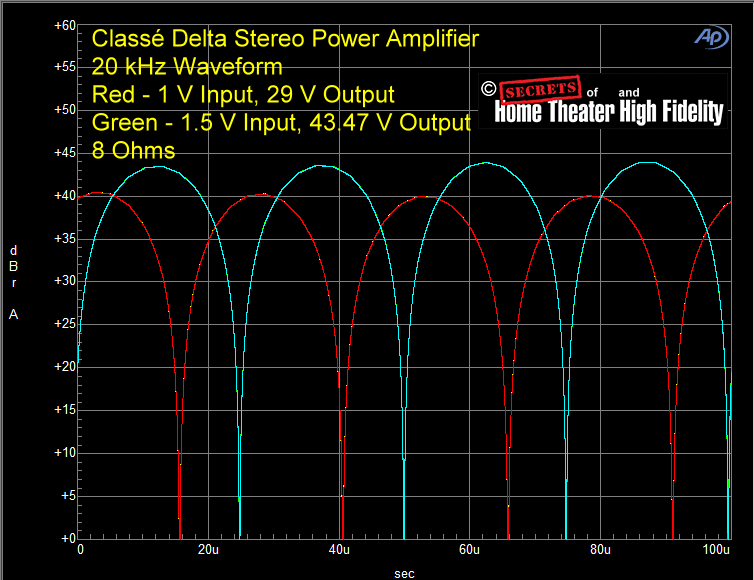
Here is an oscilloscope view of a 20 kHz waveform, using dBr instead of Voltage. The red spectrum is at 29 Volts output (105 Watts) and the green spectrum is at 43.47 Volts (236 Watts), both into 8 Ohms. You can see that the waveforms are very smooth, and the 236 Watts spectrum is near the rated output. The curves represent both the positive and negative voltage swings in dBr next to one another.
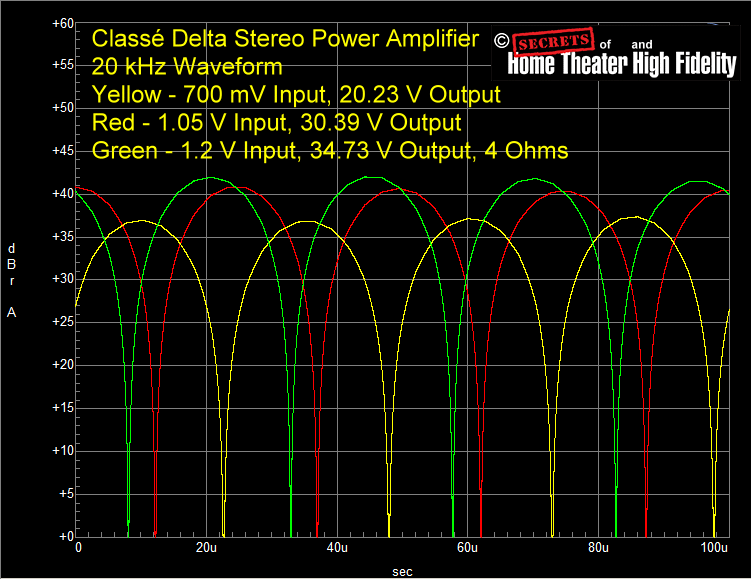
Here is the spectrum for a 4 Volts load. The yellow line is with 20.23 Volts output (102 Watts), the red line at 30.39 Volts output (231 Watts), and the green line at 34.73 Volts output (302 Watts). Again, they are very smooth.
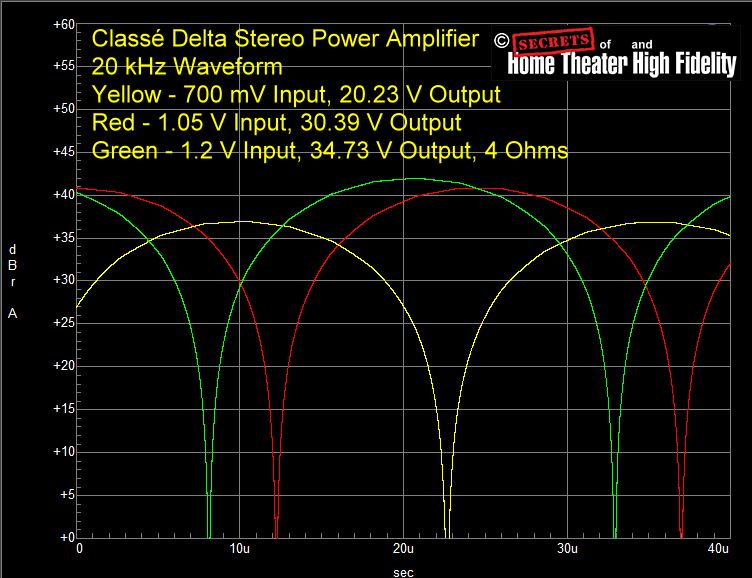
Expanding the X-axis, you can see how smooth they really are.
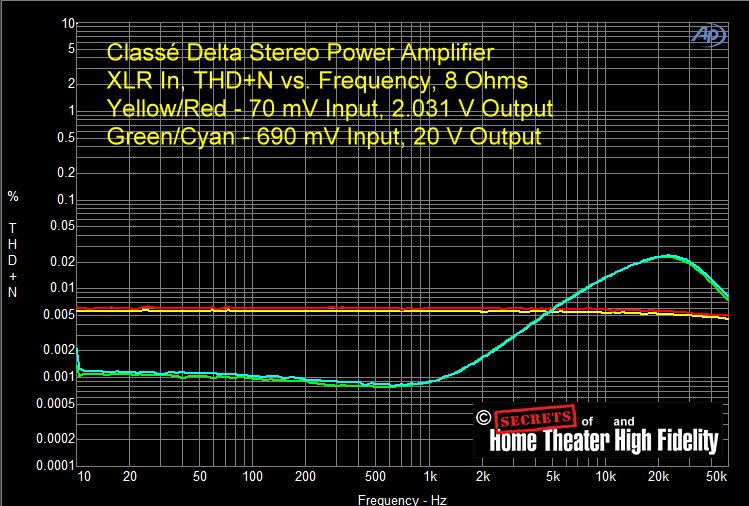
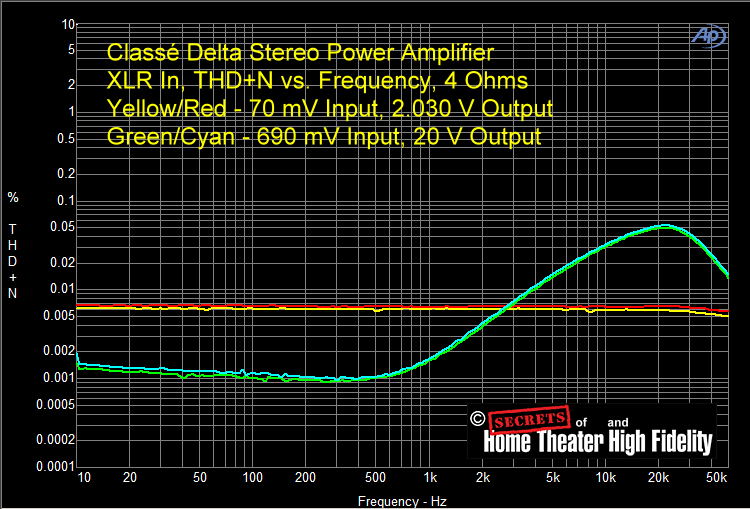
Shown below is THD+N vs. Frequency at 8 Ohms load, 2 Volts, and 20 Volts output. At 2 Volts output, it stays below 0.006% all the way out to 50 kHz, and at 20 Volts output, it is low at low frequencies, and at 20 kHz, it is only 0.024%.
With a 4 Ohms load, distortion stays below 0.007%, and at 20 Volts output, it reaches a maximum of 0.054% at 20 kHz. These are really nice results. Very impressive.
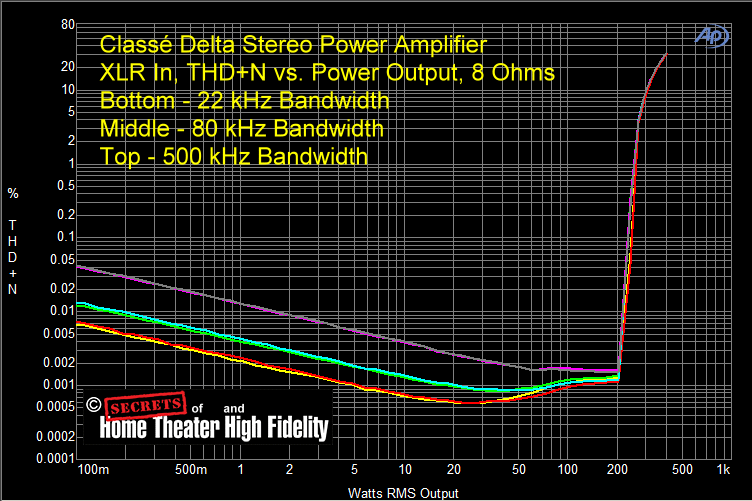
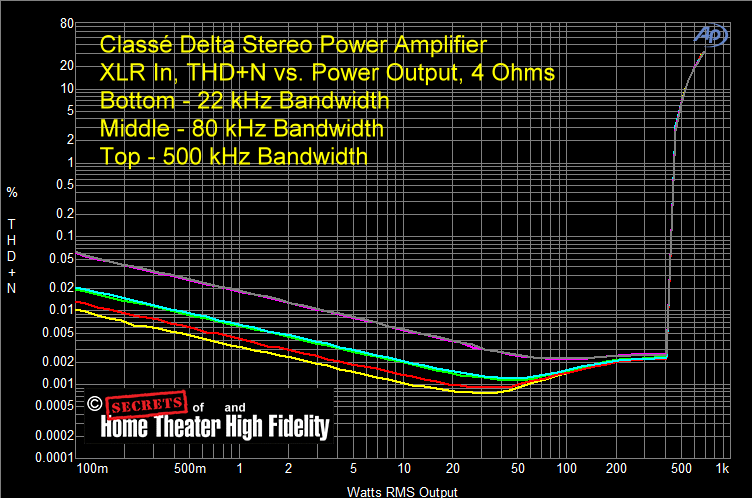
THD+N vs. Power (Watts) Output shows that it meets specifications, with 250 Watts into 8 Ohms regardless of the bandwidth.
At 4 Ohms load, the output is 430 Watts at the specification of 0.1% THD+N. This is lower than spec, but that is due to the wall AC voltage dropping. If the wall voltage is maintained (120 Volts), the specified output will be reached.
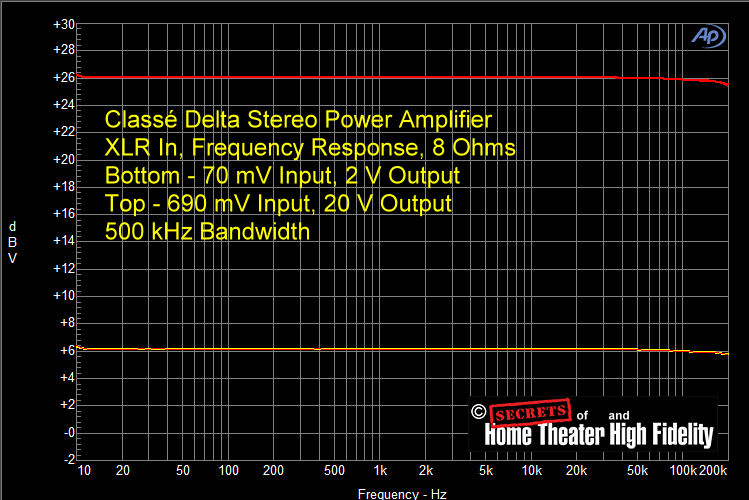
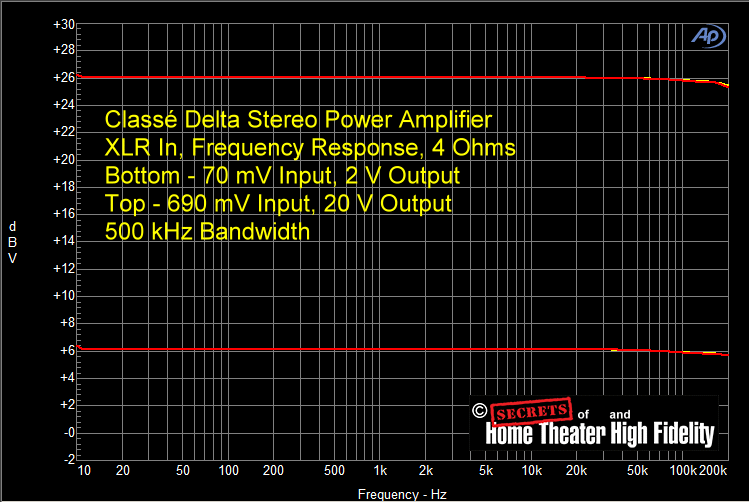
Here is the Frequency Response with 2 Volts and 20 Volts output into 8 Ohms load. It is pretty flat out to 200 kHz, with the roll-off beginning at about 38 kHz.
At 4 Ohms, the roll-off begins at about 24 kHz but is still very flat out to 200 kHz.
The Classé Delta PRE Stereo Preamplifier and Delta STEREO Power Amplifier are superb. They are two of the best preamps and power amps I have ever tested. I don’t know what else to say except that I hate to see them go. Never ran out of power, never ran out of pleasure listening to them.
- Very low distortion
- Massive build
- Choice of bypassing DSP
- Plenty of power
- Reasonably priced vs. very high quality
- Can’t think of anything
- Well, maybe a heating pad for my back from lifting the power amplifier


