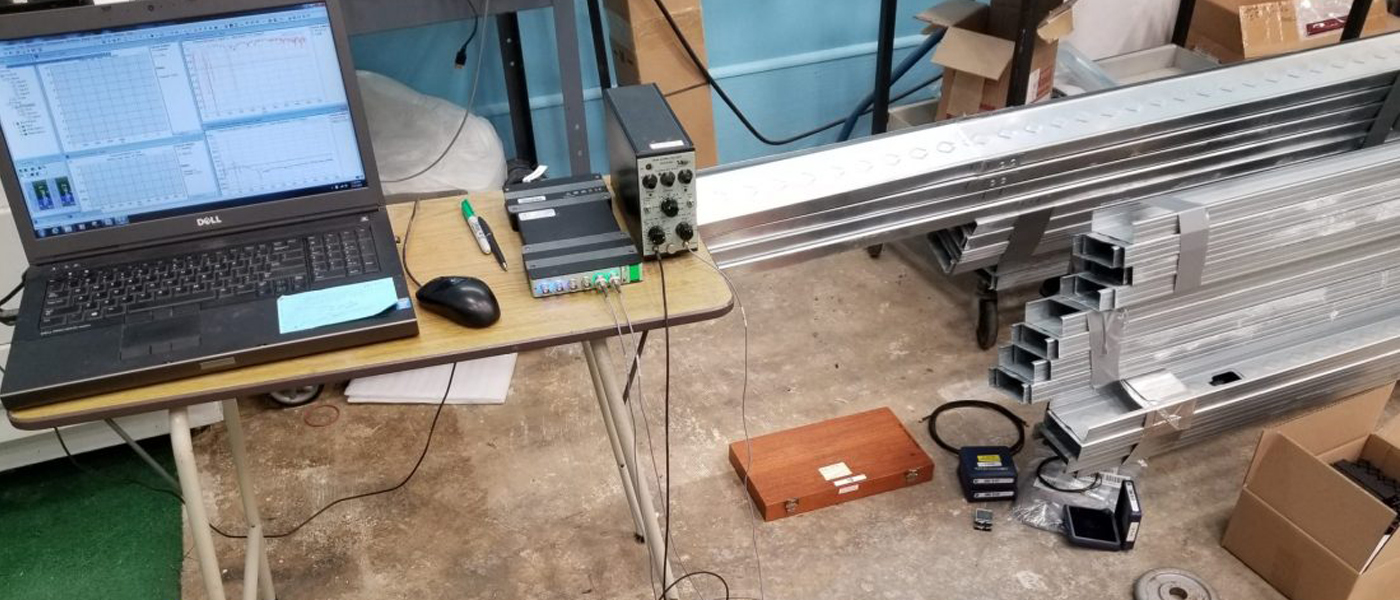
You have probably experienced going to the doctor with some ailment because something is wrong. The first thing you do is explain your complaint and your desired results to the doctor. Then they run some tests to establish what is out of whack. Then they analyze the results and determine a diagnosis and what it will take to balance what is imbalanced. Next, they prescribe specific medicine and/or actions specifically for you to get better. Finally, they run the same tests again to see if any adjustments should be made.
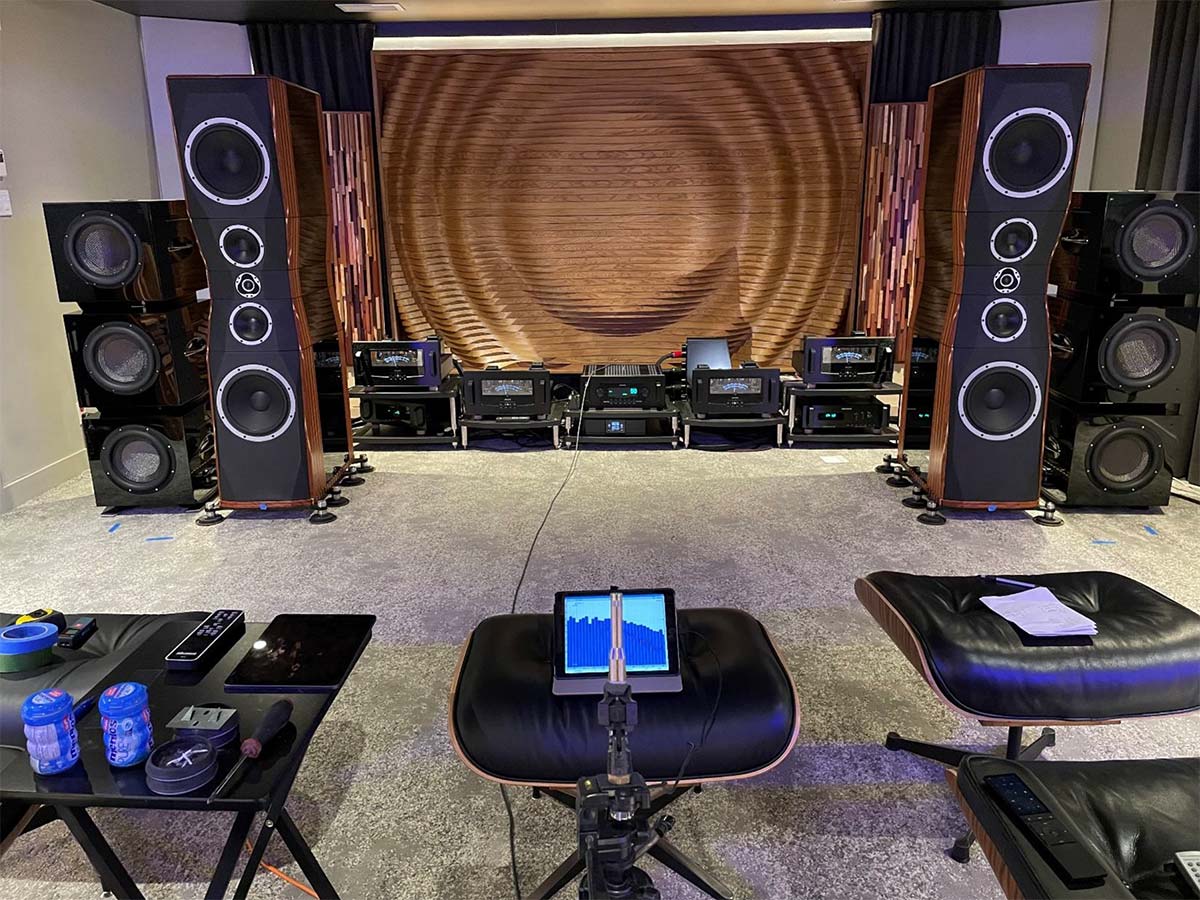
This is the same process used to determine acoustic treatments in rooms. This is the proven scientific approach. The photo shows my first visit to run objective and subjective tests to improve the system performance and personal experience for a client. The equipment and the room interact with each other and are a system.
We want to organize the sound from its chaos. You can’t simply guess, because every room is unique in its problems, dimensions, construction, and furnishings, not to mention various imposed limitations or constraints, which may include budgetary, physical space, decor, time frame, etc. In addition, each acoustic treatment has its own specific application.
The whole idea is to solve the question of, “What is needed to get from here to there?”. There will be an optimum selection of tools (products) to solve the problem without wasting your valuable time and money. It’s a proven scientific process that is very logical.
The six steps to the process:
- Understand the complaint, the desired outcome, and the constraints. This is where to explain the situation to your acoustical consultant; what are your complaints, what are your goals and what are your constraints? For example, maybe the bass response is uneven, and you would like to be more linear. Maybe the room is too reverberant and lacks articulation and focus. Maybe the sound escapes and bothers others in adjacent spaces, or the other way around.
Constraints may include budget, décor, time, available space, etc.
- Testing. This is to test the acoustic characteristics of the room under the existing conditions, primarily for the noise floor, room modes, first-order reflections, and reverberation times. This involves generating a signal over a loudspeaker in the room, and recording it to understand how sound energy develops, propagates, and decays in the room.
- Analysis. We are analyzing the measurements to see what stands out as unbalanced. What needs to be controlled and neutralized? We’re looking for smoothness (naturalness) of energy over frequency and time. Aberrations will be indicated by peaks or valleys in plotted curves.
- Modeling. Computer modeling will help determine what is needed to get from the existing conditions to the target or desired conditions—the answer to what treatment, where, and how much. Computer modeling incorporates finite-element analysis with product material data from standard laboratory test reports. These test standards include material absorption, transmission, diffusion, wave propagation, sound power, intensity, etc., and they are measured in the time, energy, and frequency domains. The goal is to make the room sonically neutral so that it doesn’t add or subtract from the recorded signal being played back. You plug in the existing data and try to bridge it to the target with materials (whose acoustic characteristics have been measured in a lab) until you have the optimal product(s) to meet the target.
- Prescription. This is the list of treatments and how to apply them. The result of the modeling is the solution or prescription of how to organize and balance the sound in a controlled fashion. This is the product build-of-materials and layout for the room.
- Testing. These are the follow-up tests to see if any adjustments to the prescription need to be made.
When we say room acoustics, we are referring to small listening rooms and the characteristics of noise control and sound quality, specifically how to achieve a high-performance, neutral room from the current, uncontrolled one. Primarily, we’re talking about controlling noise, room modes, 1st reflections, and reverberation times, but it can be more specific.
Secrets Sponsor
For noise control, we have four tools at hand: we can block the sound energy, break its path, absorb it, and/or isolate it.
For sound quality, we have three tools: reflection, absorption, and/or diffusion. Note that different treatments will address different frequency ranges, and at different amounts. This is why it is critical to know the acoustic properties of these products, as tested in a certified acoustics lab. Without the information, you are modeling completely blind.
These tools (test data, computer modeling, product test data), along with acoustic room test measuring instruments, are used to evaluate and control sound energy.
There are targets for both noise control and sound quality attributes in order to offer optimal performance and neutrality. The end goal is to make the room sonically disappear. We don’t want the sounds of our room interfering and distorting with the recording we are listening to. Every room is unique and will require specific prescriptions of the right treatments, in the right locations, in the right quantities. There is no one-size-fits-all treatment or prescription.
Let’s go through a quick, real-world example using reverberation control. When the reverberation times are too short the room feels uncomfortable and constrained. When the reverberation times are too long, the sound will be tonal, articulation and low-level details are buried, spatial cues are skewed, and dynamic range is limited:
First, we determine what our goal is.
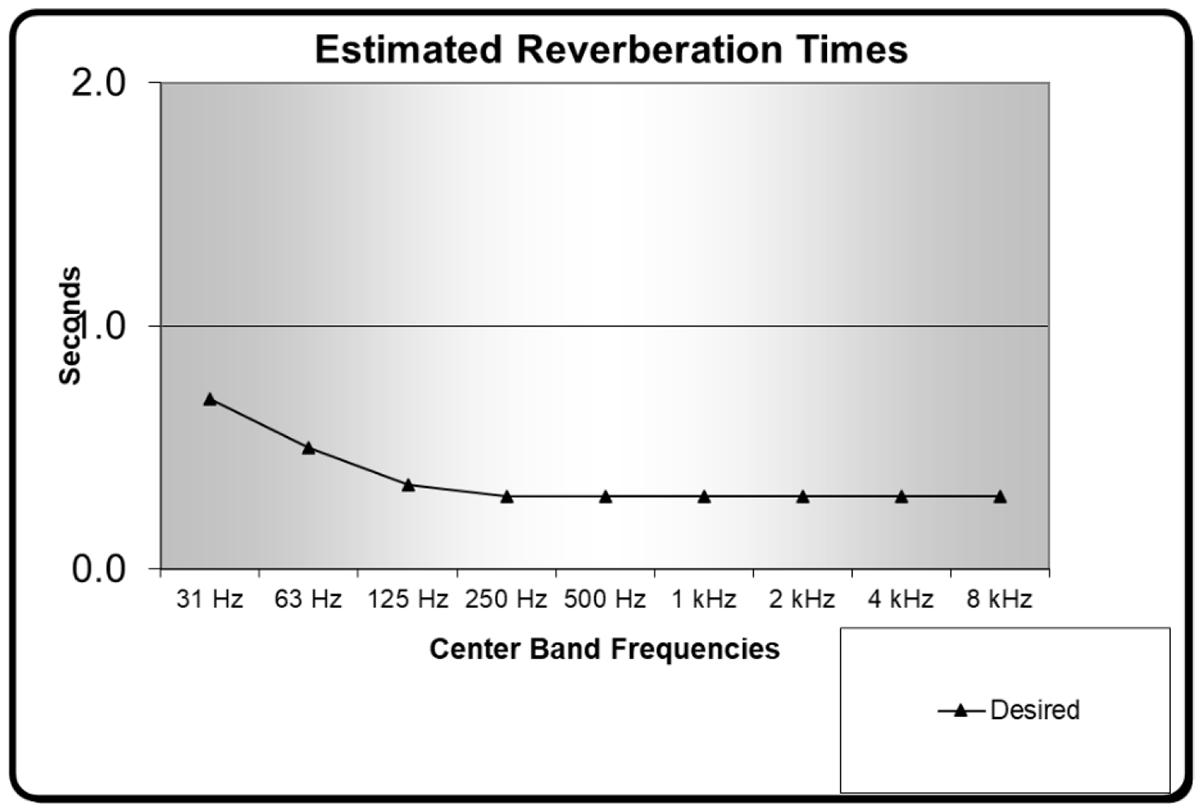 The black line is our target curve.
Then we compare our goal with our existing conditions.
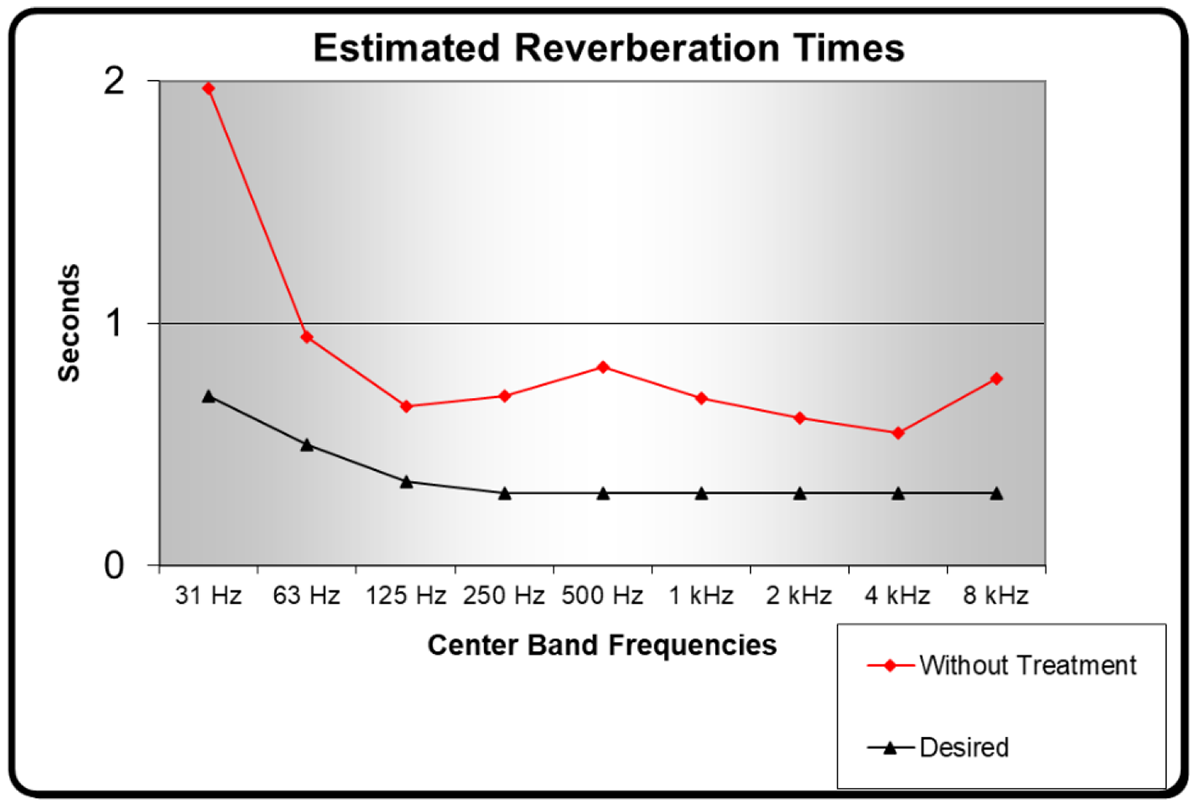 The red curve is our on-site measured existing conditions test result.
Finally, we computer model possible product solutions to match up with our target curve.
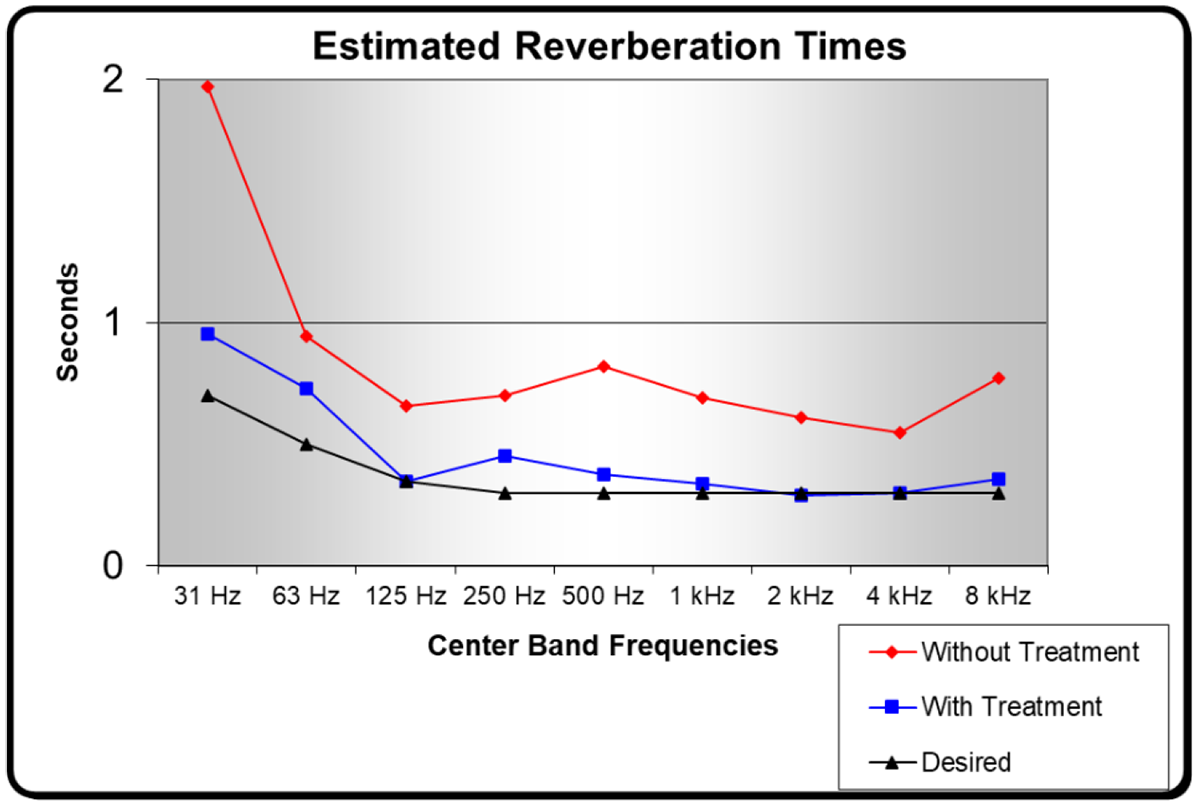 The blue curve is our optimized computer model result.
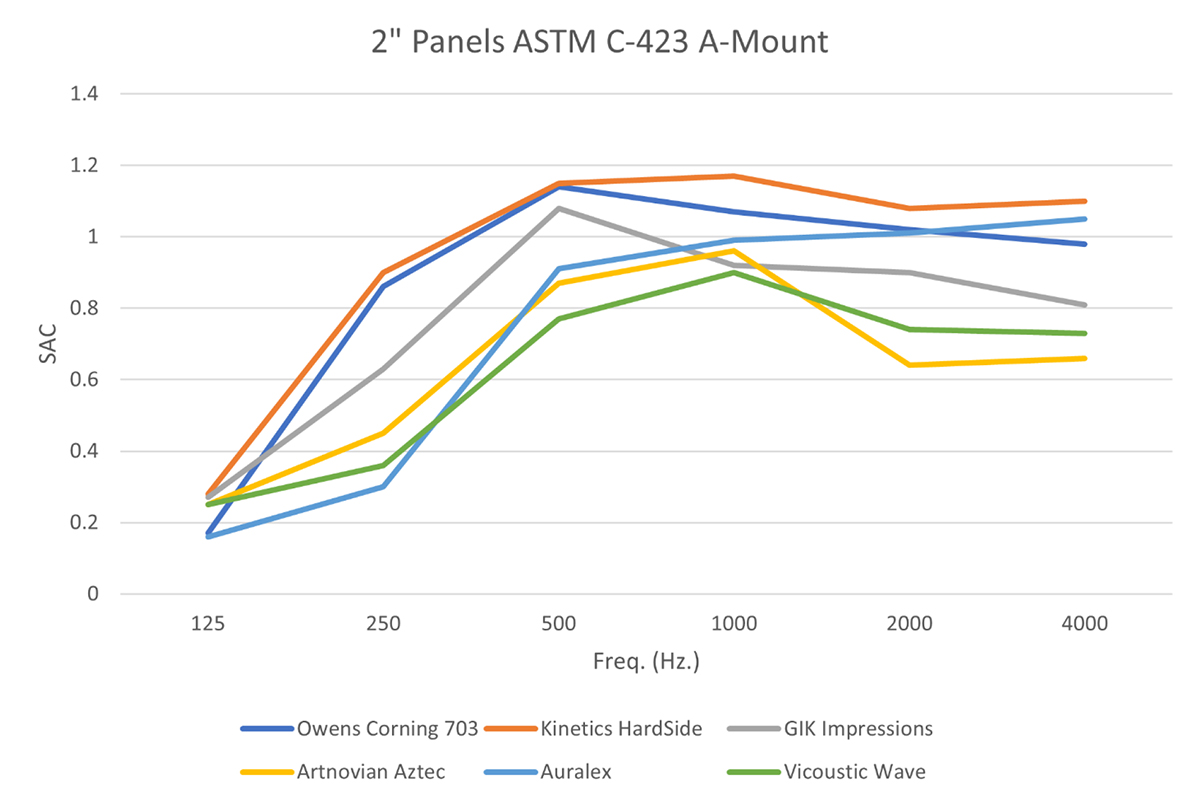 The above example represents the acoustic lab results of Sound Reduction Coefficients of various 2” thick absorption panels. This is the data used in modeling. Please note that not all absorbers perform the same. Typically, different types and quantities of panels are needed, as well as diffusers.
Secrets Sponsor
So those are the steps. Do you need to take all six steps? Most people don’t take any of them, in fact, most people don’t ever think about acoustics at all. You take all six if you want to do it right and confirm that you did. Note that there are now means for you to take what is called an Impulse Response measurement yourself and electronically send the WAV file to an acoustic consultant. This can be a money and time saver and is about 75% as good as an onsite visit, sans where experience, insights, and subjective evaluations could also be applied.
I’ll leave you with two valuable pieces of advice:
- Understand that hi-fi components cannot overcome room acoustics. The room doesn’t care how much you spend on your equipment. Mid-fi in a controlled room will beat state-of-the-art in an uncontrolled room every time.
- Avoid free, over-the-counter advice. Seek an acoustical consultant who will follow the process. As you now understand, it is not possible to prescribe room treatments with a ready-made kit of acoustic panels or based on room dimensions alone. Nine times out of ten, such rooms end up over-absorbing the frequencies of the top half of the piano (around 500 Hz. to 4,000 Hz.), and not addressing the bottom half at all.


