

It will be presented in 3 installments.
Part 1, below, will cover the design, construction, and initial installation of existing equipment in the new home theater.
Part 2 will cover “The Great Upgrade” with the selection of new speakers, a 2nd subwoofer, a new preamp processor, amplifiers and source components, remote control, a 4K projector, a new screen, a new cabinet, and Dolby Atmos.
Part 3 covers acoustic treatments in the room, measurements of room acoustics using REW, subwoofer placement, and room modes, and setting up a house curve or a customized frequency response using Anthem Room Correction.
The mention of a home theater may invoke images of a bat cave with black walls and ceiling and/or multiple rows of fixed seating with the back rows elevated so everyone can see the screen. That is not my idea for a home theater and certainly not my wife’s! In fact, our home theater has many compromises or things that many might consider being simply wrong or certainly non-ideal. But if these compromises are made as part of a consistent plan, it can turn out very well from both an aesthetic and audio/video point of view.
The concept we went for is a room that can be isolated with light control but with general-purpose comfortable seating, good acoustics, nice furniture, and lighting scenes that support various activities. This needed to function as a room that people might want to sit in whether or not they were watching TV or a movie, but one that also offers a high-quality audio-video experience when needed.
Our first home theater with these objectives was in our home in Redwood City where we first connected with Secrets many years ago now. After a dinner party, or if people just stopped over for a beer or conversation, people naturally choose to sit down in our home theater/family room rather than the more formal living room or dining room in that home. Good comfortable seating, good acoustics, and comfortable lighting were what made the home theater the room of choice for conversation. Conversations were just not as comfortable in other parts of the house where the rooms were more “live” and had more echoes and reverberation. Fortunately, a well-controlled reverberant acoustic environment is also what is needed for good home theater sound.
Ironically, one key to the non-dedicated nature of the room is a front projector at the back of the room and a roll down screen at the front of the room that will disappear when not in use. I first went this route with our home in Redwood City, where, at the time we were using a rear projection TV which could be rightfully characterized as a big black box that dominated the room. I wanted a bigger and bigger black box, but my wife was resistant. A front projector and a roll-up screen turned out to be a very good compromise in terms of getting a larger image AND a TV that would go away when not needed. Obviously, today’s flat panel displays are much less intrusive than the rear-projection TVs of yesterday, but I still prefer the image on a movie screen rather than watching an image behind a piece of glass. And a flat panel of any size can be heavy and needs a dedicated wall location.

Ten years ago, after my wife and I retired, we built a new home in Mariposa County, near Yosemite National Park, and we were able to include a room in the design for use as a home theater. The design called for a main floor, a loft, and a walkout basement since the house was positioned on a slope. In recognition of the fact that we were of retirement age and hoped to be in the house for a while, we tried to put all room necessary for everyday living on the main floor. And that, of course, included the home theater where knew we would most likely be eating dinner most nights watching TV. So, we located the home theater near the kitchen, the kegerator on the beverage bar, and a bathroom.

After studying all the most favorable room ratios, in terms of optimizing even bass response, we chose room dimensions of 19’ 4” x 13’ 11” to work with the planned 9’ ceiling. However, that ceiling height went out the window, so to speak, when we modified the shape of the room’s front window from an arch to pointed and the ceiling height grew to 10’ 8’’. This was not much of an issue acoustically as the ceiling we installed was not a hard surface but a one made with small recycled plastic beads in a pattern that purportedly provided an optimum mix of sound absorption and dispersion. More about acoustics later. We also tried to break up some of the room modes with soffits and columns and added some other decorative details that can only help with dispersion. It also turns out that when it came to a more recent Atmos installation, the higher ceiling was a real benefit.
Let’s now look at the stages the installation went through and at some of the design choices and how they work together.


While my wife and I were the owner/builders and therefore were the official contractors on the build, we were fortunate to hire an experienced contractor and his assistant to do much of the heavy lifting. You can see the acoustic ceiling going in above as well as the initial paneling on the soffits. You can also see some of the lighting installed in the soffits.

Once the basic construction of the room was completed, we installed our existing equipment with somewhat unofficial cabinetry and did our best to block the light and absorb some of the reflections coming from the various windows. Prominent pieces of equipment at this time included an Anthem D1 pre/pro, a 7-channel Theta Digital Dreadnaught amplifier, an APC power conditioner/battery backup system, and three Velodyne DF-661 speakers.


A Sony “Pearl” projector from our previous home in Pollock Pines was installed at the back of the room as well as a screen from that same home. Since that screen had a normal amount of “drop”, the viewing portion of the screen was uncomfortably high with the almost 11’ ceilings and was soon replaced with a screen with more drop.

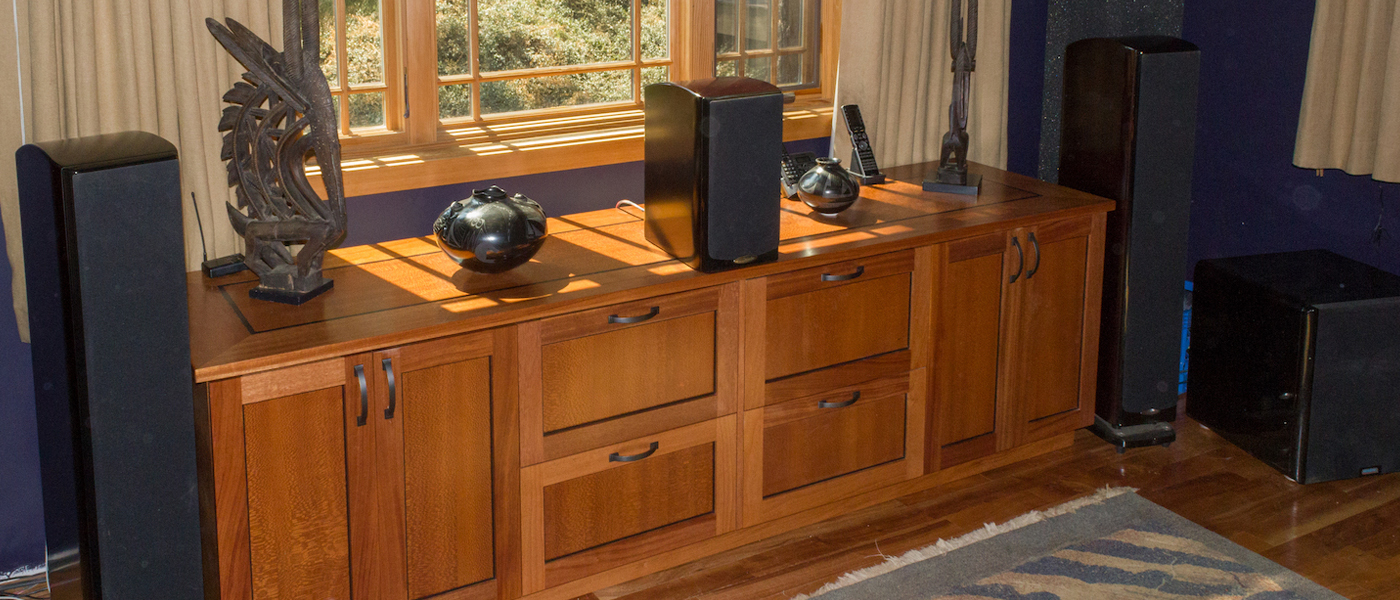
The picture at the start of this article shows the front of the home theater as it exists today with new speakers and a new cabinet. But clearly one of the first things that had to happen was to paint the walls a darker color so that light from the screen would not reflect or scatter off the white walls and spoil the contrast on the screen. Ideally, the walls would have been flat black or even covered with black velvet, but in our compromise mode, we settled on a very dark blue and tried to balance the reflected color with a complementary shade of, essentially, orange in the final wood paneling on the soffits and columns. Clearly, the lighter colored blackout drapes are another compromise but fortunately, they are not in areas where they will reflect much light onto the screen.

For our home theater in Redwood City, we bought 4 Ekornes Stressless reclining chairs and a sofa with 3 reclining seats. Twenty-plus years later those chairs and sofa are still in use in our current home theater. They are very comfortable and their Alcantara fabric covering has been surprisingly durable, although I’ll add that for daily use, they are typically covered with covers made with a darker brown fabric. When these chairs recline, the headrest comes forward providing ideal seating for viewing a somewhat elevated image. My wife and I sit in the two chairs to the left and right and just behind the center table placing us about 11 feet from the screen. As mentioned above, those sitting on the sofa also get an unobstructed view of the higher than usual screen. We have 2 more Stressless chairs that can be used when needed, albeit in a non-optimum position compared to the two normally front row chairs and sofa. The table is constructed with the same woods, Khaya, Wenge, and Lacewood, as we used in the equipment cabinet to be described later.
Ideally, a home theater would not have any windows, and yet as I am sure everyone noticed in the pictures above, there is a great big window in the front of the room and two more windows on the sidewalls near the front of the room. Since we wanted to keep this room multi-purpose as well as consider the resale value of the house, windows are a must when the drapes are pulled to make the room light and airy as possible and not at all a “bat cave”. Very heavy blackout drapes fix the light control problem and we can watch TV or a movie in the middle of the day. The heavy drapes are also valuable as sound deadening on the critical front wall. Windows are not really a problem.

In the back of the room are two sliding or pocket doors that we can close for typical viewing. The problem is that the dogs and cats like to go in and out as we are watching TV and if those doors are open at all, they let light from the other room shine directly onto the screen. The solution is a black shade that we can pull down to below the back of the sofa level and this blocks out the light while allowing the dogs and cats can pass underneath. And, yes, I need to stain the doors a darker color, straighten up the cables going to the projector and hide the do-dads that connect the ghost-wire on the walls to the speakers and wire in the soffits.

The main lighting in the room are lights in the soffits that shine down and onto the walls, and three small spotlights in the ceiling that shine down on the two front-row seats and the table. There are also bias lights at the front of the room behind and to the sides of the screen.
We turn the soffits lights off for almost all viewing but keeping the ceiling lights shining on the seats and the table makes for comfortable dining, i.e., being able to see your food and drink. Since these lights do not shine directly on the screen this is not a problem for anything other than the most critical viewing where these lights can be either dimmed or shut off entirely.

I first started using bias lights many years ago in Redwood City and found them to be very useful with projectors having limited contrast ratios and black levels like my first SONY VPL VW10HT. Since they are behind the screen and don’t shine directly on the screen, they really do not spoil the black levels as do the soffit lights. And by giving your eye something brighter in the room than the not so black screen with the 10HT, the screen just seems darker by contrast. While my current projector has orders of magnitude better contrast ratio than my 10 HT and bias lights are not really necessary now, we find that they make the room more comfortable when the bias lights are at a low level. Not so much like a cave. I know this is heresy. To each his own on this one.
Thanks for reading thus far. Stay tuned for Part 2 where I will be outlining some significant upgrades in equipment and the reasoning behind those choices. Until then, Cheers!