

Part 1 covered the design, construction, and initial installation of existing equipment in the home theater.
This part is affectionately called “The Great Upgrade.” It was a significant step in my theater’s evolution with the selection of new speakers, a 2nd subwoofer, a new preamp processor, amplifiers and source components, remote control, a 4K projector, a new screen, a new cabinet, and the addition of Dolby Atmos.
Part 3, which will publish in the near future, will cover acoustic treatments in the room, measurements of room acoustics using REW, subwoofer placement and room modes, and setting up a house curve or a customized frequency response using Anthem Room Correction.
When I was reviewing projectors for Secrets, I might have had a different projector to test and watch every month or perhaps every week and our system was in a constant state of flux. However, while building our new house, finishing the trim work, plus a few health challenges, meant that I actually kept the same projector and much of the same equipment for almost 10 years! I was sort of waiting for the whole 4K HDR thing to sort itself out and hopefully a laser or LED projector light source before upgrading, but eventually the upgrade bug got to me and I started upgrading basically all the elements of our system with perhaps emphasis on aesthetics and sound quality as well as achieving 4K HDR. The first change to happen was replacing the Anthem D1 with an Integra DHC-80-3. While not necessarily an upgrade, the Integra was able to decode the modern audio surround codecs associated with current audio video material. I had previously used a Zektor audio switcher to switch multichannel audio from multiple inputs for the D1’s 6 analog input channels, as well as an HDMI selector switch. This setup worked but was not entirely reliable as the audio and video switches could get out of sync and it used one heck of a lot of audio cables! Having audio and video both go via a single HDMI cable with the Integra was much neater and more reliable.
The next thing to go were the Velodyne DF-661 speakers that I had since days after they were first introduced at Sound Goods in Mountain View CA and had been with me in three different homes. While, with a modified crossover, they still sounded great, it was time for some better-looking speakers AND a proper nice-looking cabinet in which to store all the equipment. More about the cabinet design later.
When I first got into home theater, the advice or requirement from THX was for the front three speakers to be identical and all in a vertical orientation and ideally all tweeters at ear height. I have written volumes on this, as it is a hot button of mine, but basically pretty much every other speaker in a home theater or home has the various drivers arranged in a vertical orientation (or co-axial) to assure good horizontal dispersion, e.g. everybody seated around the room would hear the same quality sound or the same frequency response. The now typical horizontal “center channel” speaker (with a single tweeter sandwiched between two woofers) violates this ideal and compromises horizontal dispersion for ascetics or what is often called the Wife Acceptance Factor, how it looks and fits on top of the TV. It is not that simple, but if it was not for space and aesthetic considerations, there is no doubt that a vertical center channel will always be a better choice as it produces a much more seamless front sound field over a range of seating positions working with the left and right speakers, than can be achieved with speakers with different horizontal dispersion characteristics.
The challenge then was to find some good sounding speakers where I could achieve the goal of three identical or nearly identical speakers up front and manage to get them all with tweeters at the same height with the center channel speaker on a new cabinet. The key to this was to realize that a speakers unique voice or timbre comes largely from the tweeter and midrange drivers, and the required (IMHO) timbre matching of the front 3 speakers can be achieved by selecting speakers where the tweeters and midrange drivers are the same, in the same orientation and spacing, but perhaps with different woofer configurations.

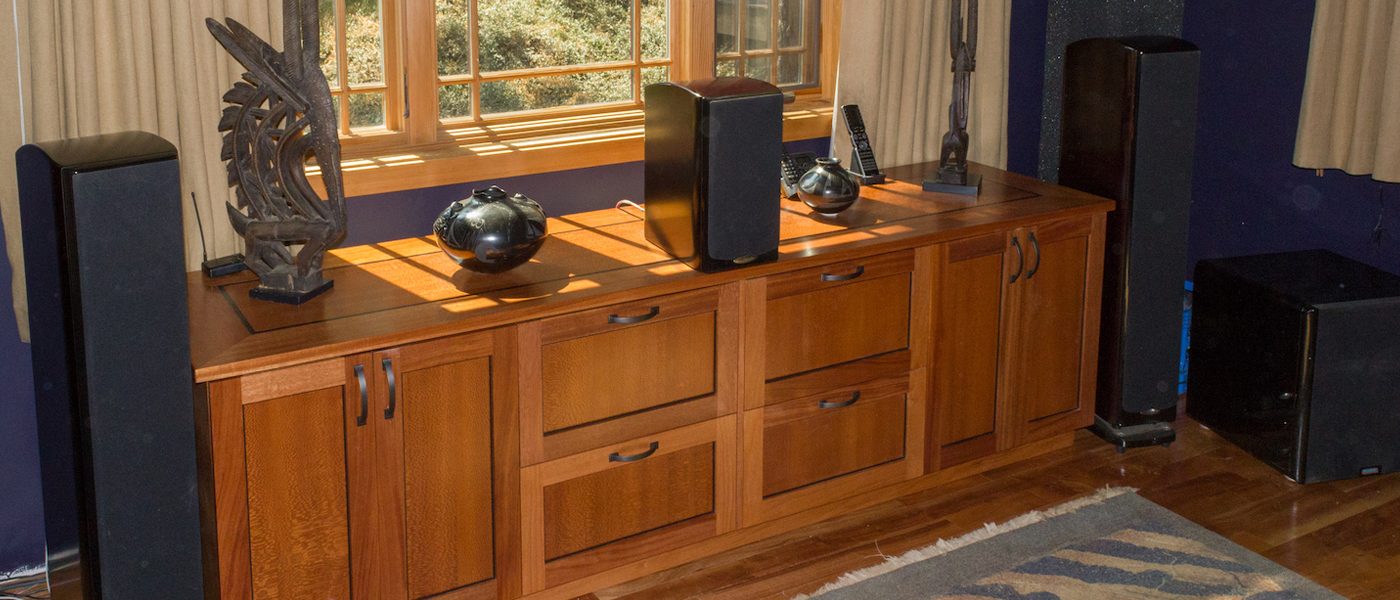
The Polk LSiM series not only reviewed well, it offered me just what I needed with the LSiM 705 tower speakers for the left and right speakers and a LSIM 703 bookshelf speaker for the center as can be seen in the pic at the beginning of this article. Of course, I could have simply used three LSiM 703s up front, but I liked the stability and aesthetics of the 705s over 703s on a stand. And with a subwoofer or two in the mix the 703 and the 705s could both handle the bass requirements with a sensible crossover of 80 Hz. The 705s have a tweeter height essentially identical to the height of a typical seater listener and the 703 on the cabinet is at that same ideal height. The front sound field from this arrangement is seamless, even when seated off axis as is the case with my wife’s and my primary listening positions.

I should add that the LSiM in midnight mahogany are also very nice-looking speakers with excellent joinery and a very attractive finish. They will also handle quite a bit of power as we shall see. I could not be happier.
After I installed the front three LSiM speakers I kept the Def Tech surrounds that I had also used for years in place for several months and was very happy with the blending of all of the above.

Then I decided to go LSiM all the way, partially for aesthetics and partially to get a bit more bass in the surround channels, and replaced the Dev Tech with 4 LSiM 702 F/X. Once installed, I fired up a 5.1 DVD Audio disk, Emmylou Harris’ Producers Cut, and sat down in my normal listening position for a critical listening test of my new completely timbre matched Polk LSiM surround speaker system.

My first reaction was one of alarm. From my listening position, there seemed to be no sound coming out of the surround speakers! How could this be as I had just used Audyssey and test tones and to carefully frequency match and set the levels of all the speakers? I jumped up out of my chair and even standing fairly close to the surround speakers I couldn’t really hear them. Of course, they were working just fine, but they blended so well with the fronts that they became sonically invisible. While I have never been aware of specific sounds coming from my previous Def Tech surround speakers with this disk, there were obviously audible clues that they were there, even after Audyssey, and once the surrounds were really timbre matched, those clues went away. Of course, if one turned off the surround sound and just played stereo, the collapse of the 3D sound field was dramatic.
The LSiM 702 F/Xs were originally installed high on the back wall and on the side walls behind the main seating areas as was appropriate for the 7.1 surround setup we were using at that time. The design of the 702 F/X speakers is interesting. They are not dipole or bipole, but simply monopole with one tweeter, midrange, and woofer as is really appropriate for most surround sound installations today. They are also very practical as they’re shaped like a slice out of a cylinder and can be easily wall mounted without having them protrude too far into the room. What makes placement interesting is that the tweeter and midrange are angled at ~45° to the center axis where the woofer is placed. This means that in order to aim the tweeter at the listening positions, they really need to be placed typically behind the seating area, or in front as will be discussed in the Atmos discussion.
SONY VPL-VW385ES

The next big move came at the beginning of 2018 when the 4K HDR bug finally got to me. I had previously owned three different SONY HD projectors, the 10HT, 11HT and the Pearl (VW50). When the true 4K Sony 285/385 started getting good reviews, and the price was no longer north of $20K for such a projector, I figured it was time to upgrade. I bought an early SONY 385, and it has been great and a real upgrade from the Pearl to be sure. Yes, JVC has seemingly gotten their act together since then, but the 385 has served me well and with the dynamic iris it has some quite acceptable black levels, especially compared to where I started with a contrast ratio of 150:1 with the 10HT. I have had a few issues with the 385 but SONY and the dealer from whom I bought it took good care of me.
Knowing my history with projectors, some might expect a treatise here on how I tweaked the image from the 385 to get the most out of it. I checked convergence and did go through the usual setting up of contrast and brightness controls and established different presets for normal and 4K HDR material, but that’s about it. The picture looked great out of the box. Will my next projector be a SONY? Maybe, maybe not, I am open, but right now the 385 is just fine.
The choice of a front projection screen is not at all trivial. There are many tradeoffs involved, e.g. for a given projector, the larger the screen, the less bright or dimmer the image. One can add “gain” when selecting a screen, but gain can limit the viewing angle, shift colors, and can cause what I call the dreaded sparkles – or shiny points on the screen. Therefore, a screen’s gain and size must be chosen with respect to the available brightness of the selected projector. In my case the width of the screen was also limited by the soffits. With the SONY pearl projector, I needed a gain of 1.3 to achieve an acceptably bright 92” image at a 16:9 aspect ratio with the projector in low bulb mode, and so I chose a Da-Lite Cinema Vision 1.3 gain screen at that time. However, after about 10 years of use, I was getting pretty tired of what I called the dreaded sparkles or sparkly points on the screen associated with the screen’s gain and they were certainly not going to help fully utilize the resolution of my new 4K HDR projector.
Secrets Sponsor
Fortunately, the SONY 385 was sufficiently brighter than the Pearl that calculations suggested that I could get away with a screen gain of 0.9 and ordered a Da-Lite HD Progressive 0.9 gain 16:9 screen. The image on that screen is stunning. Exceptionally smooth with no artifacts associated with grain or texture that can interact with the pixel spacing and spoil the very smooth image.
I am sure at this point there are readers who are wondering why anyone would use a 92” diagonal screen with an 4K HDR projector. Most people want a 200” diagonal screen! It is all about compromises. For me, the smaller screen allows for a much brighter image, which is more consistent with the HDR or High Dynamic Range aspect of my new 4K projector. The smaller screen and brighter image also allow me to operate in low bulb mode, thus extending the life of the bulb and avoiding the fan noise associated with use of the high bulb mode. In the low bulb mode, I don’t hear the projector at all even with the sound muted.

Perhaps the most controversial aspect of our home theater set up is the height of the screen. It is too high by most any standards. Not “TV above the fireplace” too high, but too high none the less. The bottom of the screen when down is just above the various speakers and thus a bit above ear (and eye) level. If I chose to use one of the dreaded horizontal center channel speakers, I could lower the screen by another 8 inches or so, but for me that would not be worth the sacrifice in front sound stage that I achieve with my current front speaker arrangement.
The truth is that once you lean back in the reclining seating, take a sip of your favorite beverage, and get involved in the movie; all is well. It’s not a problem. It actually has some advantages as well. My wife and I typically sit in the front row chairs, but if we are doing a movie night with friends, those in the sofa behind us can also see the screen just fine as it is above the heads of those if the front row. The same for people sitting just outside the home theater in our dining room, no problem seeing the screen. This is very handy for parties like on New Year’s Eve when everyone wants to watch the ball drop or when having a crowd over to watch a political debate or election night coverage.
When watching 2.35:1 images, I do use the SONY 385’s lens memory to not only use the projectors full 4096-pixel horizontal resolution but to also lower the image to the bottom of my 16:9 screen. Lens memory as well as the dynamic iris was certainly part of my thinking when choosing the VPL-VW385 over the less expensive 285.
The screen height discussion above is obviously caused by my need to have the screen above the speakers. The other obvious solution that is used in commercial movie theaters and high-end home theater installations is an acoustically transparent screen (ATS) where the speakers are placed behind the screen and project their sound through a series of micro perforations or spaces in a woven screen. An ATS is the ultimate answer in no-compromise home theater as almost always 3 identical vertical speakers will be mounted at ear level behind the screen and dialog will seem to be coming from the center of the screen, as it should. However, ATS screens are not ideal in all circumstances and do have some of their own compromises.
The first screen I bought for use with my SONY 10HT was an ATS screen. However, the spacing of the perforations in the screen interacted with the pixel spacing of the projected image and the result was a very distracting moiré pattern. I also noticed that any light source or reflections from behind the screen also got through the perforations and were visible from the viewing area. That screen was quickly replaced with a matte surfaced screen. While an ATS screen is ideal in a no compromise home theater with adequate space behind the screen for proper speaker placement, it is not right for my immediate needs.
If you get a new 4K projector then of course, you also need a 4K compatible preamp/processor or pre-pro and if that new pre-pro also supports Atmos then maybe you just might want to try Atmos. And while I wasn’t convinced at the time that I needed Atmos, I also wanted to put the final paneling on the soffits and so wanted to run all necessary speaker wire through the soffits before sealing them up. And I knew that my current 50’ HDMI cable would not transmit 4K successfully and that I would also need to run a new HDMI cable, a 50’ RUIPRO fiber optic cable, in this case.
I should also add at this point that I have always preferred “separates” to a receiver as it has allowed me to upgrade my pre-pro without changing amplifiers and vice versa as mentioned above, so I’ll cover the two topics separately.
Anthem AVM 60

I needed a 4K compatible pre-pro, and that was the decision that was probably the most difficult and time consuming. I read reviews and put together a spreadsheet to compare pre-pros from Integra, Anthem, Emotiva, Marantz and Yamaha in terms of features. While I was drawn to Anthem because of my experience with my D1 and knowledge of the company, I was concerned that the Anthem AVM 60 lacked certain features that I had previously depended on. The AVM-60 only had ONE 12V trigger and I had always used two, one to turn on the sources and amps for the main zone in our home theater and a 2nd for zone 2. Plus, the AVM-60 had no analog video inputs, and it didn’t do Airplay. While I did not plan to use any analog sources for normal viewing, my Velodyne subwoofer needed an analog display for setup and optimization. Hmmm.
In the end I chose the Anthem AVM-60 as it had a well-regarded ARC room correction capability and I decided that I valued its emphasis on audio quality and minimal bells and whistles. It was a good choice, and I could not be happier with the sound.
I use the single 12V trigger to trigger a Panamax power conditioner that then sequentially turns on sources and the amps. Right now, Zone 2 amplifiers are switched on manually when needed. My plan was to use a current sensing power strip to sense the AVM-60 turning on and that could trigger the Panamax, leaving the 12V trigger for zone 2. That will work, but I have never bothered to set it up as the current situation is not a problem. Sometimes simple is better. I have added a cheap analog video to HDMI converter to accommodate my subwoofer(s).
This home theater started with the Theta Digital Dreadnaught II 7-channel amplifier that I reviewed for Secrets and used in Redwood City.
Sonically it met all my needs, but control of the amplifier modes was complicated as it required RS-232. While the Dreadnaught II, my then Universal Remote-Control setup, and APC power conditioner all played together well, the use of RS-232 was more complicated than I wanted to support as I moved forward. PLUS, I had just built a very energy efficient home with solar panels to zero out or net energy needs. Having an amplifier that used 160W in standby and 295W at idle was not consistent with our energy efficiency goals. It also heated up the room – not so bad for winter, but not good in the summer. It also required significant ventilation with fans if it were to be installed in a cabinet with a closed front.

So, well before the big upgrade, I sold the Theta and bought a 7-channel Class-D amplifier from D-Sonic. It sounds great and has power to spare with 800 watts x3 for upfront, and 400 watts x4 for the surround channels. Think that this is a ridiculous amount of power? Read how that power capability might be not be so silly here. Lots of power and cool, energy efficient operation, that is what I wanted and that is what I got. I use XLR connections from the Anthem AVM 60 not so much because I am concerned about noise pickup, but also because I was tired of trying to shove tight RCA connectors into tiny spaces right next to other connectors and having to hold the pre-pro so it does not slide. XLR connectors just seem better in so many ways.
Atmos 7.1.4


Before a installing the final paneling on our soffits, I really wanted to try Atmos. Finding suitable small speakers that were timbre matched to my existing LSiM speakers at first seemed a problem. However, I found that the Polk Blackstone TL3s had a similar ring radiator for the tweeters and a very similar midrange. So, I ordered 4 TL-3s from Amazon figuring I could return them if they didn’t work out and temporarily installed them with somewhat unofficial wiring. I moved them a few times before I found the right place, aimed them at the listening position on the opposite side of the room in what is called time-energy trading. Bottom line is that after listening to some Atmos containing content, I was hooked, and it was time to run the wire in the soffits and put on the final paneling. While I could have potentially used 4 of Polk’s in ceiling speakers with matching tweeters, I was not sure that the foam panels in the ceiling would support them properly and cutting holes when not fully committed didn’t make sense.
While the initial tests of Atmos used my existing Zone 2 amplifier and a spare 2-channel amp that I had in storage, my more permanent setup involves 2 Crown XLS 1002 amplifiers that deliver 215 watts at 8 ohms. While the TL3s are small they feel like they are made from a brick and have remarkably good bass for their size due to their use of a tuned PowerPorttm. Polk specifies the lower 3 dB point as 115 Hz and that seems a bit optimistic. I will admit that I tried to cheat and use a somewhat lower crossover frequency for the TL3s, but careful listening tests indicated that it was better to send the midbass frequencies in question to the subwoofers than have them lost in the TL3. In the end I used 150 Hz for the crossover for the front heights and 120 Hz for the rear as they showed a bit more boundary reinforcement when measured by Anthem’s ARC.

Of course, a proper Atmos installation requires that the surround speakers be moved down to just above ear level so that the 7.1 ear level sound field has vertical separation from height or ceiling speakers. I started with the side surround speakers behind the main listing positions (MLP), but found they were even better if placed somewhat forward (the 80° position as opposed to 120°) of the MLP where the 45° firing tweeter and midrange aim back at both the front and back rows and helped fill in the gap between the rear surrounds and the front speakers. When placed behind the front row that same 45° orientation of the mid and tweeter would aim away from the back row, spoiling the speaker’s ability to deliver accurate sound to that row.
And while most of the things we watch on a daily basis are not Atmos, the AVM-60s Dolby Surround up mixing does place some sonic content into the ceiling mounted speakers with almost all surround encoded material, e.g. 5.1 or 7.1, and this does elevate the sound field in the room helping accommodate the somewhat high screen position.

I have had a Velodyne DD-15 subwoofer for probably about 13 years now and it has served me well. It uses a Class-D amplifier rated at 3000 watts and a servo feedback system to minimize distortion, as well as an 8-band parametric equalizer. Frequency response is 15-120 Hz. I did have some electrolytic capacitors go bad in the amplifier but was able to get them replaced. When it came time for the big upgrade the question was, do I get a 2nd DD-15 or two new subwoofers from some other manufacturer as I wanted 2 subwoofers in my final installation. Since I liked the DD-15 and it had served me well and had flexible equalization capabilities, I decided to buy a 2nd DD-15 on eBay. After losing a couple of bidding wars I scored one with no remote or manual or even a power cord. That was no problem for me, and I found it to be in good working order.
Proper subwoofer placement in a room is a tricky thing and having multiple subs both helps and potentially makes thing more complicated. It all depends on what you are trying to achieve. If you have a small subwoofer you may want to place it in a corner to maximize room gain and therefore the boom, boom effect. At the same time, you will be exciting certain room modes and minimizing others and so certain bass frequencies will be emphasized – perhaps great for boom, boom, but not great for sonic accuracy. Another approach is to place the subwoofer(s) in a position where it will minimize the excitation of the various room modes and this is generally the best approach from a sonic accuracy point of view.
As mentioned above, the placement of a 2nd subwoofer in the room can both help and make things more complicated. For instance, a good approach in terms of room modes is to place the two subwoofers in opposite corners of the room. This approach however adds a complication if those two subwoofers are now different distances from the main seating positions and the sound from those two sources will arrive at different times or be “out of phase”. Some pre-pros allow the tweaking of timing for multiple subwoofers, but many do not, including the AVM-60. Third party DSP processors, like the miniDSP can accomplish this and do equalization, but that adds complexity to the system.
My approach to handling two subwoofers focused on a different goal than perhaps others may use. Once again, a compromise designed to meet a particular goal – in this case achieving not only a flat bass frequency at my listening position, but also an equally flat response where my wife sits on the other side of long centerline the room. With a single subwoofer in or near a front corner, there is no symmetry in the position of the subwoofer (obviously) or its frequency response at various positions in the room that are symmetric with respect to the long axis of the room. Although my wife’s seat is only about 4 feet from where I sit, with a single subwoofer, if I optimized, via equalization, for my position, the response was different at her seat. I ended up placing both subwoofers out from the two front corners of the room, in a location that is symmetrical with respect to the long axis of the room and equalized the response at both chairs. Although with this arrangement, some of the same room modes are excited by both subwoofers, others are cancelled, and I was able to use the parametric equalizers on both subwoofers, equally, to flatten the response thus achieving the same bass response regardless of which side of the room you are sitting. The equalization and optimization of the subwoofers with respect to room modes will be covered in more detail in the third installment which covers acoustics and measurements.
Obviously, no home theater is complete without something to watch and/or listen. That is where AV sources come in. Today, DVD players are common sources, but most evenings one also wants to watch the news or something on “TV” and ideally in High Definition or HD at minimum or preferably 4K HDR. Cable, Satellite, Streaming? How does one get TV these days?
When we first installed Smallcombe home theater I in Redwood City we subscribed to Dish Network and when they came out with Dish HD, I had to have it. Problem was the one and only satellite carrying the HD signal at that time was at ~41° longitude and over the equator. If you consult a map or globe, you will find that that satellite was located above the mouth of the Amazon River in the Atlantic Ocean. And yet I had to find a place on my roof where I could aim my antenna through all the local trees and at that satellite. I did locate it and got a reasonable signal even though I was on the West Coast of North America and the satellite was off the East Coast of South America. The funny thing was that the way the Dish Network satellite dish was designed, the arm with the LMB was below the center of the reflector and when so pointed at the satellite that was just above the horizon, it looked to all that the dish was obviously pointing down below the horizon. Got lots of question from neighbors, that is for sure.
Secrets Sponsor
We kept Dish Network for many years and in HT II, for a while, we had a Hopper and a Joey to support a 2nd TV (which we never used.) Eventually we cut the cord and now stream everything on an Apple TV 4K. Our house is a good 20 miles from town in a very rural area and we live on a 25-acre lot, but we actually have acceptable internet here from a local ISP, Sierra Telephone. The speed and cost are terrible by Cupertino standards, but pretty good for a rural area and I get a good dependable 25+ MBPS download speed, which seems to support 4K streaming. I learned the hard way with our house in Pollock Pines that internet access was something one does not take for granted when buying a home in a rural area. Same with fire stations. You have got to do your homework when buying a home or land in rural areas.
Apple TV 4K

The Apple TV 4K is what we use for 99% of our viewing. I have a 4K Fire TV, but found that, at least after a while, the Amazon video on the Apple TV 4K worked well enough and I eliminated the Fire TV for the sake of simplicity. We watch the news on Hulu or PBS, but also have Netflix, HBO, Amazon Prime, CBS All Access, Britbox, Acorn and probably a few more apps that I have forgotten, many of which are now part of our Apple TV+ subscription. We find that the Apple TV’s Watch Now feature is very handy for keeping track of what you have recently watched, next or new episodes, etc. We really enjoyed the Mandalorian with Atmos!
When doing movie night or movie matinee for a church group, I’ll often use a 4K Blu-Ray disc, but most nights if we want to watch a movie in 4K Atmos, streaming works just fine and is much easier.
The great upgrade also included an OPPO UDP-203 4K UHD player and it was great, at first, and still today has some features that I really miss. But I was able to sell it for more than I bought it and got a player that better met my needs for use with a projector, the Panasonic DP-UB820. The issue is called tone mapping. The problem is that today’s 4K HDR videos have a very High Dynamic Range (HDR) going from black to VERY bright whites. While some of today’s flat panel TVs can start to do justice to an HDR video image’s dynamic range, projectors just cannot. Front projectors like the 385 can produce a great image, but their contrast ratio and maximum brightness limits their dynamic range to less than is needed for accurate HDR images.
The issue then is to fit a signal with a large dynamic range into a display with a lower dynamic range, without clipping or cutting off the areas of the image with the brightest image intensity. If you clip the brighter signals, you lose details, and the image becomes crushed or overblown as all the highlights and brighter areas of the image merge into a blob or an area of all the same maximum brightness.
The problem then is to map the HDR image’s large dynamic range unto the display’s more limited range WITHOUT losing details. That is the job of tone mapping that uses a curve to do the conversion. Tone mapping can be done at the source, e.g. the DVD player, or in the display, e.g. the projector. At the time I bought the 385, no projector, including the 385 did tone mapping, although I understand that JVC does now, so I wanted a DVD player that would handle this issue.

OPPO promised HDR tone mapping, and released a firmware version with tone mapping, but it had a “bug” where it used the wrong color space, thus losing color intensity. Not good. After waiting through several firmware upgrades for a fix, I sold the OPPO, bought the Panasonic Ultra HD Blu-Ray Player DP-UB820 and found its tone mapping to be very helpful, especially for DVDs that were mastered for a very high maximum light level, like Blade Runner, 2045. I now rely on the Panasonic for all my Blu-Ray and 4K DVDs as well as older non-Blu-Ray disks. With one exception HD-DVDs.
Fifteen years ago, there was a format war for the future of DVDs – the transition to High Definition or HD-DVDs. There were two formats, Blu-Ray supported by SONY and HD-DVD supported by Toshiba and many others. Some studios were in the Blu-Ray camp, others supported HD-DVD and some both. DVD stores, remember those, had one rack with Blu-Ray and another with HD-DVD, and another with “regular” DVDs. Obviously both formats were not going to survive, and basically, I chose the wrong format, HD-DVD, buying a Toshiba Player and more than a few HD-DVDs. That Toshiba HD XA-2 DVD player is still part of my system, although I’ll have to admit I have never watched a movie with it for many years and certainly not in this set up. The installation was a bit tricky as the XA-2 had a very old HDMI format and did not work with the AVM 60’s normal HDMI inputs, but I did find that it would with either the front HDMI input or HDMI 7 (marked MLH).

Both my wife and I had extensive record collections when we married 35 years ago, but when we moved onto a sailboat soon thereafter, all our records went into storage. When we moved into a house 7 years later, CDs were the thing and our records stayed in boxes. Recently, as we were about to give them away to a vinyl aficionado, we realized that we really did not want to do that, without perhaps listening to them first. Since the AVM 60 does not have a Phono input, I bought an Audio-Technica AT-LP120-USB Turntable that had a phono preamp built in and hooked it up.
We fell in love with our records again. The problem was that I had not planned for a turntable when I designed the cabinet we had built for our equipment, so, I ended up installing the turntable on top of one of the subwoofers, of all places. It is on top of an Auralex Acoustics Sound Damping mat AND I created a profile on the AVM 60 that is automatically selected as part of the Turntable input, and that profile does not use the subwoofers.
The funny thing is that although I have hundreds of our music CDs ripped (FLAC) and stored on a USB drive accessible in the system, when we want to listen to music, we pull out a record and give it a spin. It is not that it sounds better, but the process of selecting an album, studying the cover and dust jacket, putting it on the turntable, wiping off the dust, and lowering the tonearm make you part of the process of making music. Perhaps it is nostalgia, but it is just more fun.
Our home is all electric, that is all our appliances are electric, heating and cooling is a ground source geothermal heat pump, and cooking is via an induction cooktop. Since we live in a rural area with frequent and often lengthy power outages we have two Tesla Powerwall 2s for not only battery backup, but they, along with our 11 kW of solar, actually supply all power to the house from 3 in the afternoon until midnight, thus we are not competing for power from the grid when it is most heavily used. The batteries charge during the morning when California often has excess solar power. For extended outages, perhaps with snow covered solar panels, we have an 18 kW Kohler generator.
Given the variety of power sources some power conditioning is not a crazy idea, nor is battery backup for critical systems like the network modem, routers, switches, etc.
The initial installation of our home theater here in Mariposa County, long before we had the Tesla Powerwalls, included an APC S20 battery backup and power conditioner.
It was a great unit that I reviewed for Secrets 12 years ago now. Once we had the Tesla Powerwalls however, the battery backup capability of the S20 seemed redundant, and it was showing its age. However, I do appreciate the sequential switching capabilities of the typical power conditioner where a trigger from the pre-pro can turn on power to various source components, and after a delay to allow the sources and pre-pro to have a stable output, turn on the power amplifiers.

As part of the great upgrade then I chose a Panamax M5300-PM to fulfill those needs.
I also have an APC 600VA battery backup unit that protects the projector from power failures, hopefully giving enough time to shut it off and cool down the bulb, if all else fails. That unit was installed before the Powerwalls, but I have left it in place as it can’t hurt.
Ever since we moved from a TV with knobs on the front to a TV with a VCR, and then added a CD or DVD player, and so on, remote control devices are part of the picture. I cannot deal with having multiple remotes on the table, one for volume, one for the DVD player, one for DISH, etc. A reliable universal remote control is essential for ease of use, especially if other family members will be using the system. If one is away on a business trip and calls home, one does not want to find an angry wife because she is trying to watch TV and there is no sound. Not good.
The ideal is one button operation to turn all the needed components on and off with simple labeled buttons like, Watch TV and Watch DVD. And it is important that any macros that are meant to control multiple components work without having to keep the remote pointed at the system. This likely means RF not IR transmission from the handheld remote to a receiving unit near the components that then sends IR to control the various components. This is especially important with a closed cabinet as IR cannot penetrate doors.

When my system required RS-232 control I used a fairly complex control setup from Universal Remote Control. It was very versatile. It could control anything, but it was a complex system. When I replaced all the components that required RS-232, I went for the Harmony Elite for remote control. It does use RF to send commands from the handheld unit to the hub which is located in the closed cabinet. While the hub can blast IR to components in the same section of the cabinet, I also use a hardwired connection from the hub to an IR distribution system that sends hardwired IR signals to the AVM 60, the projector via a cable in the soffit, and the screen.
One button labeled Watch Apple TV to turn the system on, and one to turn it off. This not only keeps family members happy, it also allows house sitters, etc. to enjoy the system.

The Harmony Hub is also linked to my Insteon lighting system hub and so I can use the Elite handheld unit to control the lights in the room via various scenes for “Dinner”, “Movie”, etc.
“Simple ain’t easy.” Is a quote by Thelonious Monk. Simple is not easy and takes some effort to make simple reliable, but it is a very worthwhile goal when it comes to having people use complex system in a dark room.

As mentioned in Part 1, we were owner builders of our home, I like woodworking and have all the equipment, and I designed and built all of the cabinets in the kitchen, the bathroom vanities, etc. But when it came to professionally finish cabinet doors, I turned to a friend and neighbor, Ron, who is a professional cabinet maker. Likewise, I designed the home theater cabinet, but used Ron to build and finish it. The kitchen cabinet doors were a combination of Khaya and maple, but for the home theater I wanted only darker woods and so went for Khaya (African Mahogany), and Lacewood, with Wenge accents. It turned out very well in terms of how it looks, especially compared to the initial installation photo shown in the initial installation!
Besides keeping things neat and tidy (don’t look behind the cabinet) and hiding the equipment, the other purpose is to protect the equipment. I cannot tell you how many times I have wiped cat pee off an amplifier sitting on a lower shelf of an open cabinet. I actually lost one amp to cat vomit. And cats like to sleep on warm things, like pre-pros and amps which does not help with the ventilation of those devices.
A closed cabinet is good, but not if it cooks the equipment due to lack of air circulation. Component cooling was part of this cabinet design from the beginning. While the lower shelf of the cabinet is several inches off the floor, there is a skirt around the base of the cabinet that is just barely off the floor. There is an HVAC air duct directly under the middle of the cabinet that is always blowing filtered cool air into the closed space below the cabinet. I have air circulation in the room set to always on, so the filtered cool air is continuous, and the room is heated via radiant tubing in the floor not via hot air. When the system is on, fans in the lower shelves suck that cool air into the two center compartments where the most heat generating components are located. Since all the amplifiers are Class-D heat is not a big problem.

The AVM 60 likes to keep cool, and cool air is sucked through holes in the shelf on which it sits and through the component by an AC Infinity AIRCOM T8 running in the SMART mode. Note that the door for the AVM 60’s compartment slides underneath so that the pre-pro can be seen during operation, but in practice the door is always closed. The same for the compartment containing the DVD players. The back of the cabinet is open.

The bays on the side are largely for storage, for such things as DVDs and manuals.
That’s all for now! Next time, Part 3 will cover acoustic treatments in the room, measurements of the room acoustics using REW, subwoofer placement and room modes, and setting up a house curve or a customized frequency response using Anthem Room Correction. Thanks for reading.