
There are two fundamental differences which change the way we approach calibration for Dolby Vision, and no they aren’t the higher peak luminance or the expanded color gamut. First is the fact that we are using PQ EOTF instead of Gamma EOTF, the other is that we are not calibrating against a singular standard, not even against ST2084 per sé: We have to calibrate against a reference unique to the exact model of TV we are dealing with. This is the so called Dolby Vision Golden Reference we mentioned earlier.
Another significant practical difference when calibrating for Dolby Vision is our limited choice of test signal sources. With SDR there is a cornucopia of sources one can use to generate or deliver the various test signals, from high end generators to simple DVD/BD titles in an optical disc player. Recall that with Dolby Vision every model has a unique target to calibrate against. While it’s technically possible to create a UHD disc with test signals unique to a given model, it is not at all a practical solution and one we are never likely to see. It makes far more sense to use a pattern generator to create the required test signals on the fly, which is what the Dolby Vision model-specific Golden Reference file enables. At the time of this writing there is only one system available which is capable of doing this: SpectraCal’s CalMAN software, using as its signal source an HDMI video card output on the very PC running the software.
There are none of the optical preliminaries with Dolby Vision calibration: we don’t do basic brightness, contrast, color, or tint. The Dolby Vision Golden Reference assumes a certain set of default settings for all of those and deviating from them will invalidate the calibration. Remember that calibration of Dolby Vision (or any HDR system based on BT.2084), unlike SDR, is done in absolute luminance terms. If you raise brightness because you ill-advisedly setup your gorgeous new HDR display in a sun lit room, you may well raise the low end so far up that you can’t actually calibrate it at all!

Dolby Vision Workflow Setup Screen
Above is the setup screen for the Dolby Vision workflow. Notice that there is no choice for color space, gamma/EOTF, or even white point. The test pattern size is pre-set at 10% and this is very important because the Dolby Vision Golden Reference is predicated on that. Selecting the DVGR for your particular display is really they only setup you do here. In this case you can see we are doing a VIZIO model P50.

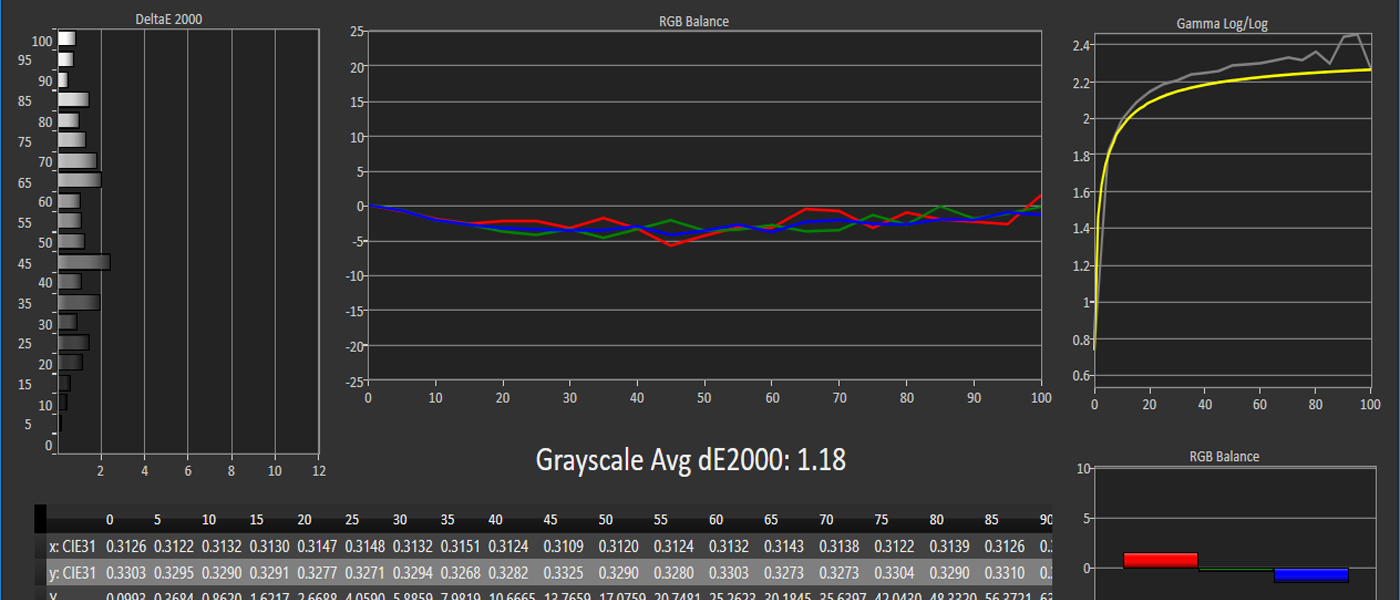
Dolby Vision Pre-calibration View
As with any calibration we take a “before” snap shot of the display as found (though in this example I had already gone through it once…out of box it was much worse than this). Please note that the Gamma/log graph of SDR has been replaced with an EOTF graph.

White Balance
Because the VIZIO has bias and gain controls, we have an opportunity here to normalize the display’s grey scale using a 2-point adjustment.

Luminance Min/Max
Unique to the Dolby Vision workflow, at this stage comes measurement of minimum and maximum luminance. Max luminance is measured two different ways: once with a 10% sized window, and again with a full screen. In this example the VIZIO gave us 317.12 nits from the window, 488.16 from the full screen, and an immeasurably low output from the black.

Dolby Vision Grayscale Calibration
Similar to SDR, here we use VIZIO’s 11-point RGB adjustment to align both grayscale (RGB balance) as well as luminance. Of particular note is that the table at lower right is pre-filled with all the targets. Contrast that with SDR calibration where, at the start, everything is blank until you take a white and a black measurement, after which the software has to calculate everything in between. Here, because we are calibrating against an absolute, everything is predetermined. In this example you can see I’m doing pretty darn well, despite VIZIO having messed up a bit in the implementation of their 11-points for HDR. The RBG balance graph is “zoomed in” quite a bit in this view making things look worse than they really are but that is very helpful in terms of giving us an overview of how were are doing and where we need to work a little harder.
It is worth noting that CalMAN (and any future pattern source for calibrating Dolby Vision) has to inject special static metadata. The more astute among you may note that we are not comparing code words to BT.2084 luminance values; rather we are comparing them to an expected output derived from the Golden Reference. In other words, the yellow line is not BT.2084 per sé, though that is what we are feeding the display.

Dolby Vision CMS Calibration
For calibration of the color space, here again the Dolby Vision Golden Reference file defines our targets. In this example we found the VIZIO did not track its color very well, so instead of dialing in the extremes of the gamut (the “points” of the triangle) we used 20% sweeps. That is, we looked at each of the primary and secondary colors at not just 100% saturation, but also 20, 40, 60 and 80%, trying our best to find settings which gave a “best overall” fit. You can see with red for example, it is still over-saturated at the low end (close to the center) yet under-saturated at the high end (upper right of the chart).

CMS Dolby Vision Post-calibration View
A post-calibration suite of measurements shows us where we’ve landed. In this case grayscale is pretty darn good, EOTF is a little under target at the very low end (not debilitating) but color accuracy is merely acceptable. Please make a note here: unlike the SDR results page, we don’t get a %-of-gamut covered figure. Why? Because we are not calibrating against BT.2020, even though that is the color space (and we certainly are not calibrating against DCI-P3). Rather we are calibrating against the known gamut of the display. If you later want to evaluate the display in terms of its BT.2020 coverage, you could do that separately for information purposes.
The major difference between calibrating Dolby Vision and HDR10 is, of course, that we do not have a Golden Reference, or anything like it, to calibrate against. We measure the display’s raw performance against PQ/2084, looking for corresponding absolute luminance.

HDR10 Workflow Setup Screen
Calibrating HDR10 starts by feeling like Dolby Vision in that there is no choice of color gamut or EOTF curve (they are always BT.2020 and PQ respectively). Note that HDR10 calibration, as with Dolby Vision, is predicated on a 10% pattern size. That’s where the similarities end.
Pre-calibration is nothing new so we’ll fast forward past it and the two-point grayscale.

HDR10 Grayscale
In the above screenshot you can see an HDR10 display calibration in progress. Of particular note are the EOTF and Luminance graphs on the right hand side.
We don’t know what the capabilities of the display are, so as with SDR, the grayscale table starts empty, yet unlike SDR we do know exactly what we want each code value in the signal to be in terms of luminance because HDR10 uses PQ/BT.2084. CalMAN cleverly addresses this challenge enabling us to calibrate an HDR10 display to a certain extent.
Similar to SDR we start by feeding the display the HDR equivalent of 100%, 10bit code value 940 for you techie types. Whatever it comes back with, in this case somewhere right around 1,000 nits, is the max luminance of the display. What CalMAN does is plot the portion of the PQ curve up to that luminance (code value 722 in this example) and simply assumes everything above that will be the same luminance, hence the flat line. In the absence of Dolby Vision’s standardized tone and gamut mapping, that’s the best we can do. Note in this example, on the luminance graph, the response from 722 to 940 code value is not flat (visible as a light grey line). This tells us the display is doing some sort of roll-off of the values above what its maximum luminance is, but we can’t actually calibrate these since we don’t know what exactly it’s doing, we only know that it is doing something.

HDR10 CMS
In the post calibration workflow the verification of grayscale and EOTF is straightforward. What is unique is our look at that pesky color gamut.

HDR10 Post-calibration CMS Sweeps
This time we do three unique gamut sweeps:
Remember please that there is no P3 in UHD and/or HDR. The signal sent to the display for ALL THREE sweeps is in fact BT.2020! We do the two “within BT.2020” sweeps simply to verify that the display in question, or perhaps a source component such as a UHD Blu-ray player, is behaving properly or if some ill-conceived “color space conversion” is taking place. We do NOT calibrate to anything other than BT.2020!
Part 6: High Dynamic Range (HDR): Current issues
Part 1: High Dynamic Range (HDR): Fundamental Concepts of Dynamic Range
Part 2: High Dynamic Range (HDR): Dolby Vision and HDR10
Part 3: High Dynamic Range (HDR): An Explanation of Resolution and Color