
Most Home Theater enthusiasts are familiar with the basic tenets of display device calibration: that there exists a standard to which devices must be calibrated against in order for the image to be considered correct.
Some of the adjustments can be made optically (“by eye”) using simple test patterns which have existed since the dawn of TV but which were only made readily available to consumers in the early 90s thanks to Joe Kane and his A Video Standard Laserdisc. Such adjustments include Brightness, Contrast, Color, Tint and Sharpness. Instrumentation, specifically a colorimeter, is required to go further and is used to calibrate a display’s greyscale tracking, gamma or power response, and other subtler but no less critical adjustments. Relative to the topic at hand we’re going to focus on only one of these: White level, aka peak white, somewhat incorrectly referred to for decades as Contrast.
Peak white, or in layman’s terms how bright the brightest white the display puts out is, has for generations been a limitation of the hardware itself. Back in the days of CRT (tube) TVs we would set white level (Contrast) as high as we could without overdriving the tube and distorting the picture. Anyone who’s been around for a couple decades should remember this beauty:

If you recognise this, you are at least as old as me…
Back then you would crank the white level up until that white line either bloomed, started to bend, or both. Because this would almost always result in peak white below the standard, many came to forget that there is in fact a correct level for it.
With the advent of flat panel displays, and LCD in particular, which do not bloom or distort like a CRT, the focus on correctly setting white level shifted to sussing out what the TV’s processor is doing in terms of translating the signal to on-screen values. The conventional wisdom is to raise the control as high as it will go without the display clipping the topmost white values. This is good advice as that is how you maximize the dynamic range of the display. On an LCD what that control is doing under the hood is setting the aperture of the panel (i.e. how “open” the LCD is, or how much of the backlight is being let through) for topmost signal values. The setting which is as open as possible without clipping may or may not result in a correct light output level on an LCD though. So next we turn to the display’s backlight control and simply raise or lower it so that peak white is output at the correct level.
For a consumer TV in a light controlled room, that level is 100 nits ( cd/m2 ), or in older parlance about 30 fL (Foot Lamberts). For larger projection systems in pitch black rooms it is somewhat lower but let’s not get sidetracked with that just now.
Please let that sink in for a moment. There is a single correct light output level for all SDR display devices. One should not be (significantly) brighter or darker than another, even if the unit is capable of higher output.
The guys and gals who spend their lives in editing suites and grading bays have their monitors setup to this standard. They are working their butts off to make sure the images look good and serve the artistic intent of the authors. They make sure dark parts of the image are in fact dark but still have detail, and that bright parts are bright without being blown out. In short, they are maximizing the dynamic range of the system we have all be working and living with for decades.

SDR. It’s a beautiful thing.
What happens if you deviate from that 100 nit standard? Well, it’s not like the luminance gestapo is going to kick down your door if you do, but…
Let’s say you have a smallish TV which you watch in a pitch black room…which you really should not do, but let’s just say you do and you find that a correctly calibrated display is subjectively too bright. If you simply lower the white level, everything gets darker and your dynamic range goes down the drain. Let me say that again: everything gets darker, not just the peak white. Those dark areas of the picture where you should be able to see detail will just become muddy black. The midtones such as, you know, people and such, will all look dim and unnatural. In short, the picture will look like crap. Incidentally, the way to watch a correctly calibrated TV, especially a smaller one, in a pitch black room, is not to. Instead, employ a bias light which illuminates the wall behind the TV to about 10% the peak white of the TV itself.
But let’s go in the other direction now and pretend you ill-advisedly setup your beloved home theater in a living room with three walls of floor-to-ceiling windows and are trying to watch The Dark Knight in the early afternoon (sadly, this is not an uncommon scenario). A properly calibrated 100 nit TV is going to be completely washed out by sunlight. So you turn up the white level….and everything gets lighter…sort of. It’s not as if you raised the level of the picture uniformly to compete with the sun. Rather what you have done is “stretched” it out which does little for the mid tones and even less for the dark areas. So to get those back you raise the black level. Now the darkest portions of the picture are no longer black at all but dark grey, yet will still be subjectively quite dark and thus invisible to you because your pupils are constricted from the blaring brightness of your peak white, and if that doesn’t screw you, the ambient light you are competing with will. So you raise brightness further and now you have a picture which is so flat and washed out that the director of photography is weeping openly at how you have ruined all their hard work. In other words, not only is the display way out of standard, it’s going to look like crap.

I’m calling foul on this photo: no one is enjoying a quality image in this room. Image Copyright Vizio
If you want to claim high performance video in your home, you are going to have to A) put the system in not a pitch black room, but a light controlled one and B) calibrate the display to the SDR standard. And when you do, SDR looks darn good. Compromise on either of these and you compromise picture integrity. Period.
If you are pretty sharp, and I bet that you are, you will by now have figured out that HDR is all about breaking out of that 100 nit barrier, but let’s get something carved in stone right now: HDR is NOT simply about raising the peak white level to something higher so that you can watch Casablanca in a sunlight room. No, no, no and no. Despite all the marketing images of giant screens with brilliant images in stark white rooms filled with light, it’s never going to happen. Period. The way our eyes work precludes it. The ideal environment remains a light controlled room! (Please chant that a few times out loud… don’t worry about the odd looks people will give you). If that is the case, why would we want to raise peak white? Excellent question.
I’d like to use audio as an allegory here as it is a little easier for most people to wrap their heads around.
Audio chains have dynamic range as well, only here we are talking about the delta between the quietest sound (think: silence) and the loudest (think: explosion in a Michael Bay crapfest). Going back to the mono optical soundtracks of film, the dynamic range was pretty lousy by today’s standards. Systems were calibrated such that the loudest sound you would hear is just over 80 dB… but that’s not the point I want you to concentrate on. What level was, say, dialogue? It was a perfectly natural 60 dB – 70 dB for a conversation, somewhat louder for someone yelling. Basically it sounded very close to what it sounds like in real life. Same goes for everything else in the soundtrack. Whispers sound like whispers, conversation sounds like conversation, and the clash of swords sound like… swords clashing (I guess). Then began the golden era of Cinema Sound advancements. Dolby Stereo raised the bar to about 90 dB. SR noise reduction gave us an extra 3 dB, and when we finally landed on Dolby Digital the dynamic range was a whopping 105 dB. Now the loudest sound you hear from any one given speaker is an ear-splitting 105 dB. But what happened to the level of dialogue? Lousy, irresponsible mixes aside; it should still be the same 60 dB – 70 dB! Increasing the dynamic range is simply that: more headroom. It does NOT mean that the entire soundtrack is raised up in level. Think about that long and hard. The sounds of birds chirping, people talking, and what have you, are all at the same level they were before we increased the dynamic range. The roar of a jet, explosions, music crescendos, and sundry other however can now be, at the artist’s discretion, louder than before.
If we port the concept over to video it should be fairly intuitive to realize that by increasing the dynamic range of the video system, we do NOT want to simply make the whole picture brighter. This is a huge misconception which is circulating right now and which we ask you to help quash. A typical indoor scene, the shadows in the corner etc. should all be similar in level to what they are in SDR. In other words, even though we might spec a system which can go to 500, 1,000, or 10,000 nits, the APL may get somewhat brighter, but it is not going to skyrocket.
So what’s the point of creating a system which breaks out of the 100 nit barrier? Highlights! Think sparks from a welder, bright reflections off a body of water, the glare from a car’s windscreen, or a sparkling Lightsaber: all can have brilliant bright highlights which just aren’t possible with SDR and which give the image so much pop.
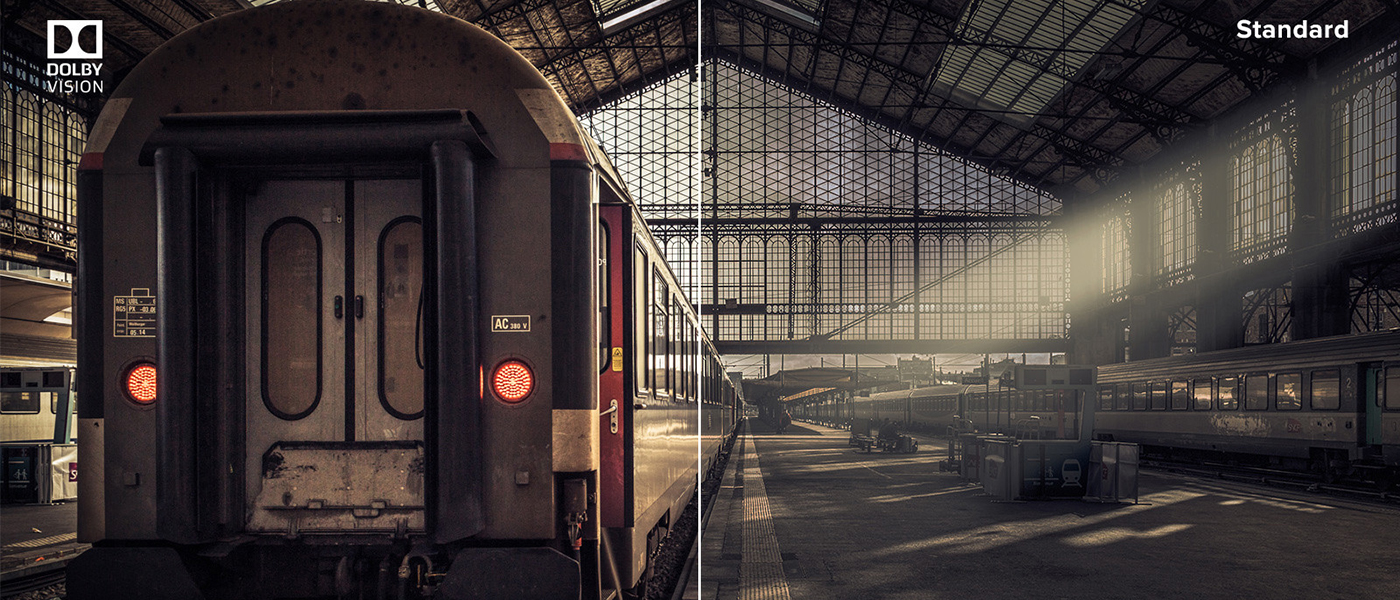
Trust me; those highlights are EVERYTHING when it comes to a picture which truly pops. HDR makes you go “wow!” in a way nothing else can. In fact, the first time you see real HDR material (as opposed to cooked up demo clips), your first reaction after just a couple minutes may well be “this doesn’t look all that different”. That’s good. That means the guy or gal at the knobs in the grading suite wasn’t getting carried away. Then a scene will come along and it will hit you…

HDR (left) vs. SDR (right) simulation. Note overall APL is similar.
In the above image I’ve tried hard to simulate for you what the real difference might be between an HDR and SDR presentation of the same scene (and even at that your computer monitor may screw it up). This is a still from hdr-2014.hdm-stuttgart.de. A very dark scene, very low APL, but with dazzling highlights. Note how most areas of the image, in particular the dark and shadow areas, are for the most part unchanged from SDR to HDR. Naturally the eye zeros in on the brighter furnace flame and the bright molten steel and sparks, but notice also the area around the flame and the flame itself has more apparent detail despite it being so bright.
“Sounds great” you are thinking, “Let’s just do it!” I wish we could. Well, we can, but we have to get some things in order first.
You see, it’s not just a matter of picking a new higher peak white level. Some people have advocated for pretty much that very thing, calling it “doing HDR with SDR”. It doesn’t work because you’d still have the same 8-bit data, stretched out over a much larger range with an old fashioned power curve which just doesn’t have a data distribution which fits (making the prospect incredibly inefficient). Ok, so we solve that by moving to a 10bit system, redistribute the bits, and pick a new nice and high white point. That’s too short sighted. If we said, for example, that it’s fairly easy to make a TV which can reliably hit 1,000 nits, and made that the new standard, we’d be crying in our beer next year when TV manufacturers announce they can do 2,000. And in a couple years 4,000. Maybe 10,000 just a few years later (yes folks, that is the plan). For that reason, we need HDR to be a system which can easily and transparently scale in the coming years…and therein lays the challenge. If we master some content today to a peak white of, say, 1,000 nits, we need to be able to display that on a device which might only be capable of 500. And in a few years we need that same mastered-to-1,000 content to display correctly on a display capable of 4,000 nits (or whatever). What we need is not just a standard, but a system. And we have one. Well, we have two darn it, possibly more. We’ll circle back to that issue in moment.
For all this talk about peak brightness, we need to step back and talk about the opposite end of the spectrum: Black, or the absence of light.
With conventional, ubiquitous LCD display design, HDR is not actually possible. While you could (hypothetically) drive an LCD panel with a zillion watt xenon arc lamp and get blinding output, you’d have no black whatsoever. LCDs have never been very good at clamping light. The solution is to slice the backlight up into blocks, or zones as they have come to be called, and modulate the brightness of the backlight independently in each zone according to image content. If a zone contains predominantly bright content, the light source behind it ramps up. If a zone contains predominantly dark content, its light source is dimmed. This Local Dimming, as it has come to be known, is made possible by the move from fluorescent backlighting to LED. LEDs can be arranged in suitable arrays and have near instantaneous response in terms of dimming. Of course zones have to be sufficient in number, or phrased another way have to be small enough, in order to create an acceptably fine luminance-facsimile of the image. While experimental models now have as many as 2,000 zones, most consumer HDR models today feature anywhere from 128 to 500 zones. This method of creating HDR images is challenged by the fact that the number of zones is at best a small fraction of the number of pixels available. Consider that there are over 2,000,000 pixels in a conventional 1080p image. That’s quite a bit more than a few hundred, or even a couple thousand, dimming zones. A zone which contains both bright and dark picture content is a bugger to illuminate to a satisfactory level: the backlight will either be too bright for the dark content, too dim for the bright content, or (most likely) a compromise favoring neither.

HDR Dimming Zones
In the above example you can see how it is not hard with 144 zones to have content which spans the extremes of luminance. The pink square highlights one such zone which has both deep low level detail as well as extreme brightness. If we quadruple the number of zones to 576, illustrated by the green square, we still have extremes occupying a single zone. The molten steel which should be nice and bright, exploiting what HDR has to offer, will have to be muted by zone dimming, otherwise the dark content surrounding it will turn muddy gray. Make no mistake, having more zones does help in that the more you have, the lower the number which are forced to compromise and the smaller the area those compromises occupy, but even with a couple thousand zones, compromises remain.
The above is all predicated on the light source, the LEDs, being arranged in an array behind the screen. Hence the marketing term “Full Array, Local Dimming” (often abbreviated FALD). There is another LED arrangement however, know as edge-lit. Be wary of it!
Up until recently the predominant configuration for LED backlighting in LCD TVs has been the so called edge-lits arrangement: LEDs are located only off to the sides (or top and bottom), their light being cast to the whole of the screen by a diffusion layer behind the LCD itself. While this makes for very “thin” TVs, it has always been a bad design, even for SDR, as this arrangement is severely challenged in terms of screen uniformity: even with state of the art diffusion, edge-lits are notorious for being brighter at the sides where the bulbs are. More to the point at hand though, it should be fairly intuitive to realize that such an arrangement cannot possibly deliver the localized contrast required for HDR. Compare the above full array local dimming zone layout to the following edge-lit local dimming zone layout:

Typical edge-lit dimming zone layout. Note how large the “compromise” area is compared to the previous example.
Because the LEDs are only on the left and right side, their light being distributed via diffusion from edge-to-center, the above layout is the only layout possible for dimming zones with an edge-lit panel (those “stripes” cannot be further subdivided horizontally). In consequence, with practically any real-world scene there will be always be extremes of light and dark in every zone. Unlike full array local dimming where even with a couple hundred zones they are at least square and thus uniformly distributed, with edge-lit not only are there far too few zones, but those zones are radically oblong. You are actually better off not trying to zone dim at all. Yet there are several edge-lit “HDR” LCD TVs on the market. I put HDR in quotes here because while some can produce some pretty decent peak luminance numbers, none can produce an acceptable HDR picture and should be categorically avoided.
OLED technology plays right into HDR. Because each pixel is its own source of light, OLED aptly side steps the mixed-content zone dilemma of local dimming LCD (you can think of OLED as having millions of zones). OLED is challenged however in terms of absolute brightness: where with LCD we can simply put ever brighter backlights behind them, OLED currently struggles to put out the sort of multi-thousand nit brightness we are hoping for with HDR (current state of the art consumer OLED tops out at about 700). As with anything though, this is bound to improve over time giving OLED a very bright future indeed (pun most certainly intended).
HDR is coming, one way or the other, and future display technologies will be developed around it. For example, Panasonic recently announced a new LCD panel arrangement which adds a per-pixel light-blanking layer between the LCD and the backlight which they claim improves native contrast at the pixel level. Whether it is truly LCD’s answer to OLED is something which we will find out in time.
Part 2: High Dynamic Range (HDR): Dolby Vision and HDR10
Part 3: High Dynamic Range (HDR): An Explanation of Resolution and Color
Part 4: High Dynamic Range (HDR): SDR Calibration
Part 5: High Dynamic Range (HDR): HDR Calibration
Part 6: High Dynamic Range (HDR): Current issues