Introduction to the XTZ Room Analyzer II Pro
We’ve all heard the adage a dozen times: your room is far more important to the sound that you get out of your system than the system itself. While this statement may very well be true, the process of tackling “your room” is far more difficult than deciding what type of receiver or speaker wire you should buy. Welcome to the world of acoustics: incredibly complicated and undoubtedly intimidating. The XTZ Room Analyzer may just be the thing to help get you into this world a little easier.
XTZ might not be a familiar name in the US. The company is based in Sweden and makes a full complement of audio equipment, from amplifiers to speakers and subwoofers. Though they have a limited presence in the United States, the Room Analyzer has quite a few fans, so we were interested in taking a look.
Anyone who has set up a receiver in the last several years has addressed room acoustics, whether they knew it or not. Those little pyramid things you plug into your receiver, that cause weird sounds chirping sounds that may concern your partner or friends that your listening tastes have gone severely off the rails? Those are test tones…and that pyramid thing is a microphone. The brains of your receiver is playing sounds, interpreting how your room is affecting those sounds, and implementing changes to the signals its playing to try and correct for what your room is doing. That’s room acoustics!
For those interested in taking the next step, the XTZ Room Analyzer may be your gateway drug. The RA is an all in one kit that contains everything you need to begin gathering your own acoustical data – the very same data that Audyssey is collecting – and use it to truly analyze the acoustics in your room. With very powerful software, and almost limitless possibilities, the XTZ RA can help you move beyond auto-calibration, and help you not only understand what systems like Audyssey are doing, but also help you make changes to your room that will improve your sound far beyond what room correction software is capable of providing.
XTZ ROOM ANALYZER II PRO SPECIFICATIONS
- Design: Room Analyzer, Real Time Analyzer, Frequency response measurement, Reverberation time/Spectrogram, SPL – Full frequency measurement, Advanced SPL Peak and average meter, Tone generator Included components
- Microphone Tolerance: ± 1 dB
- USB Microphone Preamplifier Included
- XLR and RCA Connectors
- Aluminum Carry Case
- MSRP: $330 USD
- XTZ
- SECRETS Tags: XTZ, Analyzer, Audio
Design of the XTZ Room Analyzer II Pro
XTZ was kind enough to send both Tyler and I XTZ Room Analyzer II Pro kits. What’s inside the box is actually nothing ground breaking: DIY folks out there with an interest in room acoustics have been cobbling together set-ups similar to this for some time making use of free software like Room EQ Wizard (http://www.hometheatershack.com/roomeq/). In the Room Analyzer Kit, XTZ has simply done the work for you, providing all of the hardware you need to get started, paired with a slick and highly capable software package.
The XTZ Room Analyzer comes in two flavors: a basic and a pro kit. Tyler and I were sent the Pro kit, which has a higher quality pre-amp and microphone, as well as a somewhat more extensive software package. More details on differences between the two can be found on the XTZ website.
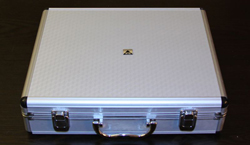
Upon unpacking the box I was greeted with a sleek silver carrying embossed with a small XTZ logo that houses all of the components.
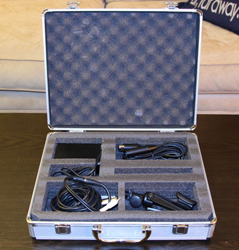
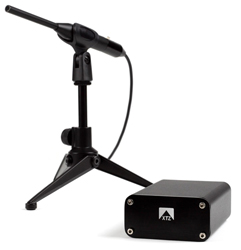
Inside this case you’ll find a microphone, a USB pre-amp, a small microphone stand and all of the required cabling including several balanced audio cables and a Y-splitter allowing you to input a stereo signal into your system. The microphone that is included is not calibrated. XTZ informs us that the included microphone is accurate to +/1 1dB across the entire frequency band with a generic calibration file. While this is fairly accurate, we both feel that for the price, XTZ should include a calibrated mic.
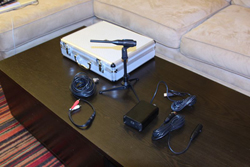
There is no software included, only a manual on a USB thumb drive; the most recent version of the software is downloadable at the XTZ website. Unfortunately a serial number is required for download. This means that you can’t experiment with the software unless you actually buy the kit. Other home theater calibration software, such as CalMan from Spectracal for video calibrations, allows users to download their software to play with, instead requiring a license activation to allow the software to interact with equipment; this would be a nice feature for XTZ to consider in the future.
Getting up and running with the RA is fairly straight forward. Everything is labeled and the nature of balanced audio cables means you can’t really plug something in where it doesn’t belong. Still I found it helpful to load up the PDF of the manual to make sure everything was in the right place.
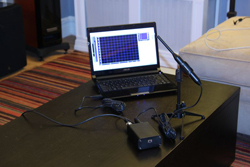
I attached the RCA splitter to the input on the front of my Integra 80.2 Processor, attached everything to the pre-amp, then connected the pre-amp to the USB input of my computer.
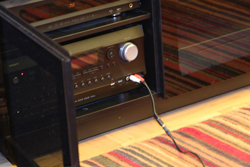
While the connection is made to your stereo input, the test tones played for the L/R channels are identical. Tyler’s setup was nearly identical to mine, connecting the RCA splitter to either the front panel stereo input of his Integra DHC-9.9 Processor or to the multi-channel analog input on the back panel to gather measurements for his surround channels.
From there it was time to fire up the software and roll up the sleeves.
XTZ Room Analyzer II Pro In Use
If you are a new to acoustics and acoustical data, the first time you sit in front of the RA software it can be a bit daunting. There are no “wizards” or guided means through which one can work through the various data collection screens. Unfortunately the manual is little help here. We both found the included documentation ambiguous at best, and at its worst downright confusing. Creating separate manuals for the Basic and Pro versions of the kit would be an easy first step to alleviating this problem. While there are plenty of resources around the web to get you started, a more competent manual, or some sort of assisted data collection wizard, would be a welcome addition to the package.
Fortunately, the software has a fairly simple user interface, which mitigates somewhat the poor instructions. The software GUI has been well organized and does not resort to burying features/functions within sub-menus. Everything is easy to find with just a few short clicks. To keep things simple, we’ll work through the software functions in the order they appear in the software tabs as well as the order that XTZ recommends for workflow.
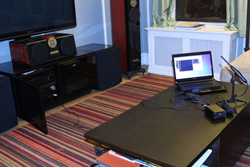
XTZ Room Analyzer Pro II On the Bench
The “Room Analyzer” is the first tab in the software and the recommended starting point for your initial analysis. Basically what the XTZ will do here is to gather the frequency response of your room from 16Hz-250Hz, allowing you to see how your room is affecting individual frequencies across a set volume level: the acoustical properties of a room (dimensions, furniture, materials, etc) are capable of amplifying some frequencies while lessening others. In a perfect scenario, we would want flat room response so we are hearing material as it was recorded.
The frequency response data can be collected at either at a single microphone position or averaged over three distinct positions: your primary seating/listening position and two positions to the side. Following the manuals instructions (with a great amount of difficulty) we attempted to place the microphone at ear level. Unfortunately the included microphone stand isn’t really all that useful for this task – it’s a small tripod that only is capable of elevating the microphone a few inches off of where you place it. If you have access to a basic microphone stand, it will make the task of placing the microphone much easier. If not – basic stands are available on Amazon at very reasonable prices and would be a nice addition to the kit.
While we were able to tease out from the manual the correct height the microphone should be at, the manual makes no recommendations for orientation. According to our conversations with XTZ, the included microphone is directional above 5kHz, so for this measurement pointing the microphone towards the ceiling would be the preferred option. There are various selectable options for data collection, which effect things like how the microphone samples the sound, and how it is smoothed. A glossary is provided in the manual that explains most of these options.
The first thing we did was set the volume level on our receiver. This is done using a level meter seen on the upper right portion of the XTZ software. Pressing the test button results in white noise through the speakers and the volume level can then be adjusted until the sound level indicates sufficient volume (and conveniently turns green). From there we were ready to measure the room.
Clicking the measure button results in a sweeping tones being played, from low to high, out of your main L/R speakers (the test tones are identical, but the connection we made was via the stereo input). The software walks you through this data collection: if you’ve opted to collect data at more than one location, it’ll tell you when it is done and to move the microphone to a different position. Once the measurements are complete, the software presents you with the calculated response of your room plus the main modes (frequencies where there is significant amplification or attenuation). The data can be viewed graphically in various ways, though the software does indicate in text form a summary of the key data. The modes can be used to program a stand-alone parametric equalizer or into a receiver/processor with parametric EQ, such as the one found in the recently reviewed Classe SSP-800.
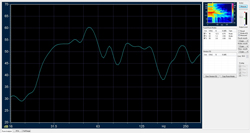
You can see from the above response curve for Tyler’s room that there is a pretty severe roll off below 30Hz for his measured positions. Part of this could be to blame on the positions of his speakers/subwoofer but it could also just be due to the location of his seating position. Take a look at the below measurement taken after Tyler moved his seating position about 18 inches further back:
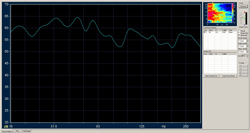
That’s a pretty significant overall improvement in bass response, and the only thing that changed was the seating position. You can easily find the best location for your seating by simply re-running the room analysis from multiple different positions until you find the best overall frequency response.
RTA: Real time analysis-
The Real Time Analysis feature does pretty much what it says it’ll do: allow you to view data collection in a real time fashion so you can monitor the effect changes you are making have on the room response. This feature is excellent in assisting you in choosing the best location for your speakers.
Collecting data with the RTA function is fairly similar to collecting data using the Room Analyzer. The only difference here is that test tones will continue to play.
We again set-up the microphone, as recommended by the instructions, at ear height in the primary listening position. This time, however, the instructions tell us to point the microphone at the speaker and set the microphone response to “fast”. The software allows you to set the scale of the real-time graph. We opted for an 80dB scale top with a 50dB scale range, which allowed for easier reading of the bars. Turning the laptop screen so that we could see it from the equipment rack, we could them move the speaker and observe the position that gave the best overall room response.
Tyler used the multi-channel analog inputs on his Integra pre-pro, which allowed him to optimize a single speaker at a time (and also bypassed all EQ/Audyssey settings). If your receiver/pre-pro lacks a dedicated multi-channel input, you are limited to individually adjusting just the front-left or front right speakers. As a work-around, you could try using the “all channel stereo” mode and disconnecting the amplifier channels you don’t want to measure but most of these multi-channel emulation modes include some sort of signal altering EQ that could skew your results. Given how prevalent HDMI ports are becoming on computers, having the software support HDMI audio for test tones would make working in multi-channel systems far easier. We would love to see XTZ support an HDMI audio signal, or at least a digital optical/digital coaxial output option that could output a truly discrete multi-channel signal to the speaker of your choice for true surround system optimization. We’d also like to see a bit more resolution in the RTA module. Currently the software uses 1/3 octave response. 1/6 of an octave would show a bit more information that could prove useful to the more advanced user.
Below is a screenshot showing the before (aqua bars) and after (green bars) RTA of a single Polk LSiM 707 tower from Tyler’s room.
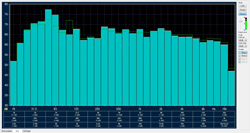
Notice that he was able to get rid of about 8dB of excess energy from 50Hz to 63Hz just by moving the speakers a bit further from the rear walls. While this did increase output around 100Hz by almost 8dB, the optimized position still offered a much more linear overall frequency response. The best part is that you can optimize a speaker’s position in less than 15 minutes once you get comfortable with the software. However, once you’ve found the ideal location use your ears to adjust speaker rake and toe-in to optimize imaging and sound stage depth. While you may think that the most even on-axis response would be best, that is not typically the case.
Full Range-
The third tool in the XTZ Room Analyzer software is the “Full Range” feature. Once you’ve got your seating position, speaker positions, and any acoustic treatments installed, the Full Range module can be used for a higher resolution analysis of the full-range response of your mains (or mains+subwoofer if you’d prefer). The Full Range mode is actually quite similar to the Room Analyzer, but has higher resolution and far more options and data variables to play with.
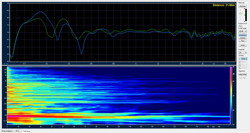
Below is a screen shot of the full range analysis of Tyler’s left front Polk LSiM 707 tower in its original position (blue trace) compared to its optimized position (green trace). While there are still significant peaks from 25-60Hz and 100Hz, the new position eliminated a large suck-out around 200Hz. Peaks can be easily addressed by room EQ systems (like Audyssey) while nodes/suck outs of this magnitude cannot usually be corrected due to the excessive amount of amplifier power needed to overcome the “null” in the room. As such, the “after” position here is far easier to live with and has the added benefit of a slightly smoother mid-range as well.
One technology we’ve referred to several times in this article is Audyssey. As Tyler pointed out above, EQ systems are capable of addressing some of the problems that our rooms create. Audyssey is just one of several EQ systems that are almost ubiquitous today, even low priced A/V receivers (others include Yamaha’s YPAO, Pioneer’s MCACC and Anthem’s ARC). All of these systems strive to do basically the same thing, though the algorithms, approaches and flexibility are slightly different. While these systems do have their critics, the benefit of something like the XTZ Room Analyzer is that it’ll allow a user to gain some insights into exactly what the systems are doing to your signal.
The Integra 80.2 I use in my system makes use of Audyssey’s most advanced room EQ system: Audyssey MultiEQ XT32. Audyssey MultiEQ XT32 builds off of the popular Audyssey MultiEQ XT system by adding additional correction points allowing for higher resolution room correction, especially in lower frequencies. In addition, Audyssey MultiEQ XT32 facilitates easier integration of dual-subwoofers. I’ve written in the past about the advantages two subwoofers can have for the bass response in your system (https://hometheaterhifi.com/features/custom-home-theaters/home-theater-build-chapter-4-whats-next-and-where-are-we-going/page-3-multiple-subwoofers.html). Audyssey MultiEQXT32 not only adds increased EQ resolution for the subwoofer channel (the two subs are EQ’d together), but also allows levels and delays to be set for two subs individually, further enhancing the ability to make bass sound its best in your room. (Note: the SVS AS-EQ1 and Audyssey SubEQ pieces that I refer to in the above link are no longer sold: all of the features found in those units, like independent levels for two subs and increased sub filter resolution, are fully integrated into Audyssey MultiEQ XT32.)
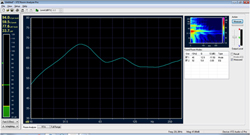
As I said above, the XTZ Room Analyzer can give you some insights into how RoomEQ is affecting your acoustics. The bass response in my room is natively pretty good given my dual JL Audio F113’s. Here is a look at the response in my room without any room correction (for simplicity purposes, we’ll show these data using the Room Analyzer feature).
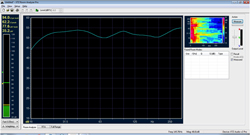
With Audyssey engaged, you can see how much flatter the bass response gets, alleviating the large peak clearly visible without Audyssey in use.
As a side note, I also use Audyssey’s Professional Kit to set up the Audyssey in my system. I’ve talked about the advantages of this kit previously (https://hometheaterhifi.com/features/custom-home-theaters/home-theater-build-project-part-3-2011/page-6-acoustics.html). The Audyssey Pro Kit, along with the XTZ Room Analyzer, will give a home user a full complement of tools for you to give your best shot at improving the sound in your room.
Other Features-
The Room Analyzer has several additional features that can allow you to conduct various tasks. As mentioned above, the software does contain an SPL meter function that can be used for setting speaker levels. There is also a function generator that can produce various test sounds (pink/white noise) that can be helpful for multiple purposes (like finding room vibrations). In addition, data is easily obtainable for doing things like setting speaker distances and speaker cross-overs.
Conclusions about the XTZ Room Analyzer II Pro
If you have more than a passing interest into acoustics, the XTZ Room Analyzer is a terrific gateway drug to get started learning: it including everything you need to get underway easily and is powerful enough to keep you busy for hours exploring the effect acoustics and proper set-up can have in achieving the most out of your equipment and your room. While one could put together all of these components individually, and use free software such as RoomEQ Wizard, having a complete, ready to go package represents an easy and cost effective way to get up and running quickly. Both Tyler and I have concerns about the documentation, which is sparse at best, and confusing at worst (creating a separate manual for the basic and pro versions would be a terrific first step in making things easier to understand). While the process of working your way through the software is one way to learn, a less frustrating one may come from a better manual, or the implementation of wizards to effectively guide you through the process. We’d also love to see some sort of digital audio option that would ease use in multi-channel systems significantly. Finally, while we were told that the included microphone is accurate to within +/-1 dB across the entire frequency band with a generic calibration file, we would like a see a fully calibrated microphone included for this price. These, however, are minor quibbles – for those interested in moving beyond auto-calibration and learning about acoustics, the XTZ Room Analyzer is a great way to start!


