Emotiva XMC-1 Processor Review Highlights
Emotiva has earned a reputation for delivering great quality products at a substantial value to their customers. Emotiva has come a long way with their processor line, and this review covers the Emotiva XMC-1 Gen 2 which is a 7.2 channel preamplifier/processor (SSP). The XMC-1 build quality is exemplary for its price point. Secrets of Home Theater and High Fidelity has published a series of articles on build quality and how component choices contribute to high-performance design.
Emotiva is a great example of a company that takes design engineering and component choice very seriously. The XMC-1 may not have every feature on the market, but it delivers on a price and performance goal that is remarkable in this industry.
Emotiva XMC-1 Processor Highlights Summary
- The sound quality is excellent for both music and movies.
- The XMC-1 includes Dirac Live LE for Emotiva room correction. An upgrade to Direct Full for Emotiva is available for $99 which offers features like custom correction curves and adjustment range “curtains”.
- Emotiva has focused on a premium design at an affordable price.
- The XMC-1 performed very well on the bench with very low distortion measurements.
- Speaker levels may need manual adjustment after Dirac correction filters are loaded into the XMC-1.
- Designed and built in the USA, in Franklin, Tennessee.
Introduction to the Emotiva XMC-1 Processor Review
Emotiva is perhaps best known for their high power, affordable amplifiers like the Emotiva XPA-1 Gen 2 Monoblocks. Emotiva has also strived to deliver high-performance processors at an affordable price. Emotiva learned a great deal from the challenges on their earlier designs, which brings us to the subject of this review – the XMC-1 Gen 2. The XMC-1 is a 7.2 channel preamp/processor which includes Dirac Live LE for Emotiva room correction. Their goal was to create a product that delivers premium sounds quality at an affordable price. Let’s take a closer look at the XMC-1 Gen 2 and see just how Emotiva went about it.
EMOTIVA XMC-1 PROCESSOR REVIEW SPECIFICATIONS
Processing:
- Design: 7.2 channel Preamp/Processor (Pre-Pro; SSP)
- DACs: Texas Instruments (Burr-Brown) DSD1796 24-Bit/192kHz
- ADC: Texas Instruments (Burr-Brown) PCM4202
- DSP: Two Texas Instruments DA710 32-bit, 300 MHz processors
- 2-Zone Operation
- Dolby® and DTS® Surround Sound Processing
Connections:
- HDMI 1.4b Audio/Video Switching: 8 In (includes 1 front-panel input), 2 Out
- Digital Audio Inputs: 3 Optical, 3 Coaxial, and 1 AES/EBU (XLR)
- Analog Audio Inputs: 3 Stereo RCA, 1 Stereo XLR, 1 Stereo 3.5 mm (front), 7.1 Multi-channel (1 set)
- 7.2 Channel Pre-outs (RCA and XLR)
- Rear-panel USB Type B Port for Audio Playback
- Ethernet Port for Wired Network Connection
- Remote IR (1 in, 1 out), and 12 Volt-triggers (4 out)
- 3.5 mm (1/8″) Headphone Output
General Features:
- 4K and 3D Video Pass-through
- AM/FM Tuner
- Remote Control
- Dimensions: 5-3/4″ H x 17″ W x 15-1/2″ D
- Weight: 21 Pounds
- MSRP: $2,499 USD
- Emotiva
- SECRETS Tags: Emotiva, Emotiva XMC-1, Surround Sound Processors, SSP, Preamplifier
The Design of the Emotiva XMC-1 Processor
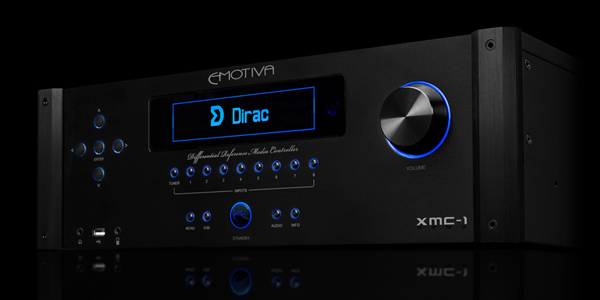
This is the first generation of the XMC-1 (the Gen 2 on the faceplate refers to the Gen 2X-series styling), and the two-tone black and silver styling of the first generation units are replaced by all black controls and black aluminum trim pieces. The front panel is made from brushed aluminum, and unlike the first generation units, the XMC-1 Gen 2 has a beautiful custom-designed 5.5” OLED display. The display is blue and supports a resolution of 256×64. Under the display are nine input buttons, one of which is assigned to the built-in tuner, while the other eight are user-assignable. To the left of the display is a standard set of cursor buttons that allow for easy navigation of the XMC-1 setup menus. In the lower left is a 3.5 mm (1/8”) headphone jack, a USB input for firmware updates, and a 3.5 mm analog stereo jack, which can be used to connect an iPod or portable music player. The large button with the Emotiva logo directly below the display is the standby power button. All the controls on the XMC-1 are highlighted in blue, which makes for a very bright but striking product in a darkened room. The brightness of the front panel can be adjusted or turned off if desired.
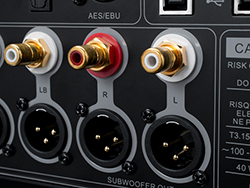
Moving on to the rear panel of the XMC-1, the first thing that jumps out is the complete absence of any analog video jacks. The XMC-1 supports eight HDMI 1.4b video inputs and two HDMI outputs that operate in parallel. Other than its ability to produce an on-screen menu, the XMC-1 does not offer any video processing capabilities. The inputs are simply passed through to the HDMI outputs. The XMC-1 still includes a 7.1 multi-channel input, as well as three stereo RCA inputs on the rear panel. It also includes a conventional record loop which makes use of a pair of RCA jacks. The XMC-1 supports seven digital audio inputs (3 coaxial, 3 optical and 1 balanced AES/EBU XLR) and includes two USB inputs on the rear panel. The USB Type A connector is used for firmware updates, and the USB Type B connector is used as a DAC input supporting up to 24-bit/192 kHz. You will also find an Ethernet connector on the rear panel that is used for the included Dirac Live LE for Emotiva room correction system and for remote control applications.
The pre-amp output jacks on the XMC-1 support a full complement of seven speakers and two independent stereo subwoofers. The RCA jacks on the pre-amp outputs, as well as the RCA jacks on the first stereo input, are premium quality gold-plated connectors.
The remaining connections on the XMC-1 back panel include antenna connections for the AM/FM tuner, and one IR input and one IR output jack. Four 12-Volt DC Triggers are also included, which allow you to turn on another device, such as an external amplifier for multi-zone operations. A nice touch is a separate power switch and a fuse panel on the power supply.
The XMC-1 comes with a custom-made aluminum remote.
From a feature perspective, the XMC-1 supports all the high-resolution audio codecs like Dolby TrueHD and DTS-HD Master Audio just as you’d find in any receiver or processor currently on the market. The XMC-1 is focused on audio quality, so you won’t find mass-market features such as multimedia applications for things like Pandora, internet radio, or accessing home media servers. Unlike some high-end processors on the market (e.g. the Bryston SP3) that offer no room correction, the XMC-1 includes three options for room correction. The first is the built-in support for Dirac Live LE for Emotiva which is a special version of Dirac Live Room Correction optimized exclusively for the XMC-1.
The second option is to upgrade to the Dirac Live Full for Emotiva software which includes features like custom target curves and offers the ability to control the adjusted frequency range or “curtains”. The upgrade costs an additional $99 for the license which is non-transferable. The third option is to use the built-in parametric EQ. The XMC-1 supports two sets of speaker presets, each of which has 11 bands of independent parametric EQ. The EQ values can be entered manually or they can be imported from the software room-calibration tool Room Equalization Wizard (REW), which can be found on the web.
From a technology perspective, the XMC-1 functions more like a very specialized computer than a traditional A/V processor. The heart of the XMC-1 is a Texas Instruments AM-1808 Sitara ARM9 32-bit 375 MHz processor which runs a custom Linux operating system that controls all the other audio and video boards in the XMC-1. Emotiva says this design gives them the ability to evolve functionality and swap-out hardware modules as required without a complete redesign of the product architecture.
On the audio side of things, the XMC-1 uses Texas Instruments (Burr-Brown) PCM 4202 for 24-bit analog-to-digital conversion and Texas Instruments (Burr-Brown) DSD1796 for 24-bit/192 kHz digital-to-analog conversion. As we’ve seen in other products like the Bryston SP3, the Emotiva makes use of technology from Momentum Data Systems to help manage the ever-changing HDMI and audio-format landscape. On the XMC-1, the audio DSP section is handled by a Momentum Data Systems DAE-7D DSP-based OEM-audio module. The MDS DAE-7D uses two Texas Instruments DA 710 DSP chips to perform Dolby and DTS audio decoding, bass management, and surround sound synthesis for Dolby Prologic IIx and DTS ES Matrix. The MDS DAE-7D uses an ASRC (Asynchronous Sample Rate Converter) chip between the two DSPs for jitter reduction. The output from the DAE-7D is then passed to dual Cirrus Logic CS3318 lossless resistor ladder volume controls.
The Left and Right main channels are fully balanced with no balanced-to-singled-ended conversion taking place. This is a great feature of the XMC-1 and it was very expensive to include. This allows balanced two channel audiophile listening. It is also worth noting that this is a pure analog path with no AD/DA conversion, unlike many other products. In fact, the 7.1 inputs are pure analog, which is great for multi-channel SACD listening.
On the video side of things, the XMC-1 uses two Analog Devices ADV7625 video transceivers to manage the HDMI interface with two independent HDMI V1.4b inputs and eight outputs. The ADV7625 chips support 3GHz video formats, including 4K resolution of 3840×2160 at 24/25/30/60 Hz. The ADV7625 supports the XMC-1 on-screen display as well as audio return channel (ARC), CEC, and 3D.
Setup of the Emotiva XMC-1 Processor
Emotiva takes great pride in their products, and it showed from the moment I opened the box. The first thing I found was a letter printed on high-quality stationery welcoming me to the “most exclusive group of audiophiles in the world – audio-conscious, uncompromising home theater aficionados.” The letter offers some additional background on the XMC-1 and on Emotiva as a company, and it provides some info on getting started. It also bears the printed signatures of the team that created the XMC-1. The letter is a very nice touch and helps to set expectations about the product. The XMC-1 itself was well packed and felt substantial taking it out of the box.
I was pleasantly surprised to find a comprehensive owner’s manual on the XMC-1 in the box along with another manual on using the Dirac Room Correction system. The owner’s manual is almost 100 pages long and is very well written. It starts with an overview of XMC-1 operations and then covers the menu system, connection options and troubleshooting. For anyone wanting to learn about the XMC-1 or if you bought the product, do yourself a favor and read the manual. It provides a wealth of information; I wish other manufacturers would include such useful documentation in the box.
Since my main speakers have powered subwoofers, I connected the XMC-1 in a 7.2 speaker configuration running a subwoofer cable to the LFE input on each speaker. Using HDMI, I connected my television, satellite DVR, OPPO BDP-105, and an Apple TV. I turned on the power, pressed the front Standby power-button, and watched as the beautiful OLED display illuminated with an Emotiva logo. Directly below the logo was a progress bar.
The boot time for the XMC-1 operating system is about 43 seconds and the progress bar definitely helps if you’re impatient. At the end of the boot sequence, the XMC-1 displays the Emotiva brand message of “Rethink High-End”.
The long boot time can be adjusted by enabling the “Video on Standby” feature. This feature keeps the XMC-1 operating system loaded when the Standby button is pressed (when the XMC-1 is on). Bringing the XMC-1 out of Standby takes less than four seconds with this feature enabled. As its name implies, the “Video on Standby” feature passes all audio and video directly to the television without any processing. This allows for watching the TV without engaging the sound system. I ended up leaving the XMC-1 in this mode for convenience and to eliminate an annoying popping sound that I occasionally experienced when using the default startup procedure. Lonnie Vaughn, VP and CTO for Emotiva, explained to me that the popping sound was most likely caused by a slight DC offset from my amplifier. When the unit is off and in its lowest power standby, the relays completely drop out the audio output lines. Once the XMC-1 boots, the relays engage, and if there is any DC offset from a downstream device, you might get a pop in the speakers while the input of the downstream device stabilizes.
The menu system on the XMC-1 is very well organized, comprehensive, and really easy to use once you spend some time getting the hang of it. Menu navigation is done using the normal arrow buttons on the remote or front panel, while option selections are made using the up and down arrows. When a new selection is highlighted, simply pressing the left arrow button automatically saves the selection and lets you continue navigating the menus and menu options. There are no “save” buttons to worry about or ambiguity about what was selected. For example, when renaming an input, there is no virtual keyboard. Instead, the letters, numbers and character options for each space in the input name are presented in a vertical menu. Simply scroll up and down the list to select the desired letter and then move on to the next letter of the input name. When finished, just move to the left using the arrow button, and the name is saved automatically. This simple and intuitive approach makes changing options on the XMC-1 really fast.
The menu system of the XMC-1 is also displayed on your television or monitor, but the size is scaled proportionally based on the output resolution. This means the menu is pretty small when overlaid on 1080p output. This can be a bit hard to read when making lots of changes depending on how far you are sitting from the television. I found that changing to a source resolution of 720p made the menus much more comfortable to view during initial product setup. There is an option to stretch the menus to make them larger, but the option makes the menu text look strange.
The XMC-1 does not automatically configure speaker size, distance or level, so the first thing I focused on was configuring the first speaker preset to match my speaker configuration. With that out of the way, I wanted to dive into Dirac Live LE for Emotiva. Emotiva provides detailed documentation on Dirac with the XMC-1, so the following is a brief overview of the Dirac process for those unfamiliar with the Dirac software.
Before getting started with Dirac, it’s crucial to configure the Dirac Speaker preset on the XMC-1 to match the speaker configuration in the room. Dirac does not identify which channels are present and will not generate any correction filters for speakers set to “None” in the Dirac Speaker preset. Along with the review unit, Emotiva sent me a laptop that was already configured with the Dirac Live LE for Emotiva software. I connected the XMC-1 to my home network and connected the laptop wirelessly. I also made sure that the laptop could successfully access the Internet. Internet access is important because the Dirac Live LE for Emotiva software needs to contact Dirac Servers both for license validation and for computational support during the measurement process. If you don’t have a good Wi-Fi connection, then Emotiva recommends connecting the laptop directly to your network router.
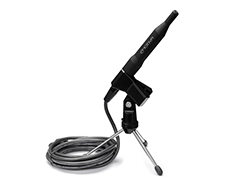
The XMC-1 ships with a calibrated microphone and a special cable that has a USB microphone preamp and digitizer on one end and an XLR connector on the other. Simply connect the XLR connector to the microphone and connect the USB jack to your computer. Emotiva ships the XMC-1 with a small tabletop microphone stand, but I found it best to use a boom microphone stand to properly place the microphone during the measurement process.
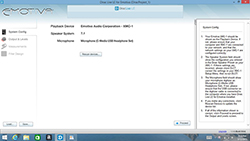
Once everything was connected, I started the Dirac Live LE for Emotiva software. The program starts by displaying the system configuration which includes the XMC-1, the microphone and the speaker configuration read from the XMC-1 Dirac Speaker preset. If a device is missing, the program allows for a simple rescan. One of the nicest features of the Dirac interface is a clearly visible help screen that is available throughout the process.
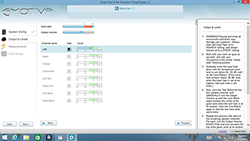
The next step in the process is to adjust the input gain of the microphone and the output volume of the test tones so that room background noise is below -24 dB and output volume is approximately -12 dB for each channel. The process involves playing a test tone for each channel and adjusting the output and input gains to keep all the test signal levels in the center of the green bars. It sounds much harder than it really was to do and only took a couple of minutes to complete.
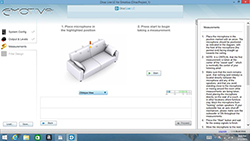
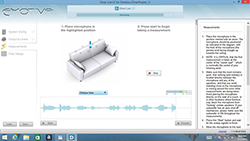
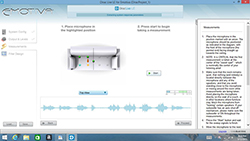
The next step is to place the microphone in the center of the “sweet spot” for the listening room. The Dirac interface highlights where the microphone needs to be placed for each of the nine sets of recommended measurements.
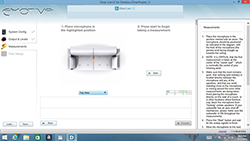
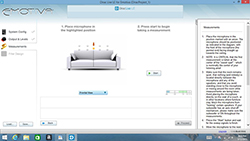
You will notice the dropdown box with a value of “Oblique View”. The other values are “Top View” and “Frontal View”. Changing the view provides some essential perspective on how the various microphone measurement positions are placed relative to each other. It is very helpful to change the view throughout the measurement process so that the microphone can be placed correctly.
Once the microphone is in position, the measurement process can begin. The Dirac Live LE for Emotiva interface displays the output level and measures response for each speaker as measured from the current position.
As each position is measured, the software works on processing the measurements and indicates where to move the microphone next. In the interface, measurement positions in green are complete, blue are measured but being processed, and yellow indicates the next position to be measured.
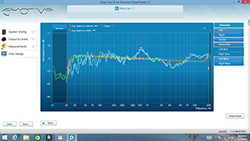
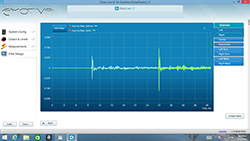
Once the measurement process is finished, it’s time to review the measurements in the Dirac Live LE interface and create the correction filters. Dirac has the ability to correct for both frequency response and compensate for errors in time response. The Dirac Live LE for Emotiva software provides graphs for each measured channel, highlighting the response and impulse timing before and after correction. The final step is to load the filters into the XMC-1. The whole process takes about 30 minutes depending on how quickly you can maneuver the microphone into position.
Emotiva offers the option to upgrade to the Dirac Live Full for Emotiva software at an additional cost of $99. The benefits of upgrading include the ability to create your own correction curve and adjust the correction limits or “curtains” for each speaker. The Dirac Live Full for Emotiva software also allows for the use of other third-party calibrated microphones and the use of custom microphone calibration files.
The Emotiva XMC-1 Processor In Use
For my listening tests, I was using a McIntosh MC8207 amplifier and a seven-speaker configuration from Definitive Technology, including a pair of BP-3000TL speakers with powered subwoofers for the front mains, a CLR 2002 speaker for the center channel, and four Definitive Technology UIW 94/A speakers for the surrounds and rear channels. I used an OPPO BDP-105 as my primary source device. I was looking forward to hearing how Dirac Live LE for Emotiva performed on the XMC-1.
I had done some initial listening tests with the XMC-1 without any room correction. I was really impressed with how great the XMC-1 sounded with some of my usual reference material from Norah Jones, Alison Krauss, and Ray Charles. The XMC-1 soundstage was richly detailed with well-placed instruments, and individual nuances in the soundtracks could be picked out with ease. Vocals sounded natural and had great detail and soul. This was a terrific sound and I often had to remind myself about the price point of the processor that I was listening too.
I turned my attention to Dirac Live LE for Emotiva and started again listening to music. The first thing that jumped out at me was just how loud everything was. With the Dirac Speaker Preset enabled, the XMC-1 was playing at approximately 10 dB higher than the Speaker Preset 1 configuration (without Dirac) at the same position on the volume control. This was simple enough to correct just by adjusting the volume. I still liked the sound, but honestly I thought it made my speakers sound a bit bright. I attributed this to the fact that I am used to the sound of Anthem’s Room Correction (ARC) in my room, and I normally only correct up to about 2 kHz in my room. In the case of the default room correction curve, Dirac Live LE for Emotiva was boosting the higher frequencies and I wasn’t crazy about it. It was also reducing some of the natural room gain, again thanks to the default curve. Both of these issues could be addressed with the Dirac Live Full for Emotiva, but that software was not available on the review system.
When it came to movies, I started out listening to some of my favorite scenes from Tron: Legacy and the James Bond Thriller Sky Fall. With the Dirac Speaker Preset enabled, I noticed that the bass response was not to my liking, and I felt that the vocals were a bit hard to hear. I ran another set of Dirac measurements, and this time I removed the subwoofers from the system and just told the XMC-1 that I had full-range speakers since my towers have built-in subs. The result was dramatically improved bass response, at least in my configuration. However, I was still not happy with the center channel vocals. I had to increase the volume to make the center channel sound correct, but then the front channel speakers were too loud.
I ran a speaker test tone through the system and quickly discovered that the channels were out of balance. The center channel was approximately 3 dB too low. I made a level adjustment in the Dirac Speaker Preset and the problem was solved. Lonnie Vaughn from Emotiva tells me that by default, the Dirac Speaker levels are set at 0 dB for all channels after Dirac measurements are loaded into the XMC-1. This is so that the levels can be adjusted as needed by the user. I question how user friendly this is for the typical user, and wish that Dirac would provide some information as to how it adjusts the channel levels in the first place. This piece of information is standard practice for systems using Audyssey and Anthem Room Correction.

Without having the full version of Dirac, I ultimately chose to not use the Dirac corrections at all and just listen to my room using the Speaker Preset 1 settings that I had already dialed-in. The result was simply delightful. Whether I listened to vocal, rock, pop, jazz or classical, the XMC-1 delivered beautiful, engaging music that made me want to listen more. For movies, I chose The Hunger Games: Mockingjay Part 1. The attack on the District 13 bunker filled the room with the sound of falling water and the rumble of bombs falling from above. The attack on the hydro-electric dam layered against the haunting lyrics and chorus in James Newton Howard’s “The Hanging Tree” was impressive.
I also loved Lorde’s amazing vocals and the bass track on the “Yellow Flicker Beat” track as the credits rolled. While Ridley Scott’s Exodus: Gods & Kings might not be quite the story of Moses as I remember it, the XMC-1 delivered an amazing performance, filling my listening room with the sound of swarming locusts and the thunder of chariots. The dramatic score sounded impressive on the XMC-1 and the sound of the sea crashing on the rocks followed by the sound of the seagulls, the wind, and the army fading into the depths of the water was simply immersive. The XMC-1 had no trouble delivering impressive sound for today’s blockbuster movies.
From an operational perspective, I was very pleased with how well the Emotiva XMC-1 handled all of my HDMI sources. I loved the OLED display but found it impossible to read from across the room since there was so much small text packed onto the screen. I had no handshake issues or audio dropouts with my satellite receiver, and even devices like my first-generation Apple TV worked well over HDMI. I ran into an occasional problem where the XMC-1 would play in multi-channel format versus stereo despite my settings, but I could not duplicate the issue reliably and found it to not be a problem in regular use. The remote is definitely very custom, very heavy, and has no backlight.
The Emotiva XMC-1 Processor On The Bench
My standard benchmark tests were done using Reference Stereo mode so that all digital signal processing was off. On tests using the XLR input, I measured the XLR preamp output of the XMC-1. On tests using an RCA input, I measured the RCA preamp output of the XMC-1. The source device for both analog and HDMI tests was an Oppo BDP-105.
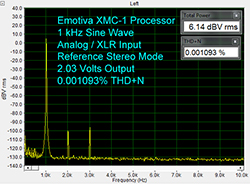
At 1 kHz into the XLR input, THD+N was 0.001093%. We see two harmonics in the spectrum with the second harmonic at 2 kHz being about 100 dB below 2 VRMS.
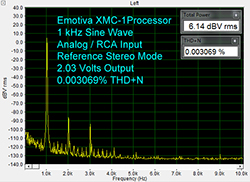
At 1 kHz into the RCA input, THD+N was 0.003069%. We see two harmonics in the spectrum with the second harmonic at 2 kHz being about 86 dB below 2 VRMS. The major difference between this and the previous graph is related to the voltage difference. For a power amplifier with the typical minimum gain of 20 (26dB), a 2 VRMS RCA input is required to produce 200 Watts out into 8 ohms. With 2 VRMS balanced as shown in the previous graph, you only have 1 VRMS single ended. In this test, we have 2.03 VRMS single ended with a slight increase in distortion.
For the XLR tests at 2 VRMS, a power amp with a gain 20V/V will have a power output of only 50Watts which is why we also supply 5 VRMS tests which will take the power amp to 300Watts.
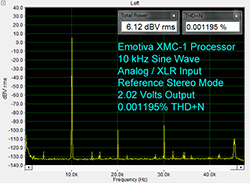
At 10 kHz into the XLR input, THD+N was 0.001195%. The second harmonic at 20 kHz is about 100 dB below 2 VRMS. The third harmonic at 30 kHz is about 94 dB below 2 VRMS.
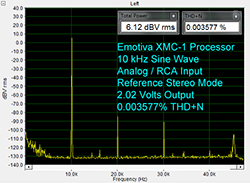
At 10 kHz into the RCA input, THD+N was 0.003577%. Compared to the previous test, we see an increase in distortion due to the higher 2.02 VRMS single ended. The second harmonic at 20 kHz is about 84 dB below 2 VRMS. The third harmonic at 30 kHz is about 90 dB below 2 VRMS.
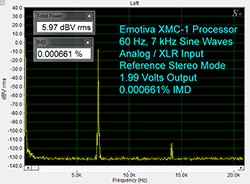
The IMD measurement using the XLR input was 0.000661%. We see no noise spurs on either side of the fundamentals which is excellent and a second harmonic at 14 kHz at 114 dB below 2 VRMS.
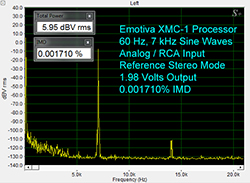
The IMD measurement using the RCA input was 0.001710%. The difference compared to the previous graph is due to the higher internal voltage of 1.98 VRMS single ended.
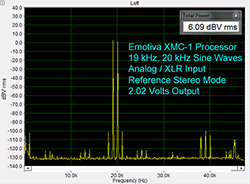
Here are the results for 19 kHz, 20 kHz combined test frequencies using the XLR input. There is a visible B-A peak at 1 kHz about 102 dB below 2 VRMS. We see several distortion spurs but the spectrum is well behaved. The second harmonics at 38 kHz and 40 kHz are about 105 dB below 2 VRMS (6 dBV).
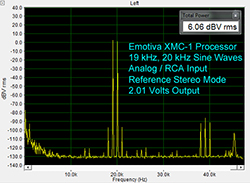
Here are the results for 19 kHz, 20 kHz combined test frequencies using the RCA input. There is a visible B-A peak at 1 kHz about 92 dB below 2 VRMS. We see several distortion spurs throughout the spectrum. The second harmonics at 38 kHz and 40 kHz are about 91 dB below 2 VRMS.
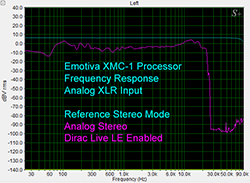
I measured the frequency response of the XMC-1 out to 96 kHz. Using Reference Stereo mode with the balanced analog input, the response is flat out to about 50 kHz and then we see a very gradual 5 dB roll-off of the high frequencies. The second plot shows what happens in stereo mode with digital signal processing and Direct Live LE for Emotiva enabled. The XMC-1 downsamples the signal to 48 kHz and applies any room correction filters for each channel. You can clearly see the inverse of the room correction curve in the plot. The signal then abruptly falls off around 24 kHz. This result isn’t surprising since we’ve seen this same downsampling with AudysseyXT32 implementations.
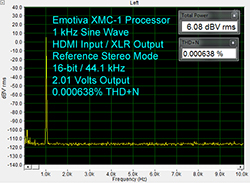
Now we take a look at the results using one of the HDMI inputs, fed from test discs played on an OPPO-BDP-105. At 1 kHz, and 16-bit/44.1k sampling rate, THD+N was 0.000638% measured from the XLR preamp output. We see some spurs in the low end of the spectrum but there are no visible harmonics or FM modulation which is excellent. For all digital tests, the DAC was driven at -5 dBFS and the volume adjusted for 2 VRMS at the output. The excellent performance on the HDMI tests is due to the ASRC (Asynchronous Sample Rate Converter) on the MDS DAE-7D board.
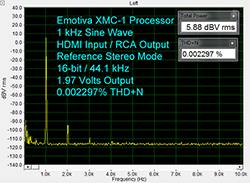
At 1 kHz, and 16-bit/44.1k sampling rate, THD+N was 0.002297% measured from the RCA preamp output, which is slightly higher than the previous test. We see some distortion spurs as well as harmonics in the spectrum with the peak at 2 kHz being about 94 dB below 2 VRMS and the peak at 3 kHz being about 108 dB below 2 VRMS which is insignificant. As with the analog direct tests, the volume was increased 6 dB to bring the single ended output to 2VRMS with the same -5 dBFS digital input to the DAC.
The remaining tests are for XLR only.
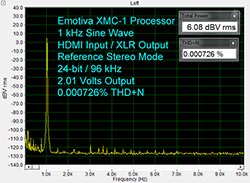
At 1 kHz, and 24-bit/96k sampling rate, THD+N was an impressive 0.000726%. We see some distortion spurs in the low end of the spectrum but otherwise this is an excellent result.
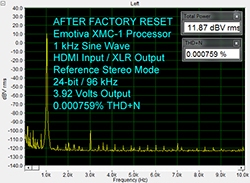
At 1 kHz, and 24-bit/96k sampling rate, THD+N was 0.000759% at 3.92 VRMS. We see some distortion spurs as well as harmonics throughout the spectrum with the third harmonic at 3 kHz being about 102 dB below 4 VRMS. We normally show this test at 5 VRMS, but the 3.92 VRMS output is the measured limit with a -5 dBFS signal with the volume control maxed at 11.0 dB. Emotiva confirmed that this is a known issue with the Texas Instruments DA710 DSP. We could achieve a higher output value by using a 0 dBFS signal, but Emotiva confirmed that the XMC-1 peaks out at 7V output when used in Reference Stereo Mode. The XMC-1 produces 10V output when using the analog inputs.
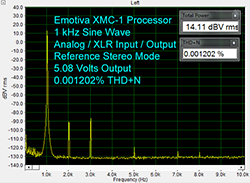
Here’s a look at the same test using the analog XLR input. At 1 kHz into the XLR input, THD+N was 0.001202% at 5.08 VRMS. We see two harmonics in the spectrum with the second harmonic at 2 kHz being about 90 dB below 5 VRMS and the third harmonic at 3 kHz being about 86 dB below 5 VRMS.
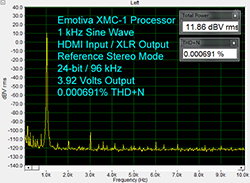
At 1 kHz, and 24-bit/96k sampling rate, THD+N was 0.000691%. The spectrum shows one harmonic at 3kHz and only some distortion spurs in the low end of the spectrum.
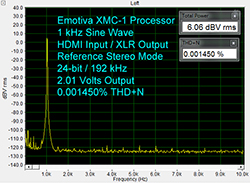
At 1 kHz, and 24-bit/192k sampling rate, THD+N was 0.001450%. The spectrum shows no harmonics and only some distortion spurs in the low end of the spectrum. This is another excellent result.
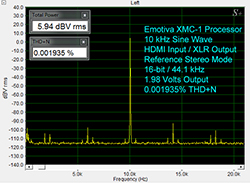
At 10 kHz, and 16-bit/44.1k sampling rate, THD+N was 0.001935%. We see a few distortion spurs in the spectrum.
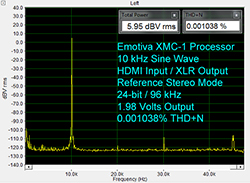
At 10 kHz, and 24-bit/96k sampling rate, THD+N was 0.001038%. We see a well behaved spectrum with the second harmonic at 20 kHz being almost non-existent about 118 dB below 2 VRMS. The third harmonic at 30 kHz is about 108 dB below 2 VRMS. This is excellent performance.
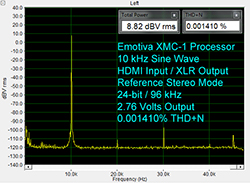
At 10 kHz, and 24-bit/96k sampling rate, THD+N was 0.001410% at 2.76 VRMS. The spectrum looks identical to the previous test. We normally show this test at 5 VRMS, but the 2.76 VRMS output is the measured limit with the volume control maxed at 11.0 dB.
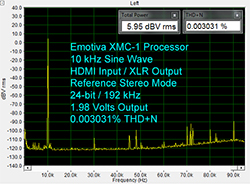
At 10 kHz, and 24-bit/192k sampling rate, THD+N was 0.003031%. We see a few distortion spurs in the spectrum with the third harmonic at 30 kHz being about 108 dB below 2 VRMS.
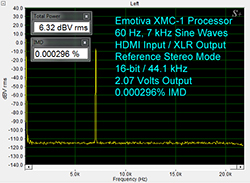
The IMD measurement through HDMI at 16-bit/44.1k sampling was 0.000296%.
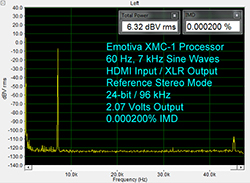
The IMD measurement at 24-bit/96k sampling rate was 0.000200%. We see a very clean spectrum with no distortion spurs.
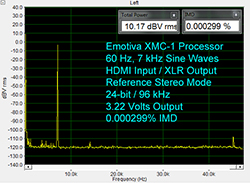
The IMD measurement at 24-bit/96k sampling rate was 0.002144% at 3.22 VRMS. We see similar results with the second harmonic at 14 kHz being visible at about 113 db below the 60 Hz tone at 3.22 VRMS. We normally show this test at 5 VRMS, but the 3.22 VRMS output is the measured limit with the volume control maxed at 11.0 dB.
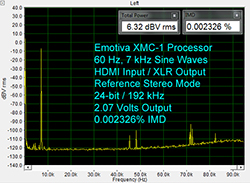
The IMD measurement at 24-bit/192k sampling rate was 0.002326%.
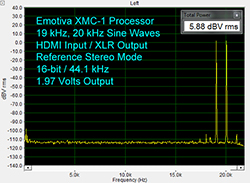
Here are the results for the 19 kHz, 20 kHz combined test frequencies using the HDMI input with 16-bit/44.1k sampling. There is no visible B-A peak at 1 kHz which is excellent.
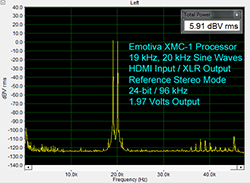
Here are the results for the 19 kHz, 20 kHz combined test frequencies using the HDMI input with 24-bit/96k sampling. We see some distortion spurs throughout the spectrum. There is a barely visible B-A peak at 1 kHz about 118 dB below each test tone at 1 VRMS which is insignificant. The second harmonics at 38 kHz and 40 kHz are about 110 dB and 114 dB respectively below 1 VRMS.
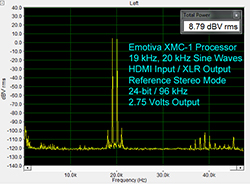
Here are the results for the 19 kHz, 20 kHz combined test frequencies using the HDMI input with 24-bit/96k sampling at 2.75 VRMS. We see slightly higher distortion spurs throughout the spectrum and two side spurs on either side of the fundamentals. There is a barely visible B-A peak at 1 kHz about 114 dB below each test tone at 1 VRMS which is insignificant. The second harmonics at 38 kHz and 40 kHz are about 108 dB and 106 dB respectively below 1 VRMS. We normally show this test at 5 VRMS, but the 2.75 VRMS output is the measured limit with the volume control maxed at 11.0 dB.
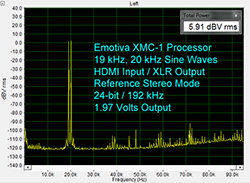
For the 19 kHz, 20 kHz combined test frequencies using the HDMI input with 24-bit/192k sampling, as in the previous test, there are distortion spurs throughout the spectrum.
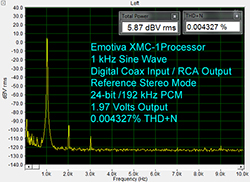
Below are the results for 1 kHz, at 24-bit/192 kHz sampling rate, measured from the coax digital input to the RCA output. The measured THD+N% was 0.004327%. The second harmonic is about 95 dB below 2 VRMS.
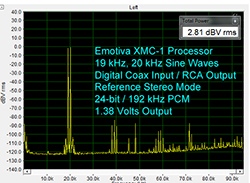
Here are the spectra for the 19 kHz, 20 kHz combined test frequencies using the coax digital input with 24-bit/192k sampling measured from the RCA output. Note that this test would normally be shown at 2 VRMS, but the 1.38 VRMS output is the measured limit with the volume control maxed at 11.0 dB.
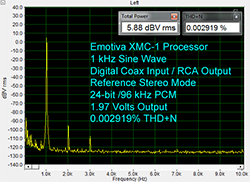
For 1 kHz, at 24-bit/96 kHz sampling rate, measured from the coax digital input to the RCA output, the measured THD+N% was 0.002919%. The second harmonic is about 97 dB below 0 dBFS.
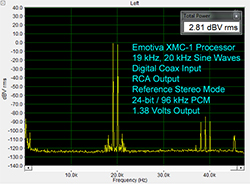
Here are the results for the 19 kHz, 20 kHz combined test frequencies using the coax digital input with 24-bit/96k sampling to the RCA output. We see slightly higher distortion spurs throughout the spectrum and two side spurs at 105 dB below each test tone at 1 VRMS on either side of the fundamentals. There is a small visible B-A peak at 1 kHz about 102 dB below each test tone at 1 VRMS which is insignificant. The second harmonics at 38 kHz and 40 kHz are about 90 dB below each test tone at 1 VRMS. We normally show this test at 2 VRMS, but the 1.38 VRMS output is the measured limit with the volume control maxed at 11.0 dB.
Conclusions about the Emotiva XMC-1 Processor
I had the XMC-1 in my system for several weeks and overall I was extremely pleased with it. The audio quality that Emotiva has managed to put into the XMC-1 at its price point is simply fantastic, and this is shown in the bench tests. The XMC-1 is amazingly configurable while being easy to understand. The inclusion of Dirac Live LE for Emotiva is a plus, but it does have some limitations that require the purchase of the Dirac Full LE for Emotiva version. I was disappointed that the speaker levels did not come out perfectly balanced after running the Dirac calibration. As it stands today, Anthem’s implementation of Anthem Room Correction on the MRX series may produce a better result for the average user than using the default curve in the Dirac Live LE for Emotiva software.
If there is any limitation to the XMC-1 at this point, it is that it does not support the new multi-channel height formats such as Dolby Atmos. I have no doubt that Emotiva is working on a product that will support Dolby Atmos, but in the meantime the XMC-1 should be on your short list if you are in the market for a 7.1 channel processor. There are certainly products like the Bryston SP3, the Anthem D2v 3D, or the Classé SSP-800 that command much higher prices and are excellent products, but the XMC-1 is a no brainer when it comes to value for the dollar in the processor market. I wouldn’t buy the XMC-1 just for Dirac, but if you are looking for a more premium sound on a reasonable budget, then I would have to agree with Emotiva on this when they say “Rethink High-end.”
Editorial Note: As Dirac makes improvements to its mathematical algorithms, and they are downloaded to the Emotiva XMC-1, the combination of Emotiva’s extremely low distortion and improved Dirac Room Correction will make an unbeatable processor in the $2,000 price range. – John E. Johnson, Jr.
The author would like to thank Dr. David Rich for his contributions on this article.


