
The Hi-Hat Club in Palmers Crossing was a major stop on the collection of venues called The Chitlin Circuit. As a result of these live performances, I acquired a love of recorded music. Over the years, I’ve collected hundreds of LPs and CDs. Unfortunately, my audio system has stayed somewhat in the past.
I own a Mitsubishi DA-R15 receiver amplifier designed and manufactured in the early 1980s. I recently upgraded to Martin Logan Motion-15 speakers. Being a bass freak, this combination of receiver and speakers perfectly catered to my need for a driving bass. I can listen to my records and CDs with the attenuation (tone controls and filters) that I prefer.
Several years passed using this configuration. And, then, disaster struck … I moved into a condominium. This move curtailed my listening hours. With neighbors above and below, I could only listen during the day. I had to keep the volume fairly reasonable. I needed to find a way to listen to music at any volume at any hour of the day or night. Then, lightning struck – connect my stereo receiver to wireless headphones.
Being analytical, I first listed my requirements. Sound quality should be as high as possible. My preference for heavy bass response must be satisfied. I wanted to spend under $100 for equipment. I was not at all sure that these criteria could be satisfied. With modern audio equipment, you seem to have to pay more for higher quality.
A little common sense told me that I needed at least 2 pieces of equipment: a wireless transmitter and headphones. Audio coming out of the Mitsubishi amplifier/receiver would be routed into the transmitter. The headphones would be paired with the transmitter. So, my first problem was how to connect the transmitter to the amplifier/receiver. Available connections influenced the transmitter selection.
I first looked at the back of my receiver to assess the available connections.

Rear View of Mitsubishi DA-R15 Amplifier Receiver
Those switches on the upper right with the red and black covers are for the speakers. The black covered knobs in the upper left corner are for the antenna. By process of elimination, a wireless transmitter would have to connect to those RCA plugs at the lower left.
I inspected those plugs more closely. Phono was for the input from the phonograph. AUX was to receive the input from a high-quality output source. AUX was for input so that connection was not going to help in getting the audio out to the wireless transmitter. According to the manual, PLAY 1 and PLAY 2 were for sending outputs to tape recording devices. Hmm, …
So, I needed a wireless transmitter that received input from an RCA plug type interface. After searching on Amazon, I chose the Giveet Audio Adapter for Bluetooth 5.0 at $29.99. Yes, this was made in China. But, I could always return to Amazon and exchange for a better model if needed.
While researching for transmitters and headphones, I realized that I would lose control over the attenuation adjustments to the music, such as the bass boosting. However, I found that some headphones emphasized deep, accurate bass response. I chose the Cowin E7 headphones with active noise cancellation and deep bass response for $59.99. With free overnight Amazon shipping, my total investment was around $80!!

Giveet Wireless Transmitter

Cowin E7 Headphones
Two of my 3 requirements appeared to have been met: deep bass response and cost less than $100. I would not know about sound quality until I connected everything together.
Once the equipment arrived, the fun began. I had two problems: where to connect the transmitter to the RCA plugs in the back of the receiver and how to route the audio signal to that connection.
REC 1 and REC 2 are used to receive an input signal from a device. PLAY 1 and PLAY 2 are used to transmit an output signal to a device – a tape player at the time the amplifier was designed. I had connected the CD player to REC 1.
Since REC 1 and REC 2 were for connection to a tape recorder, I guessed that one of these was a candidate for the transmitter. Since REC 1 was connected to the CD, I chose to connect the wireless transmitter to PLAY 2.
Now, I had to determine how to get the audio signal to PLAY 2. This had to be accomplished through the front panel of the DA-R15.

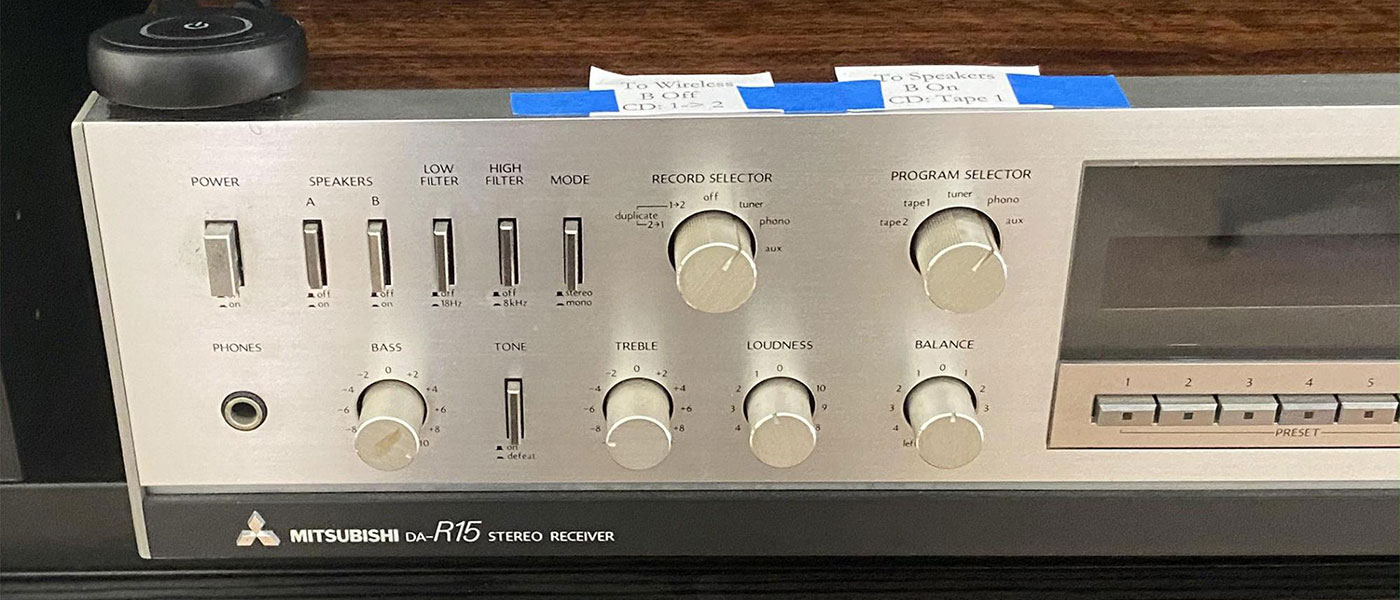
Front View of Mitsubishi DA-R15 Amplifier Receiver
An answer was provided in an unexpected location. Those two knobs on the top row just to the left of the frequency display were the key. At the left is the Record Selector knob. At the right is the Program Selector knob.

Record Selector Knob

Program Selector Knob
I read the manual over and over and just did not see how to use the knobs to route the audio signal to the wireless transmitter connected to PLAY 2. So, I just started testing combinations. After testing a lot of combinations, I was able to route the audio signal to the wireless transmitter connected to PLAY 2.
The Program Selector knob routes input source (tuner, phono, tape1, tape2) to the speakers and to PLAY 1. The Record Selector routes the input source (tuner, phono, tape1, tape2) to PLAY 2. These behaviors were NOT documented in the manual. I was able to determine these by trying combinations.
Secrets Sponsor
I could set the Record Selector knob to tuner. This selection routed the tuner to the wireless transmitter connected to PLAY 2. But, the Program Selector knob was simultaneously routing its selected input source to the speakers. I was hearing both the headphones and the speakers simultaneously. Muting the speakers while listening on the headphones was necessary to ensure that I only heard the music on the headphones.
Tape 1 admits audio from REC 1. Tape 2 admits audio from REC2. Since I connected the CD to tape 1, the Program Selector knob was set to tape 1 to listen to the CD connected to REC 1. This knowledge gave me a hint on how to route the CD to the wireless transmitter. The Record Selector has the capability to route REC 1 to PLAY 2. Listening to the CD on the wireless headphones was accomplished by setting the Record Selector knob to duplicate 1->2!
All of this is simply and easily summarized.
- The CD is connected to REC 1. The wireless transmitter is connected to PLAY 2.
- To listen to the speakers: unmute the speakers, select a source using the Program Selector knob, set the Program Selector knob to tape 1 for the CD.
- To listen to the wireless headphones, pair the transmitter with the headphones, mute the speakers, select a source using the Record Selector knob, set the Record Selector knob to duplicate 1->2 for the CD.
I taped labels to the top, front of the Mitsubishi amplifier receiver to remind myself.
These connections and procedures enabled me to listen to the tuner, phonograph, and the CD using the wireless headphones. However, I was not finished. After getting everything connected, I put my favorite CD on the player and sat in a chair literally 10 feet off to the side of the receiver amplifier. Bass response of the headphones was quite good. But, the overall quality actually sounded scratchy. Ugghh. I walked around my condo and quickly determined that the signal strength dropped rapidly. According to the specs, the transmitter works solidly up to 33 feet. I was losing signal quality within 10 feet.
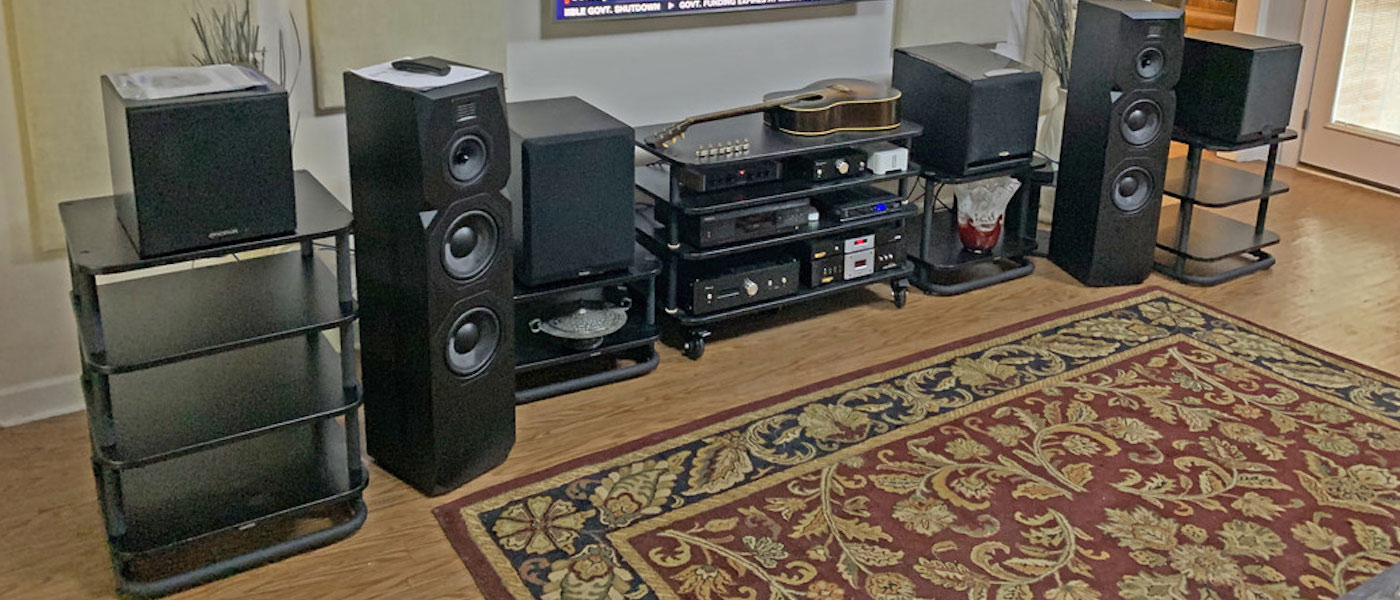
As a ham radio operator and an experienced communications system developer, I know that a higher antenna transmits a longer distance, given the same power. With this information, I had mounted the antenna at the top of the stereo cabinet.

Original Wireless Transmitter Placement
That white box on top of the stereo cabinet was the initial antenna location that delivered the scratchy sounding audio. After a half-hour of staring at this configuration, I decided I would just move the wireless transmitter lower down onto the top of the receiver, over to the left side.

Modified Wireless Transmitter Placement
Comparing with the full picture of the cabinet, you can see that this location is halfway up the height of the cabinet. I used a Velcro strip to mount the transmitter. I also hoped that would make the setup less clunky for my wife.
After turning on the tuner and the wireless transmitter, I stepped over to the side in my favorite chair. This time, the bass response was still excellent, but the sound quality was now excellent! I moved all around the condo, even into the kitchen and office next door to the room with the stereo cabinet. At all locations, the bass response was still excellent. The sound quality remained excellent. I was able to receive the audio with this quality for about 50 feet, even beyond the manufacturer’s specification.
Secrets Sponsor
Mounting the transmitter lower goes against all the guidelines for maximizing signal transmission at a given power level. I have no explanation for this. Maybe some obstacle blocked the signal when the transmitter was mounted on the top of the cabinet.
All I know is that I can listen to quality sound at any volume at any hour, day and night, even if my wife is sitting next to me on the couch. And, I spent less than $100.
With some creativity, you may very possibly be able to use a wireless transmitter and headphones with an older stereo amplifier.
In my case, the keys came when I understood the undocumented operations of the Record Selector and Program Selector knobs and when I was able to switch the CD input onto the PLAY 2 output.
These same connection issues had to be resolved regardless of whether I bought cheap equipment or expensive equipment.
The placement of the wireless transmitter has a big effect on the quality of the sound.
An inexpensive pair of headphones with active noise cancellation and deep bass response can produce a reasonable quality audio sound for the average listener.
If you like a heavy bass response, the inexpensive headphones can compensate for the loss of attenuator tone controls and filters in the output audio of the stereo amplifier.
Since I am satisfied with the bass response and sound quality of this inexpensive equipment, I will not likely spend money on a more expensive setup.
Since I need to hear sound without disturbing the neighbors, I am also not likely to invest in a pair of wireless receivers for my current speakers or in a pair of wireless configured speakers.