Introduction
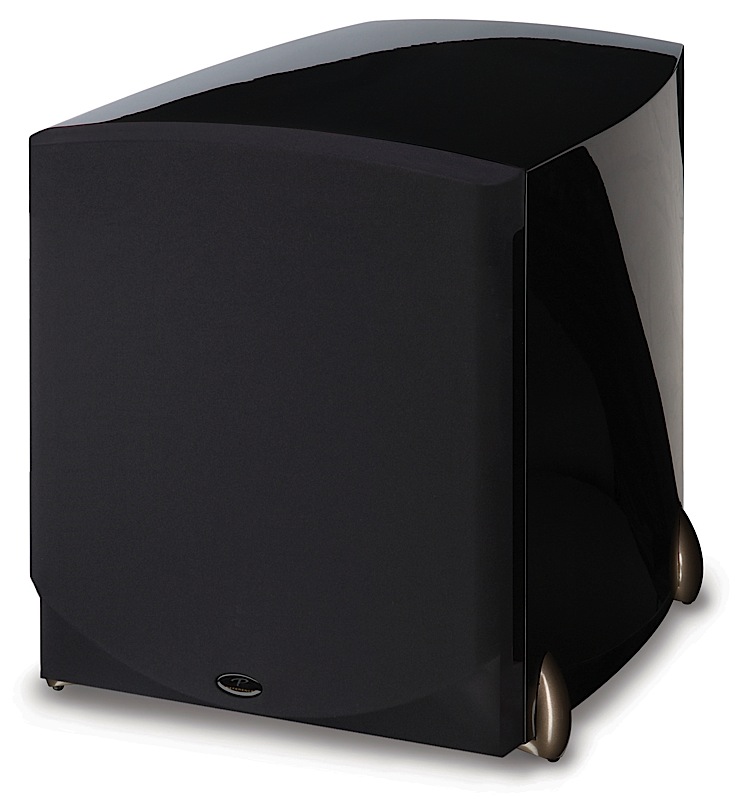
For those of you new to the home theater game Velodyne has been making subwoofers for longer than some directors have been making movies. They make big ones, small ones, loud ones, and even louder ones. They were also one of the first to recognize the importance of room correction in the subwoofer domain and have many products that feature equalization and digital sound processing. The subwoofer featured here is part of the SubContractor line of subwoofers. This unit is designed to be used in-floor or in-ceiling, and fits snuggly between standard (16 inch centered) floor joists or ceiling trusses, which is a 14″ space. Unlike most powered subwoofers the amplification for this unit is housed in a separate box which also contains digital sound processing to counteract room issues. A measurement microphone is included to program the auto-eq features. The amplifier is the same one provided with the SC-600 IW reviewed recently by Jim Milton.
Specifications
- Design: Slot-loaded Enclosure, In-Ceiling, or In-Floor Mounting
- Driver: One 12″ with 3″ Voice Coil
- MFR: 25 Hz – 120 Hz ± 3 dB
- Power Amplifier: (SC-600) – 200 Watts RMS – Class A/B
- Inputs and Outputs: Line-Level and Speaker-Level
- EQ: 5 Bands, Auto (Microphone Included)
- Dimensions: (Woofer) 34″ H x 14″ W x 9.3″ D; (Amplifier) 4.25″ H x 17″ W x 13″ D
- Weight: (Woofer) 40 Pounds; (Amplifier) 20 Pounds
- System MSRP $999 USA
- Velodyne
The big draw to a ceiling mounted subwoofer is looks. Taking the biggest speaker out of the room is a huge bonus for many spouses. The drawback is that you only get one chance to mount the sub – unless you like re-finishing your ceiling. So what happens if the bass sounds bad? You can move your chair and you can equalize the response to reduce room issues. To do equalization right you need measurement gear, and of course, the equalizer. With the SC-600 package you get a measurement microphone and an automatic seven band eq built into the powerful amplifier.
Design
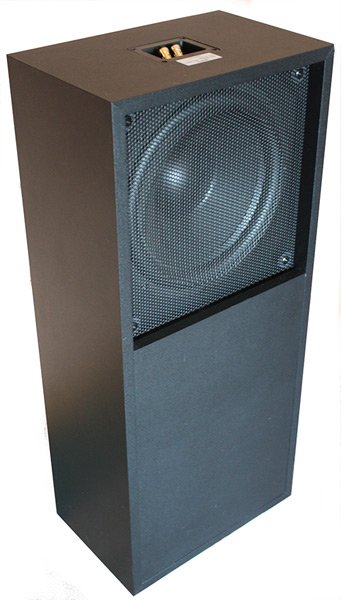
The SC-600 is a well-built slot-loaded (ported) subwoofer. There is no fancy finish because it will be mounted out of sight. It uses a 12″ driver which is mounted inside a relatively plain looking black box (the box is not visible after installation, only the grille). As most ceilings and floors will have ample space to mount such a box (unlike inside your wall) there is no need for a special design.
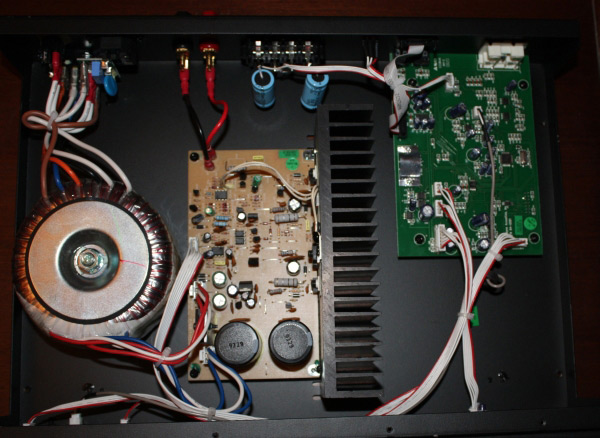
Where this unit really differs from your standard $999 subwoofer is the amplification and processing unit. The separate 200 watt RMS (400-watt dynamic) class A/B amplifier has a built-in automatic five band equalizer for room correction, a four position phase control, and four customized listening presets. The included 80 Hz high-pass crossover allows you to integrate the sub with small speakers if you have no bass management in your receiver, and the low-pass crossover is adjustable from 30 Hz – 160 Hz, with a slope of 24 dB/octave. The unit also has a 12v trigger, IR repeater jacks, and RS232 interface which increases its flexibility, allowing the amp to be easily integrated into a custom install. The only thing missing from this amplifier is the ability to see what correction has been applied and then the ability to over-ride certain changes. For power-users the ability to control the EQ would make this an even more desirable setup, and the the auto-EQ feature will do its job of taming some of your room issues
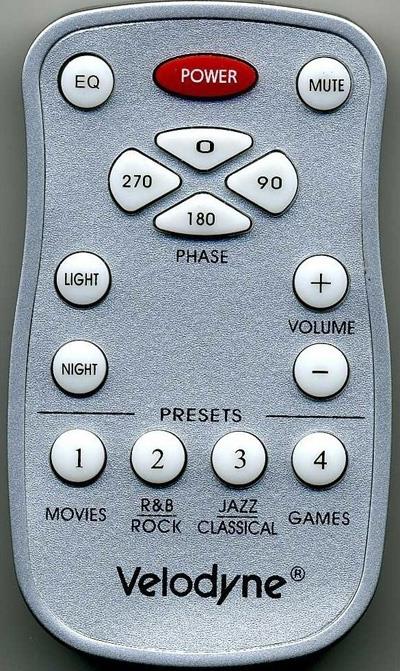
Included with the amplifier is a small remote control which can adjust the output, crossover, and presets, allowing for easy adjustments from your listening position. The remote also allows you to engage Night mode and turn off the blindingly bright blue LEDS.

Installation
Installation is fairly straight forward. You will need the following tools:
- Measuring tape
- Screwdriver
- Drywall saw
Step one is to locate the position of the subwoofer. This is tricky as once it is installed you will not be able to move it around. So choose this position carefully. If you require the subwoofer to produce sounds above 80Hz I strongly recommend you mount the sub in the first 1/3 of the room, close to the main speakers. As my speakers can comfortably dip into the 40’s I had the freedom to locate the sub beside or behind my listening position. Keep in mind that while the auto eq will help with some room issues it is not able to correct them all. In the end slight re-positioning of your listening seat may be required. So how did I end up with my final location? I chose the spot that already had a hole in it.
When I moved my projector I was left with a hole where the cables came through. Not wanting more holes in my ceiling this was a natural location. As in my wife said “naturally you are putting the sub there right?” This point is on the side wall just in front of my listening position. One often recommended procedure is to place the sub in your listening position and then take measurements in the intended locations. The idea being that the response should be similar when you put the mic where the sub will be and the sub where the mic will be. The problem with this procedure for an in-ceiling subwoofer is that the large ceiling becomes a large flat baffle. This is good for bass, yet makes it hard to take accurate readings as it will alter the microphones response. Not to mention you need a decent microphone, accurate software a computer and the know-how to do it all. In this case I wanted to see just how much the built-in DSP would correct for placement limitations.
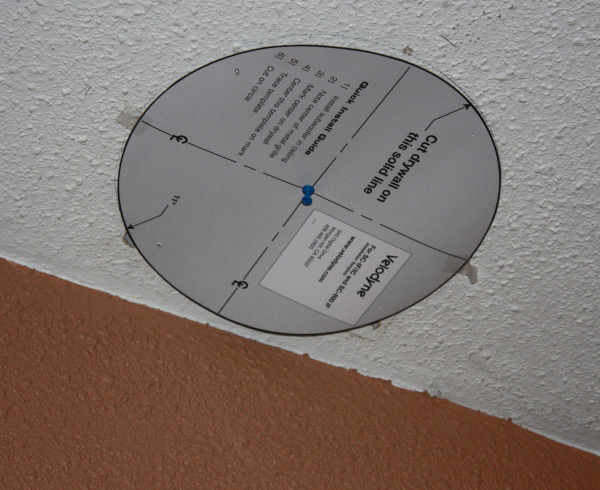
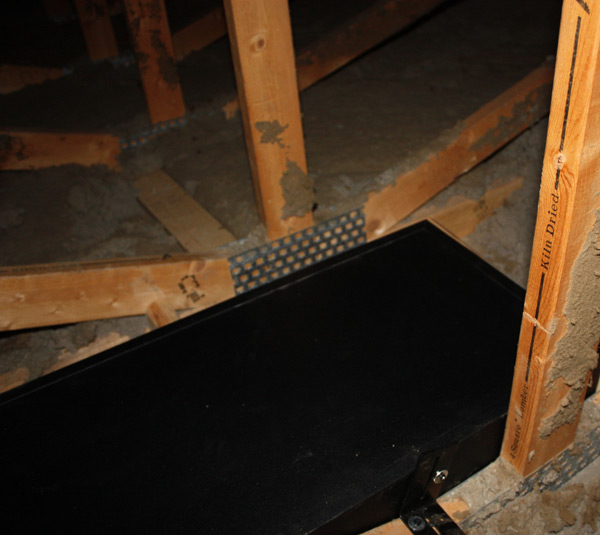
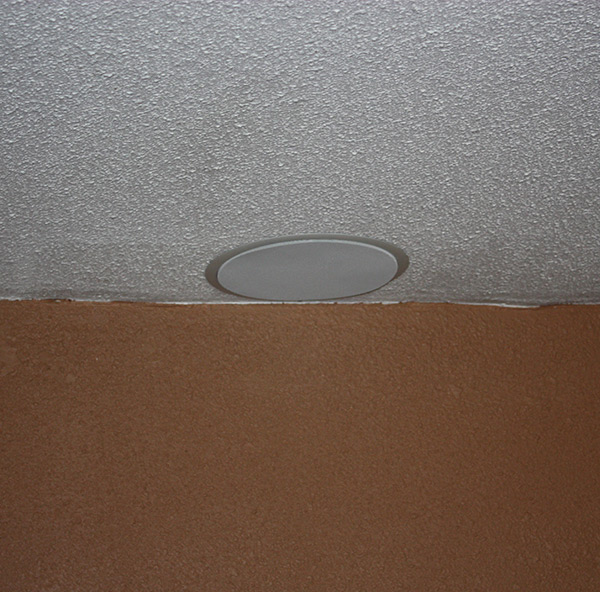
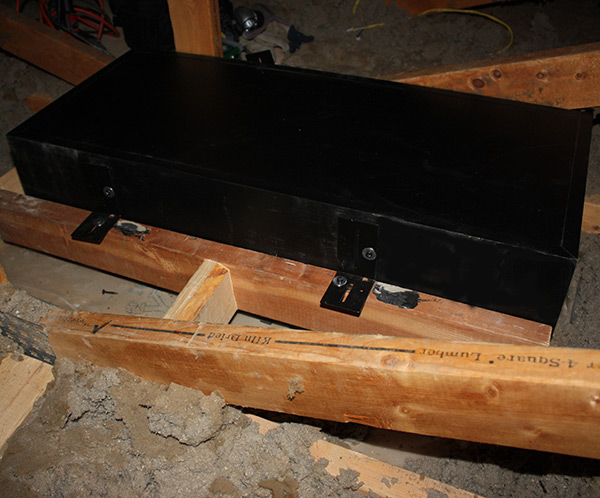
Once the mounting location was decided on I went into the attic to find the center point for mounting the ceiling grill. Velodyne offers an optional ceiling grill which I used in my installation; a white paint-able round grill with everything you need to attach it to ceiling. The subwoofer box is 14 inches wide and designed to fit between two trusses/joists on 16″ centers. Turns out mine are on 24″ centers leaving me with 22″ between trusses. As the sub requires mounting to two trusses I used 2×4’s to fill in the cavity. Then I marked the center point of where the driver is and punched a small hole with a nail. Leaving this nail in I went back into my living room and placed the mounting guide up to the ceiling using the nail to align the centers. Using a black marker I drew out the circle and then removed the guide. Cutting the drywall is fairly easy with a standard dry-wall saw, and you do not need to be perfect as the ceiling grill will cover minor imperfections.
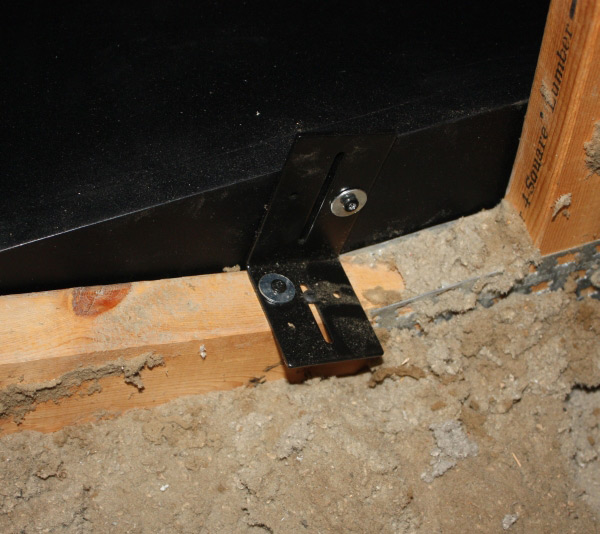
Step two is to prepare the site for mounting the subwoofer. First I removed the loose insulation that was between the joists. Then I mounted the four L brackets to the trusses and ran wire to the location. There was already 14gauge in-wall rated speaker wire in place from a previous speaker installation that I was able to utilize. In-wall rated wire is mandatory in most home insurance policies and does not cost much more than standard wire and is often found at your local hardware store.
Step three is when you realize just how heavy and awkward lifting a rectangular box weighing 40lbs into your attic can be. Here is when having a tall friend can help. Once it is up and moved to the general location you will want to affix the foam strips provided by Velodyne. Place them on the front baffle (the part that lies against the drywall) spacing them evenly. The function of the foam is to reduce annoying potential rattles and squeaks caused by the sub producing enormous energy. Now carefully lower the box woofer side down into position with the driver centered over the opening. Use the remaining screws to attach the L brackets to the subwoofer.
Here you can see the spacer I built to fill the cavity:
Step four: Plug in the speaker wire, install amplifier in your equipment location and begin your setup. Once you have connected the speaker wires to the amp and the amp to your audio system you can plug the supplied microphone into the front panel and place it where your head would be while watching movies. Then, warn your wife, put the cat outside and try to stay away from the listening position. Once you hold the EQ button for 3 seconds 12 short frequency bursts will emit from the subwoofer. Next you will want to level match the volume of the sub with your main speakers preferably with an SPL meter, if not tune by ear.

Measurements
Auto equalization takes the guesswork out of applying complex filters to the audio signal. As with anything automatic the end result is a product of its implementation. The drawback to the EQ system included with the SC-600 amplifier is its lack of user control and information. It would be very useful to be able to see and override the filters used to EQ the system. There are some room anomalies that cannot be fixed by EQ and it is a potential waste of power to try.
Using my reference microphone I took some basic in-room frequency sweeps to better understand what changes were being implemented after the auto-eq was run. Measurements were taken with a Behringer ECM8000 measurement microphone, Room Eq Wizard was used to generate the tones and plot the measurements. This amazingly powerful and free software can be found here: http://www.hometheatershack.com/roomeq/, many thanks to the people involved with REW.
The following graph includes two measurements, the black line is before the auto equalizer was run, and the red line is after.
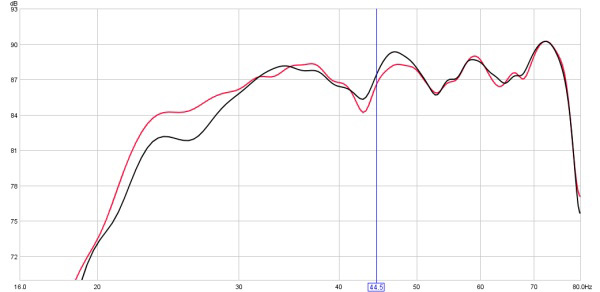
What we see is that the amplifier was able to boost the output about 3dB from 24 – 28Hz, and a peak at 45Hz was slightly reduced. Overall the -3dB point went from 29Hz – 75Hz +/- 6dB, to 25Hz – 75Hz. Not bad for a completely automatic equalization process. As with all equalizers you cannot correct every room anomaly and room treatments are always preferred over electronic equalization. With that being said the improvement afford by this simple eq was automatic and painless.
In Use
Movies
Ok, enough with all that lets watch some movies with bass. The SC-600 amplifier was fed 80Hz and below from a Denon 4308ci receiver, with video supplied by an Oppo 981-HD dvd player.

First in the queue was Titan AE and the jaw dropping couch moving “Ice Field” chapter. This scene is full of creaks and thuds as the ship silently floats through a massive ice field. The huge ice crystals slam into each other exploding upon impact. The key here is the quiet soft sounds of the ship with the tense dialog – can it be heard through the bass? With everything calibrated and played back at reference levels, I was floored. The bass was clean and strong and not once did it overpower the other sounds. I was able to feel the thuds and crashes in my couch without the bass being pretentious.

After that I loaded up Star Wars: Attack of the Clones and the first chapter has some 20-30Hz content about 2.5 minutes in. Here the bass was clean and deep. The flyover scene shook the house in a good way. You could feel the bass move the couch and despite what you would think there was no indication that the bass was coming from the ceiling. It seemingly followed the on-screen movements. The asteroid chase’s delicious use of surround effects blended nicely with the bass from the seismic charges and fly-over bass.
Music
My main speakers are capable of dropping into the 30’s and I run them from 50Hz up. Therefore the Velodyne was only required to reproduce from 20Hz – 50Hz, a frequency range not heavily used in music. For a subwoofer to work well with music in my system it must be audible invisible, that is it should not call any attention to itself.

Bass heavy music was on the menu for this first music test so I choose to demo Dub Trio’s debut album, Exploring the Dangers Of. Dub Trio’s music incorporates metal, jazz, reggae, electronic and rock, and bass. Lots of bass. The underling bass chord in Sick-em Kid goes deep bass – midbass – midbass – deep bass and you feel the change in the notes as well as clearly hear the bass line. This is not a one-note subwoofer! The entire album is bass-heavy and loud. A great test and at no times did I hear squeaks or rattles from the subs location. Had a few rattles still left in the adjoining kitchen that were excited by the intense bass.

For something completely different I put on the astonishingly clean and dynamic Whites of Earth Now by Cowboy Junkies. The bass guitar on Forgive me when augmented by the Velodyne SC-600 had excellent presence and foundation. At no time did the sub call attention to itself or distract. Crossroads starts with a solid bass line that sets the tone for the rest of the song. With the subwoofer enabled the sound was scary. The individual notes were clearly audible and at no time did they meld into a sloppy mess. And best of all the soundstage did not collapse even with the deepest notes. When Margo’s smoky vocals enter the song there is zero coloration from the subwoofer. I was honestly shocked at how good the sub performed with music playback. They were able to blend easily with my floor standing open-baffle-midrange speakers, better than my previous 12″
Conclusions
Installation was not as bad as it could have been which says a lot if you have ever seen me swing a hammer. All mounting hardware was provided and there was no special tools needed. Easy setup once installed with automatic room calibration to smooth out room response the powerful remote controlled amplifier integrated easily into my system. Surprisingly accurate with music I quickly gave up the notion that this is a movie only sub. While I would have liked to have seen more user information and control with the eq it is supposed to be automatic and it does make it very easy to do basic room correction.
Overall an easy way to hide the bass without sacrificing quality.