
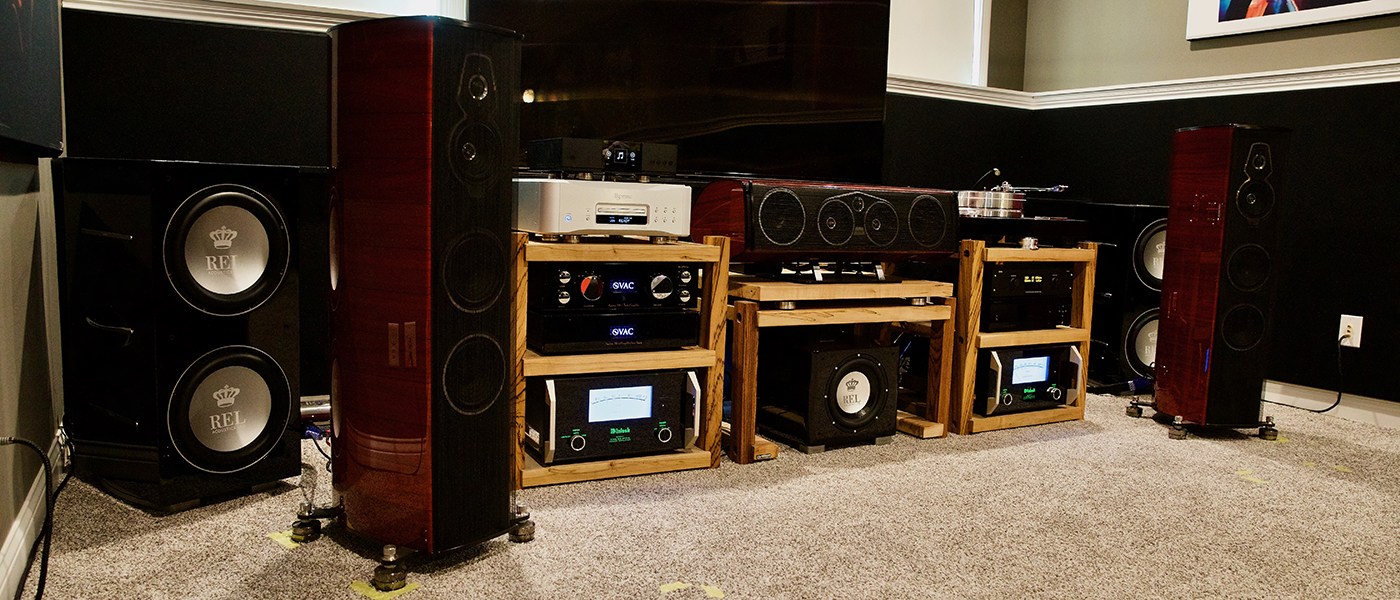

Two years ago, I moved to a condo from a home in the country with acreage, fruit trees, and a river that ran through it. It was a painful move knowing what I’d be leaving behind but living in a ‘box in the sky’ cut significant time down for my commute to work in the city and brought me closer to my clients. Since I’m writing about HiFi and not about the advantages of being able to take a kayak out on the water after a long day at work (oh, how I miss that), living in a detached home does have sonic benefits. I had a dedicated room, I could turn up the volume as loud as I wanted, and I didn’t need to worry about grouchy neighbors interrupting the fun. But once I moved into a condo, it became clear that my HiFi habits needed to change. Like many of us who change residences, one of the first items I unpacked was my audio system to pass the time with a few tunes. After a quick connection and power, I turned up the volume to my regular reference levels and…
The doorbell rang. I opened the door and a woman in a flowered dress stood there with a rather large smile on her face. With her oversized glasses nearly falling off her nose, she proceeded to introduce herself as the “woman behind my wall” and rather sternly informed me of how she could hear most of my music coming through. …and THE BASS. While “totally awesome” she admitted, everything was shaking off her walls. As my luck would have it, her bedroom was on the other side of wall closest to my audio system. Knowing that I hadn’t calibrated my subwoofers to the room and that I was just having fun cranking it (and in the spirit of being a good new neighbor), I agreed to turn down the volume and set the levels of the subs to a level I’d listen to in an average listening session.
Cue the music again. Satisfied with my new settings and ready to tackle the unpacking of dozens upon dozens of boxes, the doorbell rang again. ‘Darn. What now?’ I thought. “I can still hear it.”, she said as I opened the door and saw her twisted smile spill out those words. Now what? I didn’t feel like a conflict, so I reluctantly turned the volume down to a level that no longer gave me the thrill of listening. Now that I’m in my new space, how would I listen to my favorite vinyl? Would I be able to watch my movies at reference level? I immediately began HATING my move to a condominium even before spending the first few hours in it. Maybe life was better on land after all?
Secrets Sponsor
I had some good reasons for choosing this particular condo; the living room was large enough for my HiFi habits because it has a long, uninterrupted 20-foot wall that’s perfect for a 10-foot screen, large speakers, very large dual subwoofers, and deep enough for the sofa to be far back with rear channels. How could I not think of neighborly peace before the purchase? No matter how much my interior decorator tried to make me happy with the new aesthetics of the place, I was miserable knowing that my time with my audio – the only momentary escape I have from the real world – was being restricted by the neighbor. This was my condo conundrum. If this is a familiar story to you, I have a few words to the audiophiles and cinephiles who share spaces with others as I do: you can do something about it. There are copious books and articles on the subject that are great reads. I combed through many of them over the years and my precarious situation caused me to act. I want to make clear that the purpose of this article is not to rewrite those articles and books and present that information here. I’m far from an expert on all things audio regarding room design, but I want to inform you of my journey as I used those resources and applied a few suggestions. While you can certainly hire a pro to redesign a space, there are many steps you can do on your own just as I did. I only chose a handful of suggestions that I felt would be the most important for my room. After all, it’s still a shared space with rules in place as to what can be done to it. Learning of my experience might inspire you to do your own research and decide. The good news is that it’s just as about easily done as said and the result are tremendous. You can have an audio haven in your shared space if you’re willing to take a few steps to make it happen!
I’m all about being a good neighbor and reducing conflict, but at the same time I’m not willing to compromise my sound experience. For a whole year I reached for the volume control with everything I listened to fearing the dreaded neighborly knocking backfist to the wall to keep it down. I started feeling tense in my back and my neck anticipating the knock. It was burned into my nervous system. It was unhealthy for me. This isn’t what my listening experience should be about, and neither should yours! So, I needed to solve the questions I had of what exactly was behind my wall that was allowing the sound to get through. What type of work did I need to do to solve this problem? After much research and speaking to a few key people as to what my best options were, I came to two conclusions- I needed to increase the mass of the wall and create an airspace by decoupling it from the framing. What would that mean? Tearing down my wall, of course! Now before you get your stomach all in knots and throw your hands up in the air as something that’s not possible for you, let me tell you that this is not an unreasonable measure. Sure, it’s a pain for a short while because of the ungodly look of renovations and the increase in dust, but the cost of it is relatively cheap compared to the price of our audio gear, accessories, and the “soundproofing” materials placed on our walls. Thinking about spending thousands on upgrading an amplifier? A power conditioner? Some miscellaneous cables? Don’t ignore the important fact that your room is just as much of an audio component as the rest of your gear. It needs to be just as much of a focus, if not more. Spending some time and money on your room gives much higher returns in satisfaction!

To move forward with the solution, I put faith in the resources I found. While I won’t direct you to any specific one (and there are more than plenty out there), companies that engineer sound rooms or make products for these purposes have resources on their websites that are very good reads. I looked for information that was consistent between all of them, some technical articles from various publications – both online and in print – as well as by reading the experiences of others who had listening rooms designed. My suggestion to you is to have faith in these resources as I did, come up with a plan, cost it out, and most importantly follow through with your plan.
It also didn’t hurt to pick up the phone and call for advice to make sure I was on the right track. If I was about to embark on a little restructuring adventure, it’s often better to speak to a real human being rather than just relying on Google.
Many resources write about the importance of mass to reduce the transmission of sound (transmission loss). The greater the mass, the higher the transmission loss, expressed in higher Sound Transmission Class (STC) values. Thinner and lighter materials have a lower the transmission loss, and thus a lower STC value. If you have a heavy, dense area between your unit and the next person’s, it’s a good start for keeping your audio system’s music inside your room. It seems that newer condos are built with concrete slabs between walls, floors, and ceilings over each unit. There are minimums that are enforced depending on the city’s building code, which vary from city to city and over a period of years, and occasionally you’ll have a developer that will take it a step further as a selling feature. I’ve visited a few condos that are built this way; the concrete slabs are put together like the pieces of a puzzle and after finishing, are fairly quiet but it won’t be able to fully stop the transmission of sound between units. Sound is like water: if there’s a little hole, it’ll get through.

On the other hand, some of us are a little less fortunate as we don’t have as much mass on our side. That was precisely my situation. My condo was built in the early 1990’s and taking down the drywall revealed what was separating my neighbor and I; one wall with staggered studs, a single layer of 5/8s drywall on each side, some pink insulation and resilient channel on my side only. We share the same concrete floor and ceiling. The drywall job on her side was terrible. It was filled with large gaps and occasionally a hole. I’ve never felt so connected with the barrier that was originally built. It’s no wonder she could hear everything! I needed to take steps to reduce sound transmission.
I need my space and the only way to make that happen was to increase it between my neighbor and I. Sound is vibration, and it needs an air cavity between walls to slow those vibrations down. There was a tiny air cavity prior to renovations with the resilient channel in place, but a small airspace can, surprisingly, be worse than a large one. My audio system created the sound which vibrated my drywall, which vibrated the metal resilient channel, which vibrated the studs it was attached to, which were connected to the common wood base, which sent vibrations up my neighbor’s studs, drywall, and into her room. There was so much sound energy being transferred by solid materials that my wall needed to be completely decoupled from hers. Jamming the wall with soundproof insulation is not the only solution here, although it’s still required. I needed to reduce the attachments that would send vibrations into her wall and increase the amount of air in between to slow the sound vibrations so the new insulation in between would become effective. I chose the Rockwool Safe’n’Sound to fill in the staggered studs.


I picked up the phone and called my friend Steve Davidson at The Watershed Group to discuss solutions using Kinetics Noise Control products. The Watershed Group is a distributor of Kinetics products in Canada and you can easily seek them out or find similar products by contacting dealers near you in your country. Keep in mind that there are many sound clip solutions available, but I didn’t want to cut any corners. I went for the best – IsoMax Isolation clips. These clips attach to the stud assembly on walls and ceilings and allow a furring channel to be clipped in across the length of the space. What I liked about these clips is that they have rubber within them that surround the furring channel, further reducing vibrations and increasing the STC value. I also wanted to increase my airspace by another few centimeters, so I attached each clip to a wood block further out from the stud giving me a total air cavity of about 2.5 inches. Isolation clips were my best option since I don’t have room for a double stud construction and it allowed me to work around a closet I have at the far end of the same wall located in the kitchen.


I gave Steve my dimensions and he gave me a drawing to determine how many clips were required for the job. I also decided to decouple the bulkhead that ran perpendicular to the wall. Since electrical is being passed through it, it’s attached to the wall being decoupled and I didn’t want the sound energy from the bulkhead to be a weak point. I made sure to stagger the drywall layers as I wasn’t about to take any chances just to save a few hundred dollars or else this would be all for naught. Even though I use front projection in my room, I also didn’t want to rule out a large flat panel TV in the future.
TVs are getting larger by the year and we’ll see a day where ten-foot TVs are available (be it modular or rolled out to size). At that time, I’d ditch the projector for an HDR TV but I’d need to mount it. Since there would be no stud to screw into on a floating wall, I ordered Kinetics UniBrace clips for TV isolation (to float plywood behind the drywall) as future insurance along with a run of fiber HDMI and several runs of CAT6.


The drywall would need to be screwed into the furring channels to float away from the wall. It’s also important to increase the mass of the wall so two 5/8” layers of drywall were used with acoustic compound in between. The first layer of drywall was mounted horizontally, and the second layer mounted vertically to ensure all seams were covered. Just be sure that your contractor (if hired) doesn’t screw into the clips. I don’t think they care about these things as much as you and me, so it pays to be on top of these things. I had to inspect each day when I returned from work to make sure things were done correctly. As you can see here, there were several instances of the screw being put directly into the IsoMax clip.

A double layer of 5/8” drywall with acoustic compound in between would provide a rigid wall yet damped to allow less sound energy to pass through the second layer of drywall. I looked to Green Glue for compound between drywall layers and sealant between every little crack I could see on the neighbor’s wall and between the spaces of floor, ceiling, and around power outlets prior to any insulating and drywalling on my side. Once the first layer of drywall was installed on my side, two bottles of Green Glue Acoustic Compound was randomly squiggled onto the backs of each 4’x8’ drywall sheet for the second layer. All seams on my wall were filled in with Green Glue Noiseproofing Sealant. While I have no direct data as to how much these compounds contributed to the result alone, most room designers and companies making isolation products stress the importance of such a compound. I can speak to the results.


I share a common concrete slab ceiling and floor with the neighbors above and below me. Drywall should float without touching the floor and ceiling so sound energy isn’t transferred to those locations. I used the Kinetics RWS at those connecting points. Offset slightly behind the final layer of drywall and finished off with Green Glue Acoustic Sealant, the drywall was installed pressing up against it reducing sound transfer further.


Sometimes when you start a project there are benefits to taking it just a little further. This is personal based on your budget, but one such change I made was to install a darker engineered hardwood floor with a Husssh! acoustic pad below it. The laminate flooring that came with the condo looked old and had seen some better days in some places, so I figured since the room’s walls were down, the floor should go to. The darker floor helps my video system deliver better contrast as there are fewer reflections to spoil the image. I also didn’t know what sort of padding was underneath that floor, and even though I never received complaints of sound coming through the unit below me, I figured it was best to put a decent pad underneath.
Secrets Sponsor
While the walls were open, I made one decision that I know I now can’t live without ever again – dedicated power lines to the audio system. I had to take some drywall down on two sides of my bedroom to run the lines to the panel and to insulate it with Rockwool Safe’n’Sound, so another minor inconvenience among all the work. I ran Romex 10AWG power cabling to nine discrete 20-amp circuits off the panel, each with a Hubbell HBL5362 (which is the outlet many audiophile outlets are based on). The Romex is available at your local Home Depot while I had to source the Hubbells from a local electrical supply store. My electrician thought I was crazy that I wanted to run so many discrete 20A circuits with ‘overpriced’ Hubbells, and with the 10AWG wiring to each. I didn’t want any restrictions to my audio components and I may have 20A requirements with future amplifiers. He thought I was wasting my money and labor for something that he claimed wouldn’t make a difference in sound. “It’s math!”, he kept getting excited about, but not in the excited way I was feeling.


Everything I’ve ever read about increasing audio performance stresses the importance of dedicated power lines. I have seven monoblocks, a variety of preamps, digital, video, and analog gear, so I decided to split this up between the nine circuits. Much to his opposition, I had my electrician replace some breakers on the panel and place the new 20A circuits on the same phase. Kinetics IsoBacker acoustical fire rated backer pad was used around each outlet, old and new. All my original outlets remained so I could compare the old lines to the new ones. None of my hifi audio and video gear share a power line with anything else in the condo. If it hadn’t made any difference in sound, it was an $800 investment for peace of mind. Let’s just say that I received more than peace of mind…
After all the finishing touches of mudding, taping, and painting, the room was ready to be lived in again. I once was a very unhappy condo owner, but now I’m an extremely happy one! I can now CRANK my audio to reference levels during film and music listening. I don’t think twice about bothering anyone. What was once an extreme ordeal giving me major stress has now become a hair-raising experience in the best way possible! My music and movies can be played back with full dynamic range and with my hand off the volume control. I no longer need to be tense waiting for the possible bang on the wall or knock on the door. Well, there was just one knock. While I was having so much fun tearing through some bass heavy music, my neighbor did hear bass ever so slightly. Even with an air cavity, transmission loss is lowest with bass, so that makes sense, but she felt it was coming through the shared concrete floor. Since my speakers were sitting directly on it on my side, I ordered some Kinetics KIP-22-L pads to place underneath each corner of every speaker and subwoofer. These pads deflect resonance down to 16Hz. While not the prettiest of audiophile things, this apparently solved that final issue as she can barely hear the bass anymore. That last little bit I might be able to solve in-room by adding some bass traps and a few other acoustic treatments.

I cannot overstate the benefits of decoupling the two walls. I never expected to get so much right on the first go just by following some good research and suggestions and making sure not to miss any tiny hole or detail that the sound could get through. The room sounds a bit different, too. Maybe it’s a combination of all elements that make it much better.

Overall sound quality took a tremendous leap forward by running dedicated circuits to every single component or groups of components. How much of it had to do with the outlet alone? The 10AWG power wire? Increasing to a 20A circuit? Was it the amps, preamps, or digital components that benefitted the most, or all? I can’t weigh each independently, but the overall difference manifested in the removal of a major veil of noise. The grittiness was gone. The older outlets sounded dirty by comparison. All parts of the music, highs and lows, from classical to hard rock, from good recordings to compressed ones, all improved due to the changes in power delivery. Film soundtracks never sounded so clean and so dynamic! My Theta Digital Enterprise monoblocks feel unrestrained and sing like they’ve never sung before. The changes were so evident that friends can hear how much better the system sounds than before. It’s something that I know I’ll never look at again and was the best decision I made. Having the old outlet available right beside my new ones allowed a quick switch and an easy conclusion. You need to do this too!
If you own your condo and are suffering the same neighborly difficulties as I once did, know that there are solutions for you as outlined above. You must decide if the minor construction delays are a worthy price to pay for major audible improvements and better relations with your neighbors. How far you take these improvements are up to you, but I think I’ve taken it about as far as I could in my condo and the results speak for themselves. There’s no questioning, not even for a second, whether the renovations were worth it. Not including the new flooring, I spent about $3500 on this renovation. This included all materials from Kinetics, Green Glue, as well as all drywall, 22-gauge furring channels, insulation, power, and labor for things I can’t do or didn’t have time for. Again, you can decide what products are best for you. I was able to achieve 100% satisfaction from my choices. When we compare that cost to our audio and video components, $3500 is not that much for such a huge leap in performance. The renovations will also never break or go out of date like a component will. They never lose value. In fact, it may very well add value to your condo when re-selling! I now recommend to everyone that asks that they make changes to their room since it dramatically affects the sound we, as well as others, in shared spaces hear. It’s not just a little bit, but a huge amount! It doesn’t matter if you have small speakers or big ones, or if you use a receiver or separates. If you are frowning from the effects of sound transmission in your condo, you don’t need to move to a house to enjoy your favorite music. Take some tips from my journey and see what’s right for you. Just don’t think about it too long. Each day that goes by is one day less you can be enjoying your soundtracks to life. End the conundrum and make that day happen!
