
Do you ever think about the process that studios go through to create those recordings?
I have wondered about this for a long, long time, and I decided to find out how complex the procedure is. Well, it is very complex, and it is obvious that a lot of very talented recording engineers have contributed to developing the methods.
The purpose of this article is not to be a guide to methods of studio recording but to illustrate how many options there are in the process so that, as consumers, we understand how much hard work has gone into that process.
There is a lot to see here, so let’s get to it.

A list of the Procedural Steps in a Recording Studio Session
1. Planning the Session
- Objectives: Determine the purpose of the recording (e.g., music, podcast, voiceover).
- Schedule: Allocate time for setup, recording, and troubleshooting. Ensure you have enough buffer time.
- Materials: Prepare lyrics, scripts, or reference tracks. Share them with participants in advance.
- Checklist: Ensure all equipment and accessories (cables, adapters, etc.) are ready.
2. Setting Up
Equipment
- Microphones:
- Choose based on the needs (e.g., condenser mics for vocals, dynamic mics for instruments).
- Position correctly to capture sound effectively (e.g., cardioid mics point toward the sound source).
- Audio Interface – ADC/DAC:
- Connect the microphones and instruments to the computer.
- Ensure that the interface is compatible with the recording software.
- Software:
- Install a Digital Audio Workstation (DAW) like Pro Tools, Cubase, Logic Pro, Ableton Live, or PreSonus.
- Ensure software is updated and ready to use.
- Headphones/Monitors:
- Use closed-back headphones for isolation.
- Position studio monitors in an equilateral triangle setup with one’s ears.
- Pop Filter:
- Attach it to the microphone stand to reduce plosive sounds.
- Acoustic Treatment:
- Add foam panels, bass traps, or diffusers to reduce reflections and noise.
Cable Management
- Organize cables to avoid tripping hazards or interference.
- XLR cables for microphones and TRS cables for instruments.
3. Testing
- Levels: Set gain levels on the audio interface so that input signals are clear without distortion.
- Monitoring: Test headphones and monitor speakers for accurate sound output.
- Recording Test: Record a short clip to check for noise, distortion, or latency issues.

4. Optimizing the Recording Room(s)
- Noise: Ensure the room is quiet. Turn off fans, AC, and other noisy equipment.
- Lighting: Set comfortable lighting to help participants focus and feel relaxed.
- Comfort: Provide seating, water, and breaks for performers.
5. The Session
- Warm-Up: Allow artists to warm up their voices or instruments.
- Guide Artists: Provide feedback during recording to get the best performance.
- Take Notes: Record multiple takes and note the best ones for editing.
- Save Frequently: Back up your work regularly to avoid data loss.

6. Post-Session
- Organize: Label and save files systematically for easy access during editing.
- Backup: Store recordings on an external drive or cloud storage.
- Plan Next Steps: Discuss mixing and mastering timelines, if applicable.
Here are the details of setting up the recording console:
1. Prepare the Workspace
- Choose a suitable location: Ensure the recording environment is acoustically treated to minimize unwanted noise and reflections.
- Organize equipment: Arrange cables, microphones, headphones, and monitors for easy access.
2. Power and Connections
- Power the console: Connect the power supply to the digital console and plug it into a stable power source with surge protection.
- Connect peripherals: Attach essential devices such as:
- Microphones (via XLR inputs)
- Instruments (via TRS or DI inputs)
- Monitors and headphones (via outputs)
3. Audio Interface and Connectivity
- Connect to a computer or DAW:
- Use USB, FireWire, Thunderbolt, or Dante, depending on your console and computer compatibility.
- Install any required drivers or software for the console.
- Sync clock: Ensure your console and other digital devices use the same sample rate to avoid synchronization issues.
4. Configure Input and Output Routing
- Assign inputs: Map microphones and instruments to the correct channels on the console.
- Set outputs: Route the audio to headphones, monitors, or external devices.
- Check signal flow: Ensure the signal flows from the inputs through processing, routing, and outputs as expected.
5. Adjust Preamp Levels
- Set gain (see also notes on gain vs. volume below):
- Adjust the gain knobs on the console for each input, microphone, or line, to achieve a strong signal without clipping.
- Monitor levels using the console’s meters.
6. Set Up Channel Processing
- Apply basic processing:
- Engage high-pass filters to cut low-frequency noise.
- Adjust EQ settings for clarity.
- Add compression or gating as needed.
- Insert effects:
- Set up reverb, delay, or other effects if required for the recording.
7. Create Monitor Mixes
- Set headphone mixes: Create custom monitor mixes for performers using auxiliary sends.
- Set control room monitoring: Ensure the mix in the control room is optimal for accurate monitoring.
8. Test and Troubleshoot
- Conduct a test recording:
- Record a short test segment to confirm everything is functioning correctly.
- Check for noise: Listen for hums, buzzes, or other unwanted noise.
- Address latency issues:
- Optimize buffer size and latency settings in your DAW or console software.
9. Save Settings
- Store console presets: Save input/output routing, channel settings, and effects as a preset if your console allows.
- Document setup: Take notes or pictures of physical connections for future reference.
10. Final Preparations
- Check performer comfort: Ensure all microphones and headphone levels are comfortable for performers.
- Monitor levels: Keep an eye on input and output meters during the session to avoid clipping.
NOTES: Gain vs. Volume
The terms gain and volume are related to audio, but they serve different purposes and are adjusted at different points in the signal chain. Here’s the breakdown:
1. Gain:
- What it does: Gain controls the input level of a signal. It determines how much amplification is applied to the audio signal when it first enters a device (e.g., a microphone preamp, mixer, or guitar amplifier).
- Where it’s applied: Gain is applied at the beginning of the signal chain, before any processing or amplification.
- Purpose: Gain ensures the input signal is strong enough to work effectively with the audio equipment without introducing noise or distortion.
- Think of it as: The sensitivity of the system to the incoming signal.
- Impact on sound: Too low a gain can result in a weak signal with a poor signal-to-noise ratio, while too high a gain can lead to clipping or distortion as the signal exceeds the system’s capacity.
2. Volume:
- What it does: Volume controls the output level of a signal. It adjusts how loud the sound is coming out of the speakers, headphones, or other outputs.
- Where it’s applied: Volume is adjusted later in the signal chain, after the signal has been processed or amplified.
- Purpose: Volume lets you control how loud you hear the final sound.
- Think of it as: The loudness knob for the listener.
- Impact on sound: Unlike gain, increasing volume won’t distort the signal unless the output device is being overdriven (e.g., speakers maxing out).
Key Differences:
| Aspect | Gain | Volume |
|---|---|---|
| Position in Chain | Input level (early in the chain) | Output level (later in the chain) |
| Purpose | Signal strength for processing | Loudness for the listener |
| Effect on Signal | Affects tone and potential distortion | Affects perceived loudness |
| Adjustment Goal | Optimize signal-to-noise ratio | Adjust listening level |
Secrets Sponsor
Analogy:
Imagine you’re filling a glass with water:
- Gain is how much water (signal) flows into the system (the glass). If you pour too little, the glass is empty (weak signal). If you pour too fast, it overflows (distortion).
- Volume is how much of that water is poured out for you to drink (how loud it’s delivered to the listener).
Both are critical but serve different roles. Trim is another term, and it is the fine-adjustment of the gain.
The ADC (Analog-to-Digital Converter) has to be calibrated.
1. Understand the Studio’s Calibration Standards
- Decide on the reference level you want to use. A common standard is +4 dBu, which corresponds to 0 VU on analog equipment. +4 dBU is 1.228 Volts.
- Understand the digital reference level (e.g., -18 dBFS) that corresponds to the chosen analog reference. This defines the headroom before clipping in the digital domain.
Most recording studios aim to keep the maximum recording level at around -6dBFS or lower, especially for digital recordings. Here’s why:
2. Headroom for Processing
- Keeping peaks below -6dBFS leaves room for later processing (EQ, compression, limiting, etc.) without the risk of digital clipping.
- Mastering engineers prefer some headroom to work with, so recordings are not already at or near 0dBFS.
3. Avoiding Digital Clipping
- Digital systems hard clip at 0dBFS, which results in unpleasant distortion.
- Aiming for peaks at -6dBFS to -10dBFS ensures a clean signal without accidental clipping.
4. Consistency Across Tracks
- Recording at moderate levels prevents variations in dynamics, which helps in gain staging throughout the mixing process.
- Uniform levels make it easier to blend multiple tracks without sudden volume jumps.
5. Analog Gear & Converters Sound Better at Moderate Levels
- Many high-end analog preamps, compressors, and AD converters perform best when signals are not pushed too hot.
- Some gear introduces unwanted saturation or harmonic distortion when driven too hard.
Typical Recording Level Guidelines
- Peaks: -6dBFS to -10dBFS
- Average Levels (RMS/LUFS): – 18dBFS to -12dBFS
- Final Mix/Master: Leaves headroom for mastering (peaks around -3dBFS before final limiting).
6. Gather Necessary Equipment
- Calibration Tone Generator: Many mixing consoles and DAWs have built-in tone generators; otherwise, use an external device.
- Reference Signal: This is typically a 1 kHz sine wave at a known level (e.g., +4 dBu).
- Measurement Tools: Use an oscilloscope, multimeter, or calibrated meters in your DAW.
7. Verify Analog Signal Path
- Check the analog signal chain leading into the ADC for proper connectivity and settings.
- Disable or bypass any dynamic processing (e.g., EQ, compressors) to avoid altering the reference signal.
8. Send a Reference Signal
- Generate a 1 kHz sine wave at the chosen analog reference level (e.g., +4 dBu).
- Route the signal through the studio’s signal path and into the ADC input.
9. Measure the Digital Signal
- Open your DAW or ADC control software.
- Confirm the average incoming signal level in the digital domain corresponds to the chosen calibration point (e.g., -18 dBFS for +4 dBu).
10. Adjust ADC Settings
- If the digital level does not match the expected value:
- Adjust the input gain of the ADC.
- Verify the calibration trim pots or software settings (if available).
- Ensure that the digital reading matches the expected value consistently across all channels.
11. Check Across All Channels
- Repeat the procedure for all ADC channels.
- Ensure consistent calibration across multiple inputs.
12. Test with Real-World Signals
- Record a test session to confirm that the calibration works under normal studio conditions. Make sure signal peaks for each track are no larger than minus 6 dBFS as adding tracks together and adding special effects during mixing and mastering will increase the total voltage.
- Ensure there’s no clipping or distortion and that the noise floor is acceptable.
13. Document Calibration Settings
- Record the calibration settings for future reference, including the reference level, digital level, and any specific adjustments made.
14. Maintain Regular Calibration
- Repeat the calibration periodically or whenever the studio setup changes, such as adding new hardware or moving equipment.
DACs (Digital-to-Analog Converters) that are involved in the recording session also have to be calibrated.
1. Set Reference Levels:
-
-
- Use test tones (e.g., 1 kHz sine wave at -18 dBFS or another standard level) generated by your DAW or a test tone generator.
- Measure the output of the DAC using a reliable measurement tool, such as an audio analyzer or a voltmeter.
-
2. Match Output Levels:
-
-
- Adjust the DAC’s output level to match the reference level. For example, if -18 dBFS is your reference, the output voltage might need to be set to 1.23V RMS, depending on the system. (+4 dBu is 1.228 Volts.)
-
3. Check Frequency Response:
-
-
- Ensure the DAC outputs a flat frequency response across the audible spectrum. Use frequency sweeps and analysis tools to verify this.
-
4. Confirm Stereo Balance:
-
-
- Use test tones to check that the left and right channels output equal levels. Adjust if necessary.
-
5. Room Calibration:
-
-
- If the DAC feeds studio monitors, it’s essential to calibrate the entire monitoring chain, including the DAC, amplifier, and speakers. This can be done with tools like pink noise and SPL meters.
-
6. Regular Maintenance:
-
-
- Repeat the calibration periodically to account for drift or changes in the equipment over time.
-
Notes
-
-
- High-End DACs: Professional-grade DACs are typically well-calibrated out of the box, but you should still verify their performance in your specific studio setup.
- Calibration Software: Some DACs come with software tools for calibration and testing.
- Environment: Perform calibration in the same acoustic environment as your mixing/mastering to avoid introducing room-related errors.
-
For the recording, studios employ a combination of well-known techniques and specialty methods to achieve high-quality recordings. Here are some commonly used and lesser-known techniques:
Recording Techniques
Layering Tracks
-
-
-
- Recording multiple takes of the same instrument or vocals and layering them together for a richer, fuller sound. Subtle variations add texture and depth.
-
-
Layering is a powerful and widely used technique in digital recording studios. It involves recording multiple takes or tracks of the same or complementary parts and combining them to create a richer, fuller sound. Below are some detailed insights and variations of layering techniques:
1. Vocal Layering
-
-
- Doubling: Record the same vocal part multiple times and layer them together. Slight differences in timing and tone create a natural chorus effect.
- Example: Pop and rock vocals often use doubling to add strength to the lead vocal.
- Harmonies: Layering harmonized vocal parts to enhance the melodic structure and add emotional impact.
- Whisper Tracks: Record a whisper version of the vocal and blend it subtly to add texture and air.
- Doubling: Record the same vocal part multiple times and layer them together. Slight differences in timing and tone create a natural chorus effect.
-
2. Instrument Layering
-
-
- Guitars:
- Rhythm Guitar: Record the same rhythm part with different guitars, amps, or pickup settings to create a wide stereo image. Panning one track left and the other right adds depth.
- Acoustic and Electric Blend: Layering acoustic and electric guitars can add a mix of warmth and brightness.
- Doubled Takes: Record the same riff multiple times with slight timing variations for a natural feel.
- Drums:
- Kick Drum Layering: Combine a recorded kick with a triggered sample for a blend of natural tone and punch.
- Snare Samples: Layer recorded snare hits with processed samples to add impact or depth.
- Overheads and Room Mics: Blend close mic recordings with room mic layers for a natural ambiance.
- Bass:
- Layer a clean DI signal with an amp track or a distorted version for clarity and weight.
- Guitars:
-
3. Electronic and Synth Layering
-
-
- Synths: Combine multiple synth sounds to create a more complex and textured tone.
- Example: Blend a soft pad with a sharp lead synth to create a sound that cuts through but remains lush.
- Bass Synths: Layer sub-bass with higher-register synths to maintain low-end power while adding clarity.
- Synths: Combine multiple synth sounds to create a more complex and textured tone.
-
4. Percussion and Sound Design Layering
-
-
- Percussion: Blend natural and electronic percussion for hybrid textures.
- Example: Layer an electronic clap with a real handclap for warmth and realism.
- Sound Effects: Layer sound effects to create unique textures (e.g., layering multiple explosion sounds for a cinematic impact).
- Percussion: Blend natural and electronic percussion for hybrid textures.
-
5. Subtle Variations in Layering
-
-
- Timing Offsets: Slightly delay or advance a duplicate layer to create a slap-back or doubling effect.
- Pitch Shifts: Slightly detune one layer to add a chorus-like shimmer.
- Dynamic Layering: Use automation to bring in layers only during specific sections for dramatic builds and breakdowns.
-
6. Layering for Stereo Width
-
-
- Panning: Use layers panned hard left and right for a wide stereo field. Center a lead track for focus.
- Mono Compatibility: Check how layers sum to mono to avoid phase cancellation.
-
7. Advanced Techniques
-
-
- Frequency Layering: Assign layers to cover different frequency ranges. For example:
- Low: Sub-bass.
- Mid: Midrange punch.
- High: Airy or shimmering overtones.
- Blending Samples: Layer sampled instruments with live recordings for a polished yet organic sound.
- Re-amping Layers: Record a clean signal, then re-amp it through various effects or amps for tonal diversity.
- Frequency Layering: Assign layers to cover different frequency ranges. For example:
-
Practical Tips
-
-
- Keep Layers Complementary: Avoid creating “mud” by ensuring that layers complement rather than compete with each other.
- Use EQ to Define Roles: Carve out specific frequency ranges for each layer to maintain clarity.
- Automation: Fade layers in and out dynamically to maintain listener interest.
-
Room Emulation
-
-
-
- Using impulse responses to emulate the acoustics of famous recording spaces, allowing recordings to sound like they were made in iconic studios.
-
-
Room emulation is a technique used in recording and mixing to recreate the acoustics of a particular physical space, giving recordings a sense of depth, realism, or ambiance. It can simulate the sound of famous studios, concert halls, small rooms, or even abstract spaces. Here’s a detailed breakdown:
1. Techniques for Room Emulation
Impulse Responses (IRs)
-
-
- What It Is: An impulse response is a recording of a space’s unique acoustic signature, captured by playing a test signal (like a sine sweep or clap) and recording the reflections and decay.
- How It’s Used:
- Load the IR into a convolution reverb plugin.
- Apply it to audio tracks to simulate the acoustics of the sampled space.
- Examples of spaces include Abbey Road Studio 1, cathedrals, and concert venues.
-
Algorithmic Reverb
-
-
- What It Is: Instead of using pre-recorded acoustics, algorithmic reverbs generate the effect mathematically.
- Benefits:
- Greater flexibility in tweaking parameters like room size, decay, and diffusion.
- Useful for creative or unnatural spaces.
- Plugins like Valhalla Room or Lexicon Reverb are popular choices.
-
Hybrid Approach
-
-
- Some plugins combine convolution and algorithmic reverbs, offering realistic sound with creative flexibility (e.g., FabFilter Pro-R, Waves IR-L).
-
Applications in Recording
Studio-Like Environments
-
-
- When recording in untreated rooms or small home studios, room emulation can add the sound of a high-end recording space.
- Example: Using the IR of a large studio to add subtle room reflections to dry vocals or instruments.
-
Replacing or Enhancing Real Rooms
-
-
- If a room mic captures subpar acoustics, replace or blend it with a high-quality room emulation.
-
Mixing Applications
Adding Depth
-
-
- Apply different room emulations to individual instruments or groups to create a sense of space and separation.
- Example: Drums might use a larger room reverb, while vocals use a smaller, tighter space for intimacy.
- Apply different room emulations to individual instruments or groups to create a sense of space and separation.
-
Creating Cohesion
-
-
- Use a single room emulation across multiple tracks to unify their sound, making them feel recorded in the same space.
-
3D Mixing
-
-
- Combine room emulation with panning and EQ to position sounds within a virtual 3D space.
-
Advanced Room Emulation Techniques
Pre-Delay Control
-
-
- Adjusting pre-delay in the reverb settings can emulate the distance between the sound source and reflective surfaces.
- Longer pre-delay: Simulates a larger room or farther mic placement.
- Shorter pre-delay: Creates a sense of closeness.
- Adjusting pre-delay in the reverb settings can emulate the distance between the sound source and reflective surfaces.
-
Layered Reverbs
-
-
- Combine multiple room emulations for complex spaces:
- Example: Use a small room IR for early reflections and a large hall IR for tail reverberation.
- Combine multiple room emulations for complex spaces:
-
EQ’ing the Reverb
-
-
- Shape the room emulation with EQ:
- High-pass filter: Removes low-end muddiness.
- Low-pass filter: Reduces high-frequency harshness, especially for distant rooms.
- Shape the room emulation with EQ:
-
Dynamic Reverb
-
-
- Use sidechain compression on the reverb signal, ducking it when the dry signal is present. This creates space for the primary sound while retaining room ambiance.
-
Creative Uses of Room Emulation
Unrealistic Spaces
-
-
- Use emulations of massive, unrealistic spaces (e.g., a canyon or a warehouse) for dramatic effects.
- Plugins like Eventide Blackhole specialize in such effects.
- Use emulations of massive, unrealistic spaces (e.g., a canyon or a warehouse) for dramatic effects.
-
Movement and Modulation
-
-
- Automate the parameters of the room emulation to simulate a moving sound source or changing space.
- Example: Increasing room size gradually to give the sense of a sound receding into the distance.
- Automate the parameters of the room emulation to simulate a moving sound source or changing space.
-
Unique IRs
-
-
- Capture impulse responses from unconventional objects or places:
- Example: Inside a car, a metal tube, or a forest for creative sound design.
- Capture impulse responses from unconventional objects or places:
-
Popular Tools for Room Emulation
-
-
- Convolution Reverb Plugins:
- Altiverb (Audio Ease)
- Waves IR1 Convolution Reverb
- Logic Pro Space Designer
- FL Studio Fruity Convolver
- Algorithmic Reverb Plugins:
- Valhalla Room
- FabFilter Pro-R
- Lexicon PCM Native Reverb
- UAD EMT 140 Plate Reverb
- Free Options:
- SIR1 (convolution reverb)
- TAL-Reverb
- Convolution Reverb Plugins:
-
Notes
-
-
- Match the Genre: Choose room emulations that fit the music style (e.g., tight rooms for pop vocals, large halls for orchestral).
- Avoid Overuse: Too much reverb can muddy the mix; use sparingly to maintain clarity.
- Test in Mono: Ensure the reverb doesn’t cause phase issues when summed to Mono.
-
Custom Microphone Placement
-
-
-
- Experimenting with unconventional mic placements to capture unique tones, such as placing microphones behind drums, in adjacent rooms, or extremely close to strings.
-
-
Microphone placement is one of the most critical aspects of recording in a studio. It can drastically impact the tone, clarity, and overall quality of the recording. Here’s an in-depth guide to microphone placement techniques for various instruments, vocals, and creative applications:
1. General Microphone Placement Principles
Distance
-
-
- Close Miking (0–12 inches):
- Captures direct sound with minimal room ambiance. Ideal for isolating instruments or vocals.
- Risks: Proximity effect (increased low-end for directional mics) and plosives.
- Medium Distance (1–3 feet):
- Balances direct sound and room reflections. Common for acoustic instruments.
- Far Distance (3+ feet):
- Captures the sound of the room and the instrument. Used in classical and live recordings.
- Close Miking (0–12 inches):
-
Angle
-
-
- On-Axis:
- Pointing directly at the sound source for clarity and brightness.
- Off-Axis:
- Angled slightly away to reduce harshness or pick up more natural tones.
- On-Axis:
-
Height
-
-
- Experimenting with mic height can emphasize different tonal qualities:
- Higher placement captures more overtones and air.
- Lower placement emphasizes body and warmth.
- Experimenting with mic height can emphasize different tonal qualities:
-
2. Microphone Placement for Specific Instruments
Vocals
-
-
- Standard Placement:
- Place a cardioid condenser mic 6–12 inches away at mouth level. Use a pop filter to reduce plosives.
- Angle:
- Slightly off-axis to minimize sibilance and harshness.
- Creative Variations:
- Overhead for a distant, airy vocal sound.
- Below chin level for a darker, warmer tone.
- Standard Placement:
-
Guitar (Acoustic)
-
-
- 12th Fret Technique:
- Place the mic 6–12 inches from the 12th fret, angled slightly toward the soundhole for balance.
- Soundhole:
- Pointing at the soundhole captures more bass but can sound boomy.
- Stereo Pair:
- Use an X/Y or spaced pair technique to capture stereo depth.
- 12th Fret Technique:
-
Guitar (Electric)
-
-
- Close to Amp Speaker:
- Place a dynamic mic (e.g., Shure SM57) 1–2 inches from the speaker cone.
- Experiment with positioning:
- Center of the Cone: Brighter tone.
- Edge of the Cone: Warmer tone.
- Room Mic:
- Place a condenser mic 3–6 feet back for room ambiance.
- Close to Amp Speaker:
-
Drums
-
-
- Kick Drum:
- Place a mic (e.g., AKG D112) just inside the drum for attack.
- Further back for more low-end resonance.
- Snare:
- Top mic: 1–3 inches above the head, angled toward the center.
- Bottom mic: Captures snare rattle (invert phase when mixing).
- Overheads:
- Use a spaced pair or XY configuration above the kit for a balanced stereo image.
- Room Mics:
- Place condenser mics several feet from the kit for ambiance.
- Kick Drum:
-
Bass
-
-
- Direct Input (DI): Often combined with mic recording.
- Cabinet Mic:
- Place a mic near the speaker cone for natural low-end capture.
- Use a ribbon mic for a smoother tone.
-
Piano
-
-
- Upright Piano:
- Mic near the soundboard or open lid.
- Use spaced pair or single cardioid mic for close capture.
- Grand Piano:
- Spaced pair above the strings for stereo imaging.
- Close-miking the hammers for percussive attack.
- Upright Piano:
-
3. Creative Microphone Placement
Over-the-Shoulder
-
-
- Place a mic over the shoulder of the performer to capture what they hear. Works well for acoustic instruments and vocals.
-
Ambient Miking
-
-
- Use omnidirectional or figure-8 mics to capture room ambiance.
- Blend ambient and close mics for depth.
-
Boundary Mics
-
-
- Place boundary microphones on reflective surfaces (walls, floors) to capture natural reflections.
-
Under Miking
-
-
- Place mics underneath the sound source, such as under drum cymbals or piano strings, for unique tonal perspectives.
-
4. Stereo Microphone Techniques
X/Y (Coincident Pair):
-
-
- Two cardioid mics placed at a 90°–120° angle, capsules as close as possible. Excellent for accurate stereo imaging.
-
ORTF:
-
-
- Two cardioid mics 6.7″ apart at a 110° angle. Creates a wide stereo field with natural spacing.
-
Blumlein:
-
-
- Two figure-8 mics at a 90° angle. Captures direct sound and room reflections.
-
Spaced Pair (A/B):
-
-
- Two identical mics placed apart. Produces a wide stereo image but can cause phase issues.
-
5. Practical Tips
-
-
- Experiment: Small adjustments in position can drastically affect the tone. Take time to test placements.
- Listen: Use headphones to monitor the mic signal as you adjust its position.
- Phase Alignment: Always check for phase issues when using multiple microphones.
- Room Treatment: A well-treated room enhances the effectiveness of mic placement.
- Record Reference Tracks: Capture samples with different placements for comparison.
-
Re-amping (Reamping)
-
-
-
- Recording a clean DI (direct input) signal of an instrument (e.g., guitar plugged directly into the mixing console rather than into a guitar amplifier) and later playing it back through amps or effects pedals to achieve a specific tone.
-
-
Re-amping is a powerful technique used in both recording and mixing that allows you to take a clean, direct signal (often recorded through a DI box) and run it back through an amplifier or other gear to reshape its tone. This method provides flexibility and creative control over the tone and feel of a track after the performance is recorded. Here’s an in-depth look at the technique:
1. How Re-amping Works
Step-by-Step Process
-
-
- Record a Clean DI Track:
- Use a DI box or the direct input of your audio interface to capture a clean, unprocessed signal. This is your “source” for re-amping. A DI box, or direct injection box, is a device that converts an instrument’s unbalanced signal into a balanced signal that can be plugged directly into a mixing console or audio interface. This allows you to record or perform live without using a microphone.
- DI boxes are essential for live performances because of the long cable lengths involved, but they’re also used in recording studios. They’re particularly useful for instruments like electric guitars, basses, and synths, which have unbalanced, high-impedance signals that can pick up noise and degrade over long distances. A DI box converts the signal to a low-impedance, balanced signal that’s compatible with outboard equipment and reduces noise.
- DI boxes come in different types, including passive and active:
- Passive DI boxes
- Use a transformer to balance the signal and create a mic-level output. They don’t require power, so they don’t need a battery or phantom power.
- Active DI boxes
- Use electronic gain stages similar to the input section of a modern instrument amp. They require power from a battery or phantom power from the mixing console.
- More advanced DI boxes may also include features like ground-lift switches, pads, equalization switches, and isolated line outputs.
- Playback Through a Re-amp Box:
- A re-amp box (like the Radial X-Amp) converts the line-level signal from your audio interface back to an instrument-level signal, suitable for amplifiers or effects pedals.
- Send to an Amplifier or Effect:
- Route the signal to a guitar or bass amp, effects chain, or even other analog gear.
- Mic the amp as you would during a live performance to capture the output.
- Record the Re-amped Signal:
- Capture the re-amped sound as a new track in your DAW.
- Record a Clean DI Track:
-
2. Applications of Re-amping
Guitar and Bass
-
-
- Tone Shaping:
- Experiment with different amp settings, speaker cabinets, and mic placements to find the perfect tone.
- Layering:
- Create multiple tonal variations of the same performance by re-amping through different amps or pedals and layering them.
- Tone Shaping:
-
Vocals
-
-
- Character Enhancement:
- Send vocals through guitar amps, distortion pedals, or other processors for a lo-fi or gritty texture.
- Character Enhancement:
-
Drums
-
-
- Snare or Kick Re-amping:
- Re-amp snare or kick tracks through amps or saturation effects to add punch and character.
- Room Feel:
- Send drum tracks to an amp in a live room, then record the ambient reflections.
- Snare or Kick Re-amping:
-
Synths and Keyboards
-
-
- Analog Warmth:
- Re-amp digital synths through tube amps or analog effects to add warmth and character.
- Creative Effects:
- Use guitar pedals or modular effects for unique textures.
- Analog Warmth:
-
3. Creative Re-amping Techniques
Re-amp Through Pedals
-
-
- Use guitar or bass pedals for distortion, delay, modulation, or other effects.
- Chain multiple pedals to create layered textures.
-
Ambient Re-amping
-
-
- Place the amp in a different room (e.g., a stairwell or bathroom) and mic the environment for unique spatial effects.
-
Reverse Re-amping
-
-
- Send reversed audio (e.g., a reversed guitar riff) through an amp or pedal for surreal tones.
-
Parallel Re-amping
-
-
- Blend the clean DI signal with multiple re-amped versions (e.g., one distorted and one clean with reverb) for a rich, layered sound.
-
4. Advantages of Re-amping
-
- Flexibility:
- You can tweak the tone endlessly after the performance, eliminating the need for “perfect” amp settings during the recording session.
- Cost and Efficiency:
- Record the DI at home or in a small studio, then re-amp later with high-end gear or in a professional studio.
- Focus on Performance:
- Allows the performer to focus on playing without worrying about tone settings during tracking.
- Consistency:
- The performance stays the same while you explore different tonal options.
- Flexibility:
5. Tools for Re-amping
Re-amp Boxes
-
-
- Convert the line-level signal from your DAW to instrument level:
- Radial X-Amp or ProRMP
- Little Labs Redeye
- Palmer Daccapo
- Convert the line-level signal from your DAW to instrument level:
-
DI Boxes
-
-
- Record the clean signal during tracking:
- Radial J48
- Countryman Type 85
- Behringer Ultra-DI
- Record the clean signal during tracking:
-
Interfaces with Built-In Re-amping
-
-
- Some audio interfaces (e.g., Universal Audio Apollo) include re-amping-friendly outputs.
-
6. Best Practices
-
- Record a Clean DI Track:
- Always record a clean DI track when working with guitar, bass, or any instrument that might benefit from re-amping. It gives you options later.
- Watch Your Gain Staging:
- Ensure proper gain levels when sending the signal to the re-amp box and amp to avoid distortion or noise.
- Phase Alignment:
- Check for phase issues when combining the DI and re-amped tracks. Use phase alignment tools or manual adjustment if necessary.
- Experiment with Mic Placement:
- Treat the re-amping session like a live recording session. Try different mic positions and combinations for varied tones.
- Record Multiple Takes:
- Use different amp settings, mics, or effects during each pass to create a palette of sounds.
- Record a Clean DI Track:
7. Challenges and Solutions
-
-
- Noise or Hum:
- Use balanced cables and ensure proper grounding to minimize interference.
- Latency:
- Compensate for any latency introduced by the re-amping signal chain in your DAW.
- Limited Gear:
- If you don’t have a re-amp box, you can use a passive DI box in reverse, though results may vary.
- Noise or Hum:
-
Mixing Techniques
Parallel Processing
-
-
-
- Using parallel compression, distortion, or EQ to blend processed and unprocessed signals for a punchier or more dynamic mix.
-
-
Parallel Processing in Audio Production
Parallel processing is a versatile mixing technique where a copy of an audio signal is processed independently and then blended with the original signal. This allows for a more dynamic, detailed, and nuanced sound without overly affecting the integrity of the source material. Here’s an in-depth look at parallel processing:
1. The Basics of Parallel Processing
How It Works
-
-
- The original audio signal remains unprocessed or minimally processed.
- A duplicate signal (or “parallel chain”) is processed separately, often with heavy effects or extreme settings.
- Both signals are blended to achieve the desired effect.
-
Why Use Parallel Processing?
-
-
- Retains the natural character of the original signal while adding enhancements.
- Avoids over-processing, which can sound unnatural.
- Allows precise control over the intensity of effects.
-
2. Common Uses of Parallel Processing
Compression (Parallel Compression)
-
-
- What It Does: Adds thickness, punch, and sustain without crushing the dynamics of the original track.
- How to Use It:
- Send a copy of the signal to an auxiliary channel.
- Apply heavy compression (e.g., a low threshold, high ratio, fast attack, and release).
- Blend the compressed signal with the uncompressed signal to taste.
- Applications:
- Drums: Add punch to kick and snare while retaining transient detail.
- Vocals: Increase presence and sustain while keeping natural dynamics.
- Bass: Enhance low-end sustain without losing clarity.
-
EQ
-
-
- What It Does: Boosts or cuts specific frequencies on the parallel signal for tonal shaping without altering the source.
- How to Use It:
- Use EQ to emphasize a specific frequency range (e.g., boosting high-end shimmer on vocals).
- Blend the EQ’d signal with the original for subtle enhancements.
-
Reverb
-
-
- What It Does: Adds space and ambiance without overwhelming the source.
- How to Use It:
- Send the signal to an auxiliary channel.
- Apply reverb to the parallel track and adjust the wet/dry blend.
- Blend with the dry signal for a balanced mix of presence and space.
- Applications:
- Vocals: Create lush, spacious sounds while keeping intelligibility.
- Drums: Add room sound without losing punch.
-
Distortion/Saturation
-
-
- What It Does: Adds harmonic richness, grit, or warmth without over-saturating the original track.
- How to Use It:
- Apply distortion or saturation to the parallel track.
- Blend with the original signal to add texture and weight.
- Applications:
- Vocals: Add grit for rock or lo-fi styles.
- Bass: Add midrange harmonics for clarity in dense mixes.
- Drums: Add warmth and character to shells or cymbals.
-
Delay
-
-
- What It Does: Creates echo effects without muddying the original signal.
- How to Use It:
- Apply delay to a parallel track and adjust feedback and mix levels.
- Blend the delayed signal subtly for depth or prominently for creative effects.
- Applications:
- Vocals: Add rhythmic echoes or subtle ambiance.
- Guitars: Create wide, spacious textures.
-
3. Advanced Parallel Processing Techniques
Multiband Parallel Processing
-
-
- What It Does: Split the audio into frequency bands and process each band independently.
- How to Use It:
- Use multiband compressors or EQ to isolate low, mid, and high frequencies.
- Apply effects (e.g., compression, saturation) to individual bands.
- Blend the processed bands with the original signal.
- Applications:
- Bass: Compress the low end for control while leaving the midrange untouched.
- Vocals: Add air to the highs without affecting the mids or lows.
-
Transient Shaping
-
-
- What It Does: Enhances or softens attack and sustain characteristics.
- How to Use It:
- Apply transient shaping to the parallel signal.
- Blend it with the original for a punchy yet natural result.
- Applications:
- Drums: Increase attack for more snap or sustain for roominess.
- Percussion: Enhance clarity and definition.
-
Dynamic Parallel Effects
-
-
- What It Does: Apply effects that react dynamically to the original signal.
- How to Use It:
- Use sidechain compression, gating, or dynamic EQ on the parallel track.
- Trigger effects based on the dynamics of the original signal.
- Applications:
- Reverb: Use sidechain compression to reduce reverb during loud sections and increase it during quiet sections.
- Delay: Automate delay intensity based on vocal dynamics.
-
Creative Blending
-
-
- Experiment with unconventional combinations:
- Blend distorted and clean vocals for a modern pop/rock edge.
- Add heavily modulated synth layers beneath clean lines for richness.
- Use a reverse reverb or delay on the parallel chain for ethereal effects.
- Experiment with unconventional combinations:
-
4. Workflow Tips
-
-
- Auxiliary Sends vs. Duplicate Tracks:
- Use auxiliary sends for easy control and adjustments.
- Duplicate tracks if you need to edit or automate parallel processing independently.
- Blend Carefully:
- Start with the processed signal at zero and gradually bring it in until it complements the original.
- Phase Alignment:
- Check for phase issues between the original and parallel signals, especially when duplicating tracks.
- Automation:
- Automate the parallel signal’s level or effect parameters to create dynamic changes in the mix.
- Layering with Intent:
- Use parallel processing to enhance specific mix elements without overcomplicating the soundscape.
- Auxiliary Sends vs. Duplicate Tracks:
-
5. Example Parallel Processing Chains
Drum Parallel Compression Chain:
-
-
- Dry Track: Unprocessed drums for natural dynamics.
- Parallel Track:
- Heavy compression (fast attack/release).
- Subtle saturation for warmth.
- High-pass filter to avoid low-end buildup.
-
Vocal Chain with Parallel Reverb and Distortion:
-
-
- Dry Track: Clean vocal for clarity.
- Parallel Track 1:
- Hall reverb with a high-pass filter to keep it airy.
- Parallel Track 2:
- Distortion or saturation for grit.
- Blend: Adjust levels of both parallel tracks to add depth and character.
-
Subtractive EQ
-
-
-
- Carving out frequencies from instruments to make room for others, ensuring a cleaner mix. For instance, cutting low frequencies in guitars to allow the bass guitar to shine.
-
-
Subtractive EQ in Audio Production
Subtractive EQ is a technique where you remove (attenuate) specific frequencies from an audio signal to achieve clarity, balance, and a cleaner mix. Instead of boosting desired frequencies, subtractive EQ removes problematic or unnecessary ones, leaving space for other elements in the mix. Here’s a detailed exploration:
1. Why Use Subtractive EQ?
-
-
- Clarity: Removes muddiness, harshness, or unwanted resonances.
- Headroom: Frees up space in the mix, reducing masking effects and improving dynamics.
- Transparency: By cutting rather than boosting, subtractive EQ minimizes the risk of unnatural sounds and avoids emphasizing noise or distortion.
- Frequency Balance: Makes room for other elements to sit better in the mix, creating a cohesive soundscape.
-
2. Common Frequency Ranges for Subtractive EQ
Low-End (20–200 Hz)
-
-
- Muddiness: Often found around 100–250 Hz in instruments like guitars, pianos, and vocals.
- Low-Rumble: Remove subsonic noise (20–40 Hz) using a high-pass filter.
- Kick vs. Bass: Attenuate frequencies in one to make room for the other (e.g., cut around 80 Hz in the bass if the kick occupies that range).
-
Low-Mid Range (200–800 Hz)
-
-
- Boxiness: Particularly in drums, vocals, and guitars, boxy or hollow tones reside around 300–500 Hz.
- Woofiness: Overpowering low-mids in bass-heavy tracks can be controlled with cuts in this range.
-
High-Mid Range (2–5 kHz)
-
-
- Harshness: Harsh, nasal, or biting qualities in vocals and instruments can often be found between 2–4 kHz.
- Clutter: Overlapping frequencies between guitars, keyboards, and vocals can muddy this range. Surgical cuts can improve separation.
-
High-End (5–20 kHz)
-
-
- Sibilance: Found in vocals around 5–8 kHz (use a de-esser or EQ cut).
- Hiss/Noise: High-frequency noise or excessive brightness may need attenuation above 10 kHz.
-
3. Techniques for Subtractive EQ
Identify Problematic Frequencies
-
-
- Sweep-and-Cut Method:
- Use a narrow Q (bandwidth) and boost a band by 6–12 dB.
- Sweep the frequency range to identify resonances or harsh tones.
- Cut the problematic frequency by reducing the gain.
- Visual Analysis:
- Use spectrum analyzers (e.g., FabFilter Pro-Q, iZotope Neutron) to identify peaks or unwanted resonances visually.
- A/B Listening:
- Toggle the EQ on and off while listening to confirm the improvement.
- Sweep-and-Cut Method:
-
Use High-Pass and Low-Pass Filters
-
-
- High-Pass Filter:
- Removes low-end rumble or unnecessary bass frequencies. Set the cutoff just below the lowest fundamental frequency of the instrument.
- Common for vocals, guitars, and even drums (except kick and bass).
- Low-Pass Filter:
- Removes high-frequency noise or harshness. Useful for taming cymbals, electric guitars, or synths.
- High-Pass Filter:
-
Target Resonances
-
-
- Resonances occur when certain frequencies are overly emphasized, often due to room acoustics, mic placement, or instrument characteristics.
- Use narrow cuts (high Q) to attenuate these without affecting surrounding frequencies.
-
Subtractive EQ Before Compression
-
-
- Applying EQ cuts before compression avoids the compressor overreacting to problematic frequencies, resulting in more balanced dynamics.
-
Tame Overlapping Frequencies
-
-
- Use subtractive EQ to create space between competing instruments.
- Example: If a vocal clashes with a guitar, reduce frequencies in the guitar track around 2–4 kHz, where vocal intelligibility resides.
- Use subtractive EQ to create space between competing instruments.
-
4. Practical Applications of Subtractive EQ
Vocals
-
-
- High-Pass Filter: Remove low-end rumble or mic noise below 80–100 Hz.
- Muddiness: Cut 200–400 Hz to reduce boxiness.
- Sibilance: Attenuate harsh “S” sounds at 5–8 kHz with a narrow band or de-esser.
-
Drums
-
-
- Kick Drum:
- Cut 300–500 Hz to reduce boxiness.
- Use a high-pass filter below 20–40 Hz to remove unnecessary subsonics.
- Snare: Cut around 400–600 Hz to clean up muddiness; cut 2–3 kHz if overly harsh.
- Overheads: High-pass filter around 150–200 Hz to remove low-end bleed.
- Kick Drum:
-
Bass
-
-
- Low-End Control: Use a high-pass filter to remove frequencies below 30–40 Hz.
- Mud Reduction: Cut 200–400 Hz to avoid conflict with other instruments.
-
Guitar
-
-
- Electric Guitar:
- Cut 200–300 Hz to reduce mud.
- Use a low-pass filter around 8–10 kHz to tame hiss or harshness.
- Acoustic Guitar:
- High-pass below 80 Hz to remove low-end rumble.
- Cut 500–800 Hz for boxiness.
- Electric Guitar:
-
Synths (Synthesizers)
-
-
- Remove unnecessary low-end with a high-pass filter.
- Cut 2–4 kHz if the synth clashes with vocals or guitars.
-
Mix Bus
-
-
- Subtractive EQ can be used on the entire mix:
- High-pass filter below 20–30 Hz to remove inaudible sub-bass.
- Subtle cuts around 200–400 Hz to clean up muddiness.
- Reduce harshness at around 2–4 kHz for a smoother mix.
- Subtractive EQ can be used on the entire mix:
-
5. Tools for Subtractive EQ
-
-
- Parametric EQ:
- Precise frequency targeting. Examples:
- FabFilter Pro-Q 3
- Waves Q10
- Logic Pro Channel EQ
- Precise frequency targeting. Examples:
- Dynamic EQ:
- Attenuates frequencies dynamically, only when necessary. Examples:
- iZotope Neutron
- TDR Nova
- Attenuates frequencies dynamically, only when necessary. Examples:
- Linear-Phase EQ:
- Avoids phase shift, suitable for mastering or when transparency is critical. Examples:
- FabFilter Pro-Q in linear-phase mode
- MAAT Linear Phase EQ
- Waves Linear Phase EQ
- Avoids phase shift, suitable for mastering or when transparency is critical. Examples:
- Parametric EQ:
-
6. Tips for Effective Subtractive EQ
-
-
- Cut Narrowly, Boost Broadly:
- When cutting, use a narrow Q to target specific problems.
- For broad tonal adjustments, boosting with a wider Q is more natural.
- Cut, Don’t Boost:
- Start with subtractive EQ to remove issues before boosting.
- Trust Your Ears:
- While visual tools are helpful, rely on your ears to make final decisions.
- Don’t Overdo It:
- Too many cuts can thin out the sound. Use EQ sparingly and only where necessary.
- Context Matters:
- Always EQ in the context of the full mix, not in solo, to ensure each element complements the others.
- Cut Narrowly, Boost Broadly:
-
Frequency Slotting
-
-
- Strategically assigning specific frequency ranges to each instrument to prevent masking and improve clarity.
-
Frequency Slotting in Audio Production
Frequency slotting is a mixing technique that ensures each element in a mix has its own “space” in the frequency spectrum. By carefully carving out or enhancing specific frequency ranges for different instruments, you avoid masking (when one sound obscures another) and achieve a cleaner, more balanced mix.
1. Why Use Frequency Slotting?
-
-
- Clarity: Prevents instruments from competing for the same frequency space.
- Separation: Makes each element distinct while maintaining cohesion.
- Balance: Distributes energy across the frequency spectrum, avoiding muddiness or harshness.
- Mix Space Efficiency: Allows each element to contribute without overcrowding the mix.
-
2. The Frequency Spectrum Overview
Each element in your mix occupies specific frequency ranges:
-
-
- Sub-Bass (20–60 Hz): Felt rather than heard (kick, bass synths).
- Bass (60–250 Hz): Low-end power and warmth (bass guitar, kick).
- Low-Mids (250–500 Hz): Body and warmth (guitars, piano, vocals).
- Mids (500–2000 Hz): Clarity and presence (vocals, guitars, snares).
- High-Mids (2–6 kHz): Definition and intelligibility (vocals, cymbals, strings).
- Highs (6–20 kHz): Air and sparkle (hi-hats, synths, vocals).
-
3. How Frequency Slotting Works
-
-
- Identify the Key Frequencies:
- Determine the dominant frequency ranges of each instrument.
- For example, a bass guitar may dominate in the 60–200 Hz range, while a kick drum occupies 40–80 Hz.
- Cut or Boost Strategically:
- Reduce frequencies in one instrument to make room for another.
- Boost the desired frequencies of one instrument to emphasize its character.
- Use Complementary EQ:
- Make reciprocal EQ adjustments to related instruments.
- For example, attenuate 300 Hz in the bass to emphasize the kick drum and boost 80 Hz in the kick to accentuate its punch.
- Avoid Overlapping Frequencies:
- Instruments that share similar frequency ranges (e.g., guitars and vocals) should be adjusted to minimize masking.
- Identify the Key Frequencies:
-
4. Practical Applications of Frequency Slotting
Kick Drum and Bass
-
-
- Problem: Low-end clutter.
- Solution:
- Decide which element dominates specific frequencies.
- Example:
- Boost the kick at 60 Hz and cut the bass there.
- Boost the bass at 120 Hz and cut the kick there.
-
Vocals and Guitars
-
-
- Problem: Vocals getting masked by midrange-heavy guitars.
- Solution:
- Boost 2–4 kHz in vocals for intelligibility.
- Attenuate 2–4 kHz in the guitars to make room for the vocals.
-
Drums and Cymbals
-
-
- Problem: Cymbals overpowering snare or toms.
- Solution:
- High-pass filter cymbals around 300–400 Hz to reduce low-end bleed.
- Boost snare in the 2–5 kHz range for snap.
-
Piano and Strings
-
-
- Problem: Overlapping harmonic content in the mids.
- Solution:
- Use EQ to carve out space for each instrument’s fundamental tones.
- Example:
- Boost 1–2 kHz for piano clarity.
- Attenuate 1–2 kHz in strings to avoid masking.
-
5. Tools for Frequency Slotting
EQ
-
-
- Parametric EQ: Offers precision and flexibility.
- Examples: FabFilter Pro-Q, Waves Q10, Logic Pro EQ.
- Dynamic EQ: Attenuates only when problematic frequencies become prominent.
- Examples: iZotope Neutron, TDR Nova.
- Parametric EQ: Offers precision and flexibility.
-
Frequency Analyzers
-
-
- Visualize overlapping frequencies.
- Examples: SPAN by Voxengo, iZotope Insight, FabFilter Pro-Q Spectrum Analyzer.
- Visualize overlapping frequencies.
-
Multiband Processing
-
-
- Apply EQ, compression, or effects to specific frequency bands.
- Examples: Waves C6, iZotope Ozone.
- Apply EQ, compression, or effects to specific frequency bands.
-
Panning
-
-
- Move elements to different parts of the stereo field to complement frequency adjustments.
-
6. Workflow Tips
1. Start with High-Pass Filters
-
-
- Remove unnecessary low-end from non-bass elements like guitars, vocals, and synths. This clears space for kick and bass instruments.
-
2. Prioritize the Mix Hierarchy
-
-
- Determine which elements are the focal points of the mix (e.g., vocals in a pop song, kick, and bass in electronic music).
- Slot other instruments around these priority elements.
-
3. Use Subtractive EQ First
-
-
- Cut problematic frequencies before boosting desired ones. This approach is more transparent and avoids overcrowding the mix.
-
4. Use Complementary EQ
-
-
- When boosting in one track, consider cutting the same range in another.
- Example:
- Boost 3 kHz in vocals for presence.
- Cut 3 kHz in guitars to make room.
-
5. Automate Frequency Adjustments
-
-
- In dynamic mixes, use automation to adjust EQ settings for specific sections (e.g., lowering guitar midrange during vocal passages).
-
6. Check-in Context
-
-
- Always make EQ adjustments while listening to all elements in the mix. Soloing tracks can mislead your decisions.
-
7. Advanced Frequency Slotting Techniques
Multiband Slotting
-
-
- Split instruments into frequency bands and process each band independently.
- Example: Use multiband compression to tame the low mids in a muddy bass guitar while leaving the highs intact.
- Split instruments into frequency bands and process each band independently.
-
Sidechain EQ
-
-
- Use sidechain compression with an EQ filter to dynamically reduce masking.
- Example: Sidechain a bass track to duck its 60 Hz range when the kick drum hits.
- Use sidechain compression with an EQ filter to dynamically reduce masking.
-
Mid/Side Processing
-
-
- Use EQ to process the mid (center) and side (stereo) components of a mix separately.
- Example: Boost midrange vocals in the center while attenuating overlapping frequencies in side-panned guitars.
- Use EQ to process the mid (center) and side (stereo) components of a mix separately.
-
Parallel EQ
-
-
- Apply EQ on a duplicate signal and blend it with the original to emphasize or de-emphasize specific frequencies.
-
8. Example Frequency Ranges for Common Instruments
| Instrument | Key Frequency Ranges |
| Kick Drum | Sub-bass (40–60 Hz), punch (100–150 Hz), click (2–4 kHz). |
| Snare Drum | Body (150–250 Hz), crack (2–5 kHz), air (8–12 kHz). |
| Bass Guitar | Fundamentals (60–100 Hz), warmth (120–250 Hz), clarity (700 Hz). |
| Electric Guitar | Body (150–300 Hz), crunch (1–3 kHz), air (8–10 kHz). |
| Vocals | Warmth (150–300 Hz), presence (2–5 kHz), sibilance (5–8 kHz). |
| Piano | Body (200–500 Hz), clarity (2–4 kHz), air (8–12 kHz). |
Automated Volume Rides
-
-
-
- Setting up automating volume changes throughout a track to emphasize certain elements and ensure dynamic balance.
-
-
Automated volume rides involve dynamically adjusting the volume of individual tracks or sections in a mix using automation tools. This technique ensures a more expressive, balanced, and professional-sounding mix by enhancing dynamics and clarity. It’s particularly useful for vocals, solos, or other elements that need to remain prominent or consistent throughout the mix.
1. Why Use Automated Volume Rides?
-
-
- Dynamic Balance: Smooth out uneven performances or varying loudness levels.
- Expressiveness: Highlight emotional or important moments in the mix.
- Clarity: Keep key elements (e.g., vocals) consistently audible without over-compressing.
- Transparency: Achieve a polished mix without relying heavily on compression, which can color the sound.
-
2. Tools for Volume Automation
-
-
- DAW Automation Lanes:
- Most DAWs (Logic Pro, Pro Tools, Ableton Live, etc.) provide automation lanes for precise volume adjustments.
- Fader Automation:
- Automate fader movements manually or programmatically.
- Plugins:
- Specialized tools like Waves Vocal Rider or iZotope Neutron automate volume rides in real-time.
- Control Surfaces:
- Use hardware controllers (e.g., Avid S1, Behringer X-Touch) for tactile, real-time adjustments.
- DAW Automation Lanes:
-
3. Common Applications
Vocals
-
-
- Purpose: Ensure consistent vocal presence without over-compression.
- Example:
- Raise the volume during quiet phrases to keep them intelligible.
- Lower the volume of loud peaks to prevent them from overwhelming the mix.
-
Lead Instruments
-
-
- Purpose: Keep solos (e.g., guitar, piano) prominent during their sections.
- Example:
- Boost the lead guitar during a solo, then lower it as it transitions back to a rhythm role.
-
Dialog and Voiceovers
-
-
- Purpose: Ensure speech is clear and intelligible.
- Example:
- Gently raise quieter words or phrases without compressing the entire signal.
-
Drums
-
-
- Purpose: Add energy and dynamics by emphasizing key drum hits.
- Example:
- Highlight specific snare hits or cymbal crashes during transitions.
-
Bass
-
-
- Purpose: Maintain a consistent low-end presence.
- Example:
- Boost bass during softer parts of the mix, ensuring it’s felt but not overpowering.
-
Full Mix (Master Automation)
-
-
- Purpose: Enhance the dynamics of the entire song.
- Example:
- Raise the overall mix volume slightly during choruses for added impact.
-
4. Workflow for Automating Volume Rides
Step 1: Identify Problem Areas
-
-
- Listen critically to the mix.
- Identify moments where:
- Vocals dip below the instrumentation.
- Key elements (e.g., solos) lose prominence.
- Transitions lack energy.
-
Step 2: Enable Automation
-
-
- Activate volume automation for the desired track(s).
- In most DAWs, this involves switching the track to “Write,” “Touch,” or “Latch” automation mode.
- Activate volume automation for the desired track(s).
-
Step 3: Perform Initial Automation
-
-
- Use faders or draw automation curves to adjust volume dynamically.
- For vocals, manually ride the fader during playback to balance dynamics in real-time.
- Use faders or draw automation curves to adjust volume dynamically.
-
Step 4: Fine-Tune Automation
-
-
- Edit automation curves for precision:
- Use smooth ramps for gradual changes.
- Create sharp nodes for sudden transitions (e.g., mutes or dramatic level changes).
- Edit automation curves for precision:
-
Step 5: Adjust in Context
-
-
- Always automate while listening to the entire mix, not in solo mode.
- Make subtle adjustments to avoid unnatural fluctuations.
-
Step 6: Test with Automation Modes
-
-
- Touch Mode: Automation writes only while the fader is touched.
- Latch Mode: Automation continues writing until playback stops.
- Write Mode: Overwrites all existing automation data during playback.
-
5. Techniques for Effective Volume Rides
1. Ride the Wave
-
-
- Increase volume slightly for emotional phrases or crescendos.
- Lower volume during instrumental breaks or dense sections.
-
2. Focus on Transitions
-
-
- Smooth out volume jumps at section changes (e.g., verse to chorus).
-
3. Enhance Nuance
-
-
- Emphasize subtle details like breaths, inflections, or quiet background effects.
-
4. Use Automation with Compression
-
-
- Combine subtle volume rides with light compression to retain dynamics while controlling peaks.
-
5. Automate Post-Effects
-
-
- Apply automation after dynamic effects like compression, EQ, or saturation for better control.
-
6. Advanced Tips
Parallel Volume Rides
-
-
- Automate the volume of a duplicate track processed differently (e.g., a compressed parallel vocal) to blend in only when needed.
-
Automating Reverbs and Delays
-
-
- Ride send levels to emphasize reverb or delay tails during quieter sections or fades.
-
Multiband Automation
-
-
- Use multiband compressors with automation to dynamically control specific frequency ranges (e.g., taming vocal harshness at 2–4 kHz during loud phrases).
-
Automate Sidechain Triggers
-
-
- Adjust sidechain compression thresholds dynamically for more natural ducking.
-
Volume Rides for Genre Dynamics
-
-
- In EDM or Pop: Gradually increase volume before a drop or chorus for impact.
- In Classical or Jazz: Automate dynamics to replicate live performance nuances.
-
7. Automation Techniques by Genre
| Genre | Volume Ride Goals |
| Pop | Keep vocals upfront and automate choruses for impact. |
| Rock | Emphasize solos and transitions; control cymbals and snares. |
| Hip-Hop | Ensure vocal intelligibility; automate bass for groove. |
| EDM | Build tension with gradual volume increases before drops. |
| Classical | Mimic live dynamics; automate orchestra swells and solo passages. |
| Film Scoring | Highlight emotional cues; control dialog, effects, and score balance. |
8. Example Workflow for Vocals
-
-
- Identify Problem Areas:
- Look for words or phrases buried in the mix.
- Create Automation Nodes:
- Place keyframes around each word or phrase needing adjustment.
- Adjust Volume:
- Raise quieter words by 1–3 dB.
- Gently lower louder phrases by 1–2 dB.
- Smooth Transitions:
- Use gradual ramps to avoid abrupt changes.
- A/B Test:
- Compare before and after automation to ensure improvements are natural.
- Identify Problem Areas:
-
Mastering Techniques
Mid/Side Processing
-
-
-
- Adjusting the stereo width by independently processing the “mid” (center) and “side” (stereo) channels for a wider or more focused sound.
-
-
Mid/Side processing is a technique that allows you to manipulate the “Mid” (center) and “Side” (stereo) components of a signal separately. This is especially useful in mixing and mastering for controlling stereo width, enhancing focus, and fixing spatial imbalances. Below is a comprehensive guide to understanding and using M/S processing effectively.
1. What is Mid/Side (M/S) Processing?
In a stereo signal:
-
-
- Mid (M): The mono information, shared equally by the left and right channels (center elements like vocals, bass, kick drum, snare).
- Side (S): The stereo information, or the differences between the left and right channels (reverbs, panned instruments, room ambiance).
-
By splitting audio into Mid and Side components, you can adjust the spatial characteristics of a track or mix without affecting the entire stereo image equally.
2. How M/S Works
Encoding
-
-
- A stereo signal is encoded into Mid/Side:
- Mid = (Left + Right) ÷ 2
- Side = (Left – Right) ÷ 2
- A stereo signal is encoded into Mid/Side:
-
Processing
-
-
- You apply EQ, compression, reverb, or other effects to the Mid or Side components independently.
-
Decoding
-
-
- The Mid/Side signal is converted back into stereo:
- Left = Mid + Side
- Right = Mid – Side
- The Mid/Side signal is converted back into stereo:
-
3. Tools for Mid/Side Processing
-
-
- Plugins:
- EQ: FabFilter Pro-Q, iZotope Ozone EQ, Waves H-EQ.
- Compression: Waves Center, FabFilter Pro-C, Brainworx bx_opto.
- Stereo Enhancement: iZotope Ozone Imager, Waves S1, Brainworx bx_control.
- Reverb: Valhalla Room, FabFilter Pro-R with M/S capabilities.
- DAWs:
- Many DAWs (e.g., Logic Pro, Ableton Live, Cubase) allow M/S routing natively or with plugins.
- Hardware:
- Some high-end mastering hardware offers M/S controls for analog signal chains.
- Plugins:
-
4. Applications of Mid/Side Processing
1. Enhancing Stereo Width
-
-
- Boost Side Frequencies: Increase the level of Side components to widen the stereo image.
- Example: Boost high frequencies in the Side to make panned guitars or cymbals more spacious.
- Cut Mid Frequencies: Reduce Mid frequencies to create a sense of openness.
- Boost Side Frequencies: Increase the level of Side components to widen the stereo image.
-
2. Focusing the Mix Center
-
-
- Boost Mid Frequencies: Enhance clarity and focus on center elements like vocals or bass.
- Cut Side Frequencies: Remove unnecessary stereo information that may clutter the mix.
-
3. Controlling Reverb and Ambience
-
-
- Use M/S EQ to manage reverb tails:
- Example: Cut low frequencies in the Side to clean up muddy reverb while leaving the Mid untouched.
- Use M/S EQ to manage reverb tails:
-
4. Tightening the Low End
-
-
- Mono Bass: Cut low frequencies in the Side channel (below 100 Hz) to keep the bass focused in the center.
- Ensures better playback on systems with mono subwoofers.
- Mono Bass: Cut low frequencies in the Side channel (below 100 Hz) to keep the bass focused in the center.
-
5. Correcting Stereo Imbalances
-
-
- Panned Instruments: Use M/S EQ to address tonal imbalances in Side components.
- Example: Boost 1–3 kHz in the Side to enhance panned guitars.
- Panned Instruments: Use M/S EQ to address tonal imbalances in Side components.
-
6. Mastering Adjustments
-
-
- Stereo Width Control: Subtly widen the mix by boosting Side frequencies or narrowing by boosting Mid.
- Fixing Problems: Use M/S EQ to reduce harshness in Side frequencies (e.g., cymbals) without affecting Mid-clarity.
-
5. Mid/Side EQ Techniques
1. Brightening the Stereo Image
-
-
- Boost high frequencies (8–12 kHz) in the Side to add air and sparkle to stereo elements like cymbals and effects.
-
2. Cleaning the Low-End
-
-
- Apply a high-pass filter to the Side below 80–120 Hz to keep low frequencies centered.
-
3. Enhancing Vocal Presence
-
-
- Boost 2–5 kHz in the Mid to make vocals stand out.
- Cut the same range in the Side to reduce distractions.
-
4. Reducing Harshness
-
-
- Identify harsh frequencies (e.g., 3–5 kHz) in the Side and attenuate them to smooth out the stereo field.
-
6. Mid/Side Compression Techniques
1. Center Focus
-
-
- Apply compression to the Mid to control the dynamics of central elements like vocals and drums.
-
2. Stereo Expansion
-
-
- Use lighter compression on the Side to enhance the dynamic contrast of stereo elements, making the mix feel wider.
-
3. Balancing Levels
-
-
- Compress the Side channel to reduce overly dynamic stereo effects and create a more cohesive mix.
-
7. Reverb and Delay with M/S Processing
Mid/Side Reverb
-
-
- Apply reverb only to the Side to enhance space without muddying the Mid.
- Example: Keep the vocal dry in the Mid and apply reverb to the Side for a wide, ambient effect.
-
Mid/Side Delay
-
-
- Use stereo delays with M/S processing:
- Mid: Subtle delay for clarity and focus.
- Side: Wider delay with modulation for a lush stereo effect.
- Use stereo delays with M/S processing:
-
8. Practical Workflow for M/S Processing
Step 1: Analyze the Mix
-
-
- Use a frequency analyzer or stereo meter to identify issues with the stereo field or specific frequency ranges.
-
Step 2: Apply M/S Effects
-
-
- EQ:
- Tame problematic frequencies in the Side (e.g., harshness, mud).
- Enhance clarity in the Mid (e.g., vocals, snare).
- Compression:
- Tighten the Mid dynamics for better focus.
- Subtly control or enhance Side dynamics for width.
- EQ:
-
Step 3: Fine-Tune the Stereo Width
-
-
- Use stereo imaging tools to adjust Side levels dynamically, ensuring the mix feels open but not overly wide.
-
Step 4: Monitor in Mono and Stereo
-
-
- Regularly switch between mono and stereo playback to ensure the adjustments translate well across systems.
-
9. Tips for Effective M/S Processing
-
-
- Be Subtle: Drastic changes can make the mix sound unnatural or disjointed.
- Focus on Context: Always adjust M/S settings while listening to the entire mix.
- Match the Genre: Wide, spacious mixes suit ambient or EDM, while tighter, centered mixes suit rock or classical.
- Check for Phase Issues: Excessive Side boosts can lead to phase problems when played in mono.
-
Saturation and Harmonics
-
-
-
- Adding subtle harmonic distortion through tape emulation or saturation plugins to add warmth and character.
-
-
Digital recording studios often add harmonic distortion and saturation to tracks to emulate the warmth, richness, and character traditionally associated with analog equipment. These effects are used creatively or subtly to enhance a recording. Here are some common techniques and tools:
1. Using Saturation Plugins
Saturation plugins emulate the harmonic distortion introduced by analog tape machines, tube amplifiers, or transformers.
-
-
- Tape Saturation: Plugins like Universal Audio’s Studer A800, Waves’ J37, or Softube’s Tape replicate the slight compression, soft clipping, and frequency shaping of analog tape.
- Tube Saturation: Tube emulation plugins like FabFilter’s Saturn 2, Soundtoys’ Radiator, or Black Rooster Audio’s VPRE-73 add warmth by introducing even-order harmonics.
- Solid-State Saturation: Some plugins emulate the subtle distortion from solid-state circuits, offering a cleaner and tighter saturation.
-
2. Parallel Saturation
This involves blending a processed (saturated) signal with the original clean signal, retaining clarity while adding warmth.
-
-
- Create a duplicate track or use a plugin with a mix knob to adjust the balance between dry and wet signals.
-
3. Adding Harmonic Exciters
Harmonic exciters add subtle harmonic overtones to enhance clarity and presence. They are often used to brighten tracks without boosting EQ excessively.
-
-
- Popular tools: iZotope’s Exciter in Ozone, Waves’ Aphex Vintage Aural Exciter.
-
4. Clipping for Harmonic Content
Soft or hard clipping is used to shape transients and add harmonics. Soft clipping can emulate the behavior of analog gear, while hard clipping creates more pronounced distortion.
-
-
- Tools like StandardCLIP, FabFilter’s Pro-L 2, or Ableton’s built-in Saturator can be adjusted for various levels of clipping.
-
5. Dynamic Saturation
Applying saturation only to specific dynamic ranges, such as louder transients or peaks, helps retain a clean signal while adding color during intense moments.
-
-
- Many compressors, like the Klanghelm MJUC or plugins with saturation options, apply harmonic distortion dynamically.
-
6. Multi-Band Saturation
Applying saturation to specific frequency bands allows precise control over which parts of the audio spectrum get enhanced.
-
-
- Multi-band plugins like FabFilter’s Saturn 2, iZotope’s Trash 2, or Melda’s MSaturatorMB let you apply saturation to selected ranges, e.g., boosting the midrange for vocals or adding grit to the low end for bass.
-
7. Overdriving Preamps or Console Emulations
Plugins emulating analog consoles or preamps introduce natural harmonic distortion and saturation when driven hard.
-
-
- Examples: Slate Digital’s Virtual Console Collection, Universal Audio’s Neve Preamp, or Waves’ NLS Non-Linear Summer.
-
8. Re-amping
Sending a signal out to analog hardware (e.g., tube preamps, guitar amps) and recording it back adds authentic analog distortion and saturation.
9. Creative Use of Overdrive and Distortion Plugins
Plugins designed for distortion can be dialed back for subtle harmonic saturation.
-
-
- Examples: Soundtoys’ Decapitator, Ableton’s Overdrive, or Native Instruments’ Driver.
-
10. Layering with Subtle Noise
Adding tape hiss, vinyl crackle, or other noise textures creates a sense of analog realism and subtly enhances perceived warmth.
-
-
- Tools like XLN Audio’s RC-20 Retro Color or AudioThing’s Vinyl Strip work well.
-
11. Customizing Algorithmic Behavior
Some advanced plugins allow users to customize how harmonics are generated, including adjusting the ratio of even to odd harmonics or controlling the response curve.
-
-
- FabFilter’s Saturn 2 is notable for its detailed control.
-
Practical Tips:
-
-
- Avoid Overdoing It: Too much saturation or distortion can muddy the mix. Use subtle settings for natural results.
- Match Context: Match the type of saturation to the genre or element in the mix. For example, tape saturation may suit drums, while tube saturation can add warmth to vocals.
- AB Testing: Regularly compare the processed signal with the unprocessed one to ensure the enhancement serves the track.
-
By combining these techniques, producers can add life and character to digital recordings.
Master Bus Sculpting
-
-
-
- Using multiband compression or dynamic EQ on the master bus to control the overall frequency balance and dynamics.
-
-
Master bus sculpting is a critical process in mixing and mastering, where engineers shape the overall sound of a mix to ensure it’s polished, balanced, and cohesive. Here are some tricks and techniques commonly used in digital recording studios for master bus sculpting:
1. Start with Subtle Compression
Master bus compression helps glue the mix together by controlling dynamic range and emphasizing coherence.
-
-
- Glue Compression: Use a transparent compressor (e.g., SSL-style compressors like Cytomic’s The Glue or Waves’ SSL G-Master Buss Compressor) with a low ratio (e.g., 2:1) and slow attack to maintain punch.
- Multiband Compression: Use tools like FabFilter’s Pro-MB or iZotope’s Ozone Dynamics to compress specific frequency bands, such as taming low-end rumble or smoothing midrange harshness.
-
2. Add Subtle EQ Adjustments
Master bus EQ is used for tonal shaping and correcting frequency imbalances.
-
-
- High-Pass Filter: Gently roll off inaudible sub-bass frequencies (e.g., below 20 Hz) to clean up the low end.
- Broad Strokes: Use broad, subtle boosts or cuts (±1–2 dB) with tools like FabFilter Pro-Q 3, Plugin Alliance’s MAAG EQ4, or analog-modeled EQs like UAD’s Pultec EQP-1A.
- Mid-Side EQ: Adjust the mid and side channels separately to widen the stereo image (e.g., boost highs on sides, clean mids in mono).
-
3. Use Saturation for Warmth and Glue
Subtle saturation can add harmonic richness and analog warmth to the master bus.
-
-
- Tape Saturation: Plugins like Softube’s Tape or Waves’ Kramer Master Tape add gentle harmonic distortion and soft clipping.
- Tube Saturation: Use tools like Soundtoys’ Decapitator or FabFilter’s Saturn 2 for controlled warmth.
-
4. Widen the Stereo Image
Stereo imaging tools enhance spatial depth and width but must be used sparingly to avoid phase issues.
-
-
- Stereo Enhancers: Plugins like iZotope Ozone Imager or Waves S1 Stereo Imager can subtly widen the stereo field.
- Mid-Side Processing: Emphasize side elements (e.g., reverb, panned instruments) while ensuring the low end remains centered.
-
5. Control Transients with Limiting and Clipping
Peak control ensures a polished sound and prevents distortion during playback.
-
-
- Brickwall Limiter: Use a transparent limiter (e.g., FabFilter’s Pro-L 2 or iZotope’s Maximizer) to set the final output level and prevent clipping.
- Soft Clipping: Add subtle clipping to tame peaks and add harmonics with tools like StandardCLIP or Waves’ L1 UltraMaximizer.
-
6. Dynamic EQ and De-essing
Dynamic EQ and de-essing address problem frequencies that pop up inconsistently.
-
-
- Dynamic EQ: Use tools like FabFilter Pro-Q 3 or iZotope Ozone Dynamic EQ to dynamically control harsh midrange or resonances.
- De-esser: Control sibilance and harshness in the upper mids and highs with tools like Waves’ Sibilance or FabFilter’s Pro-DS.
-
7. Enhance with Harmonic Exciters
Exciters add sparkle and clarity without relying solely on EQ.
-
-
- Harmonic Exciters: iZotope’s Exciter or Waves’ Aphex Vintage Aural Exciter can subtly brighten the mix.
- Apply selectively to avoid harshness.
-
8. Use Reverb for Depth
Master bus reverb adds subtle space and glue to the mix.
-
-
- Short Reverbs: A very subtle plate or room reverb (e.g., Valhalla VintageVerb) with low wetness and early reflections can enhance cohesion.
- Ensure the reverb is mono-compatible and doesn’t muddy the mix.
-
9. Automate Volume and Tonal Adjustments
Automation on the master bus can add dynamics to the mix.
-
-
- Automate small volume boosts in choruses or key sections.
- Adjust EQ or compression settings dynamically for sections with different tonal requirements.
-
10. Reference Against Professional Mixes
A/B testing against reference tracks helps ensure your master matches the loudness, tonal balance, and spatial qualities of industry-standard productions.
-
-
- Use tools like ADPTR Audio’s Metric AB or iZotope’s Tonal Balance Control to compare and adjust.
-
11. Apply Subtle Multiband Processing
Multiband processing lets you target specific frequency ranges for precise control.
-
-
- Use multiband compressors like iZotope’s Ozone Dynamics or FabFilter’s Pro-MB to compress or enhance specific ranges (e.g., tightening the low end, smoothing mids).
-
12. Loudness Matching and Final Limiting
Ensure your mix is competitive in loudness without sacrificing dynamics.
-
-
- Loudness Meters: Monitor integrated LUFS and true peak levels with tools like iZotope’s Insight or Youlean’s Loudness Meter.
- Final Limiting: Use transparent limiters (e.g., FabFilter Pro-L 2) for achieving commercial loudness.
-
13. Match Context and Genre
Adjust processing to match the style and genre. For instance:
-
-
- Pop/Dance: More emphasis on clarity, brightness, and loudness.
- Rock: Emphasis on punch, warmth, and analog-style processing.
- Orchestral: Preserve dynamics and natural tone.
-
Golden Rule: Keep It Subtle
Master bus sculpting should enhance the mix without altering its core character. Small changes accumulate to create a polished, professional sound.
Additional Methods
Hidden Layers
-
-
-
- Embedding barely audible tracks, like whispers or subtle sound effects, to add emotional depth or energy to the mix.
-
-
Hidden layers in digital recording studios are a creative and technical approach to subtly enhance a mix without being overtly noticeable. These layers often provide depth, texture, or a sense of complexity that listeners may not directly perceive but feel. Here are some tricks involving hidden layers:
1. Sub-Bass Layers
Add a sub-bass layer to reinforce the low end without overwhelming the mix.
-
-
- Sine Wave Layering: Add a low-frequency sine wave (e.g., below 50 Hz) to support kick drums or bass.
- Use tools like Xfer Serum, Ableton Operator, or SubLab.
- Sidechain Compression: Duck the sub-bass layer with kick or bass to avoid clashing.
- Sine Wave Layering: Add a low-frequency sine wave (e.g., below 50 Hz) to support kick drums or bass.
-
2. Hidden Percussion
Layer subtle percussive elements to create rhythm and energy.
-
-
- High-Frequency Percussion: Use barely audible shakers, tambourines, or vinyl crackle to enhance groove and brightness.
- Reverse Hits: Reverse cymbals or snares to add tension and transition effects.
- Low-Level Percussion Loops: Tuck a processed loop low in the mix for movement.
-
3. Ambient Textures
Subtle ambient layers can add depth and richness.
-
-
- Field Recordings: Include nature sounds, cityscapes, or room noise to add context and atmosphere.
- Noise Layers: Tape hiss, vinyl crackle, or white noise can create warmth and cohesion.
- Reverb Drones: Freeze or sustain reverb tails to create a barely noticeable pad.
-
4. Micro-Melodic Layers
Enhance melodic content with hidden harmonic layers.
-
-
- Doubling with Octaves: Duplicate lead lines an octave higher or lower and blend subtly.
- Arpeggiators: Use an arpeggiated synth or plucked instrument as an almost inaudible harmonic backdrop. The term arpeggiated comes from the musical concept of an arpeggio, which involves playing the notes of a chord one at a time rather than simultaneously. Instead of striking all the notes of the chord together, you play them in a sequence, usually from the lowest to the highest (ascending), or vice versa (descending).
- Sustained Pads: Add soft, atmospheric pads under leads or vocals for depth.
-
5. Harmonic Enhancements
Introduce harmonic richness to create a sense of fullness.
-
-
- Parallel Saturation: Use parallel tracks with harmonic distortion or tape saturation, blended at low levels.
- Harmonic Synth Layers: Add soft synths playing root notes or chords under instruments or vocals.
- Chorus or Flange Effects: Subtle modulation effects on hidden layers can enhance harmonic content.
-
6. Hidden Vocals
Use extra vocal layers to subtly enrich the vocal presentation.
-
-
- Whisper Tracks: Layer whispered vocals with main vocals to add an intimate texture.
- Doubled Vocals: Duplicate the vocal and apply extreme processing (e.g., pitch shifting, reverb) to tuck it underneath.
- Reverse Reverb Swells: Create reversed reverb effects leading into vocal phrases.
-
7. Spatial Layers
Enhance the sense of space and width with hidden layers.
-
-
- Panned Textures: Add wide, low-level elements (e.g., pads, reverbs, or effects) panned hard left/right.
- Subtle Delays: Use delays with high feedback and low mix levels to add ambiance.
- 3D Imaging: Tools like Leapwing StageOne or Waves Nx can create subtle depth and width.
-
8. Hidden Transient Enhancements
Add hidden transient layers to enhance attack and clarity.
-
-
- Transient Clicks: Layer a high-frequency transient (e.g., from a hi-hat or click sample) on top of kicks or snares.
- Synthetic Snap Layers: Use synthesized snaps or claps for added punch.
-
9. Reverse Layers
Reverse audio clips to create transitions or ethereal textures.
-
-
- Reversed Vocals: Reverse a vocal phrase or word with heavy reverb for a ghostly effect.
- Reverse Instrument Tails: Reverse the tail of a sustained note for atmospheric transitions.
-
10. Barely Audible FX Layers
Subtle effects can add life and character.
-
-
- Granular Synthesis: Generate a granular texture from an instrument or vocal and layer it faintly.
- Pitch Glides: Use pitch-modulated layers that swell or glide for tension and release.
- Glitch Effects: Add subtle glitchy artifacts using tools like iZotope Stutter Edit or Output Movement.
-
11. Mid-Side Processing for Hidden Layers
Enhance stereo depth by placing certain hidden elements in the side channels.
-
-
- Side-Only Layers: Add reverb, delay, or pads exclusively to the sides for width.
- Mid-Only Focus: Reinforce key elements (e.g., bass, kick) in the mono center while using hidden layers to fill the sides.
-
12. Hidden Rhythmic Layers
Create rhythmic complexity with layers that subtly blend into the mix.
-
-
- Ghost Notes: Add low-velocity MIDI notes to drums for a groovy, human feel.
- Percussive Synths: Use synths with fast attack and decay for rhythmic movement.
- Sidechain Modulation: Sidechain a hidden rhythmic element to the kick or snare for dynamic interplay.
-
13. Micro-Effects Layers
Add tiny, momentary effects that keep the listener engaged.
-
-
- One-Shot FX: Include subtle risers, downers, or impacts at transitions.
- Micro-Reverbs: Use very short reverbs or convolution reverb tails for an imperceptible sense of space.
- Bitcrushing: Add subtle bit-crushed elements for texture.
-
14. Automation of Hidden Layers
Bring hidden layers in and out dynamically to maintain listener interest.
-
-
- Volume Automation: Fade in/out hidden elements during transitions or key moments.
- Filter Automation: Use low-pass or high-pass filters to gradually introduce or hide layers.
- Panning Automation: Move layers across the stereo field for movement.
-
15. Layering Low-Level Instruments
Use hidden instrumentation to support the mix.
-
-
- Ghost Chords: Play ghostly chords at very low levels under the main harmonic structure.
- Muted Guitars: Add muted plucking or strumming for a rhythmic feel.
- Underscore Elements: Include cinematic underscores (e.g., drones, distant strings) for mood.
-
16. Hidden Sidechain Effects
Use sidechain compression creatively to enhance groove or movement.
-
-
- Sidechained Pads: Sidechain ambient pads to the kick or snare for subtle pulsing.
- Ghost Sidechain: Use inaudible triggers to duck certain elements and add rhythm.
-
These hidden layers, while often unnoticed directly, contribute significantly to the emotional and sonic impact of a track. They’re a hallmark of professional, detailed production.
Reverse Effects
-
-
-
- Reversing reverb or delay tails to create ethereal or otherworldly textures.
-
-
Reversing reverb or delay is a creative studio trick that adds a sense of mystery, tension, or otherworldly effect to your recordings. It’s often used in transitions, build-ups, or to create ethereal textures. Here’s how to achieve this effect in a digital recording studio, along with some tips and tricks:
How to Create Reversed Reverb
Reversed reverb involves reversing an audio clip, applying reverb, and then reversing the clip back to its original orientation. Here’s a step-by-step process:
1. Select the Audio Clip
-
-
- Choose a vocal phrase, drum hit, or instrument note that you want to enhance.
- Short phrases or individual sounds (e.g., a snare hit or a word) work best.
-
2. Reverse the Audio
-
-
- Reverse the clip using your DAW’s reverse function.
- In Ableton Live: Right-click the clip > Reverse.
- In Logic Pro: Use the File Editor > Functions > Reverse.
- In Pro Tools: Select the clip > AudioSuite > Reverse.
- Reverse the clip using your DAW’s reverse function.
-
3. Apply Reverb
-
-
- Add a lush, long reverb to the reversed clip.
- Increase wet/dry mix to almost entirely wet.
- Use a reverb plugin with a long decay time (e.g., 3–8 seconds).
- Optional: Use a pre-delay to create a unique tail.
- Plugins like Valhalla VintageVerb, FabFilter Pro-R, or Waves H-Reverb work well.
- Add a lush, long reverb to the reversed clip.
-
4. Freeze or Bounce the Track
-
-
- Render or bounce the reverb tail into a new audio file to make it editable.
- Some DAWs allow you to freeze the track and flatten it into a new clip.
- Render or bounce the reverb tail into a new audio file to make it editable.
-
5. Reverse the Reverb
-
-
- Reverse the bounced reverb track to restore the original clip orientation.
- The reverb tail now swells into the original sound, creating a ghostly effect.
-
6. Align and Blend
-
-
- Align the reversed reverb so that it leads into the original sound naturally.
- Blend the reverb tail with the original clip using volume automation.
-
How to Create Reversed Delay
Reversed delay is similar but uses delay echoes instead of reverb tails. Here’s how to do it:
1. Select the Audio
-
-
- Choose a transient-heavy clip, such as a vocal syllable, drum hit, or guitar note.
-
2. Apply a Delay Effect
-
-
- Use a delay plugin to create echoes with a longer feedback setting.
- Adjust the feedback and wet/dry mix to emphasize the delayed tails.
- Plugins like Soundtoys EchoBoy, Waves H-Delay, or stock delay plugins work well.
- Use a delay plugin to create echoes with a longer feedback setting.
-
3. Freeze or Bounce the Track
-
-
- Render or bounce the delayed audio into a new file for editing.
-
4. Reverse the Delay
-
-
- Reverse the bounced delay track so that the echoes play backward.
-
5. Align and Blend
-
-
- Line up the reversed delay tails to lead into the original audio.
- Use volume and EQ automation to blend the effect seamlessly.
-
More Suggestions
-
-
- Filter the Tails: Apply low-pass or high-pass filters to the reversed reverb/delay for a cleaner or more ethereal effect.
- Sidechain for Dynamics: Sidechain compress the reversed effect to other elements (e.g., kick or vocal) for rhythmic movement.
- Automate Wet/Dry Mix: Automate the wet/dry mix of reverb or delay to bring the effect in and out dynamically.
- Layer for Impact: Combine reversed reverb with normal reverb to create complex spatial textures.
- Time Stretch the Tails: Stretch or warp the reversed audio to create a surreal, drawn-out effect.
- Stereo Imaging: Pan or widen the reversed tails for spatial depth.
- Use It as a Build-Up: Employ reversed reverb/delay as a swelling effect into a drop or chorus.
-
Uses
-
-
- Vocal Transitions: Create a swelling reverb effect leading into vocal phrases.
- Drum Hits: Add reverse reverb to snares or cymbals for impact.
- Ambient Textures: Use on pads or synths to create atmospheric layers.
- Cinematic Effects: Build tension in film scores or trailer music.
- Sound Design: Craft unique sound effects for games or media.
-
Reversed reverb and delay are excellent tools for adding a sense of anticipation, drama, and creativity to your productions. By experimenting with different sounds and processing techniques, you can tailor the effect to fit your artistic vision.
Time-Stretching Artifacts
-
-
-
- Intentionally using extreme time-stretching to create unique, glitchy textures.
-
-
Time-stretching artifacts can be both a challenge and a creative tool in digital recording studios. These artifacts occur when audio is stretched beyond its natural tempo or pitch, introducing unnatural effects or distortions. While often avoided for clean production, they can be harnessed creatively for unique sound design and production tricks. Here’s how to understand and use time-stretching artifacts effectively:
1. What Are Time-Stretching Artifacts?
Time-stretching involves changing the duration of an audio file without altering its pitch, or vice versa. Artifacts are the unintended distortions or glitches that result from extreme time-stretching. These may include:
-
-
- Graininess: A rough, fragmented sound due to breaking the audio into small grains.
- Glitches: Sudden pops or unexpected tonal distortions.
- Pitch Fluctuations: Warbling or “chorusing” effects as the algorithm tries to preserve pitch.
- Rhythmic Smearing: Loss of clarity in transient-heavy sounds like drums.
- Phase Shifts: Stereo image or phase inconsistencies.
-
2. Avoiding Artifacts for Clean Results
- Choose the Right Algorithm: Modern DAWs offer multiple time-stretching algorithms designed for different types of audio:
- Monophonic: For single melodic lines (e.g., vocals, strings).
- Polyphonic: For complex harmonic content (e.g., full chords).
- Transient/Beats: For drums and percussive elements.
- Examples: Ableton Live’s Warp modes, Logic Pro’s Flex Time, or Pro Tools Elastic Audio.
- Limit Extreme Stretching: Keep stretching to under 10–20% for minimal distortion.
- Split and Stretch in Sections: Break audio into smaller regions to reduce algorithm strain.
- Avoid Overlapping Transients: Use transient markers to maintain clarity in rhythmic material.
3. Using Artifacts
Artifacts can add unique textures and qualities to your productions when intentionally introduced.
1. Graininess for Texture
- Create Granular Effects: Time-stretch audio using a granular synthesis engine to accentuate the fragmented, grainy quality.
- Tools: iZotope Iris, Output Portal, or Ableton’s Grain Delay.
- Lo-Fi Sounds: Push the stretch to extremes to achieve a gritty, lo-fi aesthetic suitable for ambient or experimental music.
2. Glitches and Warbles
- Extreme Stretching: Stretch audio by several times its original length to produce digital glitching or robotic artifacts.
- Useful in glitch music, experimental pop, or sound design.
- Layer Artifacts: Duplicate the stretched audio, process with EQ, and layer for depth.
Pitch Warping
- Slow Down Vocals: Stretch vocals drastically to create eerie, ethereal tones with pitch fluctuations.
- Chopped and Warped Vocals: Combine time-stretching with slicing and pitch-shifting for a unique vocal chop effect.
- Tools: Antares Auto-Tune, Melodyne, or Ableton Warp.
3. Rhythmic Smearing
- Ambient Textures: Use rhythmic smearing to transform percussive loops into atmospheric pads.
- Apply reverb and delay to enhance the texture.
- Blurred Transients: Stretch drum hits into long, washy sounds for experimental or cinematic music.
4. Phase Shifts for Stereo Effects
- Stereo Manipulation: Use phase shifts from time-stretching as a stereo effect.
- Duplicate the audio and stretch one channel slightly more than the other for a wide, unstable stereo image.
- Reversing Phase Artifacts: Combine reversed time-stretched audio with the original for a swirling effect.
5. Real-Time Effects
- Live Warp Manipulation: Use real-time time-stretching during performance for dynamic pitch and tempo shifts.
- Tools: Serato Sample, Traktor, or Ableton Live.
- Reverse Stretching: Stretch reversed audio, then reverse it back to create haunting, otherworldly effects.
6. Best Tools for Time-Stretching
- Ableton Live: Warp modes like Complex Pro and Texture are perfect for creative stretching.
- PaulStretch: Free software designed specifically for extreme stretching, perfect for ambient music and experimental soundscapes.
- Melodyne: Great for detailed manipulation of pitch and timing.
- iZotope RX: Advanced tools for stretching and repairing audio.
- Logic Pro: Flex Time offers multiple modes tailored to different audio types.
- Native Instruments Kontakt: Powerful for granular and time-stretching-based sound design.
7. Layering Stretched Sounds
Time-stretching artifacts can be enhanced when layered:
- Pad Layers: Stretch a sustained note or chord to create an evolving pad.
- Percussive Layers: Stretch and EQ drum hits to add textures to beats.
- Vocal Atmospheres: Stretch vocal harmonies for a haunting background layer.
8. Combining Effects with Stretching
Pair time-stretching with other effects:
- Reverb and Delay: Add space and depth to stretched audio.
- Granular Synthesis: Create entirely new soundscapes.
- Bitcrushing: Add distortion and grit to stretched audio. Bitcrushing is a digital audio effect used in studio recording to intentionally reduce the audio resolution by lowering the bit depth and/or sample rate of a sound. This creates a distinctive “lo-fi” or “crunchy” sound characterized by distortion, noise, and a gritty, digital quality. It is often used creatively in music production to add texture, character, or a retro vibe to audio.
- Chorus/Flanger: Enhance warbling and phase artifacts.
9. Experimental Methods
- Stretch, Reverse, Stretch: Reverse audio, stretch it, then reverse again for unpredictable results.
- Repeated Stretching: Stretch audio multiple times in small increments to exaggerate artifacts.
- Dynamic Stretching: Automate stretch parameters over time for evolving textures.
Time-stretching artifacts can either be minimized for clean, professional results or embraced as a creative tool. By understanding the characteristics of different stretching techniques and algorithms, you can use these artifacts to add depth, texture, and uniqueness to your productions. Whether you’re cleaning up audio or experimenting with wild sound design, time-stretching opens up a world of sonic possibilities.
Custom Impulse Responses (IR)
-
- Capturing unique spaces or objects to create personalized reverb or sound design elements.
Using custom impulse responses (IRs) in a digital recording studio can unlock a world of creative and professional possibilities. Impulse responses are essentially recordings of how an environment or hardware device responds to an audio signal. They are most commonly used in convolution reverb plugins but can also be applied creatively in amp modeling, sound design, and more. Here are some tricks and techniques for working with custom IRs in your studio.
An impulse response (IR) in audio is a digital representation of how a system or space reacts to a brief, broadband input sweep signal, e.g., 20 Hz – 20 kHz) called an impulse (often a short click or burst of sound). It captures the unique acoustic or signal characteristics of a space, piece of equipment, or audio device, and is widely used in audio production for convolution-based effects like reverb and speaker simulation.
1. Capturing Custom Impulse Responses
Creating your own IRs allows you to replicate the unique characteristics of a space or hardware.
Steps to Create an IR:
- Generate a Test Tone: Use a sine sweep (a sound that gradually moves through all frequencies) or an impulse signal.
- Tools like Logic Pro, REW (Room EQ Wizard), or DAW plugins can generate sine sweeps.
- Record the Tone: Play the sweep through the system or space you want to capture (e.g., a room, speaker, or hardware).
- Use high-quality microphones for accurate room or device capture.
- Deconvolve the IR: Use deconvolution software (e.g., Logic Pro’s Space Designer, REW, or third-party tools) to process the recorded sine sweep and generate the IR.
- Save as WAV: Export the IR as a WAV file for use in convolution plugins.
2. Custom Reverb Spaces
Use IRs of unusual or iconic spaces to add unique reverb effects.
- Unconventional Spaces: Capture the ambiance of unique spaces like stairwells, caves, or even inside a car.
- Iconic Locations: Record IRs in famous concert halls, churches, or auditoriums for authentic ambiance.
- DIY Spaces: Use closets, bathrooms, or kitchens to create quirky and distinct reverbs.
3. Simulate Vintage Hardware
Impulse responses can mimic the tonal characteristics of vintage or rare hardware.
- Analog Gear: Capture the tonal fingerprint of vintage EQs, compressors, or preamps.
- Speaker Cabinets: Use IRs of classic guitar amp cabinets to enhance direct-input guitar recordings.
- Tools like Celestion’s speaker IRs or Two Notes’ Torpedo use this technique.
- Tape Machines: Simulate tape coloration using IRs created from analog tape machines.
4. Convolution for Creative Sound Design
IRs are not limited to reverb; they can be used to creatively shape sound.
- Filter Effects: Use IRs of resonant objects (e.g., glass bowls, pipes) for unique tonal filters.
- Lo-Fi Textures: Apply IRs of old devices (e.g., radios, telephones) for a degraded sound.
- Extreme IR Manipulation: Use non-reverb recordings (like vocals or synths) as IRs to create wild, experimental effects.
5. Combining Impulse Responses
Layer or blend IRs for complex and rich effects.
- Parallel IR Processing: Load multiple convolution reverb instances with different IRs (e.g., one for a large hall and another for a tight room) and blend them.
- Hybrid Spaces: Combine real-world IRs with synthetic IRs to create surreal spaces.
6. Customizing Pre-Existing IRs
Manipulate existing IRs for unique effects.
- Stretch and Pitch: Time-stretch or pitch-shift IRs for exaggerated or unnatural effects.
- EQ and Filter: Shape the frequency response of IRs to emphasize or reduce certain frequencies.
- Reverse IRs: Use reversed IRs for a swelling, reverse-reverb effect.
7. Using IRs for Amp and Cabinet Simulation
Guitar and bass tones can be enhanced with IRs of specific amp cabinets and microphones.
- Cabinet Swapping: Experiment with different cabinet IRs to dramatically change the character of a guitar track.
- Mic Placement: Use IRs captured with varied mic positions (on-axis, off-axis, near, far) for tonal variety.
- Creative Amp IRs: Load IRs of non-traditional “cabinets,” such as distorted or filtered spaces.
8. Enhance Vocals and Instruments
IRs can add a unique character to vocals and instruments.
- Vocal Reverbs: Use subtle room IRs to add depth or lush cathedral IRs for grandeur.
- Instrument Resonance: Use IRs of acoustic instruments (e.g., guitar bodies, piano soundboards) to enhance DI recordings.
- Pitched IRs: Use harmonic IRs to add a resonant, pitched quality to instruments.
9. Synthesizer Enhancements
Convolution reverb with custom IRs can transform synthesizers.
- Texture IRs: Use grainy or ambient IRs to create evolving pads and textures.
- Percussive Synths: Apply short, percussive IRs to synth hits for unique attack characteristics.
10. Experimental and Non-Linear Applications
Think outside the box with non-traditional IR applications.
- Drum Bus IRs: Apply speaker or filter IRs to drums for tonal shaping.
- Dynamic IRs: Modulate IR parameters (length, mix, or pitch) dynamically during playback for evolving effects.
- Noise IRs: Use noise-based IRs (like pink noise or static) for bizarre, noisy textures.
11. Using Plugins for IR Playback
Many convolution-based plugins support custom IRs and provide additional processing options:
- Reverb Plugins:
- Logic Pro’s Space Designer
- Audio Ease Altiverb
- Waves IR-1
- Ableton Live’s Convolution Reverb Pro
- Guitar Amp Plugins:
- Two Notes Torpedo
- Neural DSP Archetypes
- Line 6 Helix Native
- Sound Design Plugins:
- iZotope Trash 2 (creative convolution module)
- MeldaProduction MConvolutionMB
12. Sharing and Swapping IRs
Create a library of custom IRs and share or trade them with collaborators to expand your sonic palette.
13. Quality Control Tips
- Use High-Quality Samples: Ensure a high signal-to-noise ratio during IR recording for clean results.
- Normalize IRs: Normalize to consistent levels to avoid sudden volume jumps in playback.
- Keep IRs Short: For non-reverb uses (e.g., amp modeling), shorter IRs often yield cleaner results.
Custom impulse responses allow digital recording studios to expand their creative possibilities by emulating unique spaces, devices, or even entirely imagined sonic textures. Whether used for subtle enhancements or extreme sound design, they are a powerful and versatile tool that can set your productions apart.
Studio Workflow Procedures
Template Sessions
-
- Using pre-built DAW templates to speed up workflow, especially for recurring projects like podcasts or similar music genres.
Outboard Gear Loops
-
- Integrating analog outboard gear into digital sessions to leverage the warmth and character of hardware.
Private Plugins
-
- Using custom-developed or modified plugins that are not available to the public for specific sonic characteristics.
Reference Tracks
-
- Continuously comparing the mix to professionally mastered tracks to ensure competitive quality.
Critical Listening Breaks
-
- Taking breaks during sessions to avoid ear fatigue and maintain objectivity.
So, as you can see, digital recordings are a result of a lot of hard work by talented recording engineers.
PCM vs. DSD
The majority of DAWs used in recording studios work with PCM (Pulse-Code Modulation) digital recording and playback, and those recordings are what we stream. Each digital sample is represented by 16 ones and zeros, 24 ones and zeros, or 32 ones and zeros.
Notes on PCM Digital Recording
In a 16-bit digital audio format, the value is represented using a range of integers from –32,768 to 32,767. This range comes from the signed 16-bit integer format, where the most significant bit (MSB) determines the sign (positive or negative).
If all 16 bits are set to 0 (binary: 0000000000000000), it represents the value 0 in this range. In terms of a musical waveform:
- 0 represents silence or no sound, as it corresponds to the zero amplitude level of the waveform.
- In a waveform, this is the midpoint of the wave, where there is no positive or negative displacement from the zero line.
So, 16 zeros in a 16-bit format signify a moment of absolute silence or no movement of the speaker diaphragm in a digital audio signal.
In a 16-bit signed integer format, the negative part of the waveform is represented by the values between -1 and -32,768. These values correspond to the portion of the waveform that lies below the zero line in a typical audio signal.
Here’s a breakdown:
Representation of Negative Waveform
- 16-bit Range:
- The total range of a 16-bit signed integer is from -32,768 to 32,767.
- The most significant bit (MSB) acts as the sign bit:
- 0 for positive values.
- 1 for negative values.
- Negative Values:
- When the MSB is set to 1, the binary value is interpreted as a negative number using two’s complement representation.
- For example:
- 1111111111111111 = -1
- 1111111111111110 = -2
- 1000000000000000 = -32,768 (minimum value).
- Relationship to the Waveform:
- In the negative part of a musical waveform, the amplitude is decreasing below the zero-crossing line.
- These negative values directly correspond to the displacement of the waveform below the center line in the time-domain signal.
Visual Representation
- Positive Samples: 0 to 32,767 → Above the zero line.
- Negative Samples: -1 to -32,768 → Below the zero line.
Example of Values
If you think of a sine wave, for example:
- At its highest negative peak, the sample might be close to -32,768.
- At the zero-crossing point, the sample is 0.
- At intermediate points, the samples take on negative values like -8,192, -16,384, etc., as the wave dips below zero.
Thus, the set of 16-bit samples representing the negative part of the waveform is the range of -1 to -32,768, which encodes the amplitude of the signal in the negative half-cycle of the wave.
In a 16-bit sample, the Most Significant Bit (MSB) is the leftmost bit (the first bit in the binary representation). It holds the greatest weight (or significance) in determining the value of the number.
Key Details about the MSB:
- Position:
- The MSB is the 16th bit (from the right) in a 16-bit binary number.
- For example, in 1010101010101010, the MSB is the leftmost 1.
- Significance:
- In a signed 16-bit integer (used in digital audio):
- The MSB determines the sign of the number:
- 0 = Positive value or zero.
- 1 = Negative value (in two’s complement representation).
- Example:
- 0111111111111111 = 32,767 (largest positive value).
- 1000000000000000 = -32,768 (most negative value).
- The MSB determines the sign of the number:
- In an unsigned 16-bit integer (less common for audio data):
- The MSB represents the highest value bit, contributing 32,768 to the number if set to 1.
- In a signed 16-bit integer (used in digital audio):
- Audio Signal Context:
- In digital audio using signed 16-bit samples:
- An MSB of 0 means the sample is in the positive half of the waveform or zero.
- An MSB of 1 means the sample is in the negative half of the waveform.
- In digital audio using signed 16-bit samples:
Example:
For the 16-bit signed integer 1000000000000001:
- The MSB is 1, so the number is negative.
- In two’s complement, it represents -32,767.
In summary, the MSB in a 16-bit sample is crucial because it determines whether the value is positive or negative.
These principles also apply to 24-bit and 32-bit sampling, but the range of integers is much higher.
The range of integers for different bit depths (16-bit, 24-bit, 32-bit) in digital audio determines the dynamic range and resolution of the audio signal. The range depends on whether the integers are signed (allowing negative values) or unsigned (only positive values). Here’s a breakdown:
1. 16-bit Sampling
- Signed Range (most common):
- -32,768 to 32,767 (a total of 216 = 65,536 values).
- Unsigned Range(less common):
- 0 to 65,535.
2. 24-bit Sampling
- Signed Range:
- -8,388,608 to 8,388,607 (a total of 224 = 16,777,216 values).
- Unsigned Range:
- 0 to 16,777,215.
3. 32-bit Sampling
- Signed Range:
- -2,147,483,648 to 2,147,483,647 (a total of 232 = 4,294,967,296 values).
- Unsigned Range:
- 0 to 4,294,967,295.
How the Ranges Differ
- Bit Depth:
- The bit depth directly determines the number of possible integer values with the formula 2N, where N is the bit depth.
- For signed integers, the range splits evenly into positive and negative values (with zero in the middle).
- Dynamic Range:
- Higher bit depths provide greater precision and a wider dynamic range (the difference between the quietest and loudest parts of the audio).
- Dynamic range increases by 6 dB per bit:
- 16-bit: 96 dB
- 24-bit: 144 dB
- 32-bit: 192 dB
- Precision:
- Higher bit depths allow for smaller amplitude steps, reducing quantization noise and enabling finer detail in the representation of audio signals.
Summary of Ranges:
| Bit Depth | Signed Range | Unsigned Range | Number of Values |
| 16-bit | -32,768 to 32,767 | 0 to 65,535 | 65,536 |
| 24-bit | -8,388,608 to 8,388,607 | 0 to 16,777,215 | 16,777,216 |
| 32-bit | -2,147,483,648 to 2,147,483,647 | 0 to 4,294,967,295 | 4,294,967,296 |
So, as bit depth increases, the number of possible integer values grows exponentially, allowing for a more precise representation of audio amplitudes.
Secrets Sponsor
DSD (Direct-Stream Digital) is historically related to SACD (Super Audio Compact disc).
The history of SACD (Super Audio CD) and DSD (Direct Stream Digital) is closely intertwined, as SACD was developed to showcase the capabilities of DSD as an audio format. Here’s a look at the origins, development, and evolution of both:
Direct Stream Digital (DSD)
- Sony and Philips aimed to develop a high-fidelity digital format that would surpass the sound quality of the standard CD, addressing audiophile concerns over perceived limitations in digital audio.
- Concept and Development:
-
-
- DSD (Direct Stream Digital) is a digital audio encoding technology that was developed by Sony and Philips in the mid-1990s. It represents audio as a stream of 1-bit values (1’s and 0’s) sampled at an extremely high frequency, typically 2.8224 MHz (64 times the standard 44.1 kHz used in CD audio). This is called DSD64. There are also higher DSD sampling rates, DSD128, DSD256, DSD512, and DSD1,024. In DSD encoding, a 1 means to increase the voltage (or maintain the upward trend), while a 0 means to decrease the voltage (or maintain the downward trend). This is because DSD uses pulse density modulation (PDM), where the density of 1s and 0s represents the audio waveform.
In other words:
- A sequence of more 1’s results in a rising waveform.
- A sequence of more 0’s results in a falling waveform.
- An equal distribution of 1s and 0s represents a steady level.
This approach allows DSD to encode audio using very high sample rates with a 1-bit resolution, relying on noise shaping to push quantization noise into inaudible frequency ranges.
- Unlike the conventional PCM (Pulse Code Modulation) system used in CDs and most digital audio formats, DSD emphasizes simplicity, using a high sampling rate and low bit-depth to achieve high audio quality.
- The DSD technology was intended to closely replicate analog audio waveforms and minimize distortions like aliasing and quantization noise.
- A limitation is that, due to 1-bit sampling, the noise floor is increased. To get around this problem, the noise is moved out of the audible band by a process called Noise Shaping. Noise shaping is a method to improve the digital audio that consumers listen to. What it does is lower the noise floor in one place (the audio spectrum; 20 Hz – 20 kHz), and move the noise to another place (out of the audio spectrum), and this is accomplished using feedback, as opposed to adding white noise to produce dithering. See our 2017 article on this subject.
- DSD does a better job of creating the music waveform at high frequencies than PCM due to the number of samples. Here is a simulation of a 20 kHz waveform using 16-bit, 44.1 kHz sampling. There are only 2 samples available to create the waveform. This is why a steep low-pass filter is required in the analog output.
- DSD (Direct Stream Digital) is a digital audio encoding technology that was developed by Sony and Philips in the mid-1990s. It represents audio as a stream of 1-bit values (1’s and 0’s) sampled at an extremely high frequency, typically 2.8224 MHz (64 times the standard 44.1 kHz used in CD audio). This is called DSD64. There are also higher DSD sampling rates, DSD128, DSD256, DSD512, and DSD1,024. In DSD encoding, a 1 means to increase the voltage (or maintain the upward trend), while a 0 means to decrease the voltage (or maintain the downward trend). This is because DSD uses pulse density modulation (PDM), where the density of 1s and 0s represents the audio waveform.
 Before Low Pass-Filter Graph Diagram")
Compare that with a DSD64 (the basic DSD format) 20 kHz waveform which has 141 1-bit samples (figure below). The problem with DSD is that it has a lot of noise, but this is alleviated by using noise shaping. DSD files are also difficult to edit, so there are special editing tools for this.
-

- Here is part of the leading edge of the 20 kHz sine wave in DSD64, showing the individual bits where the voltage is increasing. It’s mostly 1’s. On the decreasing side (900 to 1800 – not shown), there would be mostly 0’s. Notice that the curve is jagged, not smooth.
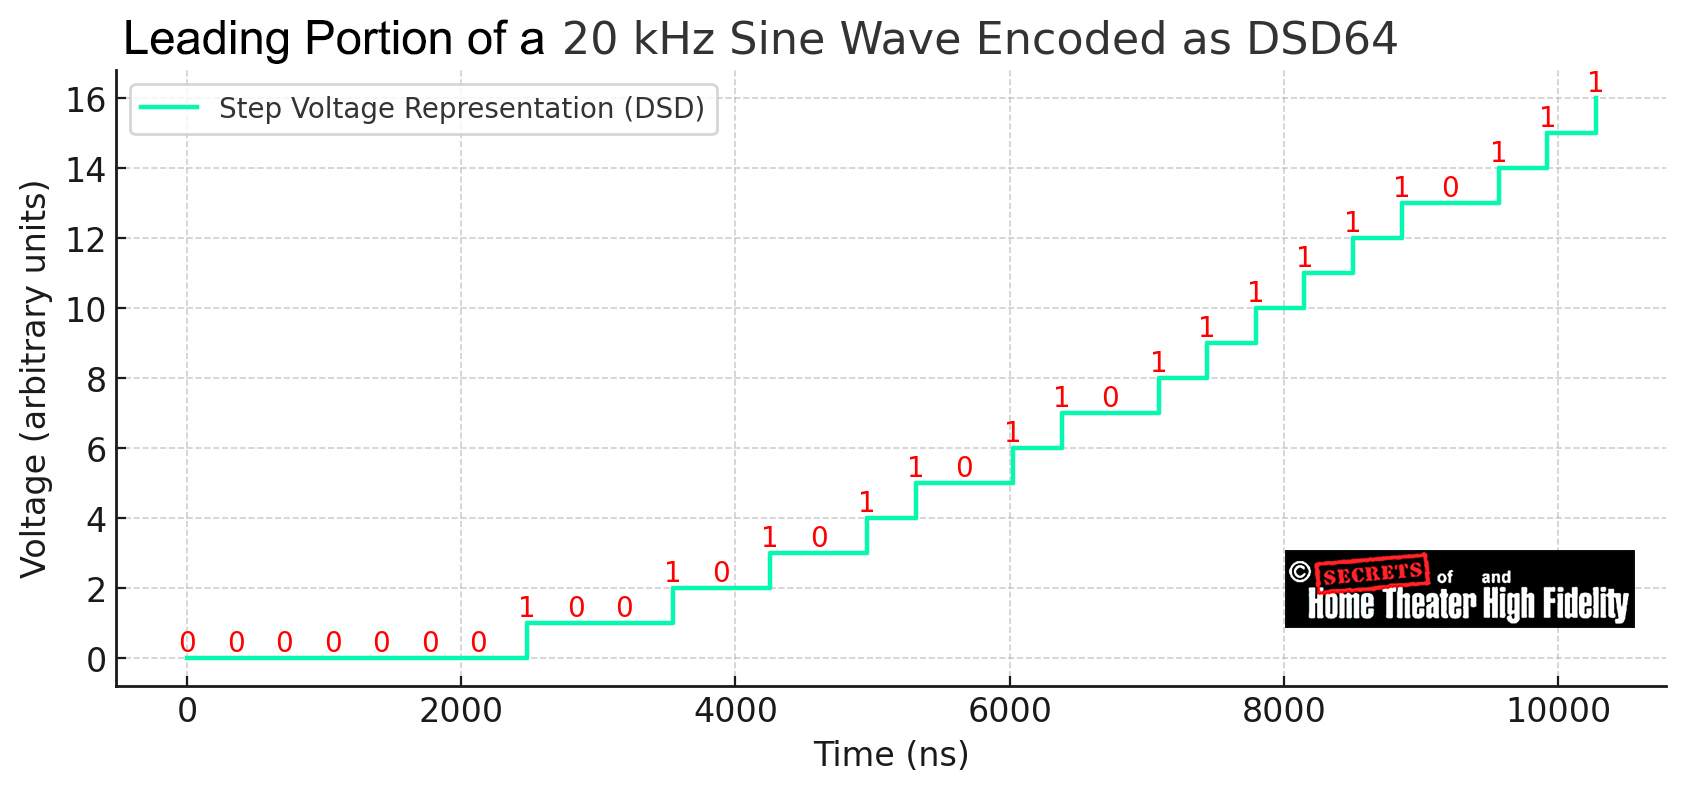 The jagged edge of a Direct Stream Digital (DSD) waveform does not result in distortion in the way that it might in a standard Pulse Code Modulation (PCM) system. The jagged edges you see in a DSD waveform visualization are a result of 1-bit sigma-delta modulation, which operates at an extremely high sample rate (e.g., 2.8224 MHz for DSD64).Why It Doesn’t Cause Distortion:
- High-Frequency Noise Shaping
- The “jagged” nature of the waveform represents the high-frequency noise introduced by the 1-bit quantization process.
- However, this noise is shaped away from the audible range (usually pushed into ultrasonic frequencies), meaning that it doesn’t interfere with the actual music signal.
- Smoothing by Low-Pass Filtering
- When converted back to analog, the high-frequency noise is filtered out using a gentle low-pass filter.
- The end result is a smooth analog waveform, free from audible distortion.
- Not Directly Related to Audio Artifacts
- While the waveform may look rough in a digital representation, our ears don’t perceive audio in the same way that a visual representation suggests.
- Unlike in PCM, where jagged edges could indicate aliasing or quantization errors, in DSD, they are simply a result of how 1-bit modulation encodes the signal.
When Can Distortion Occur?
- Poorly Implemented DSD-to-PCM Conversion: If a system converts DSD to PCM without properly handling noise shaping, artifacts or unwanted distortion can appear.
- Insufficient Low-Pass Filtering: If high-frequency noise is not adequately removed in playback, it could affect downstream audio equipment or even intermodulate with audible frequencies.
- Overmodulation: If the DSD encoding process is pushed too hard, it can introduce excessive noise or clipping-like behavior.
The jagged edge itself is not distortion but rather a byproduct of the high-speed 1-bit encoding method. Proper playback systems smooth out the signal, resulting in clean audio without audible distortion.
- High-Frequency Noise Shaping
- Even 32-bit, 768 kHz PCM sampling can’t match the 141 samples that are in the 20 kHz DSD64 waveform shown above. It (below) has only 38 PCM samples even with the recording level being high.
-

Note that at a low PCM recording level, shown in the figure below, there are less samples. This results in a lower bit resolution. This is why it is important not to set the recording gain too low, but rather, to make full use of the dynamic range capability.
A low-level digital audio signal has fewer samples primarily due to the nature of digital quantization and noise floor effects. Here’s why:
- Quantization and Bit Depth
- Digital audio represents sound using discrete amplitude levels determined by the bit depth (e.g., 16-bit, 24-bit).
- A low-level signal means that the amplitude is close to the least significant bits (LSB), meaning fewer unique quantization levels are available.
- This causes the signal to be represented with fewer distinguishable values, leading to lower resolution in amplitude.
- Dynamic Range and Noise Floor
- In digital audio, signals below a certain amplitude approach the noise floor.
- As a result, very quiet sounds can be masked by quantization noise, dithering, or even lost entirely due to insufficient bit depth.
- If the signal level is too low, it may not be captured with enough precision to show detailed variations.
- Resolution and Perceived Sample Density
- While the sample rate (e.g., 44.1 kHz or 48 kHz) remains the same regardless of volume, the perceived sample density is lower in quiet signals because amplitude variations are minimal.
- High-amplitude signals use the full range of bit depth, whereas low-level signals only utilize a small fraction, making the waveform appear coarser.
- Dithering Effects
- To counteract this issue, dither is added during quantization to introduce low-level noise and prevent digital truncation errors.
- Without dithering, very low-level signals can become distorted or even disappear due to quantization rounding errors.
Summary
A low-level digital audio signal has fewer effective samples because it is limited by the bit depth’s resolution, the noise floor, and quantization effects. While the sample rate remains constant, the precision of low-amplitude signals is reduced, leading to fewer distinct sample values in the waveform.
-

- DSD is very difficult to edit, so usually the DSD files are converted to a high-resolution PCM format such as DXD 24/352 for editing and then re-converted back to DSD. There is some theoretical quality loss when converting DSD to DXD (24-bit/352.8 kHz PCM) for editing and then back to DSD, but the extent of the loss is often negligible, especially if handled carefully with high-quality tools. Here’s a breakdown of why:
- 1. Conversion Process
- DSD → DXD Conversion:
- DSD uses a 1-bit stream at an extremely high sampling rate (e.g., 2.8 MHz for DSD64) and must be converted to PCM (DXD) to allow for precise editing, as DSD itself doesn’t support standard audio processing (e.g., fades, EQ, or reverb).
- This conversion involves filtering and decimation (reducing the sample rate while maintaining audio integrity).
- If done properly, the conversion retains the frequency and dynamic range of the original DSD file.
- DXD → DSD Conversion:
- Once editing is complete in DXD, the file is converted back to DSD.
- This involves upsampling the PCM data back into a 1-bit delta-sigma stream using noise shaping and filtering.
2. Potential Loss Factors
- Noise Shaping and Quantization:
- When converting DXD to DSD, quantization noise is introduced during the conversion to a 1-bit format.
- High-quality conversion tools apply advanced noise-shaping algorithms to push noise into inaudible frequency ranges (typically above 20 kHz).
- Editing Artifacts:
- Edits made in DXD (e.g., applying EQ, compression, or other effects) can slightly alter the original DSD file’s sound, especially if aggressive processing is applied.
- Multiple Conversions:
- If a file undergoes repeated conversions between DSD and DXD, cumulative errors can add up.
3. Real-World Perception
- Audible Impact:
- For most listeners, the difference between a native DSD file and one edited via DXD and converted back to DSD is imperceptible. The editing workflow is designed to minimize degradation.
- High-end systems and audiophile-grade listening environments may reveal subtle differences, but the impact is highly dependent on the quality of the tools and algorithms used.
- Professional Applications:
- Even in professional settings, the DSD-to-DXD workflow is widely accepted for mastering and editing. It’s a tradeoff between maintaining the purity of DSD and the practical need for precise editing capabilities.
4. How to Minimize Quality Loss
- Use High-Quality Tools:
- Software like Pyramix and Weiss Saracon (for conversion) are designed to minimize noise and artifacts.
- Use professional-grade equipment and workflows designed for DSD production.
- Avoid Multiple Conversions:
- Limit back-and-forth conversions between DSD and DXD to maintain fidelity.
- Stay in High-Resolution Formats:
- DXD’s resolution (24-bit/352.8 kHz PCM) is designed to be transparent for DSD workflows, ensuring minimal loss during the intermediate editing stage.
Summary
While there is some loss in quality when converting DSD to DXD and back, modern tools and workflows make this loss negligible for all but the most critical audiophile or high-end mastering applications. Native DSD workflows are rare because they don’t allow for precise editing, making the DSD-DXD-DSD workflow the best practical approach for production.
- DSD → DXD Conversion:
Super Audio CD (SACD)
- Launched in 1999:
- SACD was introduced in 1999 as a successor to the standard Compact Disc (CD) format, co-developed by Sony and Philips.
- It was designed to provide superior sound quality through the use of DSD encoding, offering a theoretical frequency response of up to 100 kHz and a dynamic range exceeding 120 dB.
- Key Features:
- High-Resolution Audio: SACDs provide better sound quality than traditional CDs due to DSD encoding and higher sampling rates.
- Dual Layer and Hybrid Discs:
- Many SACDs are hybrid discs containing a standard CD layer and a high-resolution SACD layer. This ensures compatibility with conventional CD players while allowing audiophiles to enjoy high-resolution audio on SACD players.
- Multi-Channel Support: SACDs often support multi-channel (e.g., 5.1 surround sound) audio playback, enhancing the listening experience.
- Target Audience:
- The SACD format was primarily targeted at audiophiles and music enthusiasts seeking high-fidelity audio reproduction.
Market Adoption and Challenges
- Initial Reception:
- SACD was warmly received by audiophiles and certain music enthusiasts. Many high-quality recordings were remastered and released on SACD, often with multi-channel surround sound mixes.
- High-profile artists and record labels released albums in the SACD format, particularly in classical, jazz, and other niche genres.
- Competition with DVD-Audio:
- Around the same time, DVD-Audio, another high-resolution audio format, was launched as a competitor. This created a format war similar to VHS vs. Betamax.
- Both formats faced limited mainstream adoption due to competing standards, lack of consumer awareness, and the dominance of standard CDs.
- Decline:
- By the mid-2000s, SACD’s growth was overshadowed by the rise of digital downloads and streaming services.
- SACD players became less common, and the format was relegated to a niche market for audiophiles and collectors.
Legacy and Current Status
- Niche Market:
- SACD remains a niche format but has retained a loyal following among audiophiles. Some high-end audio manufacturers continue to produce SACD players.
- New releases, particularly in classical and jazz music, continue to be issued on SACD, often as hybrid discs.
- DSD Beyond SACD:
- DSD has outlived SACD as a recording format. Many high-resolution digital audio files (e.g., DSD64, DSD128, and DSD256) are now distributed for playback on compatible audio systems.
- Streaming platforms and digital audio players support DSD playback, ensuring its relevance in the modern era of high-resolution audio.
Technological Influence
- SACD and DSD influenced the evolution of high-resolution audio formats and set a benchmark for fidelity in digital audio.
- The lessons learned from DSD encoding continue to inform modern approaches to preserving audio quality in recording and playback.
Despite their limited mainstream success, SACD and DSD remain milestones in the history of digital audio and are cherished by audiophiles worldwide for their exceptional sound quality.
In January 2025, the Qobuz streaming service announced that it would begin streaming DSD music, so I expect other streaming services to follow.
For enthusiasts seeking DSD-quality music to store on their computers, platforms such as NativeDSD specialize in offering DSD music files for purchase and download.
DSD is particularly popular with classical music recording.
PCM music files can be stored and streamed in lossy form, but DSD (Direct Stream Digital) files are inherently lossless because they use a high-resolution 1-bit audio encoding at very high sampling rates (such as 2.8 MHz (DSD64), 5.6 MHz (DSD128), or even higher). They are designed to preserve as much audio fidelity as possible.
However, if you want to play DSD files in a lossy format, the DSD file must first be converted to PCM or a more common non-PCM audio format, such as MP3, AAC, or OGG. These formats use high-compression algorithms to reduce the file size, but they lose some audio quality in the process.
Note that MP3, AAC, and OGG are not PCM formats. They are lossy-compressed audio formats that are derived from PCM audio but are fundamentally different in structure and purpose.
Here’s an explanation:
PCM (Pulse Code Modulation):
- Type: Uncompressed, raw digital audio.
- How It Works: PCM represents the amplitude of an analog audio signal sampled at regular intervals and encodes these samples as digital data.
- Common Examples:
- WAV (uncompressed PCM)
- AIFF (uncompressed PCM)
- FLAC (lossless compression of PCM data)
- Key Feature: PCM retains the full fidelity of the audio signal without any data loss.
MP3 (MPEG Audio Layer III):
- Type: Lossy compressed format.
- How It Works: MP3 compresses audio using psychoacoustic models, removing parts of the audio that are less audible to the human ear.
- Derived From: PCM audio is converted to MP3 during encoding, but MP3 itself is not PCM.
- Purpose: File size reduction with acceptable quality loss for most listening scenarios.
AAC (Advanced Audio Codec):
- Type: Lossy compressed format.
- How It Works: AAC is a more advanced lossy compression format than MP3, offering better sound quality at similar bitrates.
- Derived From: Encoding PCM audio into a compressed lossy format.
- Purpose: Used in modern digital audio (e.g., Apple Music, YouTube, etc.) for efficient streaming and storage.
OGG (Ogg Vorbis):
- Type: Lossy compressed format.
- How It Works: OGG is a container format often used for the Vorbis codec, which compresses audio in a manner similar to MP3 and AAC.
- Derived From: PCM audio is encoded into OGG during the compression process.
- Purpose: Open-source alternative to MP3 and AAC for compressed audio.
Key Differences
- PCM is raw or losslessly compressed audio, retaining all original data.
- MP3, AAC, and OGG are lossy formats, reducing file size at the cost of audio fidelity by discarding some of the original data.
Key Points to Consider in Converting to Lossy Format:
- Loss of Quality: Converting a DSD file to a lossy format negates the benefits of DSD’s high fidelity. The resulting file will no longer sound as good as the original DSD file.
- Compatibility: Many media players and devices do not natively support DSD files but do support lossy formats. Converting DSD to a lossy format may improve compatibility but sacrifices quality.
- Alternative Approach: If compatibility is your goal, you can also convert DSD to a high-quality lossless PCM format, like FLAC or WAV, which preserves more of the original fidelity.
So, it remains to be seen if Qobuz and other streaming services will stream DSD files in full lossless format.
If a studio records with DSD (Direct Stream Digital) audio, there are some tools and workflows designed specifically for recording, editing, and playback:
1. DAWs (Digital Audio Workstations) and Tools with Native DSD Support
- Pyramix by Merging Technologies
- One of the most popular tools for high-resolution audio and DSD workflows. It supports native DSD recording, editing, and playback.
- Widely used in classical music production and high-resolution audio mastering.
- KORG AudioGate
- A lightweight DSD editor and playback tool, often bundled with KORG’s DSD-compatible hardware (like the MR series recorders).
- Ideal for simple editing and playback of DSD files.
- TASCAM Hi-Res Editor
- A free editor from TASCAM that supports DSD playback and conversion.
- Works well for basic tasks but is not as robust as full DAWs.
2. Playback Tools
If you’re primarily focused on playback of DSD files, the following are excellent options:
- HQPlayer
- A premium software player for high-quality audio playback with advanced upsampling and DSD processing capabilities.
- Often used by audiophiles with high-end DACs.
- Foobar2000 with SACD/DSD Plugin
- A versatile and free option for DSD playback.
- Requires configuring SACD/DSD plugins to support .dsf or .dff files.
- Roon
- A high-end music library manager and player that supports native DSD playback with compatible hardware.
3. DSD-Compatible Hardware
To work with DSD audio, you’ll need hardware that supports the format. Some recommendations:
- Audio Interfaces/ADCs:
- Merging Technologies Anubis or Horus: Designed for DSD workflows.
- TASCAM DA-3000: A standalone recorder for DSD.
- KORG MR Series: Handheld recorders for mobile DSD recording.
- DACs (Digital-to-Analog Converters):
- Look for DSD-compatible DACs like Chord Electronics, iFi Audio, or RME for playback.
4. Conversion Workflow
If your primary DAW (e.g., Pro Tools) doesn’t support DSD, you can convert DSD files to PCM for editing and then convert back if needed:
- Weiss Saracon: A professional-grade tool for DSD-to-PCM and PCM-to-DSD conversion.
- XLD (X Lossless Decoder): A free tool for macOS for basic file format conversion.
- JRiver Media Center: Can handle DSD to PCM conversions and playback in a single platform.
DSD Workflow
- Hardware: Use a DSD-compatible ADC/DAC for seamless recording and playback.
- Software: If your needs are more advanced (e.g., multitrack mixing), Pyramix is the gold standard for DSD workflows.
- Archiving: Many professionals archive audio in DSD due to its high resolution, even if the final delivery is in PCM (e.g., 24-bit/96kHz).
- Playback Chain: Ensure your playback chain (e.g., DAC and player) can handle the high data rates of DSD formats.
Comparing modern digital recording sessions with the old days of using analog tape, there are a lot of differences.
1. Technology and Workflow
- Magnetic Tape Era:
- Analog workflows were linear and hardware-dependent.
- Recording, editing, and mixing were physical processes (cutting tape, manual patching, and physical fader rides).
- Limited track counts (e.g., 4-track, 8-track, or 24-track machines) required careful planning and commitment to decisions.
- Tape machines needed regular calibration, and recording required knowledge of signal-to-noise ratio, tape saturation, and biasing.
- Digital Era:
- Non-linear workflows allow for instant access to any part of a recording.
- Digital Audio Workstations (DAWs) provide near-unlimited track counts, undo functions, and advanced automation.
- Tasks like editing, pitch correction, and effects application are much faster and more flexible.
- Complexity arises from the vast number of features and plugins available.
2. Editing and Processing
- Magnetic Tape:
- Editing involved cutting and splicing tape manually—a time-consuming and irreversible process.
- Effects required external hardware (e.g., reverb plates, delay units, compressors).
- Signal processing was limited by the physical gear available.
- Digital:
- Editing is precise and non-destructive, with tools like crossfades, comping, and time-stretching available.
- Plugins emulate or extend beyond analog hardware capabilities, offering limitless sound design possibilities.
- Advanced tools like Auto-Tune, Melodyne, and spectral editors introduced new layers of complexity.
3. Track Management
- Magnetic Tape:
- Engineers had to carefully manage track allocation due to physical limitations.
- Bouncing tracks together to free up space was common, but it committed decisions early and introduced noise and degradation.
- Digital:
- Sessions can have hundreds of tracks without degradation, leading to potential complexity in organization.
- Engineers rely on detailed labeling, grouping, and color coding to manage large projects.
4. Collaboration
- Magnetic Tape:
- Collaboration was limited to in-person interactions.
- Sharing work involved physical tape reels, which were bulky and required compatible machines.
- Digital:
- Files can be shared instantly online, enabling remote collaborations.
- Cloud-based DAWs and tools like session recall add layers of convenience and complexity.
5. Technical Skills
- Magnetic Tape:
- Engineers needed deep knowledge of analog signal flow, tape handling, and machine maintenance.
- Simplicity in equipment meant fewer options but higher demands on fundamental audio engineering skills.
- Digital:
- Engineers must understand both audio principles and software operation, often across multiple DAWs.
- Knowledge of file formats, sample rates, bit depths, and software integration adds technical complexity.
6. Time and Flexibility
- Magnetic Tape:
- Decisions were made quickly due to the limitations of tape and the need to save time.
- Fewer tools meant that creative solutions often stemmed from constraints.
- Digital:
- Infinite options can lead to “decision fatigue,” as every element can be adjusted endlessly.
- The flexibility of digital allows for iterative workflows, but projects can become sprawling and overly complex.
7. Cost and Accessibility
- Magnetic Tape:
- Recording was expensive, requiring access to professional studios and costly equipment.
- Fewer people could participate, leading to a highly specialized industry.
- Digital:
- Affordable DAWs, interfaces, and plugins make recording accessible to anyone with a computer.
- This democratization has increased the volume and diversity of music production but also raised the complexity of competing in a saturated market.
Studios charge between $50 and $200 per hour. The total amount of time from setup, recording, mixing, mastering, and finalizing the product for delivery to the customer can really add up.
Here’s a general breakdown:
1. Recording Session
- Simple Recording (Single Instrument or Vocal Track): 1–3 hours per track
- Full Band Recording (Drums, Bass, Guitars, Vocals, etc.): 4–12 hours per song
- Orchestral or Complex Projects: Multiple days
2. Mixing
- Basic Mixing (Few Tracks, Minimal Processing): 2–4 hours per song
- Intermediate Mixing (More Tracks, Effects, and Balancing): 6–8 hours per song
- Advanced Mixing (Highly Polished, Many Revisions): 10–20+ hours per song
3. Mastering
- Simple Mastering (Polishing a Single Song): 1–2 hours per song
- Album Mastering: 6–12 hours for 10–12 tracks
4. Delivery
- File Preparation, Exporting, and Quality Checks: 1–2 hours
Example Timeline:
For a single song:
- Recording: 4–8 hours
- Mixing: 6–8 hours
- Mastering: 1–2 hours
- Delivery: 1 hour Total: ~12–20 hours
For an album (10 tracks):
- Recording: 40–80 hours
- Mixing: 60–100 hours
- Mastering: 10–20 hours
- Delivery: 5 hours Total: ~115–205 hours (so, 200 hours at $200/hour would be $40,000).
Key Factors Affecting Time:
- Artist’s preparedness
- Studio efficiency
- Number of revisions requested
- Level of production complexity
Since most digital music is streamed nowadays, how much do you think the artist is paid by the streaming service?
The payment a recording artist receives from streaming services depends on several factors, including the service’s payout rate, the artist’s contractual agreements, and the number of streams the album garners. Here’s a breakdown:
Key Factors Influencing Streaming Earnings:
- Per-Stream Payout Rates:
- Different streaming platforms pay artists differently. Here are average payouts (as of recent data):
- Spotify: $0.003 to $0.005 per stream
- Apple Music: $0.007 to $0.01 per stream
- Amazon Music: $0.004 to $0.006 per stream
- YouTube: $0.0007 to $0.001 per stream
- Different streaming platforms pay artists differently. Here are average payouts (as of recent data):
- Royalties Split:
- The total royalty amount is often shared among various parties:
- The record label
- The music publisher
- Songwriters
- The artist
- Artists signed to a label typically receive a fraction (10%-20%) of the total royalty.
- The total royalty amount is often shared among various parties:
- Independent vs. Signed Artists:
- Independent artists (without a label) may keep a larger share of royalties, but they also shoulder the cost of production, distribution, and marketing.
- Album Performance:
- The more streams an album receives, the higher the earnings.
- For example:
- 1,000,000 streams on Spotify could yield between $3,000 and $5,000, but this total might be split among stakeholders.
- Distribution Fees:
- If the artist uses a distribution service like TuneCore, DistroKid, or CD Baby, the service might take a fee or commission.
Example Scenario:
- An album streamed 10 million times on Spotify:
- Total payout: $30,000 – $50,000 (at $0.003 to $0.005 per stream).
- If the artist gets 15% of the royalties after the label takes its cut:
- Artist’s earnings: $4,500 – $7,500.
Recording artists typically earn modest amounts from streaming alone unless their album achieves a massive number of streams. Many artists supplement income through live performances, merchandise sales, and licensing deals. Independent artists have the potential to earn more directly from streams, but the overall payout rate remains relatively low compared to other revenue streams.
1. Independent/Upcoming Artists
- Streams per month: 10,000 – 100,000 (or fewer for very new artists).
- These artists often rely on niche audiences, grassroots promotion, or playlist placements to boost streams.
- Income: $30 – $500/month (assuming Spotify’s $0.003 – $0.005 per stream payout).
2. Mid-Level Artists
- Streams per month: 100,000 – 1,000,000.
- Artists with a moderate fanbase or occasional playlist features fall in this range.
- Income: $300 – $5,000/month from streaming alone.
3. Established Artists
- Streams per month: 1,000,000 – 10,000,000+.
- Well-known artists with a consistent fanbase and major label backing often generate millions of streams, especially after an album release.
- Income: $3,000 – $50,000/month, depending on the platform and payout.
4. Superstars
- Streams per month: 10,000,000 – 100,000,000+.
- Global stars like Taylor Swift, Drake, or BTS can easily surpass tens of millions of streams per month for a single album.
- Income: $30,000 – $500,000+.
Factors Influencing Stream Counts:
- Promotion: Albums with strong marketing campaigns typically gain more streams.
- Playlist Placement: Getting featured on curated playlists (e.g., Spotify’s “Discover Weekly” or “Rap Caviar”) can significantly boost streams.
- Album Release Date: Streams tend to peak in the first month after an album launch.
- Fanbase Size: Larger, loyal fanbases naturally lead to more streams.
- Genre Popularity: Certain genres (e.g., pop, hip-hop) generally attract higher streaming numbers.
Example:
- A mid-level indie artist with a 10-track album might achieve:
- 50,000 streams/month per track across platforms.
- Total: 500,000 streams/month for the album.
Obviously, an artist can make considerable income from streaming, but there are probably a lot of lesser known groups (garage bands) that don’t make much money.
Setting up Your Own Studio for Recording a Garage Band
A garage band could set up their own recording studio, record themselves, and deliver the digital album files to the various streaming services.
The costs of setting up a recording studio for a garage band can vary widely depending on factors like the quality of equipment, the size of the studio, and whether you are repurposing existing space or building from scratch. Here’s a breakdown of the typical expenses:
1. Space Preparation
- Repurposing a Garage or Room:
- Soundproofing (acoustic foam, panels, bass traps): $500–$2,000
- Insulation, drywall modifications, and sealing gaps: $500–$5,000
- Ventilation and temperature control: $300–$2,000
- Total (space-related costs): $1,000–$9,000
2. Recording Equipment
- Audio Interface: Converts analog sound to digital (e.g., Focusrite Scarlett, PreSonus Quantum ES 2, MOTU M4 4×4): $150 – $600
- Microphones:
- Dynamic microphones (e.g., Shure SM57/SM58, Sennheiser e 609 Silver Supercardioid, Telefunken M80 Supercardioid): $100–$250 each
- Condenser microphones (e.g., Audio-Technica AT2020, Audio-Technica AT2035, AKG C214): $150–$500 each
- Drum mic kits: $300–$1,000
Dynamic and condenser microphones are two common types of microphones, each with distinct designs, characteristics, and applications. Here’s a breakdown of their key differences:
1. Working Principle
- Dynamic Microphones:
- Operates on the principle of electromagnetic induction.
- Contains a diaphragm attached to a coil of wire, positioned within a magnetic field. When sound waves hit the diaphragm, it moves the coil, generating an electrical signal.
- Examples of popular dynamic microphones ($20-$800) include the Shure SM58 (vocals) and Shure SM57 (instruments), Electro-Voice RE20, Sennheiser MD421-II, Heil Sound PR40, Shure Beta 58A, Audix D6, Beyerdynamic M88 TG, Sennheiser e609, AKG D112 MKII, Behringer XM8500, Audio-Technica ATR2100x-USB, Samson Q2U, Electro-Voice ND76,
- Condenser Microphones:
- Uses a capacitor (condenser) to convert sound into electrical signals.
- The diaphragm acts as one plate of the capacitor, and a fixed backplate forms the other. When sound waves hit the diaphragm, it moves closer to or further from the backplate, causing changes in capacitance that are converted into an electrical signal.
- Examples of high-end (expensive) condenser microphones include Neumann U87, AKG C12, Telefunken ELA M 25, Sony C-800G, Neumann M 149 Tube, DPA 4006A, Schoeps CMC 6 MK4, Manley Reference Gold, Chandler Limited REDD Microphone, Josephson Engineering C725.
- Budget condenser mics include Audio-Technica AT2020 ($100), Rode NT1-A ($230), MXL 990 ($100), Behringer C-1 ($60), Samson C01 ($80), Audio-Technica AT2021 ($100), Samson C02 Pencil Microphones (Pair) ($130/pair), Behringer B-5 ($60) USB Plug and Play (they don’t require separate phantom power): Blue Yeti ($130), Rode NT-USB Mini ($100), Audio-Technica AT2020USB+ ($150), Fifine K669B ($40).
In a condenser microphone, changes in capacitance are converted into an electrical signal through the interaction between a thin, flexible diaphragm and a fixed backplate. Here’s how the process works step by step:
1. Capacitor Principle
- A condenser microphone works on the principle of a variable capacitor.
- The diaphragm (a lightweight, conductive material) and the backplate (a fixed conductive plate) form a capacitor.
- The capacitance of this system depends on the distance between the diaphragm and the backplate.
C=dϵA (ϵ is the Greek letter epsilon)
where:
- C is the capacitance,
- ϵ is the permittivity of the dielectric material (air, in this case)
- A is the area of the plates
- d is the distance between the plates.
2. Sound Waves Cause Diaphragm Movement
- When sound waves strike the diaphragm, the pressure variations cause it to vibrate.
- These vibrations cause the distance (d) between the diaphragm and the backplate to change, altering the capacitance.
3. Electrical Signal Generation
- A polarization voltage (usually +48V) is applied to the capacitor, either through an external power source (for externally polarized microphones) or through an electret material (in electret condenser microphones).
- As the capacitance changes, the amount of charge stored in the capacitor changes, producing a varying voltage.
The relationship is governed by:
Q=C⋅V
Where:
- Q is the charge,
- V is the applied voltage,
- C is the capacitance.
Since the charge remains constant for a short duration, changes in capacitance lead to a change in voltage, which corresponds to the sound wave.
4. Impedance Conversion
- The signal generated is typically of very high impedance, making it difficult to transmit directly.
- A FET (Field Effect Transistor) or similar preamplifier is used inside the microphone to convert this high-impedance signal into a lower-impedance signal, suitable for further amplification or recording.
5. Output Signal
- The output is a low-impedance electrical signal that faithfully represents the sound wave’s amplitude and frequency variations.
This process allows condenser microphones to capture audio with high sensitivity, wide frequency response, and detailed accuracy, making them ideal for professional audio applications.
2. Power Requirement
- Dynamic Microphones:
- Does not require external power; it generates its signal from the motion of the diaphragm and coil.
- Condenser Microphones:
- Requires external power (often supplied as 48 V DC phantom power from a mixing console or audio interface, or via a battery) to operate its internal circuitry and maintain the charge between the plates.
3. Sound Sensitivity and Frequency Response
- Dynamic Microphones:
- Less sensitive to subtle or high-frequency sounds.
- Generally better for capturing loud sounds and handling high sound pressure levels (SPL) without distortion.
- Frequency response is typically less flat, often tailored for specific uses (e.g., vocal or instrument miking).
- Condenser Microphones:
- Highly sensitive to detailed and high-frequency sounds.
- Offers a more accurate and flat frequency response, making it ideal for capturing subtle nuances in vocals and instruments.
4. Durability
- Dynamic Microphones:
- Rugged and durable, able to withstand rough handling and challenging environments.
- Less prone to damage from moisture and physical shocks.
- Condenser Microphones:
- More delicate and susceptible to damage from rough handling, moisture, and extreme temperatures.
5. Applications
- Dynamic Microphones:
- Commonly used for live sound applications (e.g., concerts, and public speaking) due to their durability and resistance to feedback.
- Often used for miking drums, guitar amplifiers, and other loud sound sources.
- Condenser Microphones:
- Preferred for studio recording where accuracy and detail are crucial.
- Ideal for vocals, acoustic instruments, and ambient recordings.
6. Cost
- Dynamic Microphones:
- More affordable and cost-effective.
- Condenser Microphones:
- Often much more expensive (thousands of dollars) due to their more complex design and higher sensitivity.
Summary Table
| Aspect | Dynamic Microphone | Condenser Microphone |
| Working Principle | Electromagnetic induction | Capacitance changes |
| Power | No external power required | Requires external power (48 V DC phantom/battery) |
| Sensitivity | Less sensitive; good for loud sounds | Highly sensitive; captures fine details |
| Durability | Rugged and robust | Delicate and needs careful handling |
| Applications | Live sound, loud sources | Studio recording, detailed sound capture |
| Cost | Generally more affordable | Typically more expensive |
Choose the type based on your specific use case and environment.
Microphone Preamplifiers
Professional Studio Preamps
- Universal Audio Solo/610
- Features: Classic tube sound, variable impedance, DI input, XLR outputs.
- Best For: High-end studio recordings with a warm vintage tone.
- Focusrite ISA One
- Features: Lundahl transformer, variable impedance, VU meter, DI input, XLR connections.
- Best For: High-quality vocals and instruments with pristine, transparent sound.
- Neve 1073SPX
- Features: Legendary Neve tone, EQ section, XLR and TRS outputs, phantom power.
- Best For: Professionals seeking a classic Neve preamp sound.
Mid-Range Preamps
- Warm Audio WA12 MKII
- Features: Discrete signal path, variable impedance, DI input, XLR outputs.
- Best For: Those seeking vintage-style warmth at a mid-range price.
- Audient ASP880
- Features: 8 preamps, Burr-Brown AD converters, switchable phantom power per channel.
- Best For: Multi-mic setups like drums or group recordings.
- ART Pro MPA II
- Features: Dual-channel tube preamp, selectable input impedance, stereo operation.
- Best For: Versatile use for vocals and instruments with tube coloration.
Budget Options
- Focusrite Scarlett OctoPre
- Features: 8 channels, ADAT output, phantom power per channel.
- Best For: Expanding audio interfaces for multi-channel recording.
- PreSonus TubePre V2
- Features: Tube warmth control, compact size, XLR and TRS inputs.
- Best For: Budget-friendly tube sound for home studios.
- Behringer MIC2200 Ultragain Pro
- Features: Dual-channel tube preamp, parametric EQ, XLR inputs/outputs.
- Best For: Entry-level setups with tone-shaping needs.
Mic preamps will definitely affect the sound quality. Frequency response and distortion in really inexpensive preamps can compromise the sound. Here are bench test results from an Earthworks ZDT 1022 2-channel Mic Preamp with 1 Volt input and the gain adjusted to a little more than 1 Volt output. Distortion is very low. The frequency response is flat all the way out to 45 kHz (the downward slope at 42 kHz is because 48 kHz is the limit of 24/96 digital sampling, so the response is sure to be flat beyond that). I bought this mic preamp about 15 years ago for $2,200, and it is no longer available. There are plenty of other good ones on the market now, some of which I hope to test.


Portable and Specialty Mic Preamps
1. Cloud Microphones Cloudlifter CL-1
- Features: Inline preamp for dynamic and ribbon mics, 25 dB clean gain, phantom power pass-through.
- Best For: Boosting gain for low-output microphones.
2. Sound Devices MixPre-3 II
- Features: Compact recorder with preamps, USB audio interface capability, XLR inputs, phantom power.
- Best For: Field recording and mobile setups.
When choosing mic preamps, consider factors like the type of microphone (dynamic, condenser, or ribbon), the sound you’re aiming for (transparent vs. colored), and the number of channels needed. If you share more details about your setup, I can provide a more tailored recommendation.
Other Items
- Cables and Stands: $100–$500
- Headphones and Monitoring:
- Studio Headphones: $50–$200 each
- Studio monitors (e.g., KRK Rokit): $300–$1,000 per pair
- Miscellaneous (pop filters, shock mounts): $50–$200
Computers and Software
- Computer: A powerful PC/Mac for running DAW software: $1,000–$2,500
- Digital Audio Workstation (DAW) Software:
- Affordable options (e.g., Reaper): $60
- Industry-standard (e.g., Pro Tools, Logic Pro): $200–$600
Instruments and Amplification (if needed)
- Basic Setup for Garage Bands:
- Guitar amplifiers, bass amps, and PA systems: $500–$2,000
- MIDI keyboard (for virtual instruments): $100–$500
Miscellaneous
- Power Conditioning and Surge Protectors: $50–$200
- Furniture (desk, chairs): $200–$500
- Lighting and décor (optional): $100–$300
Estimated Total Expenses:
- Budget Setup: $2,500–$5,000
- Midrange Setup: $5,000–$15,000
- High-End Setup: $15,000–$30,000+
Tips to Save Costs:
- Start small and upgrade as needed. Focus on essentials like soundproofing, a basic interface, and a couple of good microphones.
- Buy second-hand equipment from trusted sources or rent gear initially.
- Use free or low-cost DAWs like Audacity and plugins to begin with.
- Audacity can use two USB microphones to record simultaneously (stereo), but it requires some workarounds because most operating systems treat multiple USB microphones as separate audio devices, and Audacity typically records from a single device at a time. Start by having all of the rock musicians close together in a circle with the two microphones in the middle, facing outward. Don’t play as loud as you would at a concert. Use 16/44.1 sampling as a start, to reduce demands on your computer’s processor.
Steps to Using Two USB Microphones in Audacity (about as inexpensive a setup that could possibly be):
Connect Both USB Microphones:
Plug both microphones into your computer’s USB ports.
Ensure both are recognized by your operating system.
Combine the Microphones into a Single Device:
Windows:
Use a virtual audio device like VoiceMeeter or combine the microphones into a single device using Stereo Mix (if your sound card supports it).
Mac:
Use the Audio MIDI Setup utility:
Open Audio MIDI Setup (Applications > Utilities).
Click the “+” button in the bottom-left corner and select Create Aggregate Device.
Add both USB microphones to the aggregate device.
Linux:
Use the JACK Audio Connection Kit or ALSA to combine the microphones.
Set the Aggregate Device as the Input in Audacity:
In Audacity, go to Edit > Preferences > Devices (or Audacity > Preferences > Devices on Mac).
Under Recording, select the aggregate or virtual device you created.
Configure Channels:
If each microphone corresponds to one channel (left or right), set Audacity to record in Stereo or higher channel modes.
In the Device Toolbar, ensure the input channels match the number of microphones.
Record and Verify:
Click Record and test the setup.
Ensure each microphone is recorded on its own channel or is distinguishable in the recording.
Challenges and Tips:
Synchronization Issues:
USB microphones often have slightly different internal clocks, leading to sync drift during recording. To minimize this:
Use microphones of the same model.
Periodically sync tracks manually in Audacity by splitting and realigning them.
Audio Quality:
The combined audio quality depends on the virtual device or aggregate setup. Ensure proper configuration to avoid latency or quality loss.
Resource Usage:
Multiple USB microphones can strain your computer’s resources, especially on older systems. Close unnecessary applications to free up CPU and RAM.
Separate Tracks for Each Microphone:
For better post-production flexibility, ensure each microphone is recorded on a separate track in Audacity.
Alternative Solutions:
If the above setup proves cumbersome:
Use an audio interface with multiple XLR inputs instead of USB microphones.
Employ a USB mixer that combines multiple microphones into a single input device for Audacity.
Digital Studio Recording has improved immensely over the decades, not only in the sampling capability but the huge number of methods and sound effects. Whether you have a professional recording studio create your masterpiece, or build your own studio, digital recording has never sounded better.
CODA:
The need for professional recording studios has been declining in recent years, but this doesn’t mean they are becoming obsolete. The trend is influenced by several key factors:
Factors Driving the Decline
- Advances in Home Recording Technology:
- Affordable and high-quality recording equipment, such as microphones, audio interfaces, and software, has made it possible to achieve professional-level sound at home.
- Software like Pro Tools, Logic Pro, and Ableton Live offers advanced features that were once only available in professional studios.
- Accessibility of Online Tools:
- Online platforms provide tools for collaboration, mixing, and mastering, reducing the need for in-person studio sessions.
- AI-powered mastering services (e.g., LANDR) allow creators to polish their work without professional engineers.
- Democratization of Music Production:
- Indie musicians and smaller creators can now produce, mix, and distribute their music independently without the high costs of studio time.
- Changing Music Industry Dynamics:
- The rise of streaming platforms and shorter album cycles have shifted focus toward quick, cost-efficient production.
- Many artists prioritize quantity over quality, favoring home setups to meet fast-paced industry demands.
Why Professional Studios Are Still Relevant
- High-End Equipment and Acoustics:
- Professional studios offer specialized equipment, treated rooms, and unique instruments that are difficult to replicate in a home setting.
- High-end analog gear and expertly tuned spaces deliver sound quality that may exceed what a typical home studio can achieve.
- Collaboration and Expertise:
- Studios bring together producers, engineers, and musicians, fostering creativity and professional guidance.
- The human touch of experienced professionals is invaluable, especially for larger-scale or highly polished productions.
- Live Recording Needs:
- Bands, orchestras, and other live performers often require the space and equipment provided by professional studios to capture their sound authentically.
- Prestige and Networking:
- Some artists still value the prestige of working in iconic studios and the networking opportunities they provide.
Outlook
While the demand for traditional professional studios has diminished due to technological advances, there will likely always be a need for them in high-end, large-scale, or specialized projects. Studios that adapt by offering hybrid services—such as remote collaboration, niche expertise, or unique gear—may continue to thrive even in this evolving landscape.
REFERENCES
Cambridge Music Technology: https://cambridge-mt.com/rs2/app1/
AudioDope: https://connect.audiodope.co/what-are-the-daily-processes-in-the-recording-studio/
Recording Magazine: https://www.recordingmag.com/resources/back-to-basics-recording-techniques/understanding-digital-audio-part-1/
Travsonic Audio Production: https://www.travsonic.com/what-is-audio-production-steps-process/
LMNL Studios: https://www.lmnlstudio.com/
Mello Studio: https://www.mellostudio.com/en/?srsltid=AfmBOoowEjqCeL8Qg3Qmgpn8I3ZQDS3_RinZzfG8pfro19_3b4y7BXRi
E-Home Studio Recordings: https://ehomerecordingstudio.com/home-recording-studio-essentials/
Avid: https://www.avid.com/resource-center/home-recording-studio-setup
C&I Studios: https://c-istudios.com/demystifying-the-audio-mastering-process-what-you-need-to-know/
Abbey Road Institute: https://abbeyroadinstitute.co.uk/blog/finding-your-sound-with-mix-bus-compression/
Union Recording Studios: https://unionrecstudios.com/blog/advanced-recording-techniques-for-music-artists/
Star Sound Studios: https://starsoundstudios.com/blog/-studio-recording-techniques-tips
Building a Recording Studio, Jeff Cooper, Builder’s Book
Mastering Audio: The Art and Science, Bob Katz, Focal Press
Mixing and Mastering in the Box: The Guide to Making Great Mixes and Final Masters on Your Computer, Steve Savage,
Home Recording Studio: Build It Like the Pros, Rod Gervais
Audio Mastering Secrets: The Pros Don’t Want You To Know!, John Rogers, 2017
20 Tips On Mixing, Paul White, Sound On Sound, 1998
Mixing Tips & Tricks, Pete Weiss, Tape Op, 2000
7 Audio Mixing Techniques Every Producer Needs to Know, Ditto Music, https://dittomusic.com/en/blog/7-audio-mixing-techniques-every-producer-needs-to-know
Experiment With These 20 Essential Practical Audio Mixing Techniques, Tips & Tricks to Produce More Professional-Sounding Mixes in Your Home Studio, Renegade Producer, https://www.renegadeproducer.com/audio-mixing-techniques.html
How to Mix Music: A Complete Guide to Audio Mixing, Avid, 2023, https://www.avid.com/resource-center/how-to-mix-music
16 Essential Mixing Tips For Professional & Exciting Tracks, Dustin Miraglia, 2024, https://unison.audio/mixing-tips/
Mixing Tips for Professional Sounding Audio, Zoe Jones, Premium Beat, 2024, https://www.premiumbeat.com/blog/mixing-professional-sounding-audio/
15 Essential Mixing Tips for Better Mixes Today, Max Mcallister, Produce Like a Pro, 2021, https://producelikeapro.com/blog/15-essential-mixing-tips/
Huber, D. M., & Runstein, R. E. (2021). Modern Recording Techniques (10th ed.). Routledge.
Izhaki, R. (2023). Mixing Audio: Concepts, Practices, and Tools (4th ed.). Routledge.
Burgess, R. J. (2013). The Art of Music Production: The Theory and Practice (4th ed.). Oxford University Press.
Owsinski, B. (2023). The Mixing Engineer’s Handbook (5th ed.). Bobby Owsinski Media Group.
Owsinski, B. (2023). The Recording Engineer’s Handbook (5th ed.). Bobby Owsinski Media Group.
Corey, J. (2016). Audio Production and Critical Listening: Technical Ear Training. Routledge.
White, P. (2020). The Producer’s Manual: Tips, Tricks, and Secrets for the Modern Producer. Sanctuary Publishing.
Senior, M. (2018). Recording Secrets for the Small Studio. Focal Press.
Laskow, M. (2020). How to Make It in the New Music Business. Liveright Publishing Corporation.
Haigh, J. (2021). Audio Engineering 101: A Beginner’s Guide to Music Production. Focal Press.
Rumsey, F., & McCormick, T. (2014). Digital Audio Effects and Their Use in Modern Recording Studios. Journal of the Audio Engineering Society.
Holmes, T. (2012). Digital Sampling and Its Impact on Recording Methods. Music, Sound, and Culture Journal.
Sterne, J. (2016). From Analog to Digital: The Transformation of Recording Technologies. Media History.
Pestana, P. D., & Barbosa, A. (2014). Analyzing Mastering Techniques in Digital Audio Workstations (DAWs). Computer Music Journal.
Sound On Sound Magazine
Website: https://www.soundonsound.com
Production Expert Blog
Website: https://www.pro-tools-expert.com
Mix Online
Website: https://www.mixonline.com
Recording Revolution Blog
Website: https://www.recordingrevolution.com
Collins, K. (2014). Digital Audio Workstations in the Classroom: Pedagogical Implications. Journal of Music Technology Education.
Casey, M. A. (2016). Advances in Signal Processing for Digital Recording. Audio Engineering Society Conference Proceedings.
Zölzer, U. (2011). DAFx: Digital Audio Effects. Springer-Verlag Berlin Heidelberg.
“Digital Audio Theory: A Practical Guide” by Christopher L. Bennett
“Principles of Digital Audio” by Ken C. Pohlmann
“High-Resolution Audio: Concepts, Applications, and Realizations” by Dr. Mitsunobu Sakamoto
“Direct Stream Digital and Pulse Code Modulation: A Comparison” by Michael Gerzon (AES Journal, 1999)
“A Review of Direct Stream Digital Technology” by Andreas Spreer (2000)
“DSD vs. PCM: Audio Quality and Perceptual Analysis” by E. Brixen (AES Convention Paper, 2003).
“Understanding the Differences Between DSD and PCM” by Benchmark Media Systems
“DSD vs PCM: What’s the Difference?” by Linn Audio
“DSD: Direct Stream Digital Overview” by Sony Corporation
“PCM vs DSD: The Debate in High-Resolution Audio” by Sound On Sound Magazine
Philips and Sony: SACD White Paper (2002)
AES Standard Recommendations for Digital Audio Formats (AES31-1999)