


Photo © Universal Pictures
Few images in cinema history are as instantly recognizable—or as haunting—as the Universal Pictures Frankenstein® Monster. The flat skull, heavy brow, drooping eyelids, and those steel neck electrodes have seared themselves into our collective imagination.
Yet for all its cultural ubiquity, the creature’s visage was not a simple invention. It was the product of painstaking craftsmanship, layered artistry, and a stubborn insistence on realism, even in fantasy. What audiences saw flicker on movie screens in 1931 was not merely a costume or a mask; it was the culmination of Jack Pierce’s uncompromising devotion to transforming Boris Karloff into something halfway between life and death.
In an age before foam latex appliances, silicone prosthetics, or digital enhancement, makeup artists had to conjure the impossible with cotton, collodion, putty, spirit gum, and imagination. Pierce was not content to simply “suggest” the grotesque. He built it, literally, layer upon layer. Every morning, Karloff endured hours of application as Pierce sculpted the monster anew, constructing the now-iconic flat head, sculpting scars and depressions, and carefully painting death-like flesh tones designed not just to shock, but to tell a story. This creature had been assembled, violated, and resurrected, and the makeup made you believe it.
Beyond the physical application lay something deeper: a philosophy. Pierce approached the Frankenstein Monster as if he were a medical reality, not a movie prop. The electrodes were imagined as surgical conduits of galvanic force; the scars suggested crude stitching and anatomical violation; the hollowed eyes and sunken cheeks hinted at lingering decay. This was not makeup as disguise; this was makeup as world-building, as character, and as narrative.
Today, nearly a century later, the genius of Pierce’s work remains awe-inspiring. It is not only a triumph of early Hollywood artistry but a benchmark for practical effects, reminding us that true monsters are not molded overnight; they are painstakingly, obsessively, and lovingly built.
Jack Pierce’s transformation of Boris Karloff into Frankenstein’s creature in Frankenstein (1931) is one of the most legendary makeup processes in film history. It was entirely hand-built and applied daily, and it set the standard for character makeup.
Below is a detailed, step-by-step description of Pierce’s process as documented by makeup historians and Karloff himself.
Materials & Philosophy
Pierce worked in an era before foam latex appliances. He believed monster makeup should be constructed directly on the actor each day, “like a sculpture,” rather than cast pieces that could be glued on.
He used:
● Collodion and cotton (early prosthetic technique)
● Spirit gum
● Greasepaint
● Gum rubber
● Plasticine
● Wax
● Metal pins, tape, gauze
● Heavy costume components (braces, weights, platform boots)
Step-by-Step Makeup Process
 Face Close-up Makeup View")
Photo © Universal Pictures
1. Preparing Karloff’s Face
● Pierce began with a clean, shaved face.
● He slicked down Karloff’s hair and scalp and fitted a skullcap that flattened the forehead line and prepared for the headpiece.
● Karloff wore a dental plate on the upper jaw to recess his cheekbones (he removed his own bridgework on set).
This hollow-cheeked look contributed significantly to the gaunt, dead appearance.
2. Building the Famous Flat Head
Contrary to later latex masks, the head was built up daily:
● Layers of cotton soaked in collodion were applied to sculpt a squared, flattened cranium.
● Gauze and glue reinforced it.
● A custom-made metal mesh insert helped maintain flatness and shape.
● A rubber or putty cap covered the top, blended into the cotton-collodion construction.
This gave the monster its iconic architectural forehead.
3. Forehead Scar and Stitches
● Pierce sculpted the long frontal scar and other facial scars out of putty or wax.
● Spirit gum was used to adhere cotton strips beneath the skin texture to create raised wound edges.
● He applied stitches and metal-looking hardware pieces (painted rubber) at scar intersections.
4. Eyelids and Eye Effects
● Pierce built up the upper lids with putty to make the eyes appear heavier and sunken.
● A dark greasepaint mixture and shading deepened the sockets.
● Red eyeliner enhanced the tired, dead look.
Karloff later recalled this step as particularly uncomfortable.
5. Electrodes / Neck Bolts
Not originally “bolts” — called “electrodes” by the makeup crew.
● Pierce affixed gum-rubber fixtures to the neck.
● These symbolized the creature’s reanimation hardware.
(They were originally intended to be at the temples—Universal moved them to the neck.)
6. Skin Texture and Coloring
Pierce believed a death-like skin had no natural flesh tone.
● Light green-gray greasepaint was used (on B&W film, it translated to sickly pallor).
Here is a rare color photo from a color test used for the 1939 Son of Frankenstein when Universal was considering shooting the movie in color:

Image © Universal Pictures
● Layers of mottled tones were stippled to add texture.
● Veins were lightly painted beneath the surface tone.
7. Hair Styling
● The hair was glued to the skullcap sides.
● The top hairline was trimmed irregularly and burned with a small flame or chemical solution to give a “singed from electricity” look.
8. Body Padding and Costume
● Karloff’s costume was padded to enlarge shoulders and torso unevenly to imply rough surgical assembly.
● Custom orthopedic braces weighted his arms to create a dragging, heavy movement.
● Thick platform boots (believed ~14 pounds each) gave him an unnatural gait and height (~6’4″ to ~6’5″).
9. Final Detailing
● Lines were etched into the forehead and cheeks to symbolize sewn-together tissues.
● Dirt and grime pigments were applied around nails, ears, and seams to suggest grave-robbery and decay.
● Fake nails or nail dirt inserts were sometimes used.
Time Required
● Initial makeup tests: months of design refinement.
● Daily application: 4-7 hours (reports vary depending on shooting day).
● Removal: 1-2 hours, often painful due to collodion’s skin-tightening effect.
Karloff sometimes bled when it was taken off.
Karloff’s Experience
Boris Karloff respected Pierce deeply but described the makeup as demanding:
● Rarely ate during lunch to avoid disturbing the appliances.
● The metal headplate and heavy costume caused back strain (he later required surgery).
● Collodion hardened like shellac and pulled at the skin continuously.
Yet, both men were perfectionists, and the result has never been forgotten.
Historical Significance
Pierce’s Frankenstein makeup remains:
● A landmark in practical makeup effects.
● A design refined further in Bride of Frankenstein (1935).
● Proof that pure craftsmanship and imagination can create cinematic immortality.
Makeup artists today still study this method as a foundational monster creation technique.
1) Diagrams of the Head Appliance Layers
 schematic, simplified cross section detailed diagram")
Each layer was hand-applied, never pre-cast prosthetics.
2) Script-Style “Pierce Makeup Checklist.
Jack Pierce’s Daily Application Process (Re-created)
Call time: 4:00 AM
Duration: ~4–7 hours
| Step | Task | Notes |
| 1 | Clean & prep skin | Alcohol, shave, de-oil |
| 2 | Fit skullcap | Flatten hairline |
| 3 | Metal plate | Anchors wide cranium |
| 4 | Cotton + collodion layers | Sculpt flat, square head |
| 5 | Blend seams with/ spirit gum | Sandpaper/brush to texture |
| 6 | Forehead scar & staples | Cotton strips + gum + putty |
| 7 | Eyelid build-up | Heavy brow, swollen lids |
| 8 | Socket darkening | Greasepaint + stipple for veins |
| 9 | Neck electrodes | Glue on gum-rubber cylinders |
| 10 | “Dead skin” paint | Gray-green pallor |
| 11 | Hair stubble line | Scorched edge, irregular |
| 12 | Pad costume | Shoulder hump, uneven arms |
| 13 | Braces & 12–14 lbs. boots | Force dragging, lumbering walk |
Pierce: “A monster cannot be beautiful.”
3) Color vs B&W Appearance Comparison
ElectrodesMetallic grayIndustrial feelSocketsDeep purple/blackHollow eyes on film
| Area | Real On-Set Color | Purpose |
| Skin | Gray-green | Reads as corpse-tone in B&W |
| Scars | Brick red + brown | Creates depth and a “swollen” look |
| Hairline | Blackened & scorched | Electro-burned look |
How It Translates (maps to) in B&W
Industrial “surgery” look.Metal → bright highlights
| Film Look | Reason |
| Ashen corpse pallor | Green maps to pale gray |
| Sunken, haunted eyes | Purple → deep shadow |
| Sharply defined scars | Contrast against a pallid base. |
Karloff said people were shocked when they saw him in color, because he looked moldy.
On early days, Karloff fell asleep in the chair while Pierce worked.
4) Evolution Across Universal Sequels
| Films | Design Change | Notes |
| Frankenstein (19310 | First iconic design | Flat head, wide cranium, electrodes |
| Bride of Frankenstein (1935) | More scar detail, burns | Karloff slimmer, head more elongated |
| Son of Frankenstein (1939) | Heavier brows, darker tone | Makeup artist, not Pierce (studio politics) |
| Ghost / Frankenstein Meets Wolf Man (1942–43) | Appliance approach begins | Head shape varies from film to film |
| Abbott & Costello Meet Frankenstein (1948) | Fuller face | Glenn Strange in the role; Karloff mentor |
Pierce’s Bride of Frankenstein version is considered his masterpiece refinement.
Secrets Sponsor
Technical Notes
● Karloff removed his own dental bridge for the sunken cheek effect, not makeup!
● The “flat head” idea came from battery jars in morgues. Pierce researched anatomy and electricity.
● His boots weighed so much, Karloff permanently injured his back.
● Collodion pulled on skin tightly; removal often tore pores and hair.
1) Detailed Diagrams for Scars and Electrodes
 detailed diagram")
Attachment technique:
● Spirit gum
● Collodion edge blend
● Greasepaint to hide seam
● Highlight the line at the bottom to simulate weight
Early tests reportedly placed electrodes at the temples before moving to the neck.
2) Makeup Recipes (Historical Reconstruction)
Note: Exact Pierce formulas weren’t published, but Hollywood lab logs and eyewitness accounts let historians reconstruct them.
Base Skin Tone
| Ingredient | Purpose |
| Greasepaint — tinted gray-green | Waste-flesh cadaver tone |
| Stipple sponge | Creates pores, mottling |
| Liquid collodion | Tightens skin, adds corpse dryness. |
Color references:
● Greenish gray: reads dead in B&W
● Yellow-gray wash: bruised undertone
● Purple right around the eyes: hematoma effect
Scar Material
| Ingredient | Function |
| Cotton fibers | Raised tissue |
| Collodion | Acrylic “skin hardener.” |
| Spirit gum | Adhesive |
| Nose putty/plasticine | Blending and smoothing edges |
| Red & brown greasepaint | Inflamed tissue look |
Electrodes Paint
● Base: gum rubber
● Finish: silver pigment + graphite rub for patina
Socket Shading
● Violet/black greasepaint
● Light dusting of charcoal shavings
Pierce’s motto:
“A monster has no blood in his face, only beneath it.”
3) Side-By-Side Visual Reference Through Eras
| Era | Actor | Makeup Hallmarks |
| 1931 — Frankenstein | Boris Karloff | Raw collodion, cotton build, thinner head bulk |
| 1935 — Bride of Frankenstein | Karloff | More scars, sharper cranium taper, refined texture |
| 1939 — Son of Frankenstein | Karloff | Heavier brow, darker tone, more sculpted temples |
| 1940s sequels | Lon Chaney Jr., Bela Lugosi, Glenn Strange | Thicker foam latex, softer edges, and a more uniform head |
| 1948 — Abbott & Costello Meet Frankenstein | Glenn Strange | Fuller face, cleaner seams, refined electrodes |
Karloff personally coached Glenn Strange on the posture and hand positions.
4) 1931 Method vs. Modern Prosthetic Comparison
1931 Method (Jack Pierce)
| Attribute | Method |
| Head shape | Hand-built daily w/ cotton + collodion |
| Scars | Sculpted fresh each day |
| Adhesion | Spirit gum + collodion |
| Comfort | Low — skin pulls, heat, weight. |
| Repetition | Consistent but imperfect |
| Time | 4-7 hours daily |
Modern Foam/Silicone
| Attribute | Method |
| Head shape | Foam latex/silicone appliances, lifecast fit. |
| Scars | Pre-sculpted molds, seamless blending |
| Adhesion | Medical adhesives (Prosaide, Telesis) |
| Attribute | Method |
| Comfort | High |
| Repetition | Nearly perfect continuity |
| Time | 2-3 hours |
Today’s look has smoother blending, but Pierce’s had organic ruggedness that nobody has truly replicated since.
5) Timeline of the Universal Monster Makeup Breakthroughs
| Year | Film | Makeup Advance | Artist |
| 1931 | Frankenstein | Collodion skull build, electrodes | Jack Pierce |
| 1932 | The Mummy | Egyptian wrappings, wrinkle gauze aging | Pierce |
| 1933 | The Invisible Man | Gauze wrapping illusions | Pierce |
| 1935 | Bride of Frankenstein | Sculpt refinement, better wounds | Pierce |
| 1941 | The Wolf Man | Multi-stage yak-hair yak build, time-lapse | Pierce |
| Mid-1940s | Universal B-era | Foam latex enters | Bud Westmore era begins |
| 1954 | Creature from the Black Lagoon | Full-body latex suit | Milicent Patrick (design) & Bud Westmore (credited) |
Karloff later called Pierce “a genius… and a tyrant.” A man who refused shortcuts and whose pride shows in every frame.
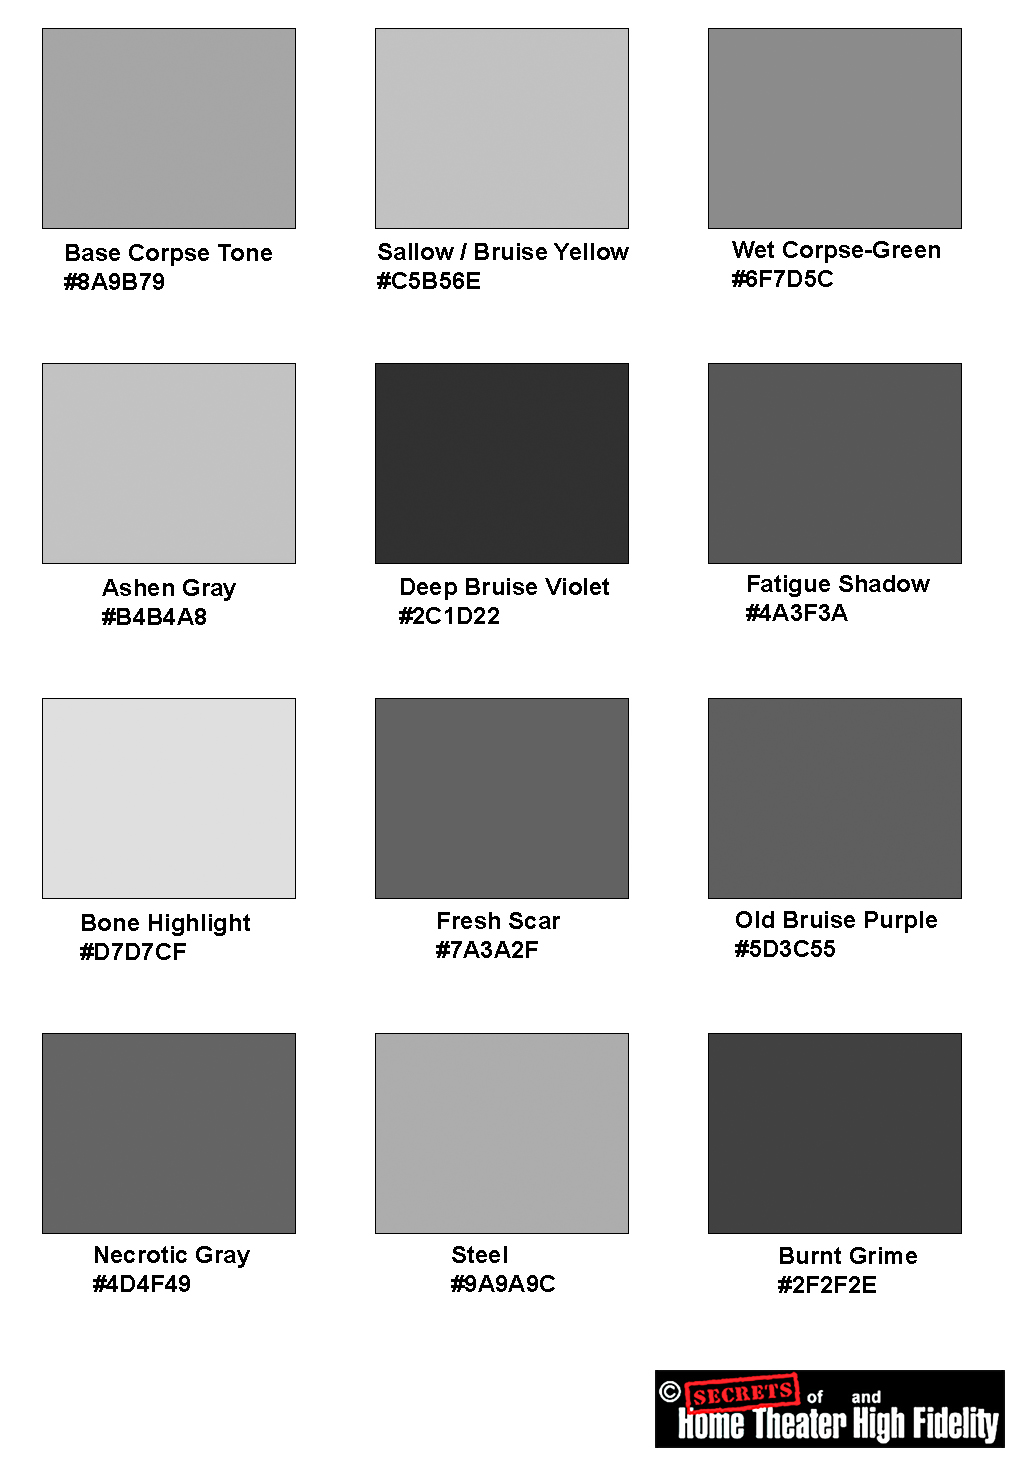
Accurate Digital Color Palette — Frankenstein (1931) (Colors chosen to match preserved makeup notes, photos, stills, and historian reconstructions.)
Primary Skin Tone (Dead Gray-Green)
| Description | Hex | RGB |
| Base “dead flesh.” | #8A9B79 | 138, 155, 121 |
| Sallow/bruise yellow | #C5B56E | 197, 181, 110 |
| Faint corpse-green glaze | #6F7D5C | 111, 125, 92 |
| Dry gray surface | #B4B4A8 | 180, 180, 168 |
The green wasn’t supposed to look green. On black-and-white film, it produced a chalky, dehydrated, undead tone.
Shadow and Eye Socket Colors
| Description | Hex | RGB |
| Deep socket purple-black | #2C1D22 | 44, 29, 34 |
| Tired flesh shadow was | #4A3F3A | 74, 63, 58 |
| Bone-gray highlight | #D7D7CF | 215, 215, 207 |
Scars & Burn Edges
| Description | Hex | RGB |
| Fresh scar undertone | #7A3A2F | 122, 58, 47 |
| Old bruise purple | #5D3C55 | 93, 60, 85 |
| Necrotic gray | #4D4F49 | 77, 79, 73 |
Electrode Tone
| Description | Hex | RGB |
| Steel/graphite cylinder | #9A9A9C | 154, 154, 156 |
| Sooty grime | #2F2F2E | 47, 47, 46 |

#8A9B79 (the color at the top left corner of the graphic shown above) is a hexadecimal color code, a way of specifying a color in digital graphics.
It breaks down like this:
| Pair | Meaning | Decimal value | Color channel |
| 8A | Red component | 138 | Amount of red |
| 9B | Green component | 155 | Amount of green |
| 79 | Blue component | 121 | Amount of blue |
So the code means:
R = 138
G = 155
B = 121
This produces a muted gray-green, which we used because it matches the corpse tone Jack Pierce used on Karloff; it photographed as pale and sickly in black-and-white film stock.
I reproduced the #8A9B79 color in Photoshop. It looks like the example in this graphic.
![#8A9B79 hex color code (a green-gray, dead flesh tone) in Adobe Photoshop [digital equivalent of Jack Pierce's makeup palette]](/wp-content/uploads/2015/06/the-amazing-complexity-of-the-universal-pictures-frankenstein-monster-makeup-fig.jpg "#8A9B79 hex color code (a green-gray, dead flesh tone) in Adobe Photoshop [digital equivalent of Jack Pierce's makeup palette]")
In plain terms:
#8A9B79 = a green-gray, dead flesh tone.
It’s the digital equivalent of Pierce’s makeup palette.
Here is what that color palette would look like using the orthochromatic film of the time (not sensitive to red and only modestly sensitive to green, very sensitive to blue):
Secrets Sponsor
The Frankenstein monster makeup stands not only as a landmark of horror cinema but as a cornerstone achievement in the history of motion-picture makeup. Long before digital retouching, CGI, or even foam-latex appliances, Jack Pierce transformed Boris Karloff using nothing more than imagination, cotton, collodion, greasepaint, gum, and extraordinary patience. Every morning, the monster was built by hand, sculpted layer by layer anew, shaded and textured with an artist’s eye, and refined through intuition rather than technology. Nothing was automated. Nothing could be “fixed in post.” The makeup lived or died on Pierce’s craftsmanship and Karloff’s endurance.
Nearly a century later, the design remains one of the most recognizable images in film history. Countless creatures, from Universal’s later monsters to contemporary screen icons, trace their lineage to that flat head, scarred brow, and hollowed stare. In an age when computers can conjure impossible worlds, the Frankenstein makeup reminds us of a different kind of magic, one born of hands, brushes, cotton, cameras, and sweat. It is a testament to the artistry of practical effects and a reminder that some of cinema’s most unforgettable creations came not from pixels, but from the human touch.
REFERENCES
● Tom Weaver, Michael & John Brunas, Universal Horrors: The Studio’s Classic Films, 1931–1946 (McFarland, rev. ed.)—standard production history with makeup notes and primary citations. Goodreads+3mcfarlandbooks.com+3Amazon+3
● Gregory W. Mank, Karloff and Lugosi: The Story of a Haunting Collaboration (McFarland)—context on Whale, Karloff, and Pierce; makeup anecdotes sourced to interviews. (See archive listing.) Internet Archive
● David J. Skal, The Monster Show: A Cultural History of Horror (Norton/FSG)—cultural framing; frequent discussion of Universal makeup traditions and Pierce’s legacy. Google Books+1
● Stephen Jacobs, Boris Karloff: More Than a Monster (Tomahawk Press, 2011)— authorised biography with primary documentation; includes chapters on Frankenstein, Bride, and Son. Google Books+1
● American Society of Cinematographers (ASC), “Jack Pierce — Forgotten Make-up Genius.” Excellent overview drawing on studio history and stills; useful to cross-check dates and personnel. The American Society of Cinematographers
● ASC, “The Bride of Frankenstein: A Gothic Masterpiece.” Production craft context: Pierce’s contributions are summarized with stills credits. The American Society of Cinematographers
● Fangoria, “Mad Science & Makeup: Frankenstein at 90.” Modern retrospective that synthesizes classic sources about Pierce’s method. FANGORIA
● The Frankenstein Files: How Hollywood Made a Monster (dir. David J. Skal, c. 1999–2002; included on Universal classic releases). Interviews with historians (Skal, Mank), Sara Karloff; makeup process discussed in detail. IMDb+2cineamo.com+2
● Digital Bits review of Universal’s Frankenstein disc (notes the Skal documentary and commentary track; useful for identifying the exact bonus features). archive.thedigitalbits.com
● Behind-the-scenes stills by Sherman Clark & Jack (Roman) Freulich (© Universal Pictures)—often reproduced in retrospectives; credit lines appear on curated pages like Cinephilia & Beyond (editorial reference only). For publication, clear via Universal or a licensed archive. Cinephilia & Beyond
● Universal production stills licensing (various agencies)—Cinephilia & Beyond page gives photographer attribution helpful for rights research; for publishable files, use studio or photo agencies. Cinephilia & Beyond
● Monsters of Makeup: “Making Up Universal’s Frankenstein.” Summarizes Pierce’s cotton–collodion build-up and gray-green greasepaint strategy for B&W photography. monstersofmakeup.com
● Frankensteinia: “The Make-Up Man: Jack Pierce.” Long-running research blog with citations and scans; useful for tracking interviews and period magazines. frankensteinia.blogspot.com
● Mande/Below-the-Line: “Man of 1000 Monsters: A Tribute to Jack Pierce.” Career survey with makeup-process highlights and quotes. mande.net
● 1939 color test/home-movie material from Son of Frankenstein—often circulated via restorers and classic-film outlets; this is the closest primary color reference to Pierce’s final Karloff makeup (though designed for B&W capture). Use judiciously and label accurately. tapatalk.com