|
|||||||||
|
Introduction Digital cameras are an explosive market, with sales outpacing film cameras this last year. There are many point-and-shoot digital cameras out there, sold by just about everyone under their own brand names, including computer companies (e.g., HP and Gateway). When digital cameras first arrived on the scene, they did not have much resolution. They were good enough to use for website photos, but not really high enough resolution to make good quality prints from inkjet or laser printers. Once resolution reached 3 megapixels and above, we finally could make great looking prints. Commercial printers can also give you good prints if you don't want to print them yourself, but even the inexpensive inkjet printers these days can do a very good job, printing your digital photos up to 8x10. For larger prints than your inkjet can handle, there are digital printing services that will print them at sizes including 20x30. SLRs are the way to go if you are a photographer who likes flexibility in settings, interchangeable lenses, and various attachments including powerful electronic flash. A number of companies make digital SLRs, and they are affordable to everyone, as long as you are happy with a resolution of 5 - 6 megapixels. If you want high resolution, above 10 megapixels, then they get to be very expensive. Enter the Sigma SD10. The Design If you have one of the big name brand SLRs, you know how expensive their lenses can be. Over the years, Sigma has made lenses that fit numerous SLR brands, serving the market of consumers who want a stable of lenses for their SLRs, but who cannot afford the lenses from that SLR brand. They started making their own camera line as well, using, of course, their Sigma lenses. The various camera manufacturers out there have their digital camera technology embedded firmly, using CMOS or CCD sensors. Factories have been built to manufacture the sensors that they use. The sensors have gotten bigger with more pixels, but the basic design for capturing color, called the mosaic "Bayer" pattern, has remained the same. Most consumers know that color imaging is based on red, green, and blue components that combine to give us the complete spectrum of color in our TVs. It is also the case with color film, and with digital color sensors in digital cameras. It is also generally understood that a 3 megapixel camera has the red, green, and blue sensor units. But, what is not generally known is that there are not 3 million red pixels, 3 million green pixels, and 3 million blue pixels in a 3 megapixel camera. There are not even 1 million red pixels in a 3 megapixel camera. To understand why, let's look at a diagram of the magnified sensor surface (shown below). Using our 3 megapixel example, and looking at the surface of the chip, there is actually a mosaic of color pixels, side by side. A color filter has been applied to the surface, and the red, green, and blue pixels alternate. So, you might assume they are evenly divided between red, green, and blue. Well, that is not the case.
In our 3 megapixel mosaic chip, 1.5 million are green, 0.75 million are red, and 0.75 million are blue. The reason for this is that our eyes are more sensitive to green than the other colors, and to maximize our image for the available pixels, added weight is given to green. In our final image then, with a 3 megapixel chip, not even 1 million of them are from the red portion of the scene, and not even 1 million are from the blue. Looking at the right portion of the figure above, you see the relative number of red, green, and blue pixels in the chip. If you think that is disappointing, well, it gets worse. Notice that the red, green, and blue pixels are not on top of each other. This means that where there is a red pixel, there is no green pixel, and no blue pixel. Where there is blue, there is no red or green. And for green, there is no red or blue. So, when the digital image file is assembled, blurring is applied to keep things from looking strange. Now, it may seem like this treatise is a criticism of the Bayer technology. It is not. Rather, it is just an explanation. The Bayer design came about because there was no known way of capturing all three colors at the same time in a single exposure. Since early sensors did not have all that many pixels, emphasis was given to green since our eyes are most sensitive to green. This is all changed now with scaled up CMOS and CCD chips, so why not alter the balance such that the pixels are evenly distributed among red, green, and blue? Factory retooling is expensive, that's why. OK, so what about Foveon technology? Here is a diagram of the surface of the Foveon X3 direct image sensor (shown below). Instead of a mosaic arrangement, the pixels are sitting one on top of the other with respect to the light hitting them coming through the camera lens. There are no color filters. The system works because silicon absorbs light energy at different depths depending on the wavelength. So, one layer absorbs red, one green, and one blue. The pixels are therefore evenly distributed for the three colors, and also, where there is a red pixel, there is a green pixel, and also a blue pixel. No blurring has to be applied to the digital image file.
Here is a diagram of how the Foveon sensor receives light vs. film.
Because the pixel colors are vertically arranged (stacked) instead of side by side, more total pixels can be placed on the same chip area. The Foveon X3 chip has more than 10 megapixels in a chip about the same size as a 5 - 6 megapixel standard Bayer CMOS or CCD chip in current cameras. Right now, the Sigma camera line is the only one that has adopted Foveon X3 chip technology, probably because they did not have Bayer CMOS or CCD chip factories that would have to be retooled. Lucky Sigma, because the X3 is a heck of a chip! The SD10 is the third model that Sigma has marketed. Changes from the SD9 include more sensitivity and some other features in the camera body. Although the MSRP is $2,000, I have seen it for $1,599 including two zoom lenses. That makes them way, way less expensive than competing models, most of which are in the 5 - 6 megapixel resolution range. (The body only can be purchased for $1,349.) Of course, there is more to a camera than just the sensor, so let's take a look specifically at the SD10. Features The front of the camera is shown in the photo at the beginning of this article. The top of the camera is shown below. The appearance is not unusual. The dial on the left is the "Drive Dial", selecting single frame shooting, multiple frame shooting, self timer, mirror lockup, and auto bracketing (takes sequential photos at different exposure settings). Buttons control spot metering and auto focus lock. The Function button turns the beeps on or off.
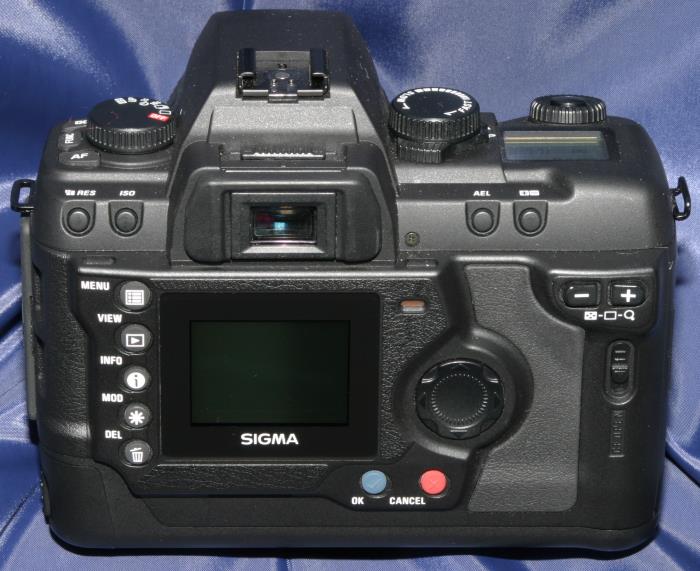
On the right side are dials for selecting Program (the camera sets everything), Aperture Priority (lets you change the aperture to a preferred setting), Shutter Priority (let's you change the shutter speed to a preferred setting), and Manual (you make all of the exposure settings). The round dial to the left of the LCD panel lets you change the shutter speeds. The shutter release is above the LCD panel, and the dial surrounding the shutter release lets you change the aperture. The LCD panel shows all of the exposure settings and other status. Just below the dials is a row of buttons for changing the resolution, the ISO (variable from 100 to 1,600), auto exposure lock, and +/- controller for adjusting exposure. A slider above the eyepiece adjusts the diopter for consumers who wear eyeglasses. The battery compartment is along the bottom. You slide it out and insert two lithium CR-V3 batteries or four AA cells. I would like to have seen a set of rechargeable lithium batteries here, as other digital SLRs routinely have them now. Some will even let you charge them in the camera. The Compact Flash drawer is on the right side. I found it a bit difficult to grasp the card to remove it for use with a card reader to upload my images to the computer. A little more finger room please. You can connect the USB jack on the SD10 to your computer and leave the card in the camera, but this consumes battery power. I always use an external card reader. The rear of the SD10 is shown below. The buttons are nice and big, and are easy to read (the instruction manual is refreshingly clear as well, by the way). Menu shows the various setting options, View lets you scroll through the pictures you have taken, along with the dial on the right, enlarging them with the - and + buttons on the above right, Info shows you the exposure data on the photos you took, Mod lets you rotate the images, and Del lets you get rid of the bad ones before anyone else can see them.
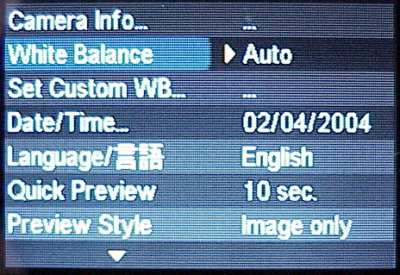
Pressing "Menu" gives the following display on the TFT screen (shown below). White Balance can be set to Auto or such things as Daylight, Incandescent, Fluorescent, etc.
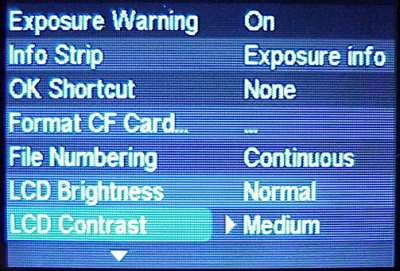
Using the round controller button in the center of the back, you scroll down to the next menu, shown below.
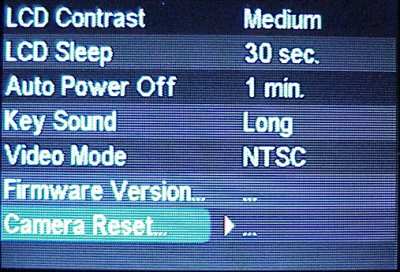
Scrolling down further brings the last set of menu options.
Pressing the Info button shows the following information about each photo that has been taken. It displays a small version of the photo in the top left corner and a histogram underneath.
Now that I shoot 100% digital photography, I wonder how I got along without all this information back when I was using a film camera. I always took a few notes on the shoot for the day, but wow, what a set of info we have now on each and every photo! Click on selection below to go to other parts of this review. Part I - Introduction, Design, and Features Part III - On the Bench and Conclusions
|
|||||||||


Magazine Publishing Solutions by