(If you would like to have your DIY project published in Secrets, please E-Mail Ralph Calabria at [email protected].)
About the design and designer - by Ralph Calabria
Chad is no stranger to these pages. I managed to pull him out of his ‘91 Talon Tsi long enough to do another article. This time he shares with us a sub/sat/center combination that will rock any home theater / audiophile den. The satellites are based on Vifa drivers. Vifa has long been a supplier of quality drivers at a very reasonable price. The subwoofer is based on the critically acclaimed NHT 1259, the same driver NHT used in their flagship powered sub, the NHT SW3P. As Chad explains, this driver is THE driver for DIYers. Easily put in a sealed box approximately 2.7 - 3.0 cubic feet, the driver delivers clean, tight bass without compromising bass extension. So, brush off that table saw, cut some MDF, and listen to the music!
Table of Contents (Click on item to go directly to it):
The Drivers
The Enclosures
The Crossover Network
The Assembly
THE SUBWOOFER
The Driver
The Enclosure
The Crossover Network
The Assembly
The List of Materials
and Cost
My brother called me one day, and said, "I'm ready to set up a Home Theater system. Do you want to make my speakers?" How could I pass up spending someone else's money to make speakers?! I accepted. After a few phone calls, and talking about the project over a few dinners, we decided to build all the speakers for his home theater. This included a center speaker, fronts, a sub, and surrounds. As you can imagine, I had my work cut out for me.
For the fronts and center I have always liked the MTM type of speaker (a tweeter sandwiched in between mid-woofers) also known as a D'Appolito configuration. This type of speaker has excellent imaging and power handling capabilities. For the subwoofer, I decided to use the NHT-1259 design that everyone on the Internet RAVES about. I must admit the terrific reviews of this sub are absolutely true. For the rear surrounds, we could not beat the Madisound Sledgling kit. It makes for an excellent surround speaker, and I didn't have to cut one piece of wood.
Front Left/Right Speakers and Center Speaker
My brother wanted the front left/right speakers and center speakers to be shielded. That way he could set the speakers close to the television without worrying about video distortion. This really limited my choices in drivers. There just aren’t that many quality shielded drivers available for DIYers. After exploring almost all the shielded drivers on the market, and running them through my Bass Box speaker design program, I decided on the Vifa P17SJ-00 for the mid-woofer, and Vifa D25ASG-05 for the tweeter.
The Vifa P17SJ-00 is a mineral-filled polycone 6.5" shielded driver with a magnesium cast frame. Two of these drivers in a vented enclosure require a box volume of 1.1 ft3. With this alignment, Bass Box indicated a Fb of 44hz, and a F3 of 53 Hz. This was not a problem since the subwoofer would be handling the 20 Hz - 60 Hz region. The Vifa D25ASG-05 is a 1" shielded ferrofluid-cooled aluminum driver. I was hesitant about using an aluminum tweeter because I have heard some really bad aluminum tweeters that made me want to cover my ears. However, this combination of mid-woofer and tweeter is an excellent choice. I was very impressed by the way the tweeter and mid-woofers blended together in music and movies. The final speaker has a sensitivity of 93 dB/w/m and a nominal impedance of 4 Ohms.
I have always liked a speaker that is narrow
and deep.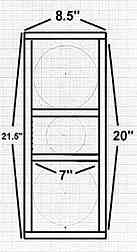 The MTMs follow that pattern. I decided
to put the vent on the rear baffle because it makes the front
of the speaker look cleaner, and I have never liked the 'whooshing'
sound a vent makes.
The MTMs follow that pattern. I decided
to put the vent on the rear baffle because it makes the front
of the speaker look cleaner, and I have never liked the 'whooshing'
sound a vent makes.  I was
somewhat hesitant to do this since a significant portion of the
sound the mid-woofer produces is a result of the vent. This is
represented by the speaker’s Fb of 44Hz.
I was
somewhat hesitant to do this since a significant portion of the
sound the mid-woofer produces is a result of the vent. This is
represented by the speaker’s Fb of 44Hz.
The enclosures for the center and fronts are identical. For the center, however, I positioned the terminal cup and the tweeter so they were facing upright when the enclosure was laid on its side. The boxes are made of 3/4" MDF. They have two shelf type braces, one above and one below the tweeter. All sides on the shelf braces are 1.5". The drivers are flush mounted in the front baffle. This is a simple thing that really improves the sound of the drivers and the custom look of the speaker. The box has a 3" diameter port that is 5.5" long. The diagrams on the left indicate the enclosure dimensions.
Following is the schematic for the crossover network:
This crossover network is a 3rd order (18 dB/octave) Butterworth design. The crossover point is at 2.9 kHz. Seeing as how I am solder-impaired, and I don’t have the faintest idea how to build a good crossover, I left that portion of the design up to Madisound. They use a test program called LEAP, and they can customize a crossover to any speaker combination that they sell. The finished crossover is an incredible work of art. I have always been impressed with Madisound’s craftsmanship in this department. I told them to use the absolute best parts they could. I provided them with the information on the types of drivers I was using in the MTM, as well as some additional information, and Madisound did the rest.
Below are the board dimensions and quantity needed to make two front speakers and one center channel speaker:
| 6 (21.5" x 8.5") These are the fronts and backs. |
| 6 (15.5" x 8.5") These are the tops and bottoms. |
| 6 (15.5" x 20") These are the sides. |
| 6 (7" x 15.5") These are the shelf braces. |
Making the boxes is pretty straightforward,
and I built them with square edges. Measuring and planning the
cuts is one of the most important steps in making the enclosure.
I spent a lot of time planning the cuts ahead of actual construction.
One wrong cut can just ruin your day! I used a table saw to make
all the major cuts on the speaker walls and shelf braces. Then
I used a jigsaw to cut out the holes in the shelf braces. 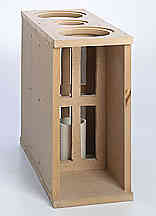 I used a router with a circle-cutting
attachment and a 1/2" straight cut carbide bit to cut the
speaker holes. Once you have the router dialed in to the right
diameter, it is just a matter of making the same cut on all the
speaker front baffles. First I routed a 1/4" deep shelf.
This cut enables the drivers to be flush mounted to the baffle.
I made this cut on all the front baffles, then switched to a 1/4"
straight cut bit, and used it to cut the hole out for the drivers
leaving the 1/4" deep x 1/2" wide shelf for the driver
to sit on. I made this cut on all the front baffles.
I used a router with a circle-cutting
attachment and a 1/2" straight cut carbide bit to cut the
speaker holes. Once you have the router dialed in to the right
diameter, it is just a matter of making the same cut on all the
speaker front baffles. First I routed a 1/4" deep shelf.
This cut enables the drivers to be flush mounted to the baffle.
I made this cut on all the front baffles, then switched to a 1/4"
straight cut bit, and used it to cut the hole out for the drivers
leaving the 1/4" deep x 1/2" wide shelf for the driver
to sit on. I made this cut on all the front baffles.
Once all the walls, and shelves were cut
and ready to assemble, it was a matter of putting it all together
with LOTS of screws and glue. I am fond of #6 x 1 5/8" drywall
screws when working with MDF. These screws have a great bite to
them. One thing that you must do before you put in the screws
is to drill a pilot hole and counter-sink hole. If you do not
drill a pilot hole, the MDF will split. I used a counter sink
bit. It is a drill bit with a cutter that does the counter sink
in the same stroke as the pilot hole. You can use about any type
of wood glue. There may be better, fancier glues, but good old
fashion wood glue does a great job. 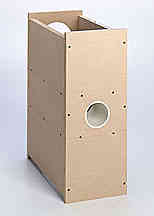
To attach the drivers to the shelf, I used
T-Nuts and machine screws with hex nut heads. This is a preferred
way to attach a driver to the shelf. Using wood screws has the
potential to strip out the MDF, resulting in a loosely secured
driver. You really don’t want that after all the work you
put into the baffles. I used a rubber weather stripping on the
shelf to seal the driver. Once everything was assembled except
for the top or bottom piece, I sealed all the inside joints with
silicone sealant. This is important to avoid any air leaks. Next
I stuffed the enclosure with damping material. I always use a
product called Acousta Stuf, which can be purchased from Parts
Express. I used about 1/2 pound for each box. 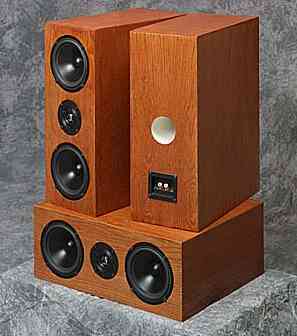 I
used 3M Spray Adhesive to attach the stuffing to the box walls.
I always "tease" the stuffing to give it more volume.
I then mounted the crossover in the box. It is always best to
get the crossover as far away from the drivers as possible to
avoid interaction of the speaker magnets with the inductor coils.
I mounted mine on the bottom panel with 1/2" wood screws.
I
used 3M Spray Adhesive to attach the stuffing to the box walls.
I always "tease" the stuffing to give it more volume.
I then mounted the crossover in the box. It is always best to
get the crossover as far away from the drivers as possible to
avoid interaction of the speaker magnets with the inductor coils.
I mounted mine on the bottom panel with 1/2" wood screws.
Now it is time to layout the wiring. I used 12 gauge Monster Cable wire. I recommend that you solder the speaker wire to the speaker and crossover connections. You would think that after soldering all these speakers, I would get better at soldering (nope). But don’t solder anything yet. You need to do the following step first. Once you have test fitted all your drivers, terminal cups and ports, and the box is air tight, it is time to apply the veneer. I used a contact cement to stick the veneer to the MDF. First make sure all your faces are well sanded and smooth. If a screw is sticking up just a little bit, it will be noticeable through the veneer. Make sure you apply contact cement thoroughly. MDF likes to soak this stuff up, so several coats may be necessary. Continue applying coats of adhesive, waiting for each coat to dry, until you have a shiny coating on the surface. Apply the cement to both the veneer, and MDF, wait 10 minutes or until the glue is dry to the touch, and stick it. (WARNING: you have one try at this. Once this stuff touches . . . there is NO moving it. You may be able to rotate it a bit if only a corner is stuck). Then I used a rolling pin to smooth and tack down the veneer permanently.
Once one side of veneer was on, I used a Veneer/Formica trim bit in the router to trim off the excess veneer from the edges. It has a bearing on it, and puts a nice bevel on the veneer while cutting away the excess. Once the veneer was applied, I put on the stain. The choice of stain and topcoat is completely up to you. My brother wanted a deep, reddish color with a glossy finish (personally I like a pickle finish like Ralph Calabria did in DIY project #1 :-) Once the cabinets were finished, I mounted the drivers in the holes, and then I soldered the speaker wires to the drivers, and bolted down the drivers using the T-Nuts.
The subwoofer is based on a design that is all over the Internet. The driver is a really nice piece of work. It is used in NHT's highly acclaimed NHT 3.3 system. The 50mm diameter, 43mm long, and two layer voice coil allows long excursion, high thermal capabilities, and tremendous output. It also has a very heavy cast frame that minimizes vibrations to the box. The nominal impedance of this speaker is approximately 4 Ohms with a sensitivity of 83 dB/w/m.
 The box measures 3 cubic feet internally. Made of
two layers of 3/4" MDF, it weighs in at 120 pounds with the
driver mounted. Make sure you know where the finished beast is
going to reside beforehand, as it takes two people to lug it around.
Is two layers of 3/4" MDF a little extreme?
The box measures 3 cubic feet internally. Made of
two layers of 3/4" MDF, it weighs in at 120 pounds with the
driver mounted. Make sure you know where the finished beast is
going to reside beforehand, as it takes two people to lug it around.
Is two layers of 3/4" MDF a little extreme? 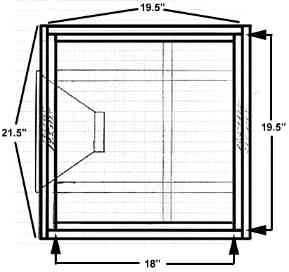 Yes,
but I only had 3/4" MDF readily available to me. So, rather
than special order 1" MDF (nobody in my area carries it),
I decided to overdesign the cabinet and use two layers of 3/4".
IMO, the minimum wall thickness for this sub should be 1".
I also used one shelf brace, and 4 dowel rods to further stiffen
the box. The driver was also flush-mounted on the front baffle.
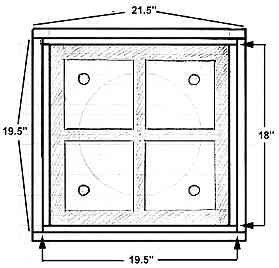
The subwoofer is a sealed-box design, which makes for a very smooth
response curve. The diagrams above map out the enclosure dimensions
for the sub.
Yes,
but I only had 3/4" MDF readily available to me. So, rather
than special order 1" MDF (nobody in my area carries it),
I decided to overdesign the cabinet and use two layers of 3/4".
IMO, the minimum wall thickness for this sub should be 1".
I also used one shelf brace, and 4 dowel rods to further stiffen
the box. The driver was also flush-mounted on the front baffle.
The subwoofer is a sealed-box design, which makes for a very smooth
response curve. The diagrams above map out the enclosure dimensions
for the sub.
The sub output on the receiver that my brother selected (Marantz SR-870) has a built-in active crossover with a low pass cutoff of 60Hz, so no internal crossover was needed in his particular setup.
Here are the cut dimensions and quantity needed to make one subwoofer:
To make the inside box of the subwoofer you need:
| 2 (19.5" x 18") These are the top, and bottom. |
| 3 (18" x 18") These are the sides and the shelf brace. |
| 2 (19.5" x 19.5") These are the front and back. |
To make the outside box of the subwoofer you need:
| 2 (21.5" x 19.5") These are the top, and bottom. |
| 2 (19.5" x 19.5") These are the sides. |
| 2 (21.5" x 21.5") These are the front and back. |
The sub is basically made in the same fashion
as the fronts and center speakers. 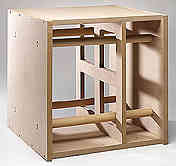 The
only difference is that you are working with a box inside of a
box. I assembled the inside box to the point where one side was
not attached. I then sealed the inside seams of the box with silicone
sealant and clamped the outside box in place. After finding the
center of the front face where the driver was to be mounted, I
drilled a hole through both layers of the MDF at the center location.
I then routed the flush-mount ledge on the front baffle where
the speaker would sit. Then I routed the inside face using the
center drill hole I made.
The
only difference is that you are working with a box inside of a
box. I assembled the inside box to the point where one side was
not attached. I then sealed the inside seams of the box with silicone
sealant and clamped the outside box in place. After finding the
center of the front face where the driver was to be mounted, I
drilled a hole through both layers of the MDF at the center location.
I then routed the flush-mount ledge on the front baffle where
the speaker would sit. Then I routed the inside face using the
center drill hole I made. 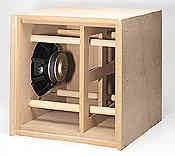 You
obviously don’t need the flush mounting ledge on the inside
of the baffle. All you need to do is rout the inner hole out.
Once the speaker hole was routed, and everything aligned up, I
added the bracing. I cut the holes for the shelf brace with a
jigsaw so all sides of the brace were 2", and I cut the dowels
with a miter saw. The dowel rods have to be the perfect length.
If they are too big, they will bow the box walls, and if they
are too small, the dowel will not do its job of bracing. I put
two drywall screws in each end of the dowel rods to secure them
and keep them from rotating/vibrating.
You
obviously don’t need the flush mounting ledge on the inside
of the baffle. All you need to do is rout the inner hole out.
Once the speaker hole was routed, and everything aligned up, I
added the bracing. I cut the holes for the shelf brace with a
jigsaw so all sides of the brace were 2", and I cut the dowels
with a miter saw. The dowel rods have to be the perfect length.
If they are too big, they will bow the box walls, and if they
are too small, the dowel will not do its job of bracing. I put
two drywall screws in each end of the dowel rods to secure them
and keep them from rotating/vibrating.
To attach the outside box to the inside
box, I used Liquid Nails For Projects. It is an adhesive made
by DAP that stays flexible after curing. 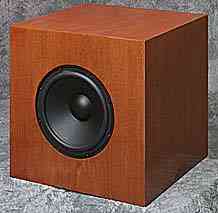 A
layer of soft material in between the two boxes helps dampen the
box. I used the serrated edge of a trough to spread a thin layer
of Liquid Nails on each surface of the inside box, and started
attaching each face of the outside box. Once all the faces were
attached, I used more dry wall screws to attach the outside box
to the inside box. I let the Liquid Nails dry overnight, and then
made the hole for the terminal cup with my jig saw. I applied
the veneer, stain and topcoat, just as in the MTM description.
Since the walls are 1.5" thick, you need to make sure the
machine screws are long enough to go all the way through the wall
and into the T-Nut when installing the driver. There was no crossover
for this subwoofer, so I ran the speaker wires from the terminal
cup directly to the driver, and mounted the driver with the machine
screws. I powered the subwoofer wuth a Marantz MA-500 (125 watt
into 8 ohms / 180 watts into 4 ohms) monoblock, and crash, bam,
wham, away my brother went.
A
layer of soft material in between the two boxes helps dampen the
box. I used the serrated edge of a trough to spread a thin layer
of Liquid Nails on each surface of the inside box, and started
attaching each face of the outside box. Once all the faces were
attached, I used more dry wall screws to attach the outside box
to the inside box. I let the Liquid Nails dry overnight, and then
made the hole for the terminal cup with my jig saw. I applied
the veneer, stain and topcoat, just as in the MTM description.
Since the walls are 1.5" thick, you need to make sure the
machine screws are long enough to go all the way through the wall
and into the T-Nut when installing the driver. There was no crossover
for this subwoofer, so I ran the speaker wires from the terminal
cup directly to the driver, and mounted the driver with the machine
screws. I powered the subwoofer wuth a Marantz MA-500 (125 watt
into 8 ohms / 180 watts into 4 ohms) monoblock, and crash, bam,
wham, away my brother went.
The List of Materials and Cost
The following is a list of material and cost for the whole project:
| Wood: 2 (5'x8') 3/4" MDF @ $25 Each |
| Veneer: 2 (2'x8') Paper Backed Red Oak @ $32 each |
| 1 (3' x 8') Paper Backed Red Oak @ $55 |
| Screws and Glue: $20 |
| Silicone sealant: $4 |
| Liquid Nails: $4 |
Fronts and Center
| Mids: 6 (P17SJ00-08) @ $45 each |
| Tweeters: 3 (D25ASG05) @ $26 each |
| LEAP Crossover Design: $35 |
| Crossover parts and assembly: 3 @37.50 each |
| PVC Vents: 3 @ $3 each |
| Acousta-Stuff: 2 (1 LB Bags) @ $8 each |
| Terminal Cups: 3 @ $4 each |
| Total without wood or veneer: $520 |
Subwoofer
| Driver: 1 (NHT-1259) @ $130 |
| Acousta-Stuff: 2 (1 LB Bags) @ $8 each |
| Terminal Cup: 1 @ $4 |
| Total without wood or veneer: $150 |
| Grand Total for entire Project: $867 |
I would like to thank the following people: My brother, for the money and understanding for the time it took to complete this project. After three months of part time work on this project, you can imagine he was starting to get anxious to quickly get it finished. Madisound (608-831-3433), for their excellent services that they provided to me throughout this entire project. Parts-Express (1-800-338-0531), for their excellent services. NHT, for the superb driver (I hope this driver will be available for many years to come). Ralph Calabria, for the opportunity to do this article, and making my ramblings of run-on sentences legible. I can’t forget my lovely wife for putting up with all that sawdust and noise.
Chad Gray
Return to Table of Contents for this Issue.
Magazine Publishing Solutions by