|
The next level of automation is called Auto-EQ. This is engaged from the sweep
screen by placing the cursor on the Manual field and pressing Select on the
remote. Again, the sliders get reset to default 1/3 octave frequencies and the
SMS-1 starts to move them up or down over 25 sweeps, trying to flatten the
response to within ± 3 dB limits. With Auto-EQ, both the subwoofer and main
speakers are in play, making for more accurate results around the crossover
region. Mine were as follows.
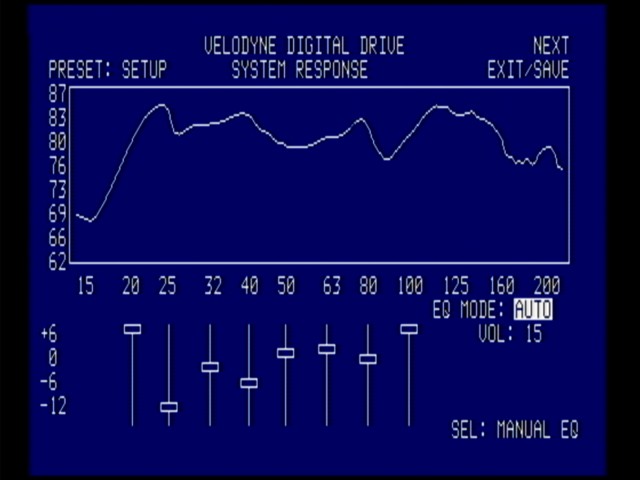
Note that this demonstrates a potential risk with either of the automated
setup processes. The SMS-1 had chosen to apply a +6 dB boost at 20 Hz to try and
raise the response where the sub is naturally starting to roll off. Applying
such a powerful boost at a low frequency like this would be very likely to
exceed the sub's capabilities, for very little actual improvement in bass
extension.
After using either of the automated EQ set-up processes, it is a good idea to
apply a sense check to the settings and manually correct anything obviously
unwise such as this.
The final method of applying EQ is to do the job entirely manually, giving you
total control and flexibility. You can place the cursor on each individual
slider using the remote control and move it up/down in level. By pressing
Select on a slider, you can then move it left/right to change the center
frequency at which the filter is applied. This works in 1 Hz steps in the range
15 Hz to 120 Hz. You can even stack sliders on top of each other to increase the
amount of boost/cut available at a particular frequency. The warning about not
exceeding your sub’s capabilities applies even more if you are stacking
boosts.
You can use the Set +/- buttons to adjust the Q (width) of the filter
which determines the range of frequencies over which the slider acts. By
default, all the sliders have a Q value of 4.3 which corresponds to 1/3 octave.
Setting Q higher restricts the effect to a narrower band of frequencies up to
a maximum value of 20.0 (equivalent to slightly narrower than 1/12 octave).
Narrowing a filter is useful to reduce the area of overlap between two closely
adjacent sliders which might otherwise fight each other.
Lower values of Q work over wider frequency ranges, right down to a very low
minimum value of 0.3 (equivalent to about 3.5 octaves). A single slider with a
low Q can be used to control broader peaks or dips.
The level (L), frequency (F) and width (Q) of the currently selected slider
are shown at the bottom right of the screen.
While the automated EQ modes are perfect for the user who wants quick results
with minimum effort, they are no substitute for careful manual set-up which
will always give the best results.
For me, the single greatest feature of the SMS-1 is that you can instantly see
on-screen the effect of every minor parameter change that you make, allowing
you to target the real problems both quickly and accurately. My final results
using manual EQ were as follows.
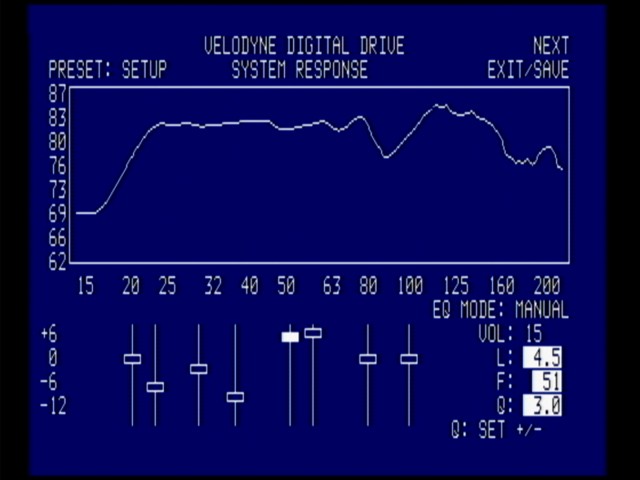
From experience, I know that the 85 Hz dip in my room cannot be corrected by
applying an EQ boost even if I were to set my crossover higher and use the
SMS-1 to attempt it. So I just choose to live with that until I can employ
some other room treatments to correct the problem. Other than that, I am very
happy with the smoothness of the response that I have achieved, despite the
fact I have had to use a couple of fairly strong boosts in the 50 Hz – 60 Hz
range.
Up to now, I have only used the global Setup preset parameters to configure the
SMS-1. Every time you change these settings, they are copied automatically
into Presets 1-5. You can later override any of those settings with different
values in each of the presets. These include EQ slider settings,
crossovers, subsonic filter, polarity, and phase. You can arrange
entirely different setups for music and movies on two different presets if you
so wish.
Click
Here to Go to Part VI.
Terms and Conditions of Use
|

