When starting up, the system first asks you to select a display type and
then fill out the model and initial display settings. This includes the
current values for brightness, contrast, color, tint and the value for color
temperature.

In situations where actual values are inaccessible, the system requires you
to count remote control button clicks, which can be quite exhausting. Once
you enter the current values, you need to also enter the minimum and maximum
settings that your display allows. For color temperature, you need to edit
the list of possible values.
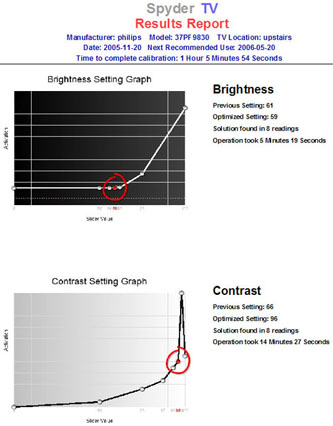
The system starts with a few simple black (0 IRE) and white (100 IRE) window patterns. This
allows the system to determine the optimal point for brightness. In this
respect, the system reached a very similar result as DVE/AVIA settings.
Contrast is a bit more problematic. The system’s approach is quite
different from DVE/AVIA, as it retains a 100 IRE window and asks you to
change contrast levels accordingly. The same logic that works well for
brightness doesn’t quite work here.
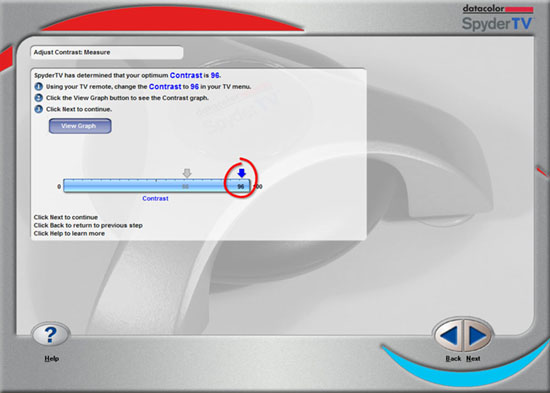
The system determines the maximum value that the display produces and then
attempts to seek out the minimal point that comes close to that peak.
However, the system does not take into account blooming, brightness detail,
or the danger of burn-in for plasma displays. I would therefore strongly
advise people to use common sense in conjunction with the system. That
usually means a lower contrast value (longer lifespan for plasmas and direct view CRTs) and to double-check the results with a brightness test
pattern.
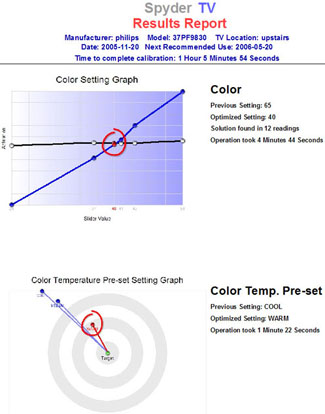
The system keeps updating the results by slowly homing in on the ideal
point. Color calibration alternates between blue and white, while tint uses
secondary colors to perform the calibration. Once color and tint are set,
the system moves on to the most interesting value – color temperature.
In this case, the system provides us with a list of possible values –
essentially the list of color temperature settings of your display device.
The system then attempts to lock down on the closest one to 6500K. In my
case, the objective was to find out if Cool, Hot, or Normal was the
closest to the 6500K (what SpyderTV calls "the target").
I strongly missed the R/G/B comparison graph from ColorFacts Pro and a gamma
calibration wizard, which would make the system much more powerful. Of
course, more power is available in ColorFacts Pro.
Conclusions
I found no significant problems with the sensor
itself – it seems to be quite repeatable and stable. The results of my tests
(performed on the 37PF9830 Philips 1080P LCD panel) produced significantly
better results than results I obtained with DVE and AVIA.
I found the feature set a bit short, and was hoping for more numbers.
Obviously, the system was designed with
novices in mind and does its best to hide inconsequential values from the
user.
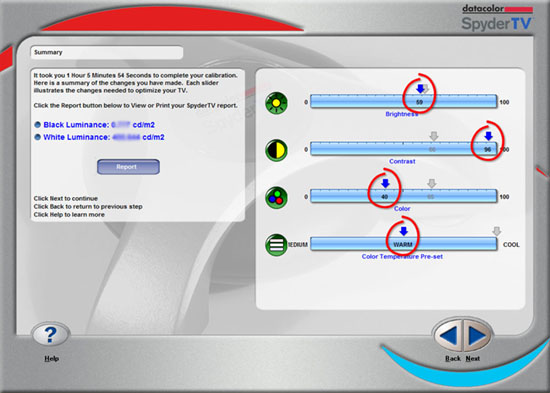
I liked the high and low cd/m2 values (allowing one to calculate contrast
ratio) and thought it was a cool addition. The systems reports are very nice
and add more class to the data.
A full-blown gamma aware D65 calibration would have come much closer to the
perfect calibration, of course, but costs for such a system start at around
4 times the cost of SpyderTV.
This is where the 10/90 law comes in. With a system costing approximately
10% of a full calibration, you get roughly 90% of the calibration
functionality.
SpyderTV is a huge step in the right direction from a basic disc-based
calibration system and will serve consumers with little or no experience at
calibration. It does the job and is inexpensive.
- Ofer LaOr -
Mr. LaOr is Editor of Hometheater.Co.Il, a Hi-Fi magazine
published in Israel. He is also the moderator for the AVS Forum Video
Processing section.