Introduction
Are you tired of having your digital projector
sitting on the coffee table? I know I was.
So, I felt it was time to put it out of the way, on
the ceiling.
There are lots of ceiling projector mounts out
there, and if you have never installed one, it can be difficult to choose.
So, I consulted Shawn McLoughlin at Full Compass,
which is a company that sells just about everything in consumer electronics,
but also professional products such as studio lighting and microphones.
I told Shawn that I wanted something I could use not
only for my own projector, but could adapt it for testing projectors sent to
us for review. In other words, I wanted something flexible.
He suggested the Peerless PRS-UNV, which is a
universal mount. Peerless also has mounts dedicated to specific projector
classes, but the universal mount was perfect for our use, now, and in the
future.
The Design
The PRS-UNV comes preassembled. But this means the
gimbal mechanism that tilts. The rest of the parts are in several plastic
bags.
"Oh no," I thought, "look at all those
bolts and screws."
Well, it turns out that you won't need most of the
bolts and screws. Peerless just includes a variety to fit the mounting holes on all kinds
of projectors.
When you purchase the PRS-UNV, or just about any
projector mount, you get a kit. This has most of the parts you will need
(see next paragraph below). In the case
of the Peerless, the kit contains three basic items: the gimbal mechanism
that will let you tilt the projector up or down to the front (pitch), and up
or down to the sides (roll). Rotation (yaw) is accomplished simply by
turning the gimbal in the column tube (the tube extends from the ceiling
mounting plate to the gimbal).
Note that you need to purchase the ceiling mounting plate
and column tube separately. The basic set is Item # ACC571
($28), which includes the ceiling plate and a flush mounting tube . If you want to
have a longer tube, then get the plate by itself (Item # ACC570 - $21) and
a tube of the desired length. I would suggest getting a tube of adjustable
length rather than fixed length. This will let you move the projector up or
down a few inches in case you are off a bit in your measurements. I got the
6"-9" adjustable tube (Item # ADJ006009 - $55).
Assembly
For the purpose of this review, we will assume you
have determined the placement of the mount with respect to the projection
screen, and have calculated the image size on that screen from the spot
where the projector will be mounted. (These procedures will be covered in
future technical articles.) If you have not done this, you should certainly
not assume that you can simply use the zoom control on the projector to fill
the screen. Zooms on projector lenses don't have the range to cover every
situation. A quick and easy method is to just hold the projector up at the
spot where it will hang from the ceiling and see where the image projects on
the screen. If you can adjust the zoom to fill it from that position, great.
Otherwise, you should consider a different mounting spot.
Lens shift is a feature on many projectors now. This
lets you shift the image up or down, and side to side, without moving the
projector. But don't let this feature make you careless. The center of the
lens has the best sharpness, so you should mount everything such that you
don't have to use the lens shift, namely on-axis with the center of the
screen. Of course, if you cannot mount the
projector directly on-axis with the screen, then the lens shift is necessary
(consider that feature when purchasing your projector).
The ceiling plate has two screw holes so it can be
attached to a ceiling joist. Here is a photo, shown below.
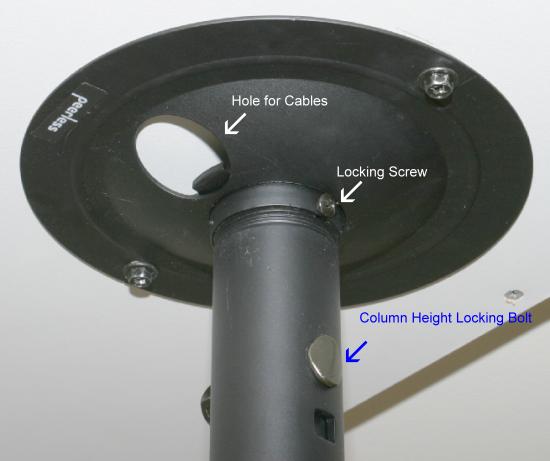
My projector needed to be mounted on a soffit at the
rear of the room, rather than directly on the ceiling. So, I put a sheet of
Melamine-coated plywood on the soffit, then the plate was screwed to the
plywood, as shown in the photo.
Next, I screwed the column tubing into the threaded
hole in the plate. You can see another hole next to the tube. That is for
threading cable through. Of course, you need to have a hole in the ceiling
in the same spot as the hole in the ceiling plate, to thread the cable down to the projector. So,
the procedure would be to mark where the screw holes are going to be in the
ceiling, as well as the hole for the cables. Cut the cable hole in the
ceiling, thread the cables down through
the ceiling hole, through the hole in the plate, then screw the plate to the
ceiling. I am constantly changing cables, so I did not use the mounting
plate hole for cables.
Use the included bolt to lock the height of the
column tubing where you want it. You can change the height again later if
you want. Don't forget to lock the column into the threaded hole with the
small screw.
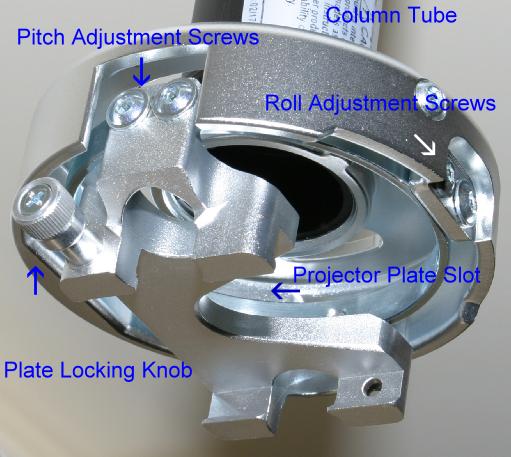
Now to the gimbal. In the photo shown below, the
gimbal has been screwed onto the column tube. You can see the pitch
adjustment screws, roll adjustment screws, and plate locking knob, which
locks the projector plate into the gimbal.
Here is the mechanism that attaches to the
projector. It consists of three arms that attach to a metal ring, an example
of which is pointed out by the Bolt 1 arrow, with the other end of the arms
attaching to three mounting holes found on the bottom of digital projectors, an
example of which is pointed out by the Bolt 2 arrow. A plate in the center
of the ring is attached using two bolts. The kit comes with four arms in
case your projector has four mounting holes.
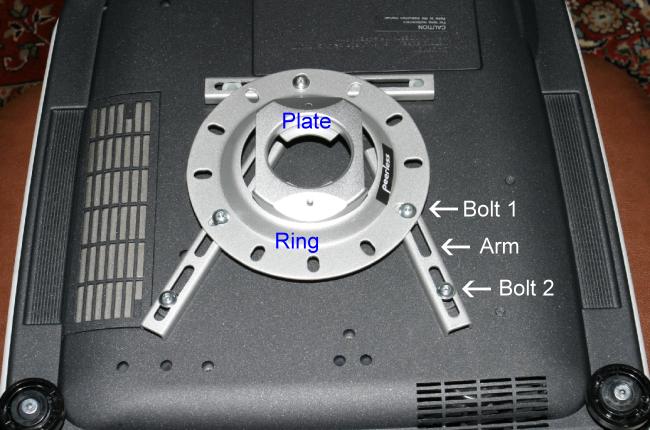
Before you attach this mechanism to the projector,
you first need to attach the plate to the ring. It uses two small bolts that
are screwed in from the bottom (that is why you need to do it first). The
plate only slides in from one end of the gimbal, so depending on whether you
will need to slide the projector into the gimbal from the front or rear, it
is important to make sure you attach it to the ring in the proper
orientation. The ring has a small slot that is to be orientated towards the
front of the projector.
Then attach the arms to the ring, aligning the bolt
with the hex slot facing up towards you, and the nut underneath the arm.
Leave them loose rather than tight for now. The arms have slots for the
bolts to pass through. Make sure you attach the bolts in the slot that gives
you enough length to reach the projector mounting holes.
Next, place the ring, with the plate having been
attached, along with the arms, onto the bottom of the projector, and slide
the arms so that they intersect the projector mounting holes. You can use
some of the Nylon washers that are included. There is a lot of flexibility
here, so move the ring such that it is in the center of the projector for
the sake of balance. Then tighten the bolts at the ring and at the mounting
holes. (Note that most of the supplied bolts require a hex wrench, which is
also included.) You can see in the photo that I bolted one of the arms in
the middle, with one Nylon washer under each outer extent of the arm. This
was because the mounting holes are not flush with the bottom of the
projector, and I also found this (bolting at the middle of the arm) worked
best for getting the ring to be exactly in the center of the projector.
Tighten the pitch and roll screws slightly, so you
can slide the projector into the gimbal. Tighten the plate locking knob by
pushing it in then turning it. This locks the projector into the gimbal. Then connect the AC power cord and
video cable to your projector and turn it on. Loosen the pitch and roll
screws so you can adjust the image such that it is square to the screen,
then tighten the screw that locks the gimbal to the bottom of the column
tube (you can see the head of this screw just above the roll adjustment
screws in the picture of the gimbal), and
you are done.
I found the Peerless unit to be easy to install and
adjust. The instructions are not very clear, but that is not unusual.
Conclusions
The Peerless PRS-UNV Projector Mount can make a very
nice addition to your home theater, by moving that digital projector off the
coffee table or shelf, and getting it out of the way. This also means you
won't have to adjust the projector every time you use it (projectors sitting
on coffee tables have a habit of getting moved for cleaning the table). You
may need longer cables, but I have found no problem with 24 foot component
video cables or 30 foot HDMI cables.
- John E. Johnson, Jr.. -


