Introduction
I have always been a fan of planar speakers, which include electrostatic
(e.g., Innersound), planar magnetic (e.g., Magnepan), and ribbon designs
(e.g., Carver, which are actually quasi-ribbon, meaning the conductor is
glued onto a plastic ribbon). All of the drivers are flat and very, very
thin to make them lightweight.
A
planar speaker uses a thin flat driver instead of a cone. For ribbon
speakers, the driver is very narrow, say 2", but quite tall, say 48". The
exception would be a ribbon tweeter, which might only be 1" in size. The
ribbon, which is conductive, is suspended between permanent magnets, and
when the amplifier power passes through it, the electromagnetic field that
the current creates is attracted or repelled by the permanent magnets, and
this moves air to create the sound you hear. If the conductor itself is
suspended, then it is a true ribbon. Most of these designs, however, are
quasi-ribbons, where the conductor is glued onto a plastic ribbon, and it is
the plastic ribbon that is suspended. Quasi-ribbons are stronger, but also a bit heavier
than a true ribbon driver.
Planar magnetic speakers are similar to ribbons, but they are simply much
wider, say 10", so it is more like a sheet than a ribbon. The conductor is a
narrow metal strip that is etched onto the plastic sheet, usually going back and forth
across the sheet. Again, amplifier current passing through the conductor on
the sheet results
in an electromagnetic field that is attracted or repelled by the permanent
magnets near the sheet.
For
electrostatic speakers (ESLs), there are no permanent magnets involved. A
thin plastic sheet (a membrane or diaphragm as thin as a human hair) is suspended between two "stators" which are perforated
metal sheets. At the base of the speaker is a module that has a transformer
inside. The ESL has to be plugged into wall AC, and the transformer raises
the wall 120V/240V to several thousand volts, after which it is converted to
DC, and the DC is applied to the plastic sheet, which has been coated with
fine particles of carbon. This gives a static charge on the sheet at several
thousand volts.
The
amplifier power is also passed through a transformer, raising it to
thousands of volts as well. It remains as an AC voltage, however, and it is
applied to the stators. The changing stator voltage creates a changing
electromagnetic field that attracts or repels the statically charged sheet,
and this produces the sound. A diagram of how the ESL works is shown below.

Each
of the three types of planar speakers has its advantages and disadvantages.
For all three, an advantage over cones is that the driver is so light, it
produces transients much more easily than conventional drivers (cones) can
do, even including tweeters. For some planars, the entire sheet is lighter
than the dome of a tweeter. The disadvantage that all three have is that the
ribbon or sheet cannot move forward or backward very much, so this means
that it cannot move a lot of air. That's OK for high frequencies, but not
for bass frequencies. So, the larger the sheet, the better. A ribbon speaker
is just not going to have that much square footage, so usually, ribbon
speakers have a cone driver to produce the bass, making it a "hybrid"
design. Planar magnetic speakers have drivers with more area, so they can be
full-range, if large enough. ESLs have a good deal of area, but they still
have to be pretty big to be used as a full-range speaker. But, they can be
manufactured as large as desired, because the plastic sheet is only
suspended between perforated metal sheets, and does not have to be next to
large permanent magnets.
A
disadvantage of the ESL is that the power it can handle is limited by the
saturation limits of the transformer.
In
spite of these handicaps, a planar speaker produces a magical sound that is
so transparent, the speaker itself disappears, leaving only the music. One bit of
serendipity here is that I have never found a woman who did not think ESLs
were beautiful. This is probably because you can see through them, and thus,
they don't overpower a room with their looks. So, the spouse approval factor
is usually very high. For our female audio aficionados out there, if you
bring a pair of ESLs home, it is likely your husband will be absolutely
delighted.
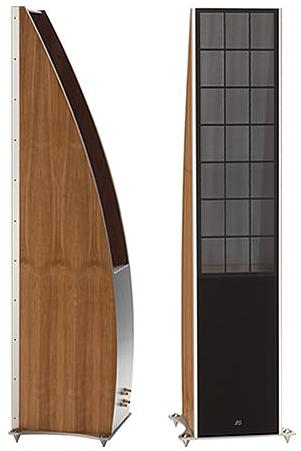
Most
ESLs are pretty big, and sort of look like a door from the front. If they
are hybrids, there will be a box at the bottom which has the cone woofer.
From the side, the top will be flat, and then there is that woofer enclosure
at the bottom. If it is full-range, then it still looks like that door from
the front, but from the side, it also looks like a door, completely flat.
Now
here is the interesting part. The sound comes out the back as well as the
front. This means sound is bounced off the rear wall in a big way, much
bigger than with a conventional cone speaker that emits sound only (or
primarily) from the front. This gives you a "wall of sound", and can be good
or bad, depending on your preferences. For orchestral music, it is a
magnificent effect, because orchestras are big. For classical guitar, well,
you end up with a 10 foot guitar. I like the effect even with guitar, but
some will not like this. It also means that you have to be careful in
placing a planar speaker. For ESLs, it has to be close to wall AC supply,
but not too close to the wall. For ribbons and planar magnetics, they don't
need the wall AC, but they still must not be close to the wall.
Innersound
The
electrostatic speaker is not new, in fact the idea is more than a century
old. However, practical applications for ESLs in terms of consumer use are
more modern. I remember hearing a pair of KLH ESLs when I was in high school
(1962), and was immediately captivated. At that age though, I could not
afford such things.
Roger Sanders, who started Innersound, was a major player in bringing ESLs
to the consumer market. Although he is no longer with Innersound, Sanders' designs
are the core of their product line.
If
you compared two different ESL manufacturers' models, you might see one
major difference, namely, the stators are either flat or curved, and herein
lies one major issue with ESLs. If you sit directly in front of any speaker,
ESL or otherwise, you will get the best sound. If you move off to one side
of the speaker, the high frequencies start to be attenuated. This has to do
with the "dispersion" characteristics of the speaker. Now here is the catch:
the wider the driver, the narrower the dispersion field, meaning that for a
wide driver, the more the high frequencies will fall off as you move to the
side. For 1" dome tweeters, dispersion falloff is not really a problem, and
even for 2" ribbons, it is not bad, but for planar magnetics with high
frequency drivers perhaps 10" wide, dispersion problems become apparent. For
ESLs, where the driver might be 16" wide, it can be really noticeable. So, this limits the "sweet spot" to a smaller area where you hear the
optimal sound.
Curving the stators will widen the dispersion angle, but it reduces the
detail, because you have high frequencies on the rear part of the curve
interacting with the high frequencies from the center of the curve. In other
words, the rear curve frequencies are a bit behind the center frequencies
coming towards your ears.
If
the ESL is perfectly flat, you get the detail, but the dispersion angle is
much narrower.
So,
what does the designer do? Well, it is a matter of making a decision: detail
or dispersion.
Innersound has decided in favor of detail, and made their ESLs with flat
stators. There are other companies who make the stators curved, and if you
are considering ESLs, you should make a point of hearing both types before
you decide.
For
this review, Innersound sent a pair of Kaya Reference for the front, a pair
of Kachina Reference for the rear, and a Tehya center channel speaker.
(Power amplifiers were also sent for review, see below.) All
three ESL models are hybrid designs, with an ESL panel at the top, and a cone woofer for the bass, housed in
a transmission line enclosure. Transmission line designs use a series of
baffles inside the enclosure to lengthen the air channel behind the driver.
Inside the enclosure, it looks like a maze, with the air finally exiting a
port at the bottom of the enclosure.
The Setup
All
of these ESL models are bi-ampable, and in the case of the Kaya, it is
actually necessary to do this. So, the Kaya comes with its own stereo power
amplifier - called the Kaya Crossover Amplifier - to drive the woofer for
the pair of speakers. The amplifier is rated at 600 watts per channel, and
includes an electronic crossover that lets you not only adjust the amount of
power going to the woofers, but also change the slope of the signal to give
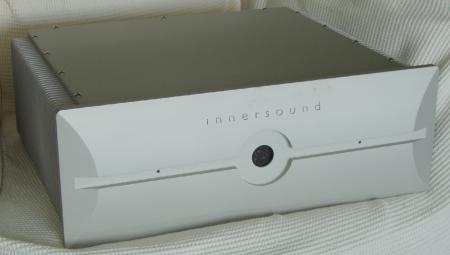
you more or less bass vs. mid-bass. One of these crossover amplifiers was sent to us
for the review, and also four iPower 750 monoblock power amplifiers, each of
which delivers 750 watts into 8 ohms. These were used to power the main
panels of the Kayas, and the complete speaker (panel and woofer) of the
Kachinas. An iPower 330 was used to drive the Tehya.
Here
is a photo of the iPower 750.
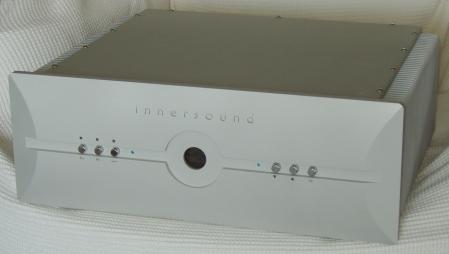
And
the crossover amplifier.
The
iPower 330 looks like the 750, and both have the standard set of speaker
binding posts as well as inputs on the rear. Here is a photo of the iPower
330 rear panel, which basically has two sets of inputs (XLR and RCA) and
outputs rather than one, compared to the 750.

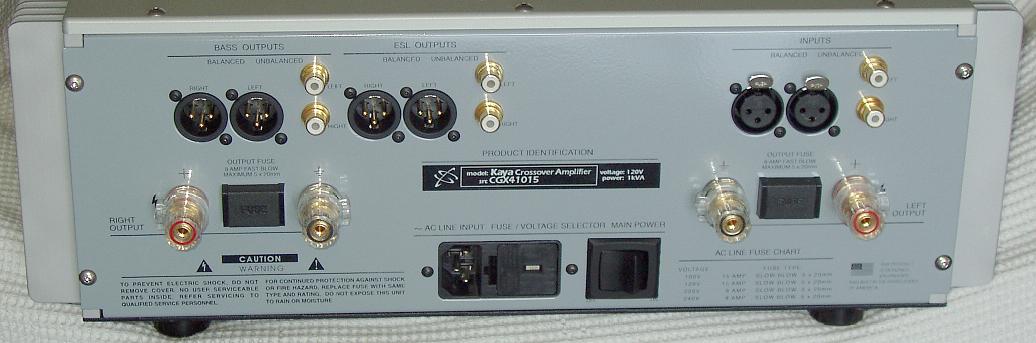
The
crossover amplifier is really interesting on the rear panel, and here is a
photo.

Click on the photo above to see a larger version.
From
the right, there is a set of XLR and RCA inputs (one for each channel), and
the speaker binding posts for the left channel. Then, on the left side, are
a set of XLR and RCA line-level outputs that go to the ESL panel power
amplifiers, and a set of XLR and RCA line-level bass outputs if you want to
feed more woofer amplifiers. For our situation, I used one set of XLR
outputs from the preamp/processor to the inputs of the crossover amplifier,
and simply connected the binding posts to the woofer in the Kayas. A
separate set of XLR outputs from the preamp/processor went to the inputs of
the iPower 750 monoblocks to drive the ESL panels.
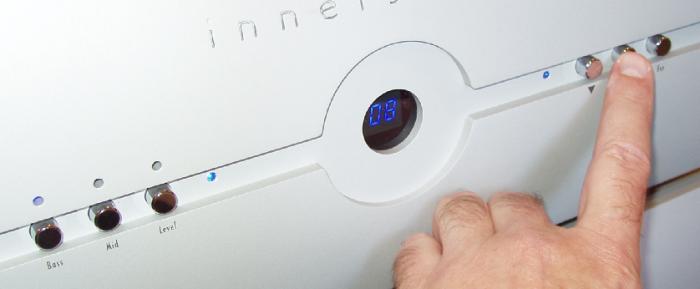
On
the front of the crossover amplifier, you adjust the amount of bass and
mid-bass that goes to the woofer. This lets you balance the sound, since a
different power amplifier drives the ESL panel.
On
the front left are buttons for Bass, Mid, and Level. First, you depress the
Level button, and use the up and down arrows to adjust the panel readout to
about 85. Then, you depress the
Bass button, which activates that function.

Using the up and down arrows on the right, you adjust the amount of
bass. This just changes the bass, not the mid-bass (which is adjusted by use
of the Mid button). The overall volume is
adjusted by the Level button.
So,
then
you do the same thing for the Mid button and up and down arrows. This changes the
volume of mid-bass.
Obviously, you have to play around with these buttons for awhile, to get the
optimum level in relation to the ESL panel volume. It is a bit of back and
forth, up and down, but it's fun. The procedure took me about 15 minutes
until I was satisfied with the sound, using white noise at first, then
music. I also used spectrum analysis software to see the response curve. A
simple SPL meter and some test tones at different frequencies can also be
used. The settings I finalized were Bass - 12, Mid - 90, and Level - 85.
If
you turn the amplifier off, then back on, these settings are lost, and all
functions are reset to zero, so Innersound suggests leaving it powered on
all the time. In any case, write the settings down, because the inevitable
power-off will happen sometime, and you will need those notes.
Now,
for the Kaya, Kachina, and Tehya.
Here
is a photo of the top of the ESL panel. Note how you can see through the
stators and plastic sheet.

The
rear of the Kaya and Kachina have two sets of binding posts. Here is a photo
of the Kaya. The metallic finish on the enclosure produced the reflections.

The
binding posts on the left are for the ESL panel, and the ones on the right
are for the woofer. The cables are Innersound's design, and I will talk
about those later. Note the AC power cord going under the Kaya.
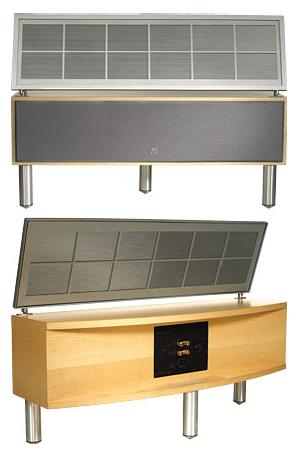
Both
the Kachina and Tehya have a volume control knob that lets you adjust the
bass, since the ESL panel and woofer are usually not bi-amped. The knob on
the Kachina is on the bottom of the enclosure, but for the Tehya, it is on
the rear panel, next to the binding posts. The power cord outlet is also on
the rear of the Tehya. Having the power cord and bass adjustment knobs on
the bottom of the Kachina was inconvenient (power cord on the Kaya is also
on the bottom). It would make things easier if everything were on the rear,
such as it is with the Tehya. There must be some design constraints that
prevent that for the Kaya and Kachina. Having the cord and control on the
bottom means that the included screw-on feet are really a must, even when
placed on rugs as was the case for me.

Click Here to Go to Part II