|
 |
Specifications:
● Non-Linear Editor (NLE) for
Consumer Use
● Capture and Edit 4:3 and 16:9
Digital or Analog Video
● Drag-and-Drop Editing
● Image Stabilization, Color
Correction, Noise Reduction,
Special Effects, Background
Music, Stereo Panning, EQ, Titles,
Menus
● Burn to CD, DVD, Tape, Internet (MPEG,
AVI, RealVideo, Windows Media 9)
● Needs 500 MB of Disc Space,
512 MB RAM, and at least 1.3 GHz
Processor
● MSRP: $99.99 USA
Pinnacle Systems
www.pinnaclesys.com
|
Introduction
Pinnacle Studio has released Version 9 of their
immensely popular Non-Linear Editing (NLE) software.
This program is designed for consumer use,
compared with their professional NLE called Edition (now in its Version
5 Liquid Edition). Edition 5 costs several hundred dollars, while Studio
9 is only $100.
The differences between Studio and Edition are
the kinds of things that television producers need for commercial
programming, such as very fine control over color balance and
sophisticated special effects.
For the everyday consumer, like I am, and
probably most of you are, Studio 9 has just the right balance of
features and capabilities, but most of all, it is easy to use. This
contrasts with the professional NLEs, including Edition, that are very
complex and easy to get lost in their myriad of features.
Studio has been around long enough to get rid of
most of the bugs, the recent ones being a smooth creation of videos on
DVD. This is important because, if you own a digital video camera and a
home theater, you will likely want to put your home movies on a DVD and
watch them on the big screen in your theater.
Several NLEs have introduced the ability to add
Dolby Digital 5.1 sound tracks to your home videos and have them play on
the DVD just like the DVD movies you rent or buy. It is because the NLEs
can help you make your own home movie DVDs that you can watch in your
home theater that we will be reviewing them, along with the cameras,
here at Secrets.
The Program
Pinnacle Studio Version 9 (PSV9) is installed
from a CD that comes in the box with a huge instruction manual. We won't
discuss everything you can do to your videos, because it would be
overwhelming. For this review, we will focus on the basic how-to so that
you can get the software up and running, capture your videos, edit them,
and make some DVDs.
When you boot PSV9, you will get a screen that
has three basic choices: Capture, Edit, and Make Movie.
Obviously, the first thing you will need to do
is get your videos into the computer so you can edit them. So, let's
assume you have taken some video on your vacation, in Hawaii. You have
the videos on a digital cassette tape from your camera. You can either
capture it from the camera or from a digital tape VCR. Up until about a
year ago, I connected the
camera to the computer for capturing, but now I use a digital VCR for this
purpose (JVC HR-DVS-3U). Either way, you need to connect your source
(the camera or the VCR) to the computer via Firewire. Most new computers
come with a Firewire jack, but if not, you have to buy a Firewire PC
card.
Here is a screen shot of the Capture Page.

I have selected DV Full-Quality Capture (bottom
right corner). First, using the buttons on the video camera image, you
play the video until it is at the starting point where you want to begin
capture. When you click the start capture button, you will be asked to
name the file as *.avi. In my case, I selected a separate hard drive
(320 SCSI, 143 GB, 10,000 RPM). It is suggested that you keep a separate
hard drive on which to capture the videos, but it is not absolutely
necessary.
Once you begin capturing, you will see the video
play on the screen at the top right corner. Each scene change will
register a thumbnail picture that shows up in the editing process. When
I get blank digital video tape, I run it through the VCR in record mode,
but with nothing being recorded. This lays down a time code over the
entire tape. Then, when you record your videos, this ensures a
continuous time line code even if you turn the camera off and on a
number of times when recording different things. It makes for a smooth
capture when transferring your videos to the computer.
After completing the capture, you will have a
very large AVI file (it takes about 1 GB of space to store 5 minutes of
digital video at full quality capture). Obviously, you may want to
capture from several tapes in a session. Each one will have to be named
and stored separately.
Now it is time to go into the editing phase.
Here is a screen shot for the editor.
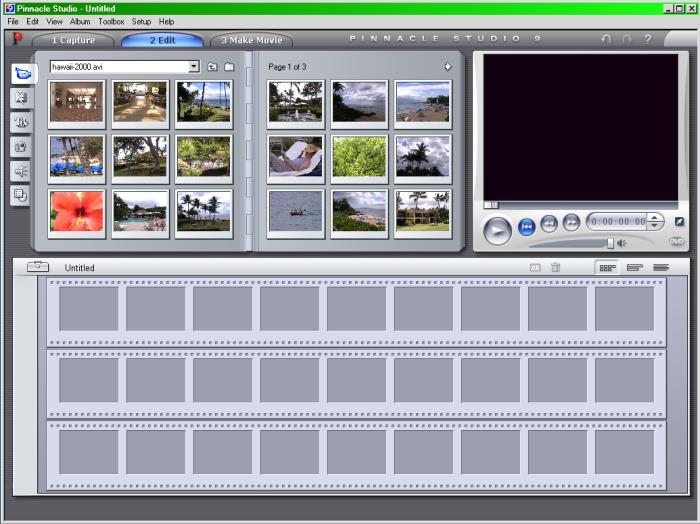
The scenes shown below are from a tape that I made, using a
digital camcorder on a visit to
Maui. The bottom half of the page is called the Storyboard.
You can also edit in the Timeline mode, which I will show you later.
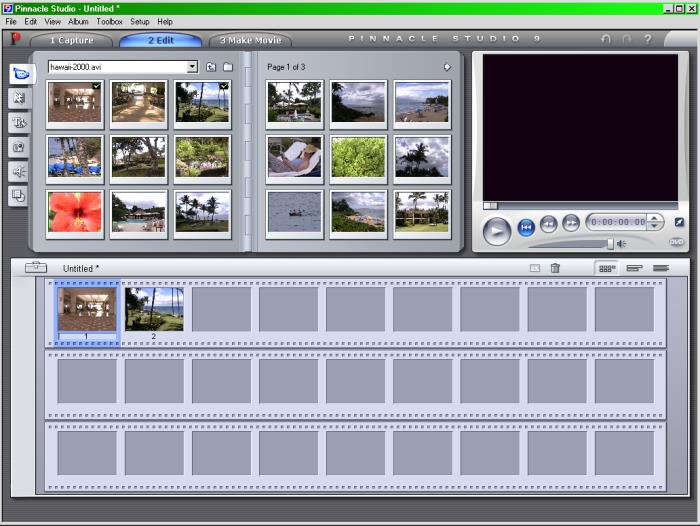
So, the next step is to start assembling the
video. This is done by simply dragging and dropping the various scenes
onto the storyboard. Here is a photo showing two scenes on the
storyboard. I started out with a scene of the hotel lobby, followed by a
scene of the beach next to the hotel.
The beauty of editing the videos is that you can
assemble them in any order you wish, and you can use any part of the
scene, but you don't have to use the whole scene. So, when I take
videos, I don't necessarily shoot things in sequence. I may go back
later and shoot some more footage of the hotel lobby, or some other
thing that will end up in a place on the video that is shown before
something I took at an earlier time. This is the way Hollywood shoots
movies too. If they are on location, they will shoot every scene that
occurs there, regardless of when it happens in the movie storyline.
To adjust the length of a scene, you click on
the thumbnail in the storyboard. This takes you to the following screen.
Here, you tag the place in the scene where you want to begin (called
"In") and where you want it to end (called "Out"). In this case, I
marked the In spot at 1.04 into the scene, and the Out spot at
8.28. The rest of the scene will not be present in the finished
video. However, none of the original video material is damaged. Whatever you
instruct the NLE to do, it only performs the instructions when the final
video is "burned", but does not alter the master video recording.
Rather, it will make a copy of the selected scene material, do whatever
you asked it to do, such as change the color balance (this is called
"Rendering") and add it to the que for recording onto the DVD.
One thing you have to get used to when using
NLEs, is that when you assemble the scenes, you have to save the
arrangement as a "Project" rather than a file like a word processor
document. So, when you start assembling the scenes, save them as a
project (for Pinnacle Studio 9, this is *.stu). Then, while working on
your project, hit the save project button regularly. NLEs have a nasty
habit of crashing computers regularly because of the intense operations
necessary, so if it crashes, you will at least retain the project
assembly that you saved last.

After you have all your scenes assembled on the
storyboard, you will want to add some transitions. It might look like
this.
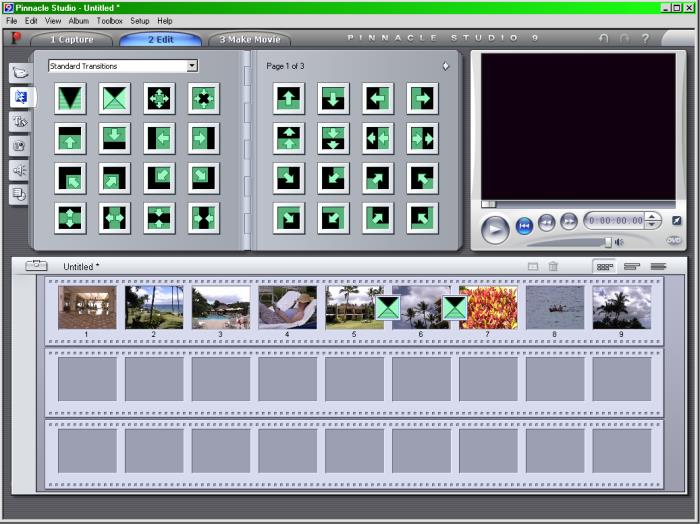
The transitions menu lets you choose among a
large number of ways to go from one scene to the next (called the
"Transition"). Although you might be tempted to add a wide variety of
transitions to your videos, there is a general rule of thumb called the
90:9:1 rule. This says that 90% of the transitions should be simple
"Cuts". This means the last frame of one scene is abutted against the
first frame of the next scene without modification. Then, 9% of the
transitions can be "Dissolves", and 1% can be "Special Effects". If you use
too many special effects, it can look like you are preparing an info-mercial
to sell that super cosmic potato peeler.
The dissolve causes the last few frames of the
first scene to dim while the first few frames of the next scene begin to
appear. I have dragged and dropped dissolves between scenes 5 and 6, as
well as between scenes 6 and 7 in the screen shot shown above.
By clicking on the dissolve (or other effect)
icon laying on the storyboard, you are taken to a menu that will let you
change the length of the dissolve, so it could be short or long in
duration.
Here are some examples of a cut, a dissolve, and
a star special effect. Click on the files to download them and watch,
using your Windows Media Player (they are WM9 files, *.wmv). Notice that
the effects take some time to occur and use up some of the video, so you
need to make sure that the dissolve or other effect does not overlap an
important part of the video.
Cut
Dissolve
Star Effect
Next, you can add a title and/or a menu. Here is
a screen shot of the titles page. I dragged and dropped one to the
beginning of the video and at the end. Then, I clicked on the thumbnail,
which took me to a title editing page where I could change the text to
suit my particular video. I titled it "Hawaii" at the beginning, and "It
Was Great!" at the end. I added a transition between the beginning title
and the end title.

If you want to add a menu to the DVD, here is
what the page looks like after dragging and dropping the one I wanted,
and after editing the text so it said "Hawaii". I moved the
buttons around too, as you can see in the second photo below.


The Menus section is the only part of this
software that I found difficult to use. Getting the menu buttons just
the right size and text fonts is tricky. It could use some work by
Pinnacle to make this step easier. Linking them to the spot you want in
the video is not easy either.
You can also add background music if you like,
either to title pages or included with scenes. First, you highlight the
thumbnail of the particular scene to which you want to add the music,
then select Add Background Music from the Toolbox menu. Here is what the
page looks like. There is a nice selection of music and you can tailor
it to specific lengths to coincide with the length of the scene.

How about some video effects? Here
is a screen shot of the menu. Like the transitions, it is easy to go
overboard and do too much with these effects. Choose them wisely. Play
them in the editor to see what you are getting.

As I mentioned at the beginning of
the review, you can edit in the Storyboard mode, as I have done here, or
use the Timeline. Here is a screen shot. I find the storyboard mode much
easier to use.

So, after you are finished assembling your
video, and testing it by playing it in the viewing screen at the top
right, you are ready to burn it to a DVD (you can also make CD videos
and VHS tapes).
Clicking on the Make a Movie selection at the
top, you are taken to the following page.
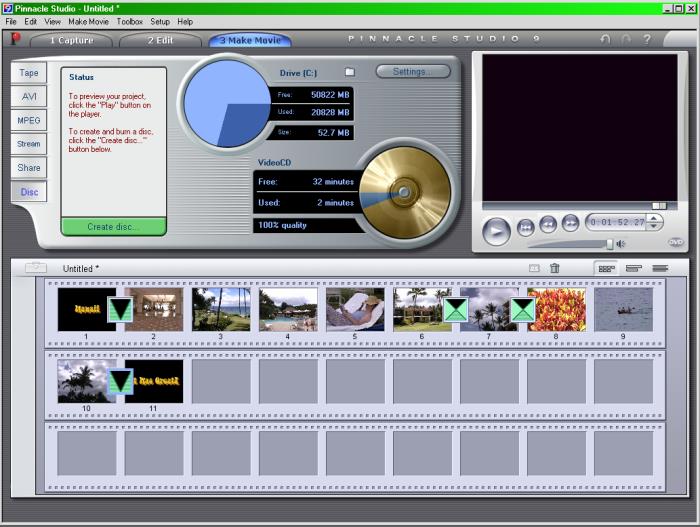
I chose Disc at the bottom of the
left hand column. You can also make MPEGs, RealVideo files, and WM9
files for use on the Internet.
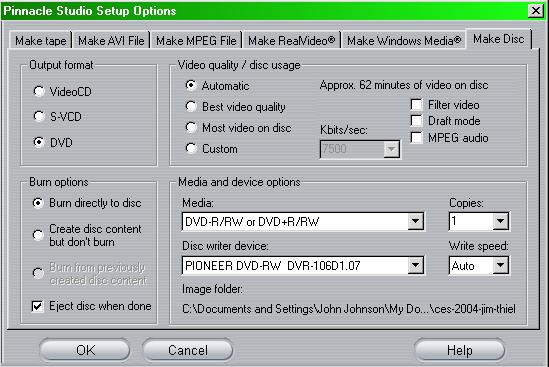
For DVDs, click on the Settings
button, which shows the following menu. I selected DVD and automatic
video quality. I also selected Burn directly to disc.
Then you go back to the Make a
Movie page, put in a blank DVD, and click the Create a Disc button.
First, the material is compiled and then it is burned to disc. This can
take a long time, so do this when you can go away from the computer
while it is burning the disc. Don't minimize the page and go about other
computer activities. The process needs your computer's full attention.
Making a DVD is time consuming, but
I burn a video to DVD first on a DVD+R/W disc (you can record on the
disc many times, erasing what was there before), then check to make sure
it is the way I want it, then I go back and burn it again to a DVD+R
disc. That way, if the video is not just the way I want, I have not
wasted a disc. I keep burning it to the R/W disc until it is just right.
Conclusions
Pinnacle Studio Version 9 is not
without difficulties here and there, but is generally the easiest to use
NLE out there at the consumer level. It does a good job from start to
finish, and is inexpensive.
Pinnacle has regular updates to
their software on their website, which fix many bugs, so be sure to
visit their site and check from time to time.
This is a long article, and we
still only covered the basics. As our NLE reviews increase, we will
spend more time on the really fancy things you can do with them. If you
have not used an NLE yet, and have a digital camcorder, you are in for a
new world experience.
- John E. Johnson, Jr. -

