|
|||||||||
|
Introduction Home Theater is one of those tricky hobbies where just when you think you've got everything under control, a new variable pops up. My theater room has been evolving since day one. This is great for me as it keeps things interesting, but if you talked to my wife she would tell you that it drives her nuts. My theater started with a rear projection set and a no frills room. A little over a year ago, I moved into a new house that had a good room for home theater. Once I moved in, I installed a front projection system. Those who have done this in their own setups realize that light control is paramount and can seriously make or break a room. But since this house is just a rental, I was limited on what I could do with it. I wanted to paint the room a very dark color, but that wasn't desirable to the property owners. So instead I bought some black carpeting and covered the entire front wall, most of the side wall, and part of my ceiling. This made a huge difference. Now here we are a year later. My full time job is in the Navy and things can change unexpectedly. I was told a few months ago that I was going to have to move. My choices were extremely slim. When I had narrowed locations down a bit I realized that front projection wouldn't be an option. It looked like my career was going to take me overseas, and I knew I wouldn't be able to afford a residence with enough space for a separate home theater room, let alone enough space for my setup. So I started thinking about what options I had. I ended up selling my screen and buying a plasma display. This took space out of play, most are universal in terms of compatibility with foreign TV standards (PAL, SECAM), and the sizes aren't too bad. So I pulled the trigger and bought one. Once I got it home and set it up though, I was introduced to a new issue: brightness. Most consumer displays don't have a lot of light output, and most aren't even close to having the brightness of a plasma. Since my room had full light control and tended to be very dark most of the time, the transitions in movies from light to dark started giving my eyes fatigue which eventually led to headaches and frustration. I also noticed that perceived contrast was a lot different. With all that black surrounding my plasma, the blacks offered by the display had some stiff competition, and anyone who has experience with plasma TVs knows that it can only get so good. At CEDIA - 2003, I had gone to a few of the classes for custom installers and had the chance to hear some points of view from Joel Silver and Joe Kane. These are two of the most respected individuals in home theater calibration and installation, and they are the guru's of high end video reproduction. They had some interesting ideas about plasma and getting the most out of your display. They both recommended a light color behind the plasma, exactly the opposite of what I had in my home theater. You see, if you have a white or light gray wall behind the display, your perceived contrast ratio will go up. Blacks will look darker overall as they aren't being compared against a true flat black. Well after thinking about where I should go from there, I contacted CinemaQuest, the inventors of the Ideal-Lume brand of bias lighting. Their bias lighting is recommend by the ISF foundation and THX. CinemaQuest President Alan Brown was very enthusiastic about my request to review their product for Secrets and to see what it might do for my setup. I had been approached by Ideal-Lume a little over a year ago about reviewing their product, but unfortunately at the time I had just installed my front projection setup, and bias lighting isn't designed for that application. Alan and I discussed my room's characteristics and my current setup with the carpeting on the walls. He reiterated what I had been told by Silver and Kane about wall color and made some suggestions. So after getting off the phone with him, I decided to tear down all the carpeting and completely repaint the room. I went to Lowe's and selected a nice light neutral flat gray paint and started. This made a pretty big difference by itself, especially with blacks in the image, but brightness was still an issue. A few days later, the review samples came in. Ideal-Lume was nice enough to provide four various kits that they offer: the Ideal-Lume Pro, Standard, Plasma, and Graphics. One of our new writers, Paul Taatjes, happens to live about fifteen minutes away and has a rear projection setup, so I offered a few of the lights to him to check out since his setup would benefit as well. I then installed the Ideal-Lume Plasma in my theater.
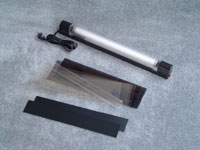
Ideal-Lume Plasma The bulb is what makes it different from most light sticks. Another feature that is hard to find is the clear diffuser (most fluorescent lights come with a white diffuser which changes the spectral performance of the bulbs. The bulbs are selected especially for their color temperature and their neutral color balance. The bulb's color temperature is extremely close to 6500K, which makes it ideal for home theater viewing. It also has a color rendering index of 98. Each light comes in a different type of casing and diameter. The plasma light is shorter than the other lights sent since it is made to sit behind the plasma on the mounting bracket. It can also be mounted directly on the wall if you want. The kit contains various filters and strips to tailor the lighting to your room. Included with both of my samples were: a 0.125 CTO filter; four clear UV filters; 1, 2 and 3 f-stop neutral density filters; two strips of light blocking film, and mounting hardware. You can use the provided data sheet in the Pro and Graphics models to figure out what type of “loss” you are taking by adding these filters, and installation is very straightforward.
The calibration discs and Ideal-Lume recommend the light output not exceed about 5-10% of the total light output of your display. If you use a light meter this is easy to measure. Just put a 100 IRE window pattern up on your display and measure the total light output, find 10% and you're good to go. Unfortunately, I didn't have a light meter handy, so I used the test pattern provided on Avia. This pattern has two neutral gray strips that give you your display's percentages in a visual representation. By mixing the various filters that came with the bias lighting, I was able to achieve a level that seemed to be about right on. This was pretty simple, but took some trial and error. The Results It didn't take long at all to reap the benefits of bias lighting. In fact, it only took about half a movie before I was sold. Image quality did not change, but the big difference was eye strain. Your pupils dilate and constrict all the time if subjected to different levels of light. With a TV in a dark room, you go from a hot spot in the center of your vision with a bright scene, to pitch black. Eventually the muscles that control this will become fatigued, just like any other muscle in your body. Not only do my eyes usually get tired, but I start getting some nasty headaches as well. I tend to notice this normally about half way through a movie. Headaches were completely eliminated; in fact, my eyes never felt any strain at all, because even during dark movie scenes, there is enough light in the room, behind the display, that my eyes don't dilate. The level of comfort watching films was increased, allowing me to watch multiple films in one session, which before would result in some serious pain. I asked my wife to come into the room, and she also thought the difference was huge. Not only did it help condition her eyes, she thought the bias lighting made the room more inviting and not the “dark cave” she felt it was before. Another thing I started to like about the bias lighting was mood. You see, my home theater doubles as my music listening room. Normally, I turn off all the lights and just concentrate on the music in my “cave”; now I can turn on the bias light and get a very pleasing atmosphere. My wife enjoys this new look as much as I do, and it is easier to get her to join me for an evening of music. Ideal-Lume Standard
The other two lights I passed on to Paul, and I'll let him chime in on the results he had. Paul's Findings I, like many people, have always tried to get my home theater as dark as possible. Heavy drapes, equipment dimmer controls, and evening viewings have made this possible in my home theater. However, watching a movie under these conditions leads to eyestrain, even with a properly calibrated display. The darkened environment causes greater extremes in the range of light entering the eyes. The idea behind bias lighting is to provide a small amount of light behind the viewing area, which keeps the overall lighting more constant, regardless of what is happening in the movie. Ideal-Lume Pro The Ideal-Lume Pro is
the professional model of Cinemaquest's line up. It is their top of the
line fluorescent model and is designed for production studios, video
calibrators, and the most discriminating videophile. The Ideal-Lume Pro kit contains a high-frequency (65-70 kHz) electronic ballast, clear protective diffuser, and a six foot grounded cord (three-pronged). Also included are: a 0.125 CTO filter; four clear UV filters; 1, 2 and 3 f-stop neutral density filters; two strips of light blocking film, and mounting hardware. The f-stop filters are not quite neutral; therefore the CTO and UV filters are used for color correction in different combinations. The real star of the show is the included 24” fluorescent bulb, a far cry from your standard department store fluorescent model. The 24” GretagMacbeth bulb uses a patented mix of 7 phosphors, which is used to give a color temperature of 6500 Kelvin and a Color Rendering Index (CRI) of 94. (The Color Rendering Index describes the effect of a light source on the color appearance of an object, with 100 being an index that means the light makes the object appear its true color. Conventional "cool white" fluorescent bulbs have a CRI of about 64.) This pure white creates a basis for a completely neutral bias light that will not interfere with your calibrated display's color reproduction. GretagMacbeth claims that these are the most accurate 6500K fluorescent bulbs available, with the world's best Spectral Power Distribution. Ideal-Lume Graphics The Ideal-Lume Graphics is CinemaQuest's solution for the bias lighting of computer monitors. The kit contains a high-frequency (31 kHz) electronic ballast, clear protective diffuser, and a six-foot power cord with a polarized plug (two-pronged). In addition there are four clear UV filters, 1, 2 and 3 f-stop neutral density filters, two strips of light blocking film, and mounting hardware.
Besides being a home theater nut, I am also a computer gamer and tweaker (is something burning?) Those late night sessions in my pitch-dark office no longer end in a bleary eyed near-blindness. I would have loved to take the Graphics model into work, but since I am still in a Dilbert-esque cubical, I don't have control over the lighting. Setup Placement of the lighting should be behind the display and it should give a nice even glow, without hot spots or shining directly in the eyes of the viewer. For me, the best position for the Pro model was behind my center channel speaker. The best place for the Graphics model was directly behind my monitor on the desk. These positions also allowed easy access to the power switches. For those who want or require remote light operation, CinemaQuest has two Radio Frequency (RF) remote-controlled on/off switches available for $20 and $30. The Society of Motion Picture and Television Engineers (SMPTE) recommends a backlighting of less than 10% of the peak white output of the display. I used the 5% and 10% gray pattern from Avia Guide to Home Theater as my reference point. CinemaQuest also recommends Digital Video Essentials or Sound & Vision Theater Tune-Up as sources for a comparison test pattern. With the test pattern up and the room dark, I was ready to begin. CinemaQuest includes a handy spectral data chart for the various combinations of filters with each light. Following the chart to maintain the proper color temperature and CRI, I tried a couple filter combinations until the light level appeared to fall between 5 and 10 percent, as given by the AVIA pattern. For the Pro model in the home theater, my final filter combination was a UV filter, 0.125 CTO filter, and the 1 and 3 f-stop filters. I was able to achieve the proper bias light level with a color temperature of 6576K (as given by the data sheet). The same process was followed for the Graphics model in the office. I finally settled on using the diffuser, a UV filter, and the 1 f-stop filter. The setup was easy, thanks to the included spectral data sheet. There was only one “trick”: the UV filter must be placed directly next to the light or the filters will break down over time. If you need to create an aperture to reduce or aim the light output, the included light blocking film strips can be used. I loved using the Ideal-Lume products. The Pro has become an integral part of my movie watching experience, and is here to stay. Gone is the eyestrain and fatigue, replaced with a much more relaxed viewing experience. I have the recommended light level, with no compromises due to a substandard bulb. I was very skeptical as to the value of adding bias light to my home theater, but I am now a believer. Conclusions Paul and I are definitely in agreement about the idea of bias lighting and the Ideal Lume products. In a hobby that is unfortunately plagued with gimmicks and scams galore, the Ideal Lume provides a very realistic improvement not only to the viewing environment, but to the onscreen image as well. If you have a direct view system of any kind, the Ideal Lume bias lighting is really a must have, and the benefits are instantly apparent.
- Kris Deering and Paul Taatjes -
|
|||||||||
 The
Plasma light is
pretty straightforward in design. It looks like a small fluorescent light
stick. It came with a collection of different filters to install around the
light tube to attenuate the overall light output, along with mounting screws.
The
Plasma light is
pretty straightforward in design. It looks like a small fluorescent light
stick. It came with a collection of different filters to install around the
light tube to attenuate the overall light output, along with mounting screws.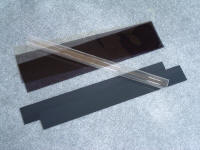 The first thing I needed to do
was configure the light output of the bias light to a proper brightness for
my system. This
can be done in various ways. You can use a light
meter or the handy test patterns on most calibration DVDs,
including Video Essentials, Digital Video Essentials, AVIA, and AVIA Pro. In
fact, Video Essentials has a whole section that discusses bias lighting and
the benefits associated with it.
The first thing I needed to do
was configure the light output of the bias light to a proper brightness for
my system. This
can be done in various ways. You can use a light
meter or the handy test patterns on most calibration DVDs,
including Video Essentials, Digital Video Essentials, AVIA, and AVIA Pro. In
fact, Video Essentials has a whole section that discusses bias lighting and
the benefits associated with it.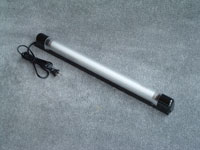 The next
unit I tried
out was the Ideal-Lume Standard. This is their entry level model, but it
still features a bulb with a color temperature of 6500K. Its size was just
a bit thicker than the plasma light, and featured the same filter strips. I
tried this light in my family room behind my direct view TV that we use for
everyday TV watching. I saw essentially the same benefits here, but we
normally have lights on in this room already since we have a new baby girl.
But, substituting the Ideal-Lume behind the TV for the regular room lighting
eliminated the nasty glare that normally appears on the
front of the screen. This option would be a nice touch for those using a
direct view monitor under 40”, because the light doesn't take up much space and can be
set on the back or on the wall behind it. It is really important that you can't see the
light directly, but rather the resulting cascade against the back wall. The
lights come with lens strips that are solid black to help in eliminating hot
spots as well.
The next
unit I tried
out was the Ideal-Lume Standard. This is their entry level model, but it
still features a bulb with a color temperature of 6500K. Its size was just
a bit thicker than the plasma light, and featured the same filter strips. I
tried this light in my family room behind my direct view TV that we use for
everyday TV watching. I saw essentially the same benefits here, but we
normally have lights on in this room already since we have a new baby girl.
But, substituting the Ideal-Lume behind the TV for the regular room lighting
eliminated the nasty glare that normally appears on the
front of the screen. This option would be a nice touch for those using a
direct view monitor under 40”, because the light doesn't take up much space and can be
set on the back or on the wall behind it. It is really important that you can't see the
light directly, but rather the resulting cascade against the back wall. The
lights come with lens strips that are solid black to help in eliminating hot
spots as well. 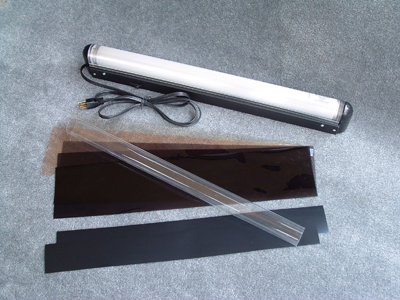
 The included 15”
fluorescent GretagMacbeth bulb uses a patented mix of 7 phosphors to give a
CRI of 94, just like the bulb used in the PRO model. The color temperature
has the option to be 5000K or 5400K, depending on application. If you are
in the photography, graphics arts, or the publishing business, you will want to
use 5000K. However, for the average user, 5400K will provide the best
results.
The included 15”
fluorescent GretagMacbeth bulb uses a patented mix of 7 phosphors to give a
CRI of 94, just like the bulb used in the PRO model. The color temperature
has the option to be 5000K or 5400K, depending on application. If you are
in the photography, graphics arts, or the publishing business, you will want to
use 5000K. However, for the average user, 5400K will provide the best
results.

Magazine Publishing Solutions by