Introduction
I'm always in the market for new speaker kits to share with Secrets readers. It
gives the average Do-it-Yourselfer some nice options that will both save
some money as well as satisfy a very rewarding hobby.
Kits offer additional
advantages as well. Buying a kit leaves the speaker designing to the
experts. When one considers the time and resources (not to mention
equipment) speaker manufacturers put into each of their designs, that adds
up to a considerable Research and Development (R&D) cost before the speaker
goes to market. Through extensive measurements and redesign, the crossover
is carefully “tweaked” so a speaker will play seamlessly across its
frequency capabilities, particularly between the tweeter and woofer
crossover point.
Since speaker manufacturers need to recover their R&D costs
somehow, you as the consumer pay that cost, which is rolled into the price
of the speaker. Although this R&D cost is still associated with a kit
design, you save a considerable amount of money by buying the designer's
components. For example, when Audax contracted Vance Dickason to design
speakers around their drivers, Vance was undoubtedly paid for his designs.
Audax, in turn, sold countless drivers to DIY'ers to build these
designs. You, as the consumer, save money by assembling the kit yourself,
while Audax makes money because they know their drivers will be used
exclusively for their design.
Assembly is another key expense for a high-end
speaker. Enclosure rigidness/bracing strategy as well as a quality finish
can contribute significantly to the bottom line. However, the DIY'er has a
plethora of resources at his/her disposal that can make a cabinet that
rivals the best built consumer cabinets at a mere fraction of the cost.
The
Rythmik Audio DirectServo sub kit is no exception, given its very reasonable
price and ease of construction. And with Audio Concepts Inc. now out of the
kit business, there's a small void needed to be filled in the DIY market.
Very much like ACI, Rythmik Audio is a direct-to-consumer company, with no
middleman, no distributor, and no salesperson. Rythmik Audio is a small
mom-and-pop company (literally!) run by Brian Ding and his wife. They
specialize in servo-controlled subwoofers, but also offer the non-servo
variety. Currently, they cater to the DIY sector, but will eventually
venture into selling assembled kits.
The DirectServo Design
There are many advantages to using a servo-controlled system for a
subwoofer. As previously described in the review of the Titan sub, the servo
design allows you to use a smaller cabinet to achieve the low-end response.
The feedback controller also protects the driver from being overdriven,
which would cause damage to the voice coil.
The feedback loop in the Rythmik sub is a
combination of current sensing and velocity sensing feedback. Unlike most
servo designs on the market, Rythmik takes on a minimalist's approach. There
are no active devices in the feedback paths. The feedback path is purely
comprised of resistor and capacitor networks. In contrast, in accelerometer
based designs, op amps are used to amplify the motion signal, therefore,
becoming a possible source of audible degradation.
The way Rythmik designed the extension filter was such that, without the
extension filter, the frequency response (from the sub, not from the amp)
will be flat to below 10 Hz. However, this type of design would not be
practical. So Rythmik inserted an additional single 2nd order high pass
filter with adjustable fs and Q values by changing the resistor and
capacitor values of the filter. That sets up the ultimate extension of the
frequency response, which allows the user to select between maximum
extension and maximum playback SPL.
The Whole Kit and Caboodle
The following hardware is included with the DirectServo kit:
● One 12” long-throw polypropylene woofer
● One 350 watt rms amplifier module with variable active crossover
●
Speaker gasket material
●
Acoustic polyester stuffing (for damping)
●
Hardware to install both the driver and amplifier
The following hardware is NOT included with the DirectServo kit:
●
Wood to build the enclosure (enclosure with grille available at additional cost)
●
Cabinet finishing materials
● Spike feet
 The
amplifier/crossover module comes completely assembled, so there's no need to
solder anything. Even the driver comes equipped with connectors that
essentially snap the wires on from the amplifier. So when I say, no
soldering is required, I mean, put away you're guns and irons . . . you don't
need them!
The
amplifier/crossover module comes completely assembled, so there's no need to
solder anything. Even the driver comes equipped with connectors that
essentially snap the wires on from the amplifier. So when I say, no
soldering is required, I mean, put away you're guns and irons . . . you don't
need them!
There really is no manual included with the kit, but quite
honestly, there is no need for one since the assembly is THAT simple. The
kit will function properly in a sealed enclosure between 2.1ft3 and 2.5ft3,
and in a vented enclosure 4ft3.
Here are some details on the amp (also available from Rythmik's website):
● Thermal-coupled MOSFET differential input stage for the power amplifier
● No electrolytic caps on signal paths, nor feedback paths
● Adjustable bass extension control (with both frequency and damping)
● Audiophile grade MIL current sensing resistor
● Integrated 3/16" thick one-piece aluminum back plate and heat sink for
better heat dissipation.
● Dimension: (W)10-3/8" x (H)12-7/16" x (D)4".
● Cutout Dimension: (W) 9 1/8" x 11 1/8"; 4" clearance in depth.
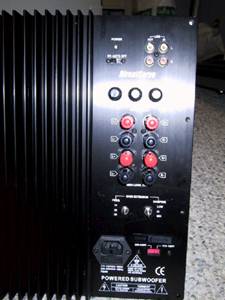
 The
amp has been optimized to work either in a sealed enclosure or in a vented
design. By a simple flip of a switch on the amp (inside), the circuitry
selects the optimum feedback control for the box design you've chosen. The
amp is very flexible in terms of connection options and variable output.
There are four sets of speaker level outputs as well as two pairs of L/R
line level outputs. There is a volume control, variable crossover, as well
as a 180° adjustable phase controller. The amp also has an auto on/off power
switch, which automatically turns on the amp when a signal is detected.
The
amp has been optimized to work either in a sealed enclosure or in a vented
design. By a simple flip of a switch on the amp (inside), the circuitry
selects the optimum feedback control for the box design you've chosen. The
amp is very flexible in terms of connection options and variable output.
There are four sets of speaker level outputs as well as two pairs of L/R
line level outputs. There is a volume control, variable crossover, as well
as a 180° adjustable phase controller. The amp also has an auto on/off power
switch, which automatically turns on the amp when a signal is detected.
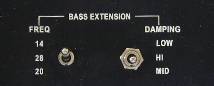
Bass extension is adjusted using the frequency and damping toggle
controllers. Frequency settings are 14 Hz, 20 Hz, and 28 Hz. The damping can be set
to low, medium, or high. Setting the damping to low provides a 3 dB gain, and
the medium gives you 1.5 dB gain. This adjustment is most useful when
fitting the sub into your existing system and room. For example, if your
room has a lot of gain and the sub sounds too boomy, you can set the damping
to medium or high to reduce this artifact. If you want maximum bass, the
low setting works best.
 The
Enclosure
The
Enclosure
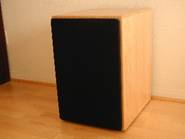
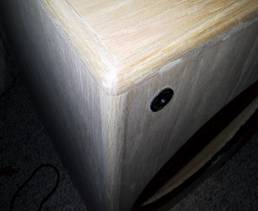
If you're not good with power tools, for an additional cost ($199), Rythmik will
provide a sealed cabinet. The cabinet is available in several different
finishes: raw (unfinished), natural, red mahogany, and dark oak. The cabinet
veneering and ¼" round molding was well done in the sample I received.
For the review, I opted for the raw cabinet so I could get a better idea
what kind of carpentry went into the cabinet. Cabinet walls were a
combination of MDF and particle board, totalling 1-¼ " in thickness. There
was no bracing in the cabinet, which was a little surprising, particularly
with a cabinet this size, and with the large cutouts on the front and back
baffles for the driver and the amp.
 Installing
the Driver, Amplifier, and Damping Material
Installing
the Driver, Amplifier, and Damping Material
As I mentioned previously, putting this beast together was a cinch. The
driver and the amp are coupled using a multi-wire connector that snaps into
position, so there no need for soldering. The gasket material that is
included with the kit is essentially worthless. The consistency of the
gasket is similar to Silly Putty, only stickier. Don't even bother to use
this gasket, as it was very difficult for me to get a good seal with it. I
would recommend using the closed cell foam gasket material available from
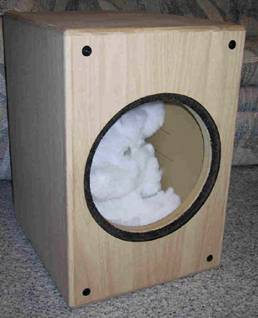
various companies that sell drivers and crossover parts. Fluff and poof the
stuffing, then place in the cabinet before you install the driver. Should
you decide secure the stuffing by using a spray adhesive, make sure you put
the stuffing in first before you install the driver or amp. Wait for the
glue solvents to completely dry before proceeding to the driver install.
 The
driver comes with a rubber gasket as well. Remove this before you install
the driver, particularly if you are going to use the cabinet available
through Rythmik. The screws that are included with the kit were more than
adequate in securing the driver and amp module. The gasket that is part of
the amp module is fairly hard, so you'll need to really bear down on the
screws in order to get a good seal (you will need a good seal around the
driver and amp to avoid air leakage out of the enclosure). Although I didn't
use additional gasket material around the amp, it may make it easier to get
a good seal around the amp without taking the risk of stripping the screw
holes. Don't forget to drill very small pilot holes for each of the screws.
This will reduce the risk of damaging the MDF.
The
driver comes with a rubber gasket as well. Remove this before you install
the driver, particularly if you are going to use the cabinet available
through Rythmik. The screws that are included with the kit were more than
adequate in securing the driver and amp module. The gasket that is part of
the amp module is fairly hard, so you'll need to really bear down on the
screws in order to get a good seal (you will need a good seal around the
driver and amp to avoid air leakage out of the enclosure). Although I didn't
use additional gasket material around the amp, it may make it easier to get
a good seal around the amp without taking the risk of stripping the screw
holes. Don't forget to drill very small pilot holes for each of the screws.
This will reduce the risk of damaging the MDF.
The Measurements
I took several measurements, adjusting the variable frequency cutoff, the
frequency toggle, and damping settings.

M = medium damping; L = low damping)

(M = medium damping; L = low damping)
As you can see, the sub has a pretty flat response between
20 Hz and 100 Hz.
As one would guess, the low-end is extended further out using the low
damping and 14 Hz frequency setting.
Movies or Music?
The age-old question once again arises, "Is this sub more suited for
movies, or does it do music more justice?" Well, the times they are a
changing, and in order to keep competitive with the other thousands of
subwoofers on the market, it's essential for a sub to do more than an adequate
job in both arenas. This is not only from a competitive standpoint, but also there
is certainly a gray area when one considers all the music intertwined in
every movie. Perhaps the distinction between movies and music comes from the
fact that so much of the low frequencies in movies are synthesized, so a
loose subwoofer will work for them. With music, particularly classical, the
low frequencies come from instruments and are natural sounds, so a tight,
clean bass is appropriate here. The Rythmik lets you choose this by the flip
of a toggle switch.
There's no question that the DirectServo delivered all the low-end punch
needed for a good home theater experience. The Lord of the Rings: The
Fellowship of the Ring provided a good test. In the scene where the ring is
almost thrown into the fires of Mount Doom in Mordor by King Isildor, the
sub did a god job of reproducing the thunderous rumbles.
 When
the Fellowship are gathered in Rivendell, Boromir suggests returning the
ring to Gondor and using it for “good”. Gandolf quickly rises up and speaks
the language of Mordor, erupting into an extreme low-end frenzy. Again, the
DirectServo showed no hint of the driver bottoming out or amplifier
clipping. The sub had no problem handling the first “stomp” of the T-Rex
coming out of “Jurassic Lunch”, which falls well below the 20 Hz frequency.
The sub's sealed box design showed its composure on several other bass
enriched movies including Terminator 3: Rise of the Machines, The Lord of
the Rings: The Two Towers, and X-Men 2. I tried to stress the driver and amp
in an attempt to overdrive either, but the DirectServo system showed
resilience past 110 db.
When
the Fellowship are gathered in Rivendell, Boromir suggests returning the
ring to Gondor and using it for “good”. Gandolf quickly rises up and speaks
the language of Mordor, erupting into an extreme low-end frenzy. Again, the
DirectServo showed no hint of the driver bottoming out or amplifier
clipping. The sub had no problem handling the first “stomp” of the T-Rex
coming out of “Jurassic Lunch”, which falls well below the 20 Hz frequency.
The sub's sealed box design showed its composure on several other bass
enriched movies including Terminator 3: Rise of the Machines, The Lord of
the Rings: The Two Towers, and X-Men 2. I tried to stress the driver and amp
in an attempt to overdrive either, but the DirectServo system showed
resilience past 110 db.
The DirectServo also did a very nice job with music reproduction. Its
flexibility in the way of damping and frequency setting created a smooth,
balanced bottom end that seamlessly blended with my L/R speakers. Music
sounded best using the high damping setting, which sets the sub to a Q =
0.6. The sub responded quite well to quick bursts of short, low notes when
listening to the timpani in "Farefare for the Common Man" (Aaron Copland; Telarc). The subs good transient response did not sound boomy and
was
very natural.
Final Remarks
Rythmik has introduced a nice kit in its DirectServo for the DIY sector. I
found the sub extremely flexible, in that the sub can be adjusted to work
well for both music and movies by a mere flip of a switch, keeping it
competitive with the best of subwoofers. The sub has enough output to
deliver pounding bass in a large room that will provide a convincing home
theater experience. The DirectServo's pricing is also very attractive. With
a 350 watt amp (with all its flexibility) and a 12” long throw driver, this
kit is quite a bargain.
Ryhtmik offers a cabinet to go with the kit. Certainly building your own
cabinet offers additional savings. A cabinet suitable for this kit should be
very inexpensive to build. It all depends on how confident you are using
power tools. But then again, that's what DIY is all about!
- Ralph Calabria -
Associated equipment for this evaluation included:
B&K AVP2000 preamp
B&K AV5000 power amp
Pioneer CLD-D703 combi player (modified for AC-3)
Panasonic CP-72 DVD player
Marantz DP-870 Dolby Digital Processor
DIY Audax A652 mains
DIY Audax Center Channel
DIY Titan Powered Subwoofer
M&K MPS-1625 tripole surrounds
Audioquest, BetterCables and Nordost interconnects
Notes from Colin Miller (Secrets Senior Editor)
and Brian Ding (Rythmik Audio):
CM - We can get additional low-end response with
EQ. What's the advantage with tailoring frequency response using a
servo-system instead?
BD - While EQ is less expensive to implement, the
system's frequency response is not as stable as true sensor-based
servo-subs. For instance, we have seen some driver manufacturers boast that
their drivers can put up with 3000 F or even higher temperature.
However, what is not mentioned is when the voice coil is at 3000
F, the voice coil resistance is 50% or so higher than in room temperature.
It can change the Q value as much as 50%, and the frequency response as
well. Sensor-based servo subs completely eliminate this problem. That is,
the system will have the same frequency response regardless of the
temperature of voice coil.
CM- Some of us have had mixed experiences with
different implementations of servo-controlled subwoofers based on
accelerometers, some good, some not so good. I recall in particular how an
accelerometer-based subwoofer that I owned sounded clean, ‘fast', and
dynamic until it met its headroom limit (via the last elephant thump in the
opening scene of The Lion King) in which case the woofer suddenly and
conspicuously went BANG much harder than any conventional subwoofer.
BD- Our servo-sub works on a different principle.
We use a sensor coil to detect cone velocity. Accelerometer-based servo-subs
are difficult to work with. First problem: whenever one moves the sub when
it is still powered on, one may see the cone move in and out, sort of like
warbling (I like to call it induced transient response). This is because the
accelerometer is referenced to ground/earth (as in physics, not
electronics). The cone does not want to follow the movement of
the enclosure. Our servo-system does not have this problem because our
sensor signal is referenced to the driver assembly, and therefore, the
enclosure. The cone will follow the movement of the enclosure. Another
common problem with accelerometer-based subs is stability. That is why we
have heard comments like above to explain why accelerometer-based systems
can create the BANG noise. In this regard, our DirectServo technology is
absolutely stable because we use a combination of velocity sensing feedback
and current feedback. When the voice coil is out of the gap, the current
feedback plays the current limiting role. As a matter of fact, it is so
stable we don't need to use relays in our amps. The power-on noise is still
within acceptable level.
CM- One of the more well-known proponents and
manufacturers of accelerometer-based servo-subwoofer systems addresses this,
I believe, by incorporating limiting circuits to protect the driver, though
it has been said that this may in some circumstances limit dynamic
performance.
BD- This is a trade-off. Limiting circuits do
sacrifice dynamic range. Sometimes the limiting circuits also serve the
purpose of preventing the system from entering areas of unstable operation
(such as amp clipping or out-of-gap). We have chosen not to use limiting
circuits for sonic reasons. The excellent stability characteristic of the
DirectServo sub allows us to do without a limiting circuit.
CM- So, then when the voice coil goes beyond the
gap, the impedance drops, and the current-sensing portion of the circuit
provides the protection and actually backs off amplifier output beyond
linear excursion, and the system is more stable because it inherently tries
to keep the driver within its linear range, as opposed to trying to
linearize behavior regardless whether it's in its linear range or not. So
that part of the feedback circuit protects the driver by its very nature?
Then, functionally speaking, in addition to the protection from
over-excursion provided by the driver suspension and mechanical stiffness of
the enclosure air, you get the benefits of a smarter limiter that provides a
soft kind of protection based on the most important aspect of protecting the
driver-cone excursion, as opposed to typical limiters that operate on the
basis of amplifier output level? That sounds smart.
BD- Yes.
CM- Can you explain ‘velocity sensing' vs.
‘current sensing'?
BD- We use a sensor coil to pick up the velocity
signal. The velocity signal is similar to an accelerometer's, except that
it's derived from the motion of the coil through the motor's magnetic gap,
as opposed to an accelerometer's motion referenced to inertia. In our sub,
the sensing coil is like the second coil of a dual voice coil driver, except
that it's smaller to let the primary coil use most of the space and make the
most efficient use of the magnetic flux of the motor. Current sensing looks
at the current drawn by the driver itself.
CM- How does the current sensing adjust to the
resonant impedance peak in the driver? For instance, if it were purely
trying to make the current draw match the proportion of the input signal, it
would increase the signal at the peak to force more current, and you'd get a
big bump in frequency response. For that matter, how do you incorporate the
different impedance curve caused by a vented design, or a larger/smaller
cabinet?
BD- It is based on the concept of impedance
loading. The effect of impedance loading can be created by using negative
current feedback and negative motional feedback at the same time. The effect
of impedance loading is to create a driver with a set of "virtual" T/S
parameters that are very different from physical T/S parameters. The overall
system response will act as if the driver possesses this new set of virtual
T/S parameters. Since a sealed box and vented box work differently, it will
require different sets of virtual T/S parameters, and hence, the feedback
networks will also be different for the two.
CM- Wow. Thanks for the thorough responses to our
questions.
BD- You're very welcome.