|
||||||||||
|
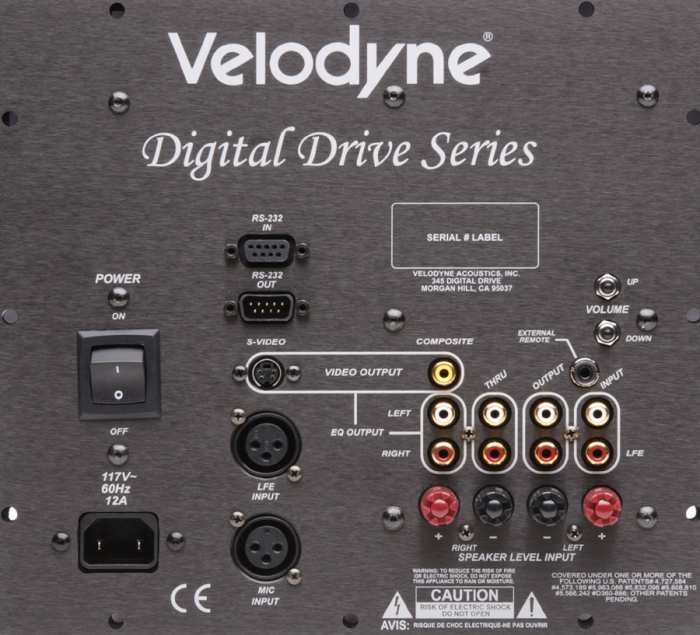
Introduction That has all changed with their introduction of Digital Drive technology, which basically not only converts their servo-feedback to digital, but adds digital EQ. The Design Velodyne's DD series includes a 10", 12", 15" and the 18" version reviewed here. The Class D power amplifier which drives the units is basically the same as previous HGS models, being 1,250 watts RMS. What has changed is the way the solid state servo chip mounted on the 3" voice coil operates. Whereas before, the chip sent an analog 3.5 kHz signal back to the comparator (compares the signal being sent to the power amplifier with the actual movement of the driver as sensed by the servo chip), the new DD series chip converts the movement of the driver to a digital signal at much higher frequency (16 kHz), and the comparator converts it to analog before sending the difference between input signal and driver movement to the power amp for canceling distortion. Secondly, there is a sophisticated digital EQ circuit built-into the DD processor, along with composite and S-Video outputs for the consumer to set the EQ using an On-Screen Display (OSD). The amplifier has unbalanced RCA and XLR inputs, low-pass adjustable frequencies between 15 Hz and 199 Hz, in 1 Hz increments, 6 dB - 48 dB per octave in 6 dB increments, 00 - 1800 phase adjustments in 150 increments, and high-pass at 80 Hz. Adjustments in such fine increments are only possible with digital processing, which the DD series has. You can adjust the volume with a pair of buttons on the rear panel if you like, but it is much more convenient just to use the remote control. There is an RS232 port for updating the software that controls the processor. You download the update and feed it to the subwoofer from your PC through this port. The AC cord is ungrounded and detachable.
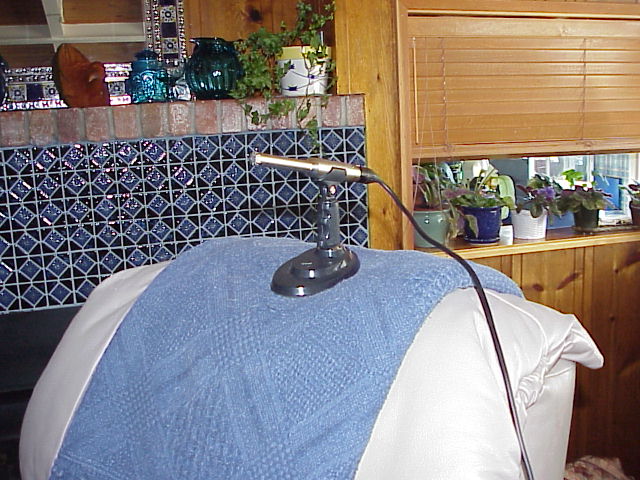
Setup To set up the DD18, you connect the calibrated balanced microphone (supplied) to the XLR microphone jack on the rear panel, and place the microphone on the top of the chair (at head level) where you listen to music and watch movies (photo below).
Next, you connect either a coaxial RCA cable (supplied) or S-Video cable (supplied) to the video output jack on the rear panel, and the other end to your TV. A coaxial cable (supplied) is also connected to the audio out jack on the rear panel, and an input on your receiver. This is used for the subwoofer to measure the room response. Then you turn on your receiver, the subwoofer, and your TV. The first screen you see with the OSD is shown below. It tells you the current subwoofer volume setting and which Preset (there are several to choose from) you have.
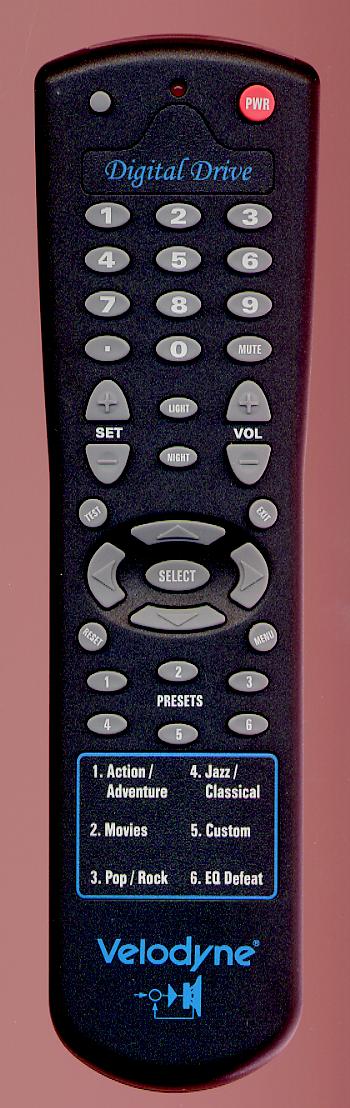
You press "Menu" on the remote control (shown below)
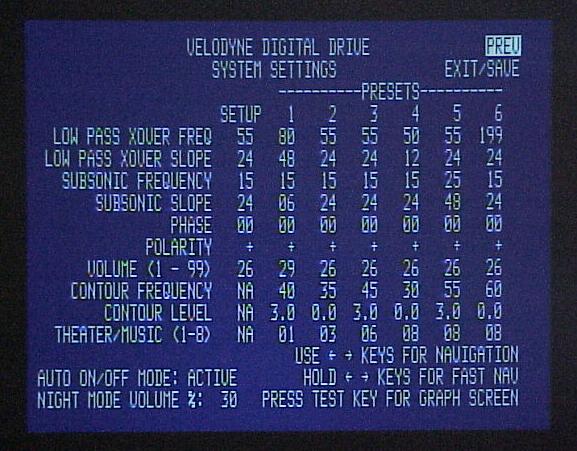
Click on the photo above to see a larger version. The OSD changes to the next screen, below. In this menu, you can change the low-pass frequency, the low-pass slope, the subsonic frequency cutoff, the subsonic slope, the phase, polarity, the volume, the contour frequency (for giving a boost at a specific frequency like many movie fans want to have), the contour level, and the amount of servo-feedback control that you want (1 is no servo-feedback control, and 8 is maximum servo-feedback control). This is where you configure the Presets, so that you can have one for action movies, one for melodramas, one for rock music, one for classical music, and so on. When using the subwoofer, you select which Preset you want from the remote control. A blue Velodyne logo at the bottom front of the subwoofer blinks to let you know the remote control signal is being received by the subwoofer.
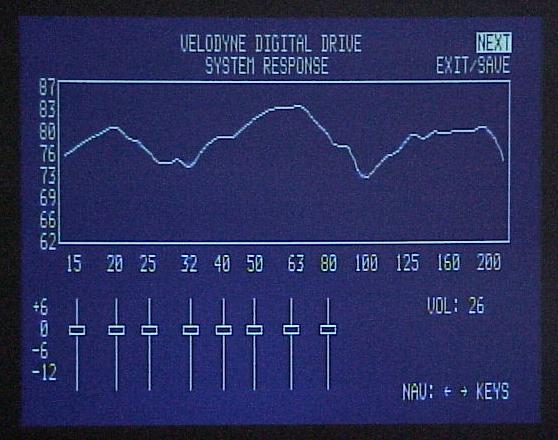
Next comes the EQ setup. By pressing the "Test" button on the remote, you see the following screen. You will hear a low frequency sweep in the subwoofer, and you adjust the volume so that you get it to display up around 80 dB, as indicated on the left hand column of the graph. This is the graph with no EQ, and you should be using one of the Presets other than Preset 6, which bypasses the EQ. The graph below is my home theater room. Notice how there are numerous dips, such as at 30 Hz and 100 Hz.
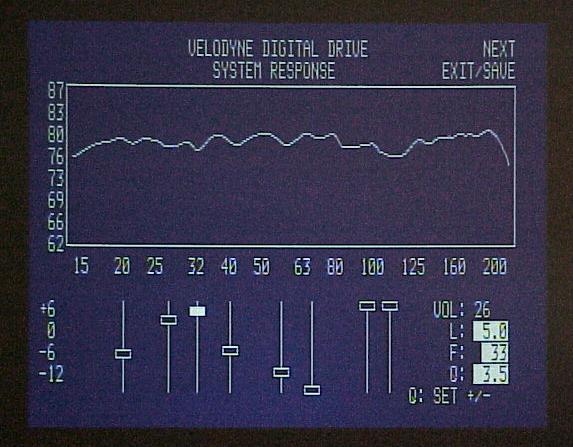
Using the navigation keys, and while the sweep is playing, you adjust the EQ bands and the center frequency for each band, until you get a flatter response. Rather than trying to raise the dips, you should always just lower the peaks. The column on the lower right lists the overall volume, the level for the hightlighted band (L), the center frequency (F) and the Q. The Q adjusts how wide the particular band is, so it could be very narrow, only adjusting 1 Hz on either side of 33 Hz, or it could be wide, adjusting several Hz around 33 Hz. You can see from the graph, that I was able to get the room response much, much flatter than it was with no EQ.
I have several subwoofers in my system, so I then turned on a second sub (Velodyne HGS-18), and got the following graph when no EQ was in the system (Preset 6). Notice that the graph is a little flatter than with just one sub. This supports the idea that two subs are better than one for a flat response.
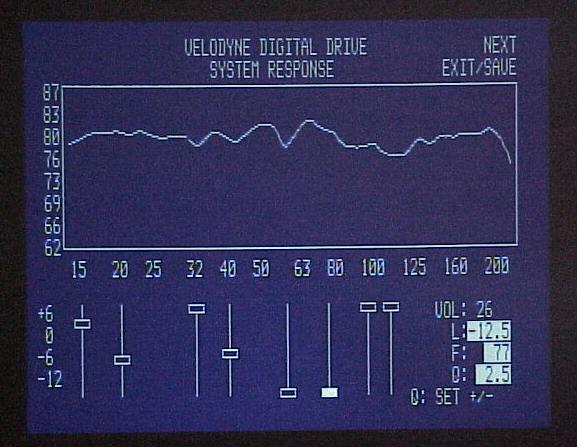
Shown below is the graph with the two subs operating, and with EQ applied from the DD18. As expected, I was able to get the response much flatter, and it points out that just adding the DD18 to a multi-subwoofer system can work in flattening the room response, even though the other subwoofer(s) do not have digital EQ. One other point about digital EQ is that it eliminates phase shift that is caused by analog crossover components (inductors and capacitors). This is very important in getting time alignment of the bass with the midrange and high frequencies in the other speakers.
Click here to go to Part II - The Sound, On the Bench, and Conclusions
|
||||||||||


Magazine Publishing Solutions by