|
|
|
|
Specifications:
●
Resolution: XGA (1024 x 768)
●
Display Device: Digital Light Processing
DLP™ Technology by Texas
Instruments
●
Brightness: 1000 ANSI lumens
●
Aspect Ratio(s): 4:3 Native, 5:4 / 16:9
Compatible
●
Contrast Ratio: 2000:1
●
Lamp: 200 W User Replaceable UHP Lamp
●
Lamp Life: 2000 hours
●
Lens: 1:1.2 Manual Zoom and Manual
Focus; F / 2.44 - 2.69, f = 28.8 - 34.5
mm
●
Keystone: Correction: + / -16 Degrees
●
Input: Computer: DVI Connector;
S-Video, Composite , HDB 15-Pin D-Sub
(Component Video / HDTV input port)
●
Fan Noise: 32 dB
●
Weight: 6.4 lbs.
●
Dimensions: 10.9 in. (W) x 8.9 in. (D) x
3.3 in. (H) 277 x 225 x 85
mm
●
MSRP $3,995
Optoma
http://www.optoma.com
|
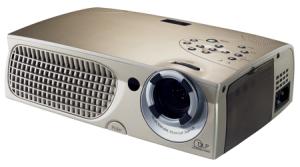
Introduction
I recently reviewed the Optoma H55, a small,
lightweight multimedia projector base on a 4x3, XGA (1024x768) Digital Light
Processing (DLP) or Digital Micro-mirror Device (DMD) developed by
Texas Instruments. While there were many aspects of the H55 that I liked
very much, I could not give it an unequivocal recommendation for Home
Theater (HT) usage for several reasons, including the practicality of
using the H55 with 16x9 screens and, frankly, less than stellar performance
in terms of contrast ratio and artifacts.
At the CES in January 2003,
however, I was able to see the H56, the H55's direct replacement in Optoma's
HT projector offerings, and it appeared to be a totally different projector.
Actually, the projector looked very similar to the H55 in outward
appearance, but the image it projected was dramatically better, with good
contrast, deep blacks and minimal dithering artifacts. I was impressed.
So,
I was delighted when I recently had a chance to try an H56 in my
HT with my own source material and setup. And of course, I was also anxious
to do some measurements and find out how well this projector really
performed.
When I received the H56, I quickly set it up by placing it on top of my
usual temporary support structure (which consists of an end table, a milk
crate, and miscellaneous boards) to allow the projector to be placed behind
the couch at the back of my viewing room, slightly above the height of the
bottom of my 102” diagonal Da-Matte (gain=1) screen.
After my initial viewing of the H56, it was clear that the black levels and
contrast ratio were much better than my reference projector Sony 11HT). Dithering
artifacts (a problem with DLP) didn't seem noticeable either.
The other feature that immediately convinced me that this was a real step up
from the H55, and a serious HT projector, was the presence of both a screen
and a format control, allowing the projector to be used at a fixed position
with a 16x9 screen and with both 4x3 and 16x9 images.
As I described in my review of the H55, use of a 4x3 projector with a 16x9
screen typically is not very practical, as the shape of the screen and shape
of the DLP panel are different. If you position the projector to use the
full screen width of a 16x9 screen, 16x9 images will fill the screen, but
will only use the center portion (vertically) of the 4x3 panel with perhaps
areas of potentially distracting light leakage from those unused pixels
above and below the screen. The problem comes if you now attempt to display
a 4x3 image with the projector at this same distance from the screen. Most
4x3 projectors projecting a 4x3 image will naturally use the full 4x3 panel,
and the image will be too tall for the 16x9 screen. The typical solution is
to move the projector forward until the height of the image matches the
height of the screen, or use a zoom lens. Moving the projector is obviously not convenient in a permanent setup.
So generally, 4x3 projectors are best paired with 4x3 screens – not the
ideal solution for HT.
Fortunately, with the H56, the combination of screen and format menus solves
this problem very nicely. For a 16x9 screen, you
use the format menu to choose either 16x9 images or the “window” format that
places 4x3 images in the center section of the 16x9 screen – exactly what is
needed to allow convenient projection of the two common image formats on a
16x9 screen with a fixed position projector. While this approach does not
use all the available pixels for 4x3 projection, for most people who prefer
to optimize their HT setup for widescreen 16x9 viewing, this will certainly
be the preferred setup with the H56.
Therefore, it became quite obvious that this was a projector that I could and
would want to use on a daily basis to watch a combination of DVDs, High
Definition TV (HDTV), in the 16x9 format, and standard definition TV in the
4x3 format. My temporary support structure behind the couch had to go. So I
built a shelf on the back wall near the ceiling such that I could semi-
permanently “ceiling-mount” this very nice little projector and enjoy it
every evening for about a month.
The Next Generation of DLP – DDR and Dark Metal Technology
One of the main reasons the H56 is an improvement over the H55 is that it
uses a newer generation, Double Data Rate (DDR) DLP chip from TI. If you
are not familiar with DLP technology and its pros and cons,
check out the DLP vs. LCD page to gain a bit more background on this subject before you
read on.
These new DDR chips use “Dark Metal” technology, i.e., an optically
absorptive coating is applied to the interior of each chip, minimizing the
stray light reaching the screen when mirrors are switched off. Furthermore
the tilt angle of the mirrors has been increased from 10° to 12°, thus
making it harder for the light in the tilted off position to reach the
screen. These two changes, TI would claim, combine to give a 20% increase in
light output and essentially a doubling of the contrast ratio!
The Double Data Rate feature is also an important improvement over previous
generation chips because each mirror in a DDR DMD receives more data per
second and can tilt toward or away from its light source faster than
previous generation DMD chips, thus improving grayscale tracking accuracy
and minimizing dithering artifacts.
Based on my measurements and viewing experiences, I would
certainly agree that these DDR DMD chips do produce a much better image than
that produced by previous generation DMD chips.
Perhaps at this point it is worth distinguishing between the 4x3 XGA
(1024x768) DDR DMD chip used in the H56, (and the NEC HT1000), with the
1280x720 HD2 (“Mustang”) chip used in most of the higher end HT DLP
projectors. There are currently about a dozen different projector models
available based on this 16x9 HD2 “Mustang” chip. While all of the earlier
HD2 models were considerably more expensive that the H56 with MSRPs at or
above $10K, the recent offering by Immersive of the Virtuoso HT720 at $8500
and Optoma's offering of the HD2-based H76 for a MSRP of $5995, are
definitely shaking things up!
The other new DDR DMD chip worth mentioning is the 16x9 format, 1024x568 “Matterhorn”.
While this chip is native 16x9, its resolution in the 16x9 mode is no
different than 1024x768 XGA chips used in the H56. The difference however is
that with the 16x9 “Matterhorn” chip, all the pixels, and therefore all the
lumens, are used for a 16x9 image, thus potentially delivering a brighter
16x9 image than a projector with similar lumens rating, but with a 4x3 chip.
Inputs and connectivity
The H56 can easily connect with any input you are likely to give it,
although at first you might ask, “Where are the component inputs?” The
15-Pin D-Sub connector seen above can be used for both Component Video and
HDTV signals (with the provided adaptor cable), as well as for VGA-based
inputs. There are also S-Video and a DVI port for connection to a computer
or other DVI compatible devices. There is an adaptor to allow a second
component connection via the DVI port. (The H56 comes with a very complete
set of cables and adaptors.) Gone are the audio inputs present
on the H55 that are, of course useless in an HT environment.
Controls
The remote control
 contains all of the controls to select inputs and aspect
ratios (Format) as well as to tweak the projector via the on-screen menu
system. As is the custom, most of these buttons are duplicated on the
top of the projector. Focus is adjustable through the typical arrangement of
a rotating ring on the lens assembly. A zoom ring is located on the top of
the projector. The H56 also has a digital image ‘Zoom' button that allows
the user to temporarily zoom in on part of the image. This should not be
confused with the optical zoom feature that ones uses to adjust the total image to
fit the screen. contains all of the controls to select inputs and aspect
ratios (Format) as well as to tweak the projector via the on-screen menu
system. As is the custom, most of these buttons are duplicated on the
top of the projector. Focus is adjustable through the typical arrangement of
a rotating ring on the lens assembly. A zoom ring is located on the top of
the projector. The H56 also has a digital image ‘Zoom' button that allows
the user to temporarily zoom in on part of the image. This should not be
confused with the optical zoom feature that ones uses to adjust the total image to
fit the screen.
The user menu system for the Optoma H56 is greatly improved over the H55
with everything necessary to set up good grayscale tracking readily accessible
without the need to enter a service or factory mode. This is another good
example of Optoma keeping the special needs of the HT enthusiast in mind
when they designed the H56.
Of course there are other menu controls for ‘Brightness' and ‘Contrast', as
well as ‘Color”, ‘Tint' and ‘Sharpness' which can be adjusted using a test
disk such as Avia. The remote also has buttons for fine-tuning many of these
same controls, e.g., ‘Contrast'and ‘Brightness', without bringing up the
whole menu system. There is a ‘Color Temp' adjustment with setting of
1, 2 and 3 (more about this in the measurements section).
Placement in the Room
As explained in the introduction, the H56 is a 4x3 projector, and I have a
16x9 screen, but use of the format control allowed convenient placement at
the back of the room while projecting both 16x9 and 4x3 images. When used
with a 16x9 screen, the H56 is, in practice, a projector with a long-throw
lens and thus must be placed further back in the room than my reference
projector.
The fan noise on the H56 is specified at 32 dB, but the noise and hot air
exited the front of the projector where, in my case, the seating area was
located. Thus, I found the H56 to be a bit noisier than other projectors I
have used that had similar specifications, and where the fan noise is
directed away from the user. On the other hand, there should be no problem
placing the H56 right up against a back wall.
Measurements and Viewing
User Level Adjustments
Using the relevant Avia test images, I determined that the optimum contrast
setting was 18, with the brightness set to –13. I set the color control to
–12 and the tint to 8. I was a bit disturbed that the optimal values were
not the center point of the control range, e.g., 0 or 50, but Optoma assured
me that this reflected the way it was set up in the factory. (Nothing wrong
with this, I just find round numbers reassuring.)
Measurements
When I evaluate a projector, I not only look at images, I measure the color
balance of the projector at various light intensity levels and determine the
quality of what is called ‘grayscale tracking'. The idea is that black,
white, and all shades of gray, should have the correct ratio of the three
primary colors used in video projection Red, Green and Blue. You can read
more about the testing method in my past projector reviews on Secrets, or at
http://www.smartavtweaks.com.
Before tweaking, the Light Intensity data from the H56, as a function the
video input signal or IRE level, are shown in the chart above. In this case,
the ‘Color Temp' setting in the user menu was set to 2.
What we see in the above graph above are traces for red, green and blue
which all rise along pretty much the same curve, but with the red curve just
a bit below the others. This indicates that with the color temperature
setting of 2, the color temperature was close, but about 500K above the
desired color temperature of 6500K. The measured light level at the 16x9
screen with an IRE 100 window was 12.7 ft-L. This corresponds to 520 lumens
out of the projector, assuming all of the pixels were in use, and the
equivalent of 391 lumens when using my 16x9 screen. The measured contrast
ratio (IRE 100 window vs. black) was 921:1, a dramatic improvement over the
396:1 measured for the H55.
As discussed above, a consistent ratio of colors as a function of IRE level
is perhaps equally important to overall picture quality, as an absolutely
“correct” color temperature. In the color intensity chart above, it is
difficult to discern the details of the color balance at the low IRE level,
or how the overall color intensity compares to the ideal for that IRE level.
For these purposes, SMART uses two different charts – one for color balance
and one for gamma tracking.
In the Color Balance chart generated by SMART, we can compare the ratios of
the various colors at the various IRE levels. In this case, the intensity
for the individual colors is compared to the average intensity for that IRE
level. In the Color Balance chart, ideally all three curves will stay very
close to 1 at all IRE levels, indicating that the color balance is the
desired one, and does not change as a function of IRE level.
As can be seen in the above Color Balance graph, the H56, out of the box,
shows remarkably consistent color balance at all IRE levels. This is
certainly the best grayscale tracking I have ever measured for an
“untweaked” projector. (I did get this projector directly from the
manufacturer so I was not completely surprised that it was well set up.
Nevertheless most projectors aren't this good even after tweaking!)
The Color Balance chart also shows that the color temperature is a bit high
(red is too low) using the initial setting, but again, very close to the
desire color temperature and is easily fixed, as will be seen below.
Gamma Tracking
The other thing we can measure is gamma tracking, or how the light output of
the projector responds to the input signal. If the projector's gamma
tracking is off, then details in the image will either be lost, or the image
may look flat and have little contrast. The Gamma Tracking graph shows the
combined light intensity at the various IRE levels relative to a theoretical
level. If the projector is accurately producing the intended light intensity
level as a function of input or IRE level, all values should be close to 1 in
the gamma tracking graph.
In the Gamma Tracking graph above we can see that the H56, with the gamma
control set to 1, has quite accurate gamma tracking that is well described
with an overall gamma of 2.2 – which is excellent performance.
Tweaking the Optoma H56
One of the real advantages of accurately characterizing a projector's
performance is that you can then use the same measurement system as a guide
to tweaking or improving the projected image. Tweaking typically involves
changing various control parameters in the projector, such as those that
allow adjustment of drive or gain levels and offsets or bias settings for
the primary colors. Fortunately, with the H56, all necessary controls are
located in the user menu, so there was no need for me (or anyone else wishing
to perform similar tweaks) to enter a service or factory mode.
After tweaking, the color balance remained remarkably flat and right at the
desired ratios. I also managed to get 10 percent more light out of the
projector, and the contrast ratio improved to 1035:1. Gamma tracking remained
excellent with an effective gamma of 2.2.
I did check the effect of the Color Temperature control after calibration
with the Color Temperature set at 2. Lowering the Color Temperature to 1, or
raising it to 3, lowered or raised the measured color temperature by about
-1000K and +1500K respectively. This use of relative user color temperature
adjustment should prove very handy for those wishing to try a slightly
warmer or cooler color temperature for different source materials.
A few comments on contrast ratio and lumens output are perhaps appropriate
at this point. While 1035:1 is very good, it is short of the H56 2000:1
specification. Unfortunately, it is not unusual for a projector to fall short
of its contrast ratio specification when tweaked to the proper color
temperature, and the H56 is no exception.
To measure 1035:1, I had to be very careful about other sources of light in
the room, e.g., I had to turn off the bias lights I use for normal viewing.
It should also be noted that there is considerable light spill from the
front grille of the H56, and it noticeably illuminated the ceiling directly in
front of the projector. While I did not make measurements to confirm it, I
have no doubt that if this light spill were blocked it would significantly
improve the on/off contrast ratio. I was also able to get an additional 15%
light output, over that reported above, but at the cost of color balance –
the whites turned greenish.
Color Decoder Accuracy
At this point it is very important to understand the difference between
grayscale tracking accuracy and color decoder accuracy. As discussed above,
grayscale tracking has to do with the proportion of red, green, and blue in
black and white, and all the shades of gray. If all we watched were black and
white (and gray) movies, this would be sufficient. With color images we also
care how accurately colors are made. Red is red, of course, but we want to
have reds of various levels of saturation or ‘redness', and we want
combinations of the primary colors to make all the other colors in all their
various levels of saturation. Making accurate colors is the job of the color
decoder. When someone says that a projector has ‘red push', they mean that
red is more saturated in the image than was intended, not that there is too
much red in the white and gray parts of the image. These are separate issues
and should not be confused.
As I used the red, blue, and green filters with the Avia Color Decoder test
(in the Special Tests menu), it was a bit more difficult to determine the
matching levels than with my reference projector. It seemed that the colors,
especially green and blue, were not quite as pure green or pure blue as with
my reference projector. Ideally when viewing this pattern through the red
filter, the green and blue colored patches should appear black. With the H56,
there was a bit more leakage of one color into the other filters than with
my reference projector, suggesting that green and blue especially, were a
bit too white, or contained some of the other primary colors. I set the
color control so that red was at the proper level of saturation, and this
left green and blue a bit under-saturated. I understand from talking to Optoma that there are service level RGB controls that might well have helped
here, but I did not attempt any service level adjustments.
Video Memories
As I used this projector for about a month, I needed to frequently switch
operation between S-Video and component inputs – HDTV, DVD, etc. This was
not a problem, as the H56 supports two sets of component inputs. The H56 also stores
virtually all user menu settings separately for each input, and automatically
selects the appropriate set of stored values with each change of source. On
powering up, the H56 would search for an active input, or one could use the
remote to request a specific input. I much prefer this input or input
format-based style of automatic video memory selection to one where the user
assigns certain modes of operation to certain video memories. The only thing
I needed to change manually on switching inputs was the ‘Format' control if
I went from a 16x9 mode to a 4x3 mode of operation.
Scaler and Deinterlacer – the Video Essentials Montage
I checked the performance of the deinterlacer using the
montage on the Video Essentials (VE) disc using the interlaced component output from my Denon
1600 DVD player. Using the interlaced mode, the pan back from the building
was not as smooth as it should be, and the waving US flag definitely showed jaggies (jagged diagonal lines). The pan over the bleachers in the stadium
did show a somewhat jerky motion. There was some twitter in the zoom of the
green leaves. Using the progressive output from the same DVD player, I saw
no jaggies on the waving flag and a smoother pan over the bleachers,
buildings, and leaves. Therefore, I did the rest of my viewing using the
progressive component output from the DVD player and I would suggest that
you do the same.
I must admit that the montage was a good preview of things to come, with
great blacks and shadow details in the opening, and in many other scenes.
The green of the soccer field and the leaves was a bit under-saturated,
compared to my reference projector. Overall, the images looked stunning.
Viewing and Comments
Spending a month with the H56 was a real pleasure. The black levels and
contrast ratio were clearly much better than with my CC40R tweaked Sony
11HT. The picture was also “softer”. There are several reasons for this.
First, there was no Fixed Panel Noise (FPN) or Sreen Door Effect (SDE) visible
at my viewing position 11 feet from the 102” diagonal screen. FPN is
definitely an issue in some scenes with my LCD-based 11HT. Second, the
resolution of the H56 is less than my reference projector: 1024x576 vs
1364x768 for 16x9 images. Third, some of the colors were just a bit “softer”
or less saturated. The forth factor was that my 11HT has a gamma of 2.5,
while the gamma of the H56 is 2.2. (The other gamma settings seemed to
lower the gamma further).
A lower gamma tends to make a softer looking picture with better shadow
details. A higher gamma gives an image with more “punch” or apparent
contrast, but at the expense of shadow detail. So, even though the contrast
ratio of the H56 was more than twice that of my 11HT, most images did not
appear to have higher contrast. Shadow details and black levels were great
however, and I quickly became aware how little real black there was in many
images. The H56 does black very well, and when watching movies with a
2.35:1 aspect ratio, one always has the black bars as a reference. But some
parts of the scene that I expected to see as black were clearly somewhat
more luminous than the reference black bars.
A display's gamma has a significant effect on how low level details are
displayed. Gammas in the range of 2.2 to 2.5 are considered acceptable values for projectors. However, the difference in light output for low IRE
signals with this range of gammas is significant. For instance, with image
segments that fall just above black, e.g., IRE 2-IRE 5, changing the gamma
from 2.5 to 2.2 will more than double the light output in this segment! This
is not a bad thing at all; it simply means that the H56 does a better job of
differentiating shadow details than my reference projector.
Where the contrast ratio and black level of the H56 really came into play
was, of course in dark scenes, e.g., the scenes in and approaching the Mines
of Moria, in "Lord of the Rings – Fellowship of the Ring". When a scene does
contain blacks, the H56 reproduced them very well indeed. Blacks were
blacker than with my reference projector – no doubt about it! It is in the
low contrast dark scenes where the H56 really shines, by NOT delivering very
much light to the screen.
One of the movies my wife and I really enjoy is "Star Trek – First Contact",
but with my 11HT the night scene where the Borg first attack earth always
seemed washed out. Not so with the H56. That scene and the dimly lit scenes
on the Enterprise looked far more real than I had previously seen. The next
evening we watched "Star Trek – Nemesis", and there were plenty of
opportunities to see both good blacks and good shadow detail with the crew
wearing dark gray/black uniforms. It is a good movie; it's just too bad they
killed off . . . (well, if you haven't seen it, I won't spoil it for you.)
HDTV looked great on the H56, but not quite as sharp as with my higher
resolution (1364x768) 11HT. The lack of FPN was welcome, but the image was
not quite as 3-dimensional as with the higher resolution reference display
(it uses almost twice as many pixels). I tested the H56 using both 1080i and
720p signals from my DISH 6000 and preferred the 720p mode as the image
seemed smoother, and the 1080i mode had a slight red tint to the first few
top lines of the image. This likely could have been solved with a masking
adjustment, but I didn't bother, as the 720p images looked fine.
We also watched quite a bit of standard definition TV via an S-Video input,
as well as up-converted by my DISH 6000 to 720p. Frankly, I was amazed how
good the S-Video images looked – very smooth. The H56 handle scaling the
S-Video information much better than my reference projector.
With the H55, I found dithering artifacts to be objectionable in some
scenes. This was much much less of an issue with the H56. There is no doubt
that this is because of the higher data rate of the newer DDR DMD chips. However, dithering is likely to be the most problematic at
the very lowest light levels, just above black. I suspect that the gamma of
2.2 helps elevate some of the potentially problematic IRE input levels to
less problematic output levels. This, combined with the very low absolute
levels for black, makes it pretty unlikely that dithering artifacts will be
visible from the normal seating position. If you know when and what to look
for, you can find dithering artifacts, e.g., some of the shadow detail just
above black on the uniforms in Star Trek – Nemesis. From my viewing chair, I
could only suspect that there might be dithering artifacts in a region of
the picture, and I had to walk up to the screen to confirm it.
(Actually, dithering artifacts make a great way of adjusting the brightness
control of most DLP projectors. Black should never have any dithering, so one
can use a black window on Avia or a black bar on a DVD and lower the
brightness until the dithering just goes away. You will want to stand close
to the screen to do this.)
Rainbows? I was not at all bothered by rainbows with the H56. I could make
rainbows happen if I really wanted to, (but that generally involved doing
things that hurt). I did not see rainbows in normal viewing, although several
of my quests did in scenes with bright white vertical stripes, for example
the scene in the captain's quarters in Star Trek – Nemesis. I think that
they are more interesting than bothersome. Rainbows are a potential
issue with any single chip DLP, so try before you buy. (If you can't see
rainbows when others around you can, do your best to overcome your feelings
of inadequacy and just enjoy the movie!)
As adjusted, colors were just a bit muted (except for red), and reds with the
H56 were spectacular. Try "The Fifth Element" – it's a real treat with the H56!
The colors were “right”, e.g., greens were not yellow or cyan, they were
green, just a bit less “green” than with my reference projector. Overall, the
images with the H56 looked great, and I would much rather have slightly muted
colors than an oversaturated cartoon-like image.
Conclusions
All in all, watching and using the H56 was a real pleasure. I built a
special mounting platform for this projector, high on my back wall, so that
I could really ascertain how I'd like a single chip DLP for extended
viewing. The H56 convinced me, for the first time, that I could indeed be
happy with a single chip DLP-based projector. The lack of FPN and the
excellent grayscale tracking and contrast ratio made for a very smooth
satisfying realistic image – one I could definitely live with and be happy
with.
Would I replace my 11HT with an H56? Tough question. The H56 has the better
image, no doubt. The loss in resolution in HDTV compared to my reference
projector, however, was noticeable. Given the imminent arrival of less
expensive higher resolution 16x9 HD2-based projectors, I'd more likely go
that way. I have seen the Optoma H76 and was very impressed. Let's hope the
production units look as good. I hope to find out soon!
The H56 is a 4x3 projector, but unlike the H55, the H56 the can be set up for
convenient use with either a 16x9 or 4x3 screen. This makes it a very viable
projector for Home Theater usage. Although it might not have quite the
resolution of the HD2-based projectors, I don't doubt that it will continue
to be priced lower than its higher resolution cousins, and it has more than
enough resolution to get the most out of DVDs, while providing very
satisfying HDTV viewing.
If you have an older projector and a 4x3 screen, and you are looking for a
significant upgrade, the H56 is an obvious choice. It will work with your
existing 4x3 screen, and if you ever decide to switch to a 16x9 screen in the
future, the H56 will be ready and able. If you are just getting started in
the HT game, the H56 is likely your lowest cost way of accessing the latest
generation of DLP DDR technology, with its excellent contrast ratios and
black levels.
 This is both a wonderful time to buy a projector and a terrible time to buy
a projector – with new models right around the corner. But that is the way
it is, and likely will be for some time to come. If you decide to purchase
an H56 today, chances are you won't be sorry; it's a very good projector for
not a lot of money! The MSRP was recently reduced from $4995 to $3995, and
part of that reduction includes not having the very nice (Kitty approved)
carrying case (Kitty not included) that was part of the former price. But,
that carrying case would have only been needed if you used the H56 for board
room meetings. For home theater, once the projector is installed, the
carrying case is of no further use anyway. This is both a wonderful time to buy a projector and a terrible time to buy
a projector – with new models right around the corner. But that is the way
it is, and likely will be for some time to come. If you decide to purchase
an H56 today, chances are you won't be sorry; it's a very good projector for
not a lot of money! The MSRP was recently reduced from $4995 to $3995, and
part of that reduction includes not having the very nice (Kitty approved)
carrying case (Kitty not included) that was part of the former price. But,
that carrying case would have only been needed if you used the H56 for board
room meetings. For home theater, once the projector is installed, the
carrying case is of no further use anyway.
- Steve
Smallcombe -
Reference Equipment:
Denon 1600 DVD player B&K Ref 30 preamplifier
Theta Dreadnaught amplifier, 3x225 and 4x100
Adcom Power Center
KimberCable interconnects and speaker wire
DISH 6000 HDTV receiver
Velodyne DF-661 front speakers (modified crossover) - 3
Definitive Technology surround speakers - 4
Velodyne 15" subwoofers - 2
Sony VLP-VW11HT video projector (reference projector, tweaked with CC40R filter)
|
Related to the article above, we
recommend the following: |
|
Primer - TVs |
|
|
|
|
Terms and Conditions of Use

|