|
|

Click on Photo Above to See
Larger Version |
|
Specifications:
●
R1280x720 TI HD2 (“Mustang”) DLP Chip
●
2000:1 Contrast Ratio
●
1000 ANSI Lumens
●
6 segment, 5x speed color wheel with a
proprietary anti-vibration design
●
Sealed Optical Path
●
1:1.2 Zoom Lens, 1.36- 1.66 x Screen
Width
●
10-bit Proprietary Gamma Correction
●
3:2 Pulldown Detection
●
Adjustable Video Filters
●
PIP and POP
●
Supports Composite, S-Video,
Component, DTV Y/PB/PR, DTV RGB and
DVI-I
●
Digital Keystone Correction ± 15°
●
200 Watt Lamp – 2000 Hours life
●
RS-232 Control Port, 12V trigger
●
Noise Level < 30 dB
●
Size: 17.75” x 4.72” x 11.1”
●
Weight:17 Pounds
●
MSRP: $5999 USA
Available from Projector People
at Substantial Discount.
BenQ
www.benq.com |
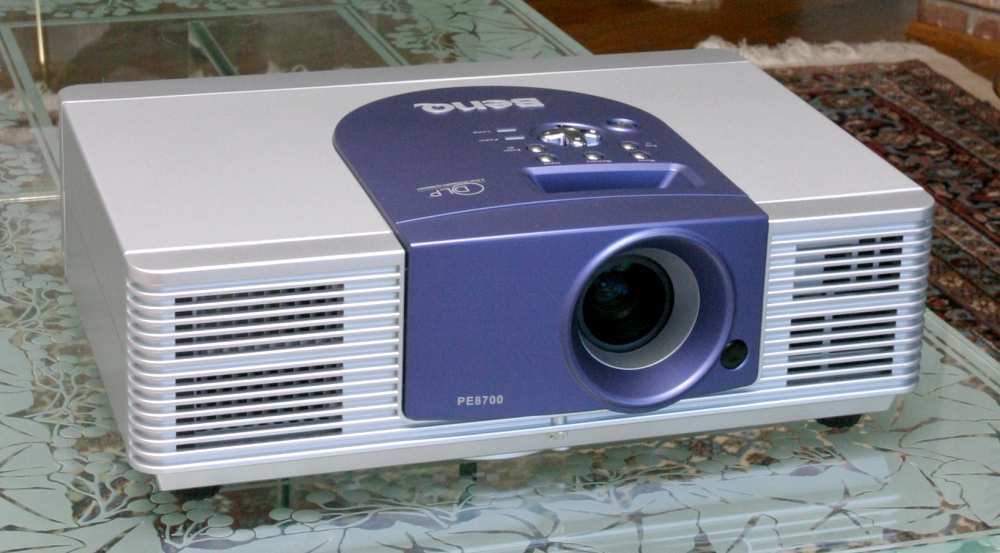
Introduction
The BenQ
PE8700 is a video projector aimed directly at the Home Theater (HT)
market. The 8700 is based on Texas Instruments' 16x9 (1280x720) HD2 or
“Mustang” Digital Light Processing (DLP) or Digital Micro-mirror Device (DMD) that also
uses Dark Metal technology for improved black levels and contrast ratios. I
have seen almost the entire current crop of HD2 DLP-based projectors at
various shows. However, this
was my first chance to review one. I must say that the BenQ was an excellent
place to start – they hit the target very well.
When it comes to features, perhaps the first thing that should be pointed
out is that the BenQ 8700 has a short throw lens (i.e., short focal length,
which means the picture size is larger at a given distance than with a long
focal length lens), and is capable of producing a very big picture in a
small room. (The other implications of this will be further discussed in the
Installation and Room Placement section below.)
The 8700 also has one other unusual feature, Picture In Picture
(PIP) and and Picture On Picture (POP) that allows the user to show
images from two different sources at once, either in PIP , small window in a
large window, or in the side-by-side POP format. For instance, I found that
I could display a small version of what my satellite receiver was seeing in
the corner of my DVD movie playback. This might be used to show the program
guide while you watch something else at the same time.
Although the 8700 is a high-end projector, it does not have several features that one might expect on
full-featured HT projectors, e.g., power zoom, power focus, and lens shift.
Although these power features are handy during setup, I would not let the lack
of these features steer you away from the BenQ, as once set up, the image it
produces is hard to fault. The 8700 is also one of the lowest cost HD2-based
projectors you can find today.
The BenQ PE8700, like many of its HD2-based competitors, is specified to have a
contrast ratio of 2000:1, and its brightness rating of 1000 ANSI lumens
suggests that it might be somewhat brighter than many of its well regarded,
and more expensive HD2-based competitors.


At this point, it is probably worth my admitting that I am getting the
upgrade bug. I have been very happy with my Sony 11HT, but it is probably
time to think about getting a new projector. I had hoped that the HD2-based BenQ
would compare well with my 1364x748 pixel LCD-based reference projector in
terms of resolution and sharpness, while at the same time having a smoother
image without the annoying Screen Door Effect (SDE) typically associated with
LCD-based projectors. Of course I also wanted the high contrast ratios and
excellent black levels associated with DLP projectors, with hopefully enough
brightness to make a truly engaging image. I want it all, and I'll have to
admit, in these respects, the BenQ met and exceeded my expectations!
Here is a
link to a comparison of DLP vs. LCD.
Inputs and Connectivity
The BenQ PE8700 has a complete set of inputs on the back of the projector,
as can be seen in the photo above. There are composite and S-Video jacks, RCA jacks for
component inputs (interlaced only), and BNC jacks for either RGB or
component inputs (interlaced and progressive input compatible).
There is also a DVI connector that supports inputs up to XGA (1024x768).
BenQ's documentation does state that the DVI input is HDCP compliant (not
tested). I was a bit disappointed when my attempts to use DVI in 1280x720
mode from my laptop led to a message that this format was not supported.
However, correspondence with 8700 users suggests that the DVI input does
work with DVD players that have DVI output.
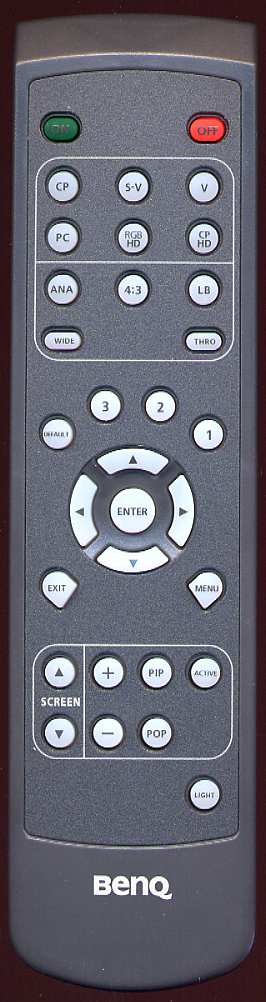
Controls
The lighted remote control has discrete controls for all inputs, aspect
ratios, video memories, and menu controls. There are also controls for
PIP and POP, and for screen up and down, assuming that you have a screen
made by BenQ.

Click on Photo Above to See Larger Version
As is the
custom, most of these buttons are also duplicated on the top of the
projector, but you have to go through a menu in some cases.
I found the remote very easy to use, even in the dark, with logical
placement of the various buttons.
Focus and zoom are adjustable via rotating rings accessible via a recess in
the top of the projector.

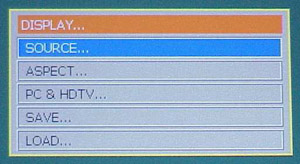
Menu System
The user menu system on the 8700 had a reasonable layout with most of
the controls needed for tweaking located in the top Picture menu.

In the Picture
menu, the user will find the typical Contrast,
Brightness, Color, Tint, and Sharpness, along with a few other items,
such as Color Temp, Filter, and Red, Green, Blue, and Yellow(!)
levels. As you will see in the Measurements and Viewing sections, some of
these controls had unexpected, but useful functionalities.

The Display
menu on the 8700 allows entry of Source and Display formats, as well as Loading and
Saving settings in the three user video memories.
The Installation
menu handles the typical chores of front/rear and
ceiling/floor installations. This menu also allows the user to
display a useful focusing pattern, although I thought it reverted to the
normal display a bit too quickly for my focusing habits.

The Environment
menu shows the lamp usage in hours and minutes(!) and
also allows the user to reload the Default values for the current input
source. While I never used this function, it certainly could come in handy
if tweaking goes astray.

Installation and Placement in the Room
As mentioned in the
Introduction, the BenQ PE8700 has a short throw lens,
i.e., the distance from the screen to the projector needs to be between 1.36
to 1.66 times the screen width. This is just what is needed to replace most
CRT projectors as they tend to have similar throw ratios. This throw ratio
will likely mean that the 8700 will need to be placed in the room in front
of, or roughly at the same distance as the seating area.
With a short throw lens, you will also need to be careful in the selection of
a projection screen. Screens with significant gain should probably not be
used with the 8700 in order to avoid hot-spotting. If you need to use a
screen with significant gain, make sure that the projector is at the far end
of it throw ratio. Fortunately, as you will see in the Measurements and
Viewing section, the BenQ is more than capable of making a bright punchy
image with a unity gain screen (a gain of 1), such as the one I own.
The lack of the lens shift feature means that you will need to carefully
place the 8700 vertically to avoid the use of digital keystone correction.
It is worthy of note that the proper vertical position is slightly below
(table mount) or slightly above (ceiling mount) the bottom or top or the
screen. The vertical offset in my setup was about 3 inches. This is
certainly not a problem, and in most cases is likely an advantage, e.g. if I were to
permanently mount the BenQ, the offset would put the projector a bit closer
to the ceiling. Just keep this need for a vertical offset in mind in your
installation planning, as well as the fact that the lens is also a bit left
of center.
When I powered up the 8700 I was immediately impressed how quiet it was. The
specification for noise level is < 30 dB. When it comes to Spousal
Acceptance Factor (SAF), one of the things my wife often mentions about the various
projectors we have had the privilege of testing is, “Why does it have to be
so noisy”? I agree, a low noise level is very important in the HT
environment, and I have yet to experience a projector that is as quiet as my
ceiling-mounted 11HT. The 8700 starts up very very quiet, but after it warms
up a bit, the fan speed increases and then typically cycles between two
speeds every 15 to 30 seconds or so. With the projector mounted on a table
in the middle of our seating area this was noticeable and a bit distracting
in quiet scenes. It should also be noted that the fan noise and air flow
comes from the front and back of the projector, not the sides.
BenQ claims that their 6 segment, 5x speed color wheel has a proprietary
anti-vibration design. What I can say is that all of the noise from the 8700
sounded like moving air – white noise – with none of the usual color wheel
“whine” that I have heard with other 1-chip DLP projectors. I strongly
suspect that if the 8700 were ceiling mounted in the same position as my
11HT (a very tempting possibility!), and therefore further away, that the
noise level would not be an issue.
Measurements and Viewing
I'll have to admit that when I first started testing the 8700,
I was a
little frustrated. When I get a new projector to review, I set it up on the
coffee table, connect the component DVD inputs, put on Avia for initial
brightness and contrast adjustments, and get an initial impression of the
projector. The problem was, that there was no image coming from the BenQ,
only a faint 4x3 rectangle in the middle of my 16x9 screen, and an
occasional flicker of a double-picture. It seemed as if the 8700 would not
sync with my DVD player! It took me a little longer than it should have to
figure out that the problem was that the RCA component inputs
on the 8700 only support interlaced inputs, and my Denon 1600 DVD player was
set up for a progressive output. Switching the DVD player to an interlaced
output solved the problem, and I then had a 16x9 image that more than filled
my screen.
I bought some RCA to BNC connectors at Radio Shack (Cat # 274-254) so that I could
use the BNC jacks on the BenQ with a progressive input from the DVD player, as well as
use my DISH 6000 HDTV receiver. I then proceeded to go through the normal
setup of the user controls using the usual Avia test images.
User Level Adjustments
The Black Bars test on Avia is very good image for setting the
brightness, as it presents two almost black moving bars that are just above
or lighter than black. At the proper brightness setting, you should just be
able to see the darker of these moving bars, and easily see the lighter one,
thus assuring that shadow details are properly distinguished from black.
However, using the progressive component input with the 8700 I was unable to see the
darkest moving bar at any Brightness setting.
I experienced a similar problem with the almost-white moving bars on
the Needle Pulse test image. In this case, I could not see either one of the almost-white bars at any Contrast setting, even when I lowered Contrast to the
point where the overall light output of the projector was noticeably
reduced. This was most disconcerting, as it suggested that both shadow detail
and highlight details are crushed using a progressive DVD input.
My attempts to adjust Sharpness led to similar confusion – the Sharpness
control seemed to have minimal effect when looking at the Sharpness test
image. So, I set it at –5, on general principles, and scratched my head. As
Perot might say, I was beginning to think that my “little gray cells” were
starting to fail me.
I switched to an interlaced input and now all the tests and adjustments
worked just as they should, with either the RCA or BNC jacks. Both
almost-black bars appeared and disappeared properly with adjustment of the
Brightness control, and both almost-white bars were visible and acted
appropriately with adjustment on the Contrast control. I quickly
determined that the proper Brightness setting was 32 and the proper
Contrast setting was 18. The Sharpness control also behaved properly,
although I did not check that at this time. I'll discuss the Sharpness and
Filter setting in more detail in the viewing section.
Using the usual test image on Avia, I set the Color control at 36 and
Tint at 17.
I checked the response of the Color Temp and the Red, Green, and Blue
controls. In the manual the Color Temp control is described as follows:
0 : The default color temperature of the lamp.
1 : Low color temperature (6500°K). Makes white appear reddish.
2 : Middle color temperature (7500°K). Maintains normal colorings for white.
3 : High color temperature (9300°K). Makes white bluish.
A Color Temp Setting of 0 gave a very bright yellowish looking white, but
the other settings looked about as described. (More about this in the
measurements section.)
My next surprise was that the user RGB controls had absolutely no effect on
the color balance of white or any level of gray, and therefore no effect on
grayscale tracking! What these control did, however, was effectively to
control the saturation of the respective colors in the color decoder. So
when looking at the Color Decoder test on Avia, one could use these
controls to set the saturation level of each color – very handy. This is a
control that I wish more projectors made available in the user menu, as it
allows one to correct for “red push”. I was able to dial in all three colors
to the correct level; I boosted green by 2 to 19, lowered red by 1 to 16,
and left blue at the default value of 17.
Video Memories
The 8700 has
three user video memories as well as a system that
automatically stores all user menu settings separately for each input. It
also automatically selects the appropriate set of stored values with each change
of source. The automatic system is all that I find I need for daily usage,
but the user memories can be handy at other times.
Measurements
When I evaluate a projector, I not only look at images, I measure the color
balance of the projector at various light intensity levels and determine the
quality of what is called ‘grayscale tracking'. The idea is that black,
white, and all shades of gray, should have the correct ratio of the three
primary colors used in video projection Red, Green and Blue. You can read
more about the testing method in my past projector reviews on Secrets, or at
http://www.smartavtweaks.com

The Color Balance data from the 8700 with the Color Temp control set to 2
is shown above. Obviously, the measured color balance of the 8700 is very
flat as a function of IRE level, and the Correlated Color Temperature (CCT) at
this setting was close to 6800K. Similar data were obtained with a Color
Temp setting of 1, but in that case the CCT was closer to 6100K and the
image did appear a bit red. Since I was unable to affect grayscale tracking
with the user controls, and since, frankly, the image looked great as it
was, I left the Color Temp control at 2 moved on to viewing. No advanced
tweaking was really necessary with the BenQ 8700!
Oh, perhaps I should mention that, as calibrated, the IRE 100/IRE 0
contrast ratio was 1795:1 and the IRE 100 window produced an image that
measured 19 ftL at my 102” diagonal unity gain (gain=1) DaMatte screen. This
corresponds to 597 Lumens light output from the projector. Needless to say,
both numbers represent excellent performance. (I have no doubt that with the Color Temp set
to 0, the much brighter image would have allowed the BenQ to exceed both its
contrast ratio and Lumens specifications. However, the color balance would
be off in this case.)
Gamma Tracking
The other thing we can measure is gamma tracking, or how the light output of
the projector responds to the input signal. If the projector's gamma
tracking is off, then details in the image will either be lost or the image
may look flat and have little contrast. The Gamma Tracking graph shows the
combined light intensity at the various IRE levels relative to a theoretical
level. If the projector is accurately producing the intended light intensity
level as a function of input or IRE level, all values should be close to 1 in
the gamma tracking graph.

In the Gamma Tracking graph above we can see that the 8700 has very accurate
gamma tracking that is well described, with an overall gamma of 2.51 – the
ideal gamma for a video display!
You may notice that the data points for the graphs
shown above don't line up with the 10, 20, 30, etc. IRE levels specified on
the X axis. This is because the IRE levels on the Avia disc are not exactly
at 10, 20, 30, etc. We use the actual IRE numbers, i.e., IRE 10 on Avia is
actually IRE 2.7, IRE 20 on Avia is actually 13.5, etc.
Scaler and Deinterlacer – The Video Essentials Montage
Since for the reasons stated above, I used an interlaced DVD input with the
8700, its deinterlacer performance became of critical importance. I checked
the performance of the deinterlacer using the montage on the Video
Essentials (VE) disc with the interlaced component output from my Denon
1600 DVD player. The pan back from the building was fine, the leaves showed
a bit of twitter, and the waving US flag was better than I typically see
with the deinterlacer built into most projectors. I really did not see
jaggies (jagged diagonal lines) in the flag, but it was not have quite as
smooth as I typically see with the progressive output of my DVD player. All
in all, I decided that the built-in deinterlacer was up to the job and used
the interlaced DVD mode for all critical viewing.
Viewing and Comments
Once I had worked out some of the 8700's, err
. . . um . . . idiosyncrasies, the image
was truly sensational. Let's examine why. With a white level on my screen of
at 19 ftL, the 8700 is nearly twice as bright as my reference projector
(Cinema black and CC 40R filter in place), as well as most of its direct
competitors. A 19ftL image is a bright involving image just above the light
levels typically found in commercial theaters. I find 16 to 20 ftL to be
just about right for viewing in a darkened room.
I remember well an occasion where my wife and I watched "Lord of the Rings" on
another HD2-based DLP projector with an 1800:1 contrast ratio, but with a
considerably lower light output level than the BenQ. I was impressed with the black
levels, but my wife said that she thought
the picture looked too dark. With the 8700, the picture never had a dark
or dim feeling unless, of course you were in the mines of Moria, and then it
looked really dark, as it should!
I think that it is partly a matter of balance and partly a matter of what
you are used to viewing. With a sound system, if you have extended highs and
extended lows, it sounds balanced. If you have extended lows, but the highs
are muted, the system will likely sound heavy. Perhaps having both the
whites brighter and the blacks blacker than our reference projector made
the image seem well balanced. With a gamma of 2.5 the image had punch and
did not look at all soft in comparison with my reference projector (which
also has a gamma of 2.5).
Thus, with the 8700, the combination of brightness contrast ratio and the
ideal gamma of 2.5 meant that the luminous part of the image signal was
handled about as well as can be handled today. Well done, BenQ.
Another part of the image quality obviously involves color and color
saturation. Getting rich well-saturated colors is often a problem for
single-chip DLP projectors relative to their LCD-based counterparts. While
the DMD chip itself is very efficient in the use of light, in single-chip
DLP designs, color is achieved by alternately passing light through RBG
filters in the color wheel, and the designer may need to compromise color
saturation in order to improve overall brightness, and, of course, the all
important Lumens rating. The more saturated the Red, Green and Blue filters,
the better the color saturation in the image, but at the cost of light
output. If, on the other hand, the filters were a bit on the “light” side,
e.g., a light green filter instead of a forest green filter, then you get
more light output, but a less saturated green color.
When I first fired up the 8700 my distinct impression was the BenQ had
probably used a fairly light green filter in their color wheel. Reds were
great, blues, OK, but greens were definitely on the “light” green side. The
greens in the VE montage and the “green” color field on Avia looked a bit
insipid. Fortunately adjusting the RGB user controls to increase the green
saturation helped quite a bit. Once adjusted, I was never really bothered
again by poor color saturation in normal viewing. The greens were not as
saturated as with my reference projector, but to be fair this is a common
issue with single chip DLP projectors, not just the BenQ. Color saturation
actually looked very good at the lower IRE levels where the high contrast
ratio keeps colors from looking washed out.
Sharpness is the next issue that needs to be discussed. With all but
perhaps one exception, if I asked my wife what she thought of the image of
the projectors I have reviewed, inevitably the response also included, “It's
not as sharp as our projector; I don't like it as well.” Frankly, it's hard
to beat the sharpness of the Sony 11HT with its 1364x768 resolution and its
excellent (and large) lens.
I was therefore anxious to see how she would feel about the sharpness of the
HD2-based 8700. Although its pixel resolution of 1280x720 is slightly less
than our reference projector, the lack of SDE, or pixel grid, in the image
should, perhaps, make up for some loss in resolution. This is especially so with DVD
where the projectors have far more resolution than the source.
On the first evening, we were watching "Lord of the Rings" – it's sort of a
rite of passage for any new projector – and I was surprised that it was me
saying, “Wait a minute, this projector is not nearly as sharp as ours”. She
certainly agreed. No question about it. We were watching the first scenic
views one gets of Lothlorien, with its waterfalls and intricate
architecture. In the next few scenes, it was clear, something was wrong with
the sharpness of the image.
The following day, I decided it was time to explore the Sharpness control
again. Perhaps lowering it to –5 was not such a good idea after all. I found
that there were two parameters that I had to get right to get good sharpness
without obvious artifacts. The first was the Filter setting. For video,
Filter settings of 0 to 3 are available, with the higher settings
supposedly giving better detail. By looking at the Sharpness test on Avia,
it was clear that Filter settings of 2 and 3 gave noticeable ringing, or
white edges on either side of black lines. It was also clear that a
Sharpness setting of less than 0 softened the image. I ended up using +3
for subsequent viewing. I also checked these settings on the Lothlorien
scenes and was much happier with the result. This projector was pretty sharp
after all. Details do matter.
Dithering? Rainbows? Neither was a issue for me with this projector,
although it seems I am less sensitive to Rainbows than some. Dithering has
bothered me with some DLP-based projectors, but I'll have to say that there
was not one scene where I saw any evidence of dithering from my normal
viewing position. Sure, if you hit pause on the remote and walk up to the
screen, you can see dancing pixel intensities in dark areas of the screen,
but from my normal viewing position, dithering artifacts were not an issue
for me.
So how about HDTV? When I first hooked up my DISH 6000 to the BNC-based
component inputs, I was impressed with the overall image quality. There were
however, a few more motion artifacts than I was used to seeing in various
scenes with vertical pans. It occurred to me that the 1080i output setting
that I prefer for my 11HT was not optimal for a 1280x720 projector.
Switching the DISH 6000 to 720p solved this problem and now vertical pans
were smooth and without obvious artifacts. HDTV was really sharp on the
8700.
One evening, "Men In Black II" was on in HDTV. It was an excellent movie to
show off the great black levels and high contrast ratio of the 8700. "Dead
Like Me" on ShowTime HD also looked great, as did the various travel-logs or
historical docu-dramas that we watched on the Discovery HD channel.
On our last evening with the projector, we put on Disc 2 of the extended
version of "Lord of the Rings, Fellowship of the Rings". This time I was very
impressed. The image was smooth and it was sharp. Several of the scenic views
of the rocks and mountains took on a 3-Dimensional quality that I had never
seen before with this or any other DVD. The low SDE really seemed to
help make the image not only smoother, but more realistic as well.
At this point, I was getting hooked on this projector pretty quickly. It was
a good thing I only had the 8700 for a week, because another few days and I might not have
been able to let it go. I expectantly asked my wife what she thought of The BenQ projector, and she said, “It looks very good”. Now that is what I call
a breakthrough!
I haven't decided on an upgrade for my trusty Sony 11HT, but I am definitely
thinking about it. The 11HT usually looks pretty good when I see it again
after spending significant time watching another projector, but I'm afraid
not this time. The SDE was pretty obvious when I hooked the 11HT up again.
Discovery HD was on, and this time it was my projector that didn't look so
sharp. Hmm. There is no doubt that the BenQ is currently on my upgrade
short-list, with its excellent all around performance. It also passes some
of my more practical tests such as mounting on the ceiling in the same place
as my current projector, and working well with my current matte white
screen. It is also a very nice looking unit. I do plan to check out quite a
few other projectors in the next few months. We'll see what happens.
Conclusions
If you read this far, you must know that I really like the BenQ
PE8700. It
produces an excellent image with an an ideal gamma of 2.5, an honest 1800:1
contrast ratio, and a very bright 19 ftL image on my 102” diagonal matte
white screen. The colors, especially green, are a bit “light” in color, but
overall the image quality is excellent. Some of the inputs are not quite as versatile as you would expect, so check out the details in this review before
you buy. You should also make sure that the short throw ratio of the 8700's
lens will work with your planned installation. If you do decide on the BenQ
PE8700, chances are you will really like the bright sharp punchy image it produces. My
wife and I certainly did.
- Steve Smallcombe -
Reference Equipment:
Denon 1600 DVD player B&K Ref 30 preamplifier
Theta Dreadnaught amplifier, 3x225 and 4x100
Adcom Power Center
KimberCable interconnects and speaker wire
DISH 6000 HDTV receiver
Velodyne DF-661 front speakers (modified crossover) - 3
Definitive Technology surround speakers - 4
Velodyne 15" subwoofers - 2
Sony VLP-VW11HT video projector (reference projector, tweaked with CC40R filter)
|
Related to the article above, we
recommend the following: |
|
Primer - TVs |
|
|
|
|
Terms and Conditions of Use

|