Introduction
What if a videophile were given total control over the design, production and distribution of a projector? You would expect a high degree of color accuracy, great optics, easy calibration for different screens and environments, no unnecessary features, consistent quality and of course a stunning image. Samsung has answered this question with the help of Joe Kane. The result of this collaboration has been a series of DLP projectors, the latest example being the SP-A900B.
It’s always a pleasure to work with a display that makes image accuracy and quality the primary design goal. There is no reason any television or projector cannot have options that reproduce the correct color space, grayscale and gamma. With the current state of display hardware technology, it’s simply a matter of properly designed software. Coupled with good optics, it is possible to reproduce an image that is absolutely faithful to the source material. You will see a picture that matches the monitors it was mastered on; and therefore match the director’s intent. The Samsung SP-A900B is designed solely for this purpose. You will not likely see this projector anywhere but in a home theater or screening room application. It is intended to be as much a precise instrument as a home entertainment component.
Specifications
- Design: Single DLP Chip (0.9″ Texas Instruments DarkChip 4)
- Native Resolution: 1920x1080p
- Zoom Lens Throw Ratio: 1.72-2.24
- Lens Shift: Manual, Vertical
- Light output: 1000 Lumens
- Contrast Ratio: 12,000:1
- Screen Size: 40”-250” Diagonal
- Inputs: 2-HDMI, 1-component, 1-S-video, 1-composite, 1-PC (D-sub)
- Fan Noise: 24 dB Theater, 30 dB Bright
- Control: RS-232, 12v Trigger
- Lamp Power: 300 watts
- Rated Lamp Life: 1500 Hr
- Dimensions: 7.8″ H x 17″ H x 18.4″ D
- Weight: 21.6 Pounds
- MSRP: $12,999.99
- Samsung
The Design
The Samsung SP-A900B is a single-chip DLP projector with a 300-watt UHP lamp. Rated bulb life is 2000 hours (1500 on the high setting). The DMD chip used is Texas Instruments’ newest, the DarkChip 4. This offers a higher contrast ratio than Samsung’s previous SP model, the 800B. The 900B also has a superb lens that is an improvement over its predecessor. Maximum brightness is a claimed 1000 lumens and my testing did not dispute this figure. There is more than enough output for screens up to 250 inches diagonal. Also new is the iris or Dynamic Black feature. You can opt for an automatic setting that changes based on image content or stop down manually with 101-step control.
The SP-A900B goes through a unique quality control process that differs from other mass-produced displays. After coming off the assembly line, all units are bench calibrated. In this process, the meter is aimed at the lens rather than the screen. They are then shipped to DVE Distribution, the sole vendor for this product. DVE opens each box and does a final quality check of the lens, the cleanliness of the light path and the accuracy of the calibration. Another calibration is done when the projector is installed to properly match it with its screen and viewing environment.
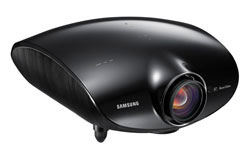
The projector’s case is quite a stylish piece with a very curvaceous design. The top has basic controls that are touch-sensitive rather than traditional buttons. You can turn the power on and off, change inputs and navigate the menu. There are also status lights for standby, lamp and temperature. The lens is dead center with inputs in a recessed panel on the back. In addition to the two HDMI inputs there are two component, and one each of S-video, composite and VGA via 15-pin D-sub. There is also an RS-232 control/service input. Underneath are adjustable front feet and a dial for the vertical lens shift. Focus and zoom are handled by rings around the lens. All lens controls are manual with fairly precise movement; no cheap gears or worm drives here. At this price point, it would be nice to have a motorized focus control. A lens of this caliber deserves the most precise focus and that is harder to achieve when you have to go back and forth between the screen and the projector to dial it in.
The remote comes in one of the coolest shapes I’ve ever encountered. It’s a lot like an elongated egg which has been sliced through the middle lengthwise. It feels great in the hand and is very easy to pick up when you lay it buttons-down. There is a raised ridge around the edge that prevents the buttons from contacting whatever surface you leave it on. At the top are separate power on and off keys and one for the backlight. Seven buttons cover the projector’s discreet input selection. In the center are menu navigation controls and a button for the info screen. Lowermost are toggles for picture size (aspect ratio), picture mode, dynamic black (iris), still image, installation orientation and the three User picture modes. I imagine most installations of the A900 will include a control system or some sort of universal keypad but those users will be missing out on a really neat remote!
Menu System and Options
The menu system is very efficient and easy to navigate. The first submenu, Input, allows you to choose a source and rename it if you wish. The Picture menu has all the typical calibration controls along with a selection of seven picture modes: Dynamic, Standard, Movie 1, Movie 2 and three User modes. Movie 1 defaults to Rec 709 (HD) color space with a 6500k color temp and the Film gamma preset which measures around 2.5 with flat tracking. After calibration which I’ll discuss later, you can select Movie 1 and touch nothing else. Selecting a picture mode brings up all the calibration controls on two pages. Brightness, Contrast, Color and Tint are perfect at the default settings and the Sharpness control is set at 0. You can turn this up if you wish but it will only add unnecessary edge enhancement. Tint is only available when a composite or S-video signal is input.
The second page of picture controls has color temp presets (5500K, 6500K, 8000K and 9300K) along with gains and offsets for red, green and blue. The gamma control has three presets called Film, Video and Graphic. Film is around 2.5, Video is around 1.8 and Graphic is lower yet. You can ask your installer/calibrator to change these presets in the service menu as there are more curves available. The Dynamic Black control is for the projector’s iris. The options are Off, Manual (101 steps) and Auto. Finally there is a Save command which will write your settings to one of the user modes. You can also reset the projector to factory defaults here.
Moving on to the Size control, there are six options: 16:9, Zoom 1, Zoom 2, Wide Fit, Anamorphic and 4:3. Anamorphic is for use with an anamorphic lens which you can get from DVE Distribution. The 16:9 mode is 1:1 pixel-mapped with zero overscan. The Position control lets you shift the image digitally. Digital Noise Reduction is available for analog signals. Black Level lets you set a 0 or 7.5 IRE setup for analog signals or select light or dark for HDMI signals. This option will be grayed out if the A900 senses the correct black level from your source as it did for me. In every instance, the below-black information was displayed just fine.
The next control is called Color Pattern and it lets you show one color at a time ostensibly so you can adjust the color decoding. I found however that as soon as I tried to adjust the Color control, the gating shut off and all the colors returned. It was of no matter as I did not have to change the default color setting thanks to a very unique and precise calibration system I’ll cover on the next page. The Overscan option is either on or off and introduces about 3% overscan when turned on. The next option is for 1080p/24 signal acceptance. The A900 will accept a 24Hz signal and display it at either 48Hz or 60Hz. Thanks to DLP’s 100 percent digital signal path, there is no flicker at 48Hz as there would be on an LCD or LCoS design. The final option is called Film Mode. When this is activated, interlaced signals are inverse-telecined.
The Setup sub-menu begins with installation options (front-floor, front-ceiling, rear-floor, rear-ceiling) flipping the image appropriately according to the projectors placement. The Light Setting for the bulb has two steps, Theater and Bright. Theater was more than enough for my setup as I had to stop the iris down nearly 75 percent to get to a comfortable 13 foot-Lamberts. Bright will shorten the lamp life to 1500 hours and increase the fan noise. Setup is also where you’ll find test patterns including a crosshatch, a sizing pattern showing different aspect ratio markers and full-field red, green, blue and white patterns. These color patterns factor into the unique calibration procedure which I’ll outline in the Setup section. The next control, Color Standard, lets you choose between three color spaces, HD, EBU (Europe) and SMPTE-C. The cool thing about this is you only have to calibrate the HD color space. The others are calculated automatically by the projector’s software.
The final submenu is called Option and has controls for language; and menu placement, translucency and timeout. The A900 allows you to set the menu to never time out if you wish. I absolutely love this feature as it makes calibration SO much easier when menus don’t pop up or change in the middle of a measurement. Controls for the LED indicators are next and a control called Light Effect. This refers to a large blue bar that lights up on top of the projector. You can turn this off completely or have in active in standby or power on states. The final item is Info which brings up a very complete screen of information about signal type, white balance settings, lamp hours and other parameters. This screen is also accessible from a button on the remote.
Setup
I installed the A900 on a shelf that put the lens axis just below the top of my screen. The vertical lens shift allowed me to center the image nicely. Most DLP projectors at this price point and below have few or no lens shift options. There is however, no horizontal shift. This was not a problem for me though as my shelf is quite wide. The zoom range is 1.72 to 2.24 (screen width to throw distance). Focusing took a bit longer due to the manual control but when finished I was quite impressed with the edge-to-edge sharpness of the image. This is obviously a very high-quality lens.
Calibrating the A900 is a little different than other display types. Bulb-based DLPs use a color wheel to create the primary and secondary colors. Setting the color parameters is a simple matter of measuring the raw values from the color wheel using internal test patterns then entering those values into the service menu. The projector’s software does the rest. In addition to the Rec 709 (HD) color space, there is SMPTE-C (SD) and EBU (Europe) available. I measured these to verify them and they were indeed spot-on. The projector also calculates the white point from the color values. The color temp presets are labeled in Kelvin values and they also measured exactly to spec. The 5500K setting is perfect for black & white movies. The warmer sepia tone is meant to match the color temperature of the lamps used in theater projectors of the past.
After color calibration I tweaked the grayscale tracking to perfection. The peak output with the iris fully open was over 19 foot-Lamberts; too bright for my black-hole of a theater. I first tried lowering the contrast control. This worked fine but it made the grayscale a bit more difficult to adjust accurately. I then tried the different iris options. Besides off (fully open) you can set it to Auto or Manual with 101 steps, 0 being fully open. I settled on 73 which gave me a peak output of around 13 fL. I am not a fan of auto irises because they have a negative effect on gamma and grayscale tracking. I found if I wanted to use the auto setting, I had to re-calibrate grayscale. I also could not achieve flat gamma tracking. Though this projector doesn’t quite have the contrast performance of the latest high-end LCoS models, it does just fine without using an auto iris to artificially pump up the dynamic range. To its credit however, I did not observe any brightness pumping or hear any noise when it was in operation.
In Use

Computer-generated animation looks good on pretty much any display. On the A900 it was simply stunning. The series Star Wars: The Clone Wars was a great example. This makes heavy use of painter-like textures rather than the 3D surfaces common in Pixar films. Objects have a more weathered and well-used look. The fine gradations of color were readily apparent no matter what the color or brightness level in the scene. The dirt and grime on things like spaceship hulls and floors made me reach for a mop more than a few times!

I don’t normally evaluate displays using DVD content but I just had a hankering to watch Star Wars Episode IV: A New Hope (hey George Lucas, where is that Blu-ray?). Since the A900 has SMPTE-C as a color space choice, I employed it here since that is the DVDs native gamut. Flesh tones looked more pleasing and natural rather than the slight redness that I’m accustomed to. It’s a subtle difference but a noticeable one. I had not created a SMPTE-C color profile on my reference Anthem LTX-500 before but since trying it out on Star Wars, I consider it a must.

The utter annihilation of life as we know it never seems to occur on a bright sunny day with warm lush color does it? The world of Terminator Salvation is no exception to this rule of moviemaking. The entire film exhibits a bluish tint radiating a coldness that I could feel in my chair. This type of color presentation can make the image flat and lifeless but the A900 did an admirable job of preserving some dimensionality. Facial detail was very good with well-defined skin textures on all characters. Details like razor stubble and perspiration were able to pop out despite a color palette that ran the ragged edge of monochromatic.

The disaster film Deep Impact was my sampling of a natural color presentation. This is a superb transfer with very accurate color. What struck me most were not only the excellent flesh tones but the textures of different characters’ skin. This is what really sets a display apart from its competition. The A900 has exceptional optics and it really showed here. There are other projectors with accurate color and good contrast performance but the 3D effect of a good lens has to be seen to be appreciated. With so much high-quality content available today on Blu-ray disc, it only makes sense to pair precise imaging with equally precise optics.
On The Bench
Although color calibration was a snap with the A900, grayscale and gamma adjustments took me longer because of the many options available. I quickly discovered that the different iris settings gave me varying levels of accuracy for both grayscale tracking and gamma. Furthermore, I found more gamma presets in the service menu that allowed me to experiment a little
Equipment used: EyeOne Pro spectrophotometer, CalMAN Professional 3.3 analysis software, Accupel HDG-3000 signal generator, Spears & Munsil Benchmark Blu-ray.
All measurements were taken off the screen (Carada Brilliant White, gain 1.4) from the seating position (10 feet).
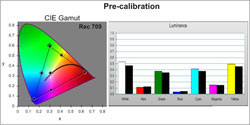
The color measurements both before and after adjustment were barely different. The sample I worked with had been bench-calibrated (meter pointed at the lens) previously so I only had to make tiny changes to get a nearly-perfect CIE triangle and luminance values which were within .3fL of the targets.
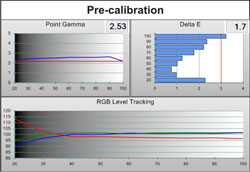
Grayscale and gamma were also very good both before and after the color calibration.
The average gamma value of 2.5 is somewhat higher than I’m used to seeing. I asked Mike Wood at Samsung about it and he passed along an explanation from Joe Kane. He sets the film gamma at 2.5 in order to better match the CRT mastering monitors still widely used to create film-to-video transfers. I have heard this argument before and it makes sense. Still, I’ve never particularly liked the look of a display set to this gamma level. I feel it flattens mid-tones too much. A gamma average of 2.2 provides a much punchier image. There is some debate among calibrators about this. Since very few displays can even achieve 2.5, the point is mostly moot. The A900 can do this easily but there is a 2.2 gamma curve available in the service menu. I assigned this curve to the video user menu slot so I could have both available from the remote.
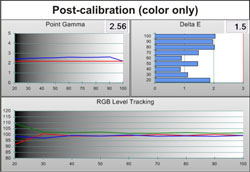
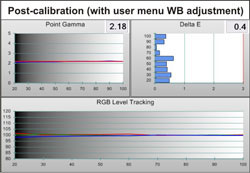
After selecting the 2.2 gamma preset, setting the iris to a fixed value of 73, and adjusting the user menu white balance controls I recorded the following results. This is excellent performance.
Contrast performance was decent though not quite at the level of the high-end LCoS designs. With the iris set to 73, the minimum black level was .001 foot-Lamberts. I set the iris to output a peak level of around 13 fL. This gave me an on/off contrast ratio of 13,000:1. With a 300-watt lamp, there is plenty of light available. With the iris fully open I measured over 19 fL, too bright for my theater. This was with the lamp at its lower brightness setting called Theater.
I tested the video processing with the various Spears & Munsil clips played from an Oppo BDP-83 set to source direct mode and connected directly to the A900. Performance was below average. The projector failed all the source adaptive tests. Edge adaptive tests weren’t too bad with minimal jaggies on the ship ropes. The A900 would not accept a 480i signal over HDMI. 1080p/24 signals were handled correctly with the projector outputting a 48Hz refresh rate. Though this rate is lower than some other projectors, there was never a hint of flicker or motion blur.
The poor video processing performance was a surprise but not a problem for me. There are so many source components that employ quality video processing, it’s just not necessary to have it in the display. Setting my Oppo BDP-83 to output 1080p24 or 60 resulted in superb image quality in every respect.
The lens is one of the best I’ve ever encountered. It is easily the best I’ve tested at this price point. Full-field uniformity was excellent with no visible color or brightness variation anywhere on the screen. There was no sign of chromatic aberration with excellent edge-to-edge and top to bottom focus.
Conclusions
I was very impressed with the performance of the SP-A900B. All the material I viewed was reproduced with accurate and consistent quality. The generous light output makes this projector suitable for a wide variety of environments. The near-perfect color accuracy means you will see exactly what the director intended no matter what the content. The superior lens delivers a crisp and detailed image with no optical artifacts. The unique calibration procedure makes it easy to maintain that accuracy throughout the life of the product. The only negative here is the price tag. $13,000 is a bit above some other projectors that offer the same color accuracy with better black level performance, greater installation flexibility and motorized lens controls. The Samsung however has few peers in lens quality. Precise optics like this are expensive and the A900 really delivers on that score. There is no question in my mind; this is as much a precise instrument as it is a home theater component; highly recommended!


