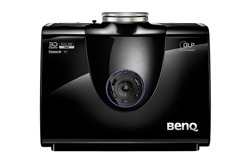
Introduction to the BenQ W7500 Projector
Looking over Secrets’ last few years of projector reviews, it quickly becomes evident that the pricing sweet spot has settled around the $3,000 mark. This makes sense since it’s only a little more or less than you’d pay for a top-quality 65-inch flat panel. A few years ago, any TV over 50 inches carried a big price premium. When I bought my Pioneer Kuro in 2009 for example, I paid $2,900 for a 50-inch screen. I really wanted the 60-inch model but it was almost double the price at $5,600!
BENQ W7500 PROJECTOR SPECIFICATIONS
- Design: Single-Chip DLP Projector
- Six-Segment Color Wheel, 6x Speed
- Native Aspect Ratio: 16:9
- Native Resolution: 1920 x 1080
- Anamorphic Lens Support: Yes
- 3D Formats: Frame-Packing, Side-by-Side, Top-Bottom
- 2D-3D Conversion: Yes
- Lens Throw Ratio: 1.62 – 2.43
- Lens Shift: Vertical ± 125%, Horizontal ± 40%
- Light Output: 2,000 Lumens
- Contrast Ratio: 60,000:1
- Iris Control: Auto or Off
- Image Size: 28″ – 300″
- Inputs: 2 x HDMI 1.4a, 1 x Component, 1 x Composite, 1 x S-Video, 1 x VGA
- Controls: 1 x RS-232, 1 x 12v trigger
- Lamp Power: 300 Watts
- Rated Lamp Life: 3,000/2,000 Hours (Economic/Normal)
- Dimensions: 5.7″ H x 16.9″ W x 12.5″ D
- Weight: 14.8 Pounds
- Warranty: 1 year
- MSRP: $2,799
- 3D glasses: Sold Separately, $69/each
- BenQ
- SECRETS Tags: DLP, BenQ, Projectors, Video
But I digress. The REALLY BIG screen experience is still only available from front projection. Sure you can get an 84-inch TV if you have the coin but there’s just nothing quite like sitting 10 feet from a 92-inch screen when you’re looking for the most immersive video experience.
We’ve looked at quite a few projectors in the $3,000 range and Epson’s 3LCD line has pretty much dominated that market. But there are other players and technologies to consider. BenQ has always focused their efforts on producing value-oriented DLP projectors that bring a big-screen experience to the home for no more than the price of a decent HDTV.
Why would one consider DLP? Well if you first agree that no display technology is perfect, DLP does offer some advantages over LCD and LCoS. First is light output. DLP wastes almost no light in the imaging process and therefore offers a lot more brightness for a given bulb wattage. Second, with its single-chip design, there is no convergence error possible and therefore, theoretically, a sharper image. Third, the quality of motion is significantly better thanks to the fact that DLP scans its image like plasma and CRT; rather than using the sample-and-hold method like LCD or LCoS. If you don’t like motion blur, DLP is definitely the way to go.
Another issue DLP puts to rest is that of filter degradation. LCD and LCoS imaging chips have a filter for each primary color that is constantly in the light path. Some users of those technologies have observed a shift towards yellow in their projectors after a year or two in service. While this is not a rampant issue, it’s not something you’ll have to worry about with this or any other DLP.
Last year, I got to check out Mitsubishi’s DLP, the HC8000D. This time, BenQ sent me their new W7500. For $2,799, it offers some great features and very high performance coupled with tremendous light output. Let’s take a look.
The Design of the BenQ W7500 Projector
The W7500 employs the DarkChip3 Digital Micro-mirror Device (DMD) as the basis for a 2000-lumen light engine. This chip was at the core of some very expensive projectors from Runco and Samsung in the past. Now that the high-end models have moved to DarkChip4, lower-priced projectors like this can take advantage.
The second component in the light engine I want to talk about is the color wheel. All single-chip DLPs must use a color wheel, made up of at least three segments of primary colors, that spins in the light path to create a color image. One side-effect of this technology is the so-called “DLP rainbow” effect seen by around one percent of people. This manifests as a color fringe around bright moving highlights like stars or sharp reflections. DLP displays attempt to mitigate this by increasing both the number of color wheel segments and the rotational speed. BenQ’s solution is to use a six-segment wheel (RGBRGB) and spin it at six times the normal rate.
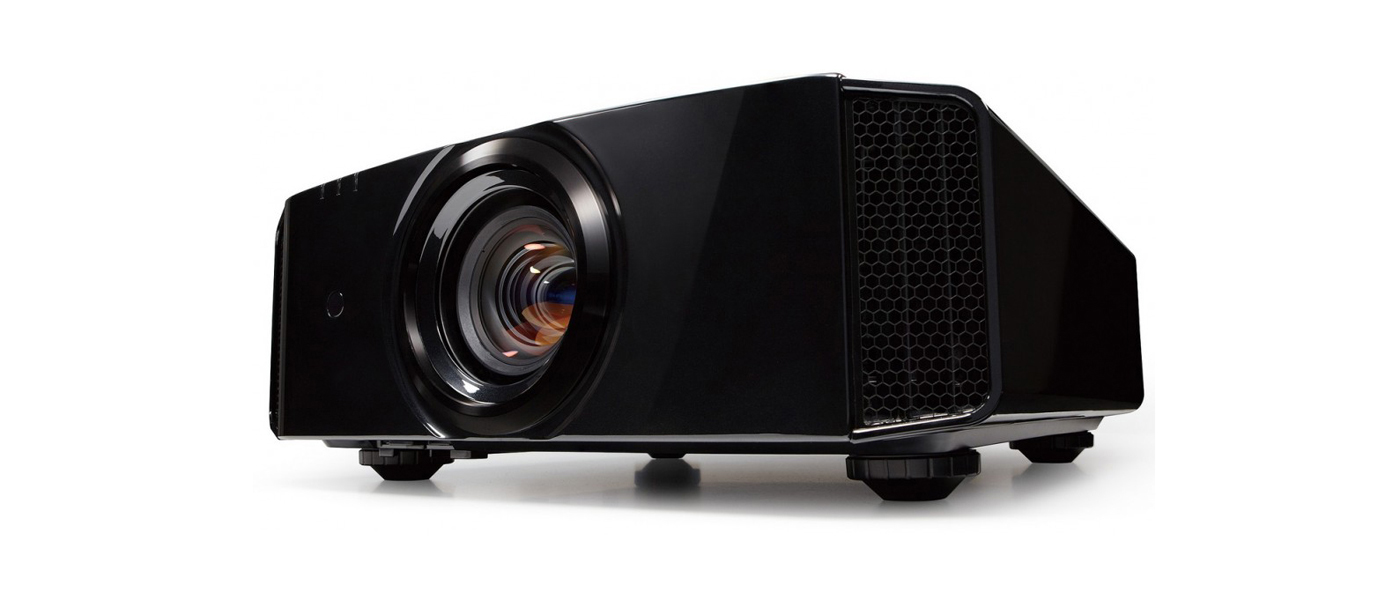
Since the W7500 is marketed as a home theater projector, BenQ has taken care to create an appropriate chassis. The case is all-black and fairly compact. The plastic is finished in a high gloss which may create reflections in rooms with some ambient light. While I always recommend eliminating all light in a theater, some users would rather not watch in total darkness. And with the extra light available from the W7500, this is a good projector to use in that environment.
The lens is centrally-mounted in a large surround that contains rings for focus and zoom. Ventilation is prodigious with air flowing in and out of the projector on three sides. The front exhaust vent showed a bit of light leakage but not enough to impact the image in my installation. On top are basic controls for menu navigation, input selection, picture mode, and power. Around back is a complete set of inputs for every possible source. In addition to the two HDMI 1.4a ports there is one each of composite, component, and even S-video. A VGA port handles computer signals and there are RS-232 and 12-volt trigger jacks for control. On the bottom are four independently-adjustable feet for leveling and four threaded fittings for M6 mounting bolts.
Unlike many DLP projectors, the W7500 offers generous lens shift. This is accomplished with a small joystick next to the lens. It’s quite different than the typical gear-driven system I’ve used on other projectors. There is no mechanical play in the system at all. The only challenge is that the stick moves through a very small gate. It takes only a tiny movement to make a large adjustment. I was able to line the image quite easily once I got the hang of it. Zoom and focus are also manual and were very precise in my experience. Of course nothing beats getting right up to the screen and sharpening the image with a motorized focus but I had little trouble dialing in the W7500.
The other big feature here is 3D. Thanks to DLP’s superior motion rendering, 3D can look quite good on a projector like this. And with the W7500’s 300-watt bulb, brightness reduction shouldn’t be an issue. The glasses sync using DLP Link rather than IR. This is a much more reliable system since the glasses don’t need line-of-sight with the projector or a separate emitter. BenQ doesn’t include glasses in the box but they can be purchased for around 60 bucks. And any DLP Link compatible glasses will work; you don’t have to use BenQ’s. The projector also offers 2D-3D conversion with adjustable depth. We’ll take a look at that in the In Use section.
The remote is extremely well-designed and very powerful. I could point it just about anywhere and the projector would respond. It’s fully backlit and the buttons are shaped differently making it easy to operate by feel alone. This is one of the best remotes I’ve ever used.
On top are discrete power buttons followed by individual input, aspect ratio, and picture mode keys. In the center is menu navigation. Further down are direct-access controls for brightness, contrast, color, and tint. At the bottom there are PIP functions, a 3D toggle, and the backlight key.
Setup of the BenQ W7500 Projector
Most DLP projectors are designed for an inverted ceiling mount and have large lens offsets to accommodate this. The W7500 however gives you generous lens shift around a central axis. You can even install the projector in line with the screen center if you want. I put my review unit on a stand about two feet above the centerline of my 92-inch Carada screen. Throw distance was 11 feet which let me fill the screen with just a little zoom range to spare. My sources were connected exclusively to the HDMI inputs; I did not test the analog connections.
After running the projector for 50 hours I was ready to explore the menus and perform the calibration. There are four preset picture modes, including 3D and three user memories. All modes are fully adjustable. After a few preliminary measurements, I settled on Cinema as the best starting point for calibration.
I noticed that ISF Day and Night modes are available so I obtained the access code from BenQ. Not only is there a full set of calibration controls, you can even perform a CCA procedure if you want. This is a calibration routine unique to DLP displays that uses measurements of the native color along with an offset to dial in color. It’s extremely accurate when done properly and much faster than using a traditional CMS. If you want to calibrate your W7500 this way, definitely hire a pro. You can seriously mess up your projector’s color if you don’t know what you’re doing.
The W7500 has a two-point white balance control plus a full color management system and gamma presets. My typical procedure is to adjust levels followed by gamma, white balance, and color gamut. This time though I discovered that the gamma presets interacted with the CMS; something I had not seen before. I wanted to experiment with a new gamma standard, BT.1886, since this projector has so much light output so it required a little more time to dial in. You can read more about my gamma experiments in the benchmark section.
Ultimately, I was able to calibrate the W7500 to a very high standard. The grayscale calibration fixed most of the issues I observed with color so I didn’t have to do too much in the CMS besides correct a few luminance errors. I also had to dial the contrast down quite a bit to get the peak light output to a comfortable level. My out-of-box measurement was over 50 foot-Lamberts! I couldn’t help wishing for a manual iris but only an automatic one is included. Tweakers may want to consider neutral density filters to improve contrast.
I discovered a couple of other quirks along the way. In the Advanced Setup menu, HDMI Format is set to Auto. I found that in order to see information below black and above white, I had to force the projector into PC mode. Neither the Auto nor Video modes would display the extra signal info. I also experimented a bit with the sharpness and clarity control settings. Normally I would set these at zero to avoid edge enhancement but the W7500 looked a bit soft when I did that. Leaving Sharpness at 1 and Detail Enhancement at 3 provided the best image with only a tiny bit of ringing on vertical lines which I could not remove.
The BenQ W7500 Projector In Use
For movie-watching, I try to select titles that represent the best and worst quality transfers. I like to see a display show the bad as well as the good, but if a projector can do a decent job with a poorly mastered Blu-ray, all the better.
I mentioned previously that BenQ uses a 6X color wheel to combat the rainbow effect. While I am not in the one percent group that sees them all the time, I can observe the effect if I flick my eyes back and forth while watching a white-on-black grid pattern. With the W7500 and its high-speed color wheel, I was unable to see any rainbows even when I moved my eyes quickly. The extra rotational speed really does make a difference. If you have crossed DLPs off your list because of the rainbow effect, you might want to test a W7500 and see if it suits you.

I started with the new release of Fried Green Tomatoes. This film switches between past and present and has a slightly different color palette for each period. The warmer tones of the flashback sequences rendered nicely with just a tiny bit of red push. The transfer keeps the original film grain intact and it was very present though not to the point of distraction. Close-up shots looked nice and sharp with good color detail while the wide-angle pans were softer and grainier. This disc has a little bit of black crush at times but the W7500 didn’t look too murky with this content. I did miss the rich blacks I’m accustomed to from LCD and LCoS projectors but the auto-iris did a decent job of improving contrast.
Turning to one of the worst Blu-ray transfers I’ve ever seen, I cued up Force 10 From Navarone. This disc has every color error and video artifact in the book and unfortunately, the W7500 didn’t do it any favors. The red push was intensified by the poor color of this transfer. In this case, I’d have to say the BenQ made the Blu-ray look a little worse than I’ve seen on other projectors.

I had just seen The Hunger Games: Catching Fire for the first time on Blu-ray and I remarked on how incredibly dark it was. Most of the competition sequences take place at night and though the detail is there, it takes a fine display to show it all. While the W7500’s black levels aren’t reference quality, its detail rendering is quite good. Nothing was crushed and I didn’t observe any softness. It was actually nice not to have to strain to see everything! While I still prefer the deepest blacks possible, this projector would give you a shot at watching this film with the lights on!
I finished up my 2D watching with Star Trek Into Darkness. Its opening scene takes place on a very red alien planet. While the W7500 made these reds a little more intense, there was no loss of detail and the extra saturation was not objectionable. The all-important flesh tones held up just fine and detail was solid. And contrast looked fantastic. The grayish blacks didn’t bother me as much on this reference-level title.
3D Movies

Since my Star Trek Into Darkness package included a 3D version of the film, a back-to-back comparison was a no-brainer. The W7500 did a great job with this material. While this isn’t a great example of 3D, it looked about as good as it could here. Colors were still nice and saturated despite the reduced light output of around 66 percent. When you insert a 3D Blu-ray, the projector automatically kicks into the 3D picture mode and turns the lamp up to its high setting. You can still use the frame interpolation if you want although it gives motion the same un-natural look as it does in 2D.
Avatar is still, and will be for some time, the benchmark 3D title. Depth cues are done perfectly and the sense of immersion is something you won’t see in any other film. Contrast is fantastic with nice deep blacks and bright highlights. I kept the Dynamic Black option turned on and it definitely made a difference to the positive. After watching Avatar I’d have to say this is the best 3D I’ve seen on a projector to date.
The BenQ W7500 Projector On The Bench
The projector was installed right-side-up at an 11-foot throw distance. Test gear included an Accupel DVG-5000 Pattern Generator, i1Pro Spectrophotometer, Spectracal C-6 Colorimeter, and CalMAN 5.2 software. Measurements were taken off the screen; Carada Brilliant White, gain 1.4.
Grayscale Performance
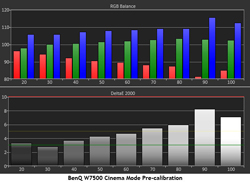
I found Cinema mode to be the best starting point for calibration so I took all measurements in that mode. Here’s the grayscale tracking chart.
Like most displays, the default color temperature is too cool. The errors range from a low of 2.84 to a high of 8.24 Delta E. This is average performance.
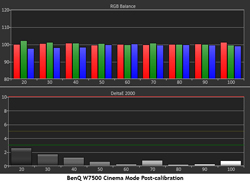
The gain and offset controls work quite well.
This is an excellent result. All errors are now below the threshold of visibility. Values range from .30 to 2.64 Delta E. The average error is only .98.
Gamma Performance
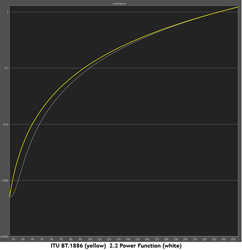
Gamma, as you may know, refers to the rate of transition from minimum black to maximum white. Until 2011, most content was mastered using the 2.2 Power Function. Our benchmarks reflected this and the vast majority of displays are engineered to this standard. In 2011, SMPTE updated the gamma standard to ITU BT.1886. This differs from 2.2 Power Function in two major ways. First, the average value is higher at 2.4. At first glance one might think this will result in a darker overall image. However, the other difference is the lower brightness levels are actually raised above the 2.2 exponent. Check out the graph below.
At the upper end, the brightness level is almost identical but down low, BT.1886 is just a bit brighter. The end result is a little more mid-tone contrast and slightly better shadow detail with no change in the brightest parts of the image.
Even the newest displays are still engineered to the 2.2 power function so for now, we will include charts that show both standards. Unfortunately, the only way to adjust your projector’s gamma to BT.1886 is with a multi-point control and that is a rare thing.
The BenQ W7500 is set by default to a gamma value of 2.4. Here is the pre-calibration trace.
You can see it rides a very straight line at the 2.4 mark. So the preset value matches the measurement pretty much exactly.
Now here’s the same measurement run compared to BT.1886.
Now the tracking is not so straight. This projector is clearly engineered for a power function gamma curve rather than BT.1886.
Here’s the final result using 2.2 Power Function.
With the prodigious light output available from the W7500, you can easily up the gamma to 2.4 if you want a slightly darker presentation.
Color Performance
The first step in achieving accurate color with the W7500 is to turn the Brilliant Color option off. It’s on by default, and it doesn’t have a huge impact but the results are better without it.
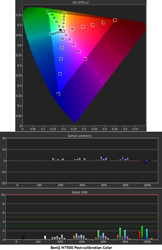
This is the gamut before any adjustments are made. The CIE chart on top doesn’t look too bad. Red is a bit over-saturated but the other colors are pretty close. The big issue shows up on the luminance chart. All the colors are well below their brightness targets. It’s time to spend some time with the CMS.
This is way better on every level. Not only are the colors’ hues more in line, most of the red over-saturation has been fixed. And check out that luminance chart. It’s nearly perfect. The end result is an average error of only 1.10 Delta E; completely invisible to the naked eye. This is excellent performance.
Contrast Performance
DLP projectors in this price range are not known for terrific contrast. Fortunately, help can sometimes come in the form of a dynamic iris. The W7500 has one; the feature is called Dynamic Black. Be assured, it works over the full brightness range. Because it skews gamma readings, I left the iris off during the calibration. Here are the results without the iris.
- Black Level – .0304 fL
- White Level – 18.0126 fL
- On/Off Contrast – 620.9:1
The picture looks a bit washed out at this setting. Blacks never get below a medium gray. Turning on Dynamic Black activates an excellent auto-iris. Even with the projector right behind my head I couldn’t hear it working. I did see a little brightness pumping here and there but the increase in contrast is more than worth it.
- Black Level – .0095 fL
- White Level – 17.6213 fL
- On/Off Contrast – 1862.7:1
This is much better; three times better in fact. While this DLP projector won’t compete with most LCD and LCoS units in overall contrast performance, this BenQ does reasonably well. And its auto-iris works better than others I’ve experienced.
Video Processing
I performed the usual battery of tests using the Spears & Munsil Blu-ray. These tests show how a display handles a variety of signal resolutions and formats. In most systems, it’s better to let your player handle these chores but sometimes it’s necessary to have the display deal with non-native signals like when you’re using a streaming device or cable/satellite receiver.
The W7500 passes all the tests in all signal formats with the exception of 2:2 pull-down (a common failure) and mixed content vertical where it showed line twitter around the scrolling text. Two caveats should be mentioned. In order to see below black and above white information in any signal format, you must set HDMI Format to PC Signal. Auto and Video will clip all levels below 16 and above 235. Secondly, calibration settings are tied to signal format but the carry over to all resolutions. I calibrated the projector using an RGB signal. When I switched to 4:2:2 and 4:4:4 component, my settings disappeared. Fortunately, they returned when I switched back to RGB; which by the way is how to see maximum resolution performance from the W7500.
3D Performance
Using the Accupel, I can view special 3D patterns that make it easy to measure the amount of crosstalk between the left and right eyes. The pattern can render in red, green, blue, or gray. The viewer closes one eye and an adjustment is made until the nested squares blend together. On the W7500, it only took a few clicks to achieve this measuring a vanishingly low .08% crosstalk for both eyes and all colors. This is excellent performance. Unless the content is authored incorrectly, you won’t see any crosstalk on this display.
With the high light output available, I expected decent 3D contrast and I wasn’t disappointed. Using the auto iris, I measured an on/off value of 569.3 to 1. The peak white was 5.954 fL. While there’s no danger of retinal damage, this is pretty bright for a $2800 projector.
Conclusions about the BenQ W7500 Projector
Likes-
- Excellent accuracy and video performance
- Prodigious light output
- Bright and crosstalk-free 3D
- Generous lens shift
- Super-quiet fan
- Lots of calibration options including CCA and ISF modes
Dislikes-
- Lens optics are a tad soft
- CMS and gamma interact making calibration a little more difficult
- So-so black levels
Whenever I review a DLP projector, I find myself in a self-debate. I absolutely adore the high contrast and smooth image from my LCoS projector; but I’m also drawn to the sharp bright picture that comes from DLP. And the motion processing is noticeably smoother and more natural than the blur and judder inherent in LCD and LCoS designs.
As I said at the beginning, no projector is perfect. You have to choose the one that checks most of your personal boxes. There will always be compromise. For me, contrast is king so I’m drawn to LCoS. But if you’re looking for high brightness, good 3D, sharp detail, and saturated color, DLP might be your ticket.
There are DLP models in every price bracket and BenQ has filled the sub-$3000 category nicely. In a market dominated by LCD, the W7500 brings more light, better 3D, better screen uniformity, and excellent installation flexibility. The DLP-link glasses are super-convenient and inexpensive when compared to their IR-controlled counterparts. Coupled with an excellent remote and lots of calibration tools, this projector bears serious consideration.
And did I mention the accuracy? The W7500 put up some great numbers in my tests with invisible errors in all categories. And its gamma tracking was some of the best I’ve seen in a while. I would have to say BenQ has made great strides in all aspects of image quality with the W7500. The only mountain left for it to climb is contrast. Those seeking super-low black levels may need to look elsewhere. But if you want to have the lights on, this projector has no equal at this price point.
It’s difficult to make absolute recommendations for projectors. It’s more important that you select the right tool for the job. If you want quality 3D, lots of light, accurate color, and ease of installation, then the W7500 is for you. Highly recommended.


