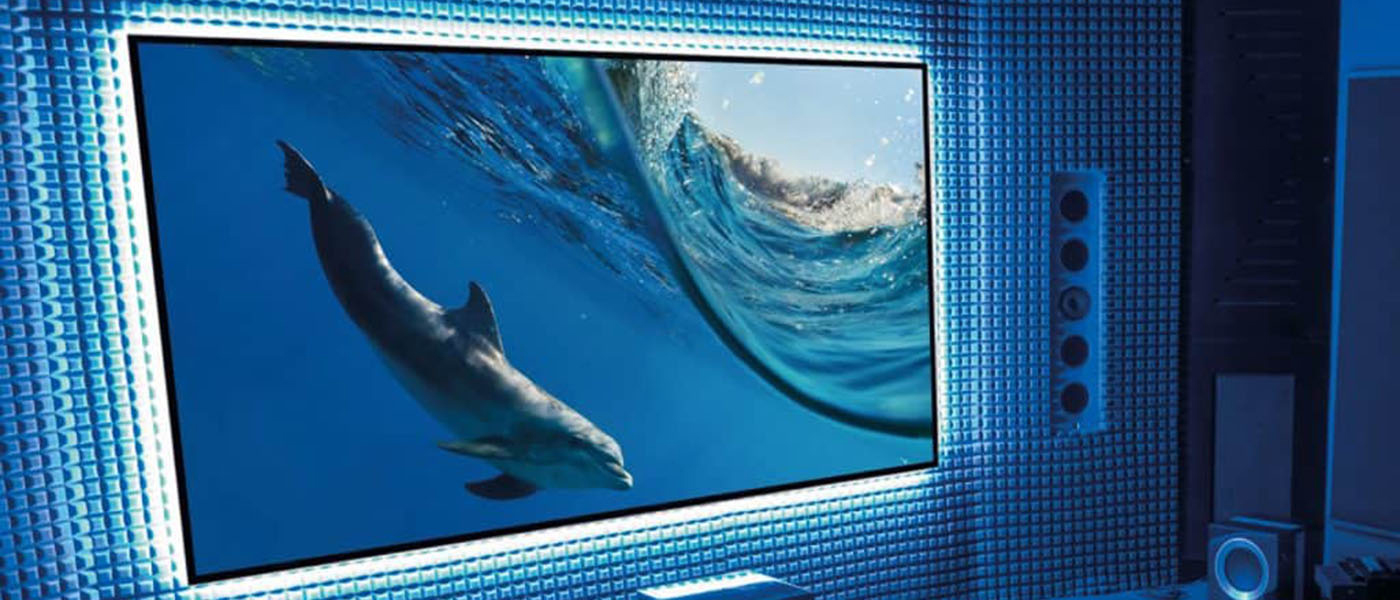
Commercial cinemas place their speakers behind the screen so sound is anchored with the picture. Adding a masking system means you can project those pesky black bars onto light absorbing material instead of the screen surface rendering a picture with more perceived contrast and pop. Today I have Seymour-Screen Excellence’s TAM-1T True Aspect Masking System on hand with Enlightor 4K acoustically-transparent material installed.
Seymour-Screen Excellence True Aspect Masking Acoustically-Transparent Screen
- Fully assembled frame/screen/masking system
- Constant-width design with top-down mask
- Acoustically-transparent Enlightor 4K fabric screen material
- Suitable for Ultra HD and 4K projectors
- Single-edge mask saves 30% cost over traditional dual-edge systems
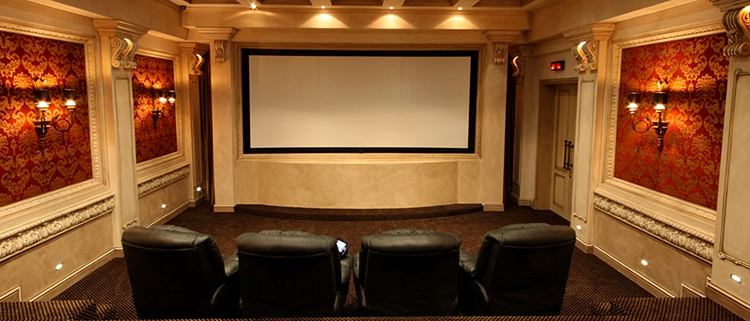
In commercial cinemas, projection screens nearly always incorporate two features not commonly found in home theaters – a masking system that changes shape to suit the film’s aspect ratio and the ability to install the front speaker array behind the screen so sound literally comes from what’s happening before the viewer.
Design:
Fixed-frame with top-down, automated mask
Material:
Enlightor 4K finely-woven fabric acoustically transparent surface
Gain:
.9
Color:
White
Tested size:
72” x 45” (85” diagonal)
Available sizes:
90”-160” wide
Aspect ratio:
1.78-2.40:1
Frame material:
Aluminum covered with Infinite Black velvet
Frame dimensions (WxHxD):
82.5” x 41” x 5.5”
Price as tested:
$8883
Company:
SECRETS Tags:
Seymour Screen Excellence, Enlightor 4K, TAM-1T, True Aspect Masking, Projection Screen, Screen Review, Seymour-Screen Excellence Reviews 2017
Masking is easy enough to do in the home, if you have the cash. Many mid and high-end projectors include lens memories that allow the viewer to zoom and shift the image to suit the aspect ratio which can be 1.78, 1.85, 2.35, or 2.40:1. Placing masks over the black bars renders them completely invisible which really accentuates contrast and makes the image pop.
Placing speakers behind the screen requires a little more planning – and space. If you can do it however, the effect is quite compelling. As good as modern cabinet speakers and surround processors are, there’s no substitute for having the sound come directly from the screen rather than from the sides and below. Accomplishing this requires acoustically-transparent material. Literally, you need a substance that reflects light and passes sound at the same time.
Today I’m looking at Seymour-Screen Excellence’s True Aspect Masking 1T System with the Enlightor 4K acoustically-transparent screen surface. It’s a total package that offers top-down masking and sound transparency with no equalization required. By using a single-edge mask, it saves the consumer around 30% over the price of traditional dual-mask systems. If you have the means, and the space, it provides a home movie experience like none other.
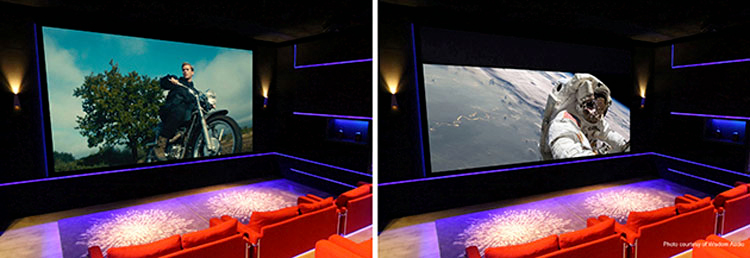
The Seymour-Screen Excellence TAM-1T is a masking projection screen with acoustically-transparent material. Let’s look at each element individually.
Masking is nothing more than placing a black piece of fabric over the projection surface to block light from a portion of the image. In cinema applications, it’s used to remove black bars or other projector light spillage so the image is surrounded by complete darkness.
The TAM-1T is Seymour’s most economical masking system. It works by rolling acoustically-transparent fabric down from the top of the frame. Since it only operates from one side, the projector must shift the image downwards to remove the lower bar. One way to make this happen is with lens memories. Many mid and high-end displays have this feature. Another method is with an outboard video processor. Some models can shift the image anywhere within its native resolution to remove unwanted elements.

The net result is an image perfectly framed by blackout material. This really enhances contrast and depth taking the picture to another level. It may seem like a small detail but once you’ve seen it for yourself, it’s hard to go back to letterbox bars, even when your projector has awesome black levels.
Acoustic transparency is another element that can significantly enhance the big screen experience. Placing speakers behind the screen brings the audio alive and further enhances the suspension of disbelief. Sound that comes out of the screen has a palpable effect over audio that emanates from the sides and bottom.

Left: typical perforated vinyl screen material.
Right: Seymour-Screen Excellence Enlightor 4K fabric.
Projection screen material can allow sound to pass through in one of two ways, perforation of traditional vinyl substrates or by using woven fabric. The former method has the advantage of allowing for things like positive gain and light rejection. Pretty much any existing screen material can be perforated. The downside is that higher frequencies are attenuated by 2dB or more, necessitating a re-equalization of your audio system. It also reduces resolution and light output since there are actually holes in the screen. Most large commercial venues employ this screen type.
In the home, fabric makes a better material for this purpose. If you think about it, we all have acoustically-transparent fabric in our systems. It’s better known as a speaker grill. Manufacturers have taken great pains to create substances that hide the drivers while remaining sonically neutral. The same principle is applied to projection material. You’ll have to give up things like high gain and light rejection but the simple solution to this is to pair such a screen with the right projector.
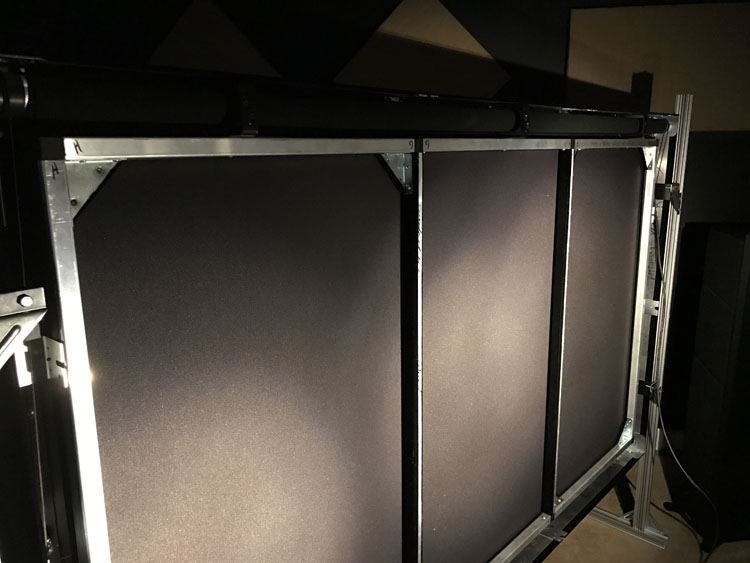
The Seymour-Screen Excellence TAM-1T is built like a tank. All the framing is made from aluminum stampings and square tubing. Corners are gusseted with steel plates to ensure everything remains square and rigid. The mask-roll and motor are tucked neatly in an upper corner with a single cable coming down that connects to a control box. From there, you can choose either IR or network control. You’ll notice in the photo that the screen backing is black. This is an acoustically-transparent scrim installed to prevent back-reflection.
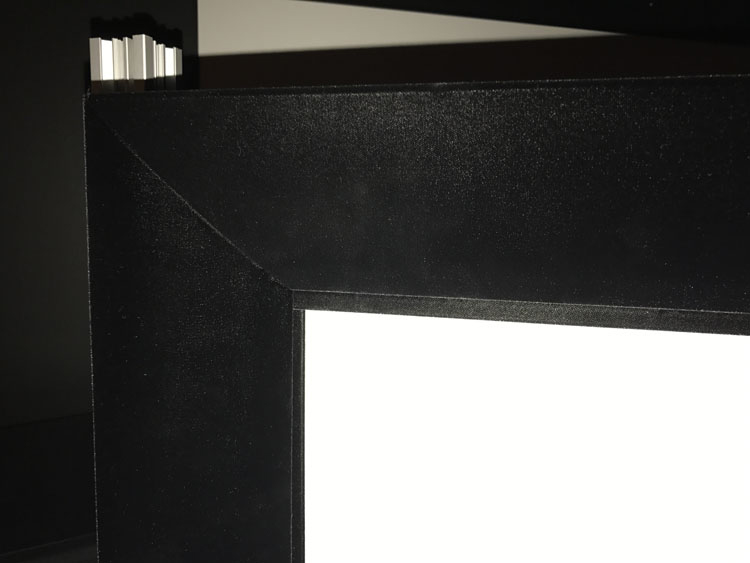
If you’re considering a product like this for a DIY project, you should know just how large and heavy one of these systems is. I received an 85” diagonal screen fully assembled in a large crate. According to the paperwork, the total weight was 389lbs. The screen itself can be moved by one person with difficulty. I managed to avoid injury but I didn’t have to deal with stairs!
Since you need a cavity behind for the speakers, you’ll need some sort of bracket system to suspend the screen in front of them. For my purposes, Seymour supplied me with a pair of extruded-aluminum legs so I could stand the screen in front of my LCR array. Since each unit is made to order, you’ll be able to work out your options in advance.
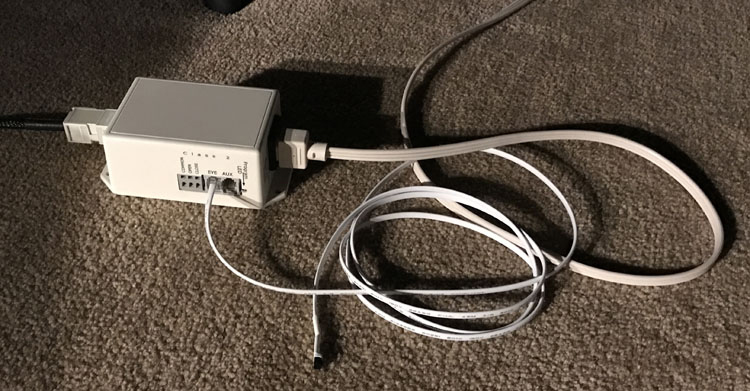
Once I had it in place, hookup was simple. A small power-supply/control box is provided in the kit. One connection is for the motor and another accommodates an IR sensor. You can also hook the TAM rig into the control solution of your choice via RS-232. It’s compatible with all the major brands.
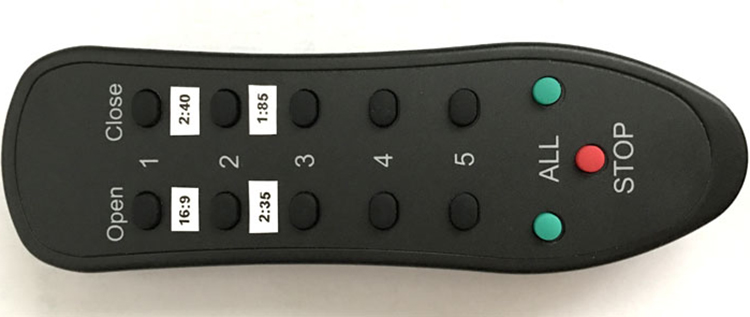
The remote I received was preprogrammed with the four most commonly-used aspect ratios, 1.78:1, 1.85:1, 2.35:1, and 2.40:1. Pressing the appropriate button raised or lowered the mask into position within a few seconds. The motor was very quiet.
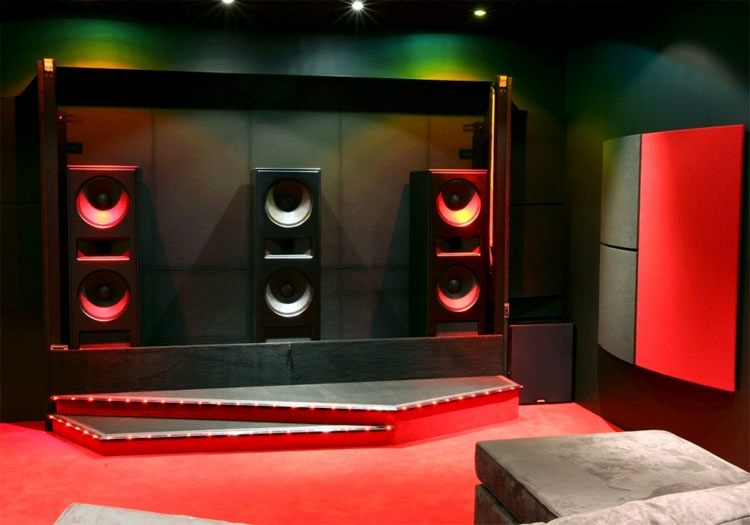
When installing speakers behind a screen, you have two options, a cavity for traditional cabinets or in-wall models. The latter solution means you simply hang the screen on the wall in front of the speakers and you’re done. With cabinets, the space should be planned carefully to avoid bass-bloat and tubby sound. It’s also important to make the cavity as black as possible. Light-absorbing fabric like duvetyn or flat-black paint is recommended. Since the Enlightor 4K is a woven material, some light will bleed through. Seymour-Screen Excellence mitigates back-reflection by the aforementioned scrim behind the screen fabric.
As you’ll see below, my tests show a color and contrast-neutral screen. Because its gain is .9, I decided to use a BenQ HT1070 DLP projector I had on hand (review is forthcoming). It is substantially brighter than my reference Anthem LTX-500. As I watched different Blu-rays, I looked for signs of texturing, color and contrast quality, and how my front speaker array sounded from behind the screen.

Jason Bourne, in the franchise’s latest iteration, returns to its roots with Matt Damon and director Paul Greengrass teaming up once again. The familiar gritty look is back as well with prominent film grain and a pallor that suits the material perfectly. DLP projectors like the HT1070 are great at detailing this grain and bringing out every minute element. The Enlightor 4K fabric had no trouble rendering everything the creators intended. Facial textures were almost touchable and you could see every bead of sweat and every dirt particle on the actors’ skin. Wide shots retained their resolution even in distant backgrounds. Color and contrast were as good as the BenQ was capable of, which is quite a lot. The image looked no different than it would on a traditional vinyl screen.
Speaking of that: this is the first time I’ve placed a screen in front of my speakers and I must say it was an amazing experience. First off, the Enlightor 4K material was completely invisible, sonically that is. I heard no difference whatsoever from a typical presentation where the speakers are exposed. I always thought my Axiom VP180 did an admirable job of making dialog seem to come from the screen rather than underneath it. But when placed behind, the effect was altogether different. It made me wish for more space so I could install this screen permanently. Maybe the wife would let me punch out into the living room. Maybe not.
Lights Out is a great test for black levels and shadow detail. While the HT1070 isn’t the king of dark material, its perfect gamma means you will see every subtle shade of black, right down to the minimum. The Enlightor 4K material had no trouble with this. In fact, blacks looked darker once I had the mask in place. Putting fabric in front of those black bars did wonders for perceived contrast. With a system like this, your choices for high-contrast projectors just increased in number. Like the sound, the mask’s effect is palpable. One gets used to black bars until there is an effective way to remove them. Then you wonder how you coped without a masking system.
I finished my viewing with Ghostbusters, the 2016 version. This film is finished in almost cartoon-like color with bright reds and other warm hues. Since the Enlightor 4K had already proved color-neutral in my tests, I saw the expected presentation which almost requires sunglasses to view. Contrast was again enhanced by the mask and I enjoyed the film in a new way thanks to dialog that truly came from the actor’s mouths and not from below.
When I test a projection surface I’m looking for two major things – color neutrality and contrast performance. It’s important to remember when calibrating any projector, one should measure color, grayscale, and gamma from the screen to be sure that the entire system is adjusted to spec. If you only measure from the lens, the screen may introduce color errors that are visible to the viewer.
To perform these tests I measured a BenQ HT1070 DLP projector with an i1Pro Spectrophotometer and CalMAN 5. Patterns came from an Accupel DVG-5000 signal generator. Each chart below shows the results from the lens, representing the projector’s native image; and from the Seymour-Screen Excellence Enlightor 4K screen material. We’ll start with RGB levels which represent grayscale tracking.
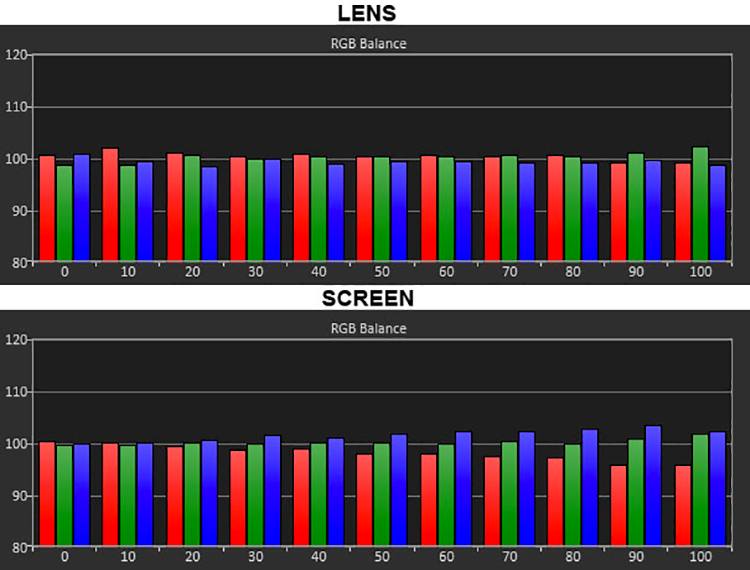
It looks like the screen raises the blue levels slightly as brightness increases. This isn’t a big deal because as you’ll see below, the errors aren’t visible to the naked eye. Since the material has a negative .9 gain, it might actually help add a tad more punch to the image.
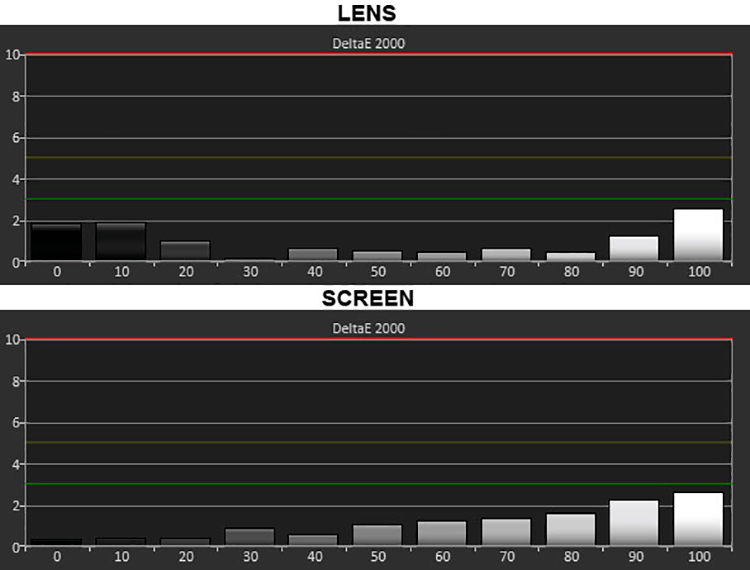
DeltaE levels clearly show no visible issues either from the lens or the screen. Tracking is a bit better from the lens but again, every brightness level’s error is under the all-important 3dE. That’s the point where differences in color and grayscale become visible. What we’re seeing here is visually indistinguishable from perfection.
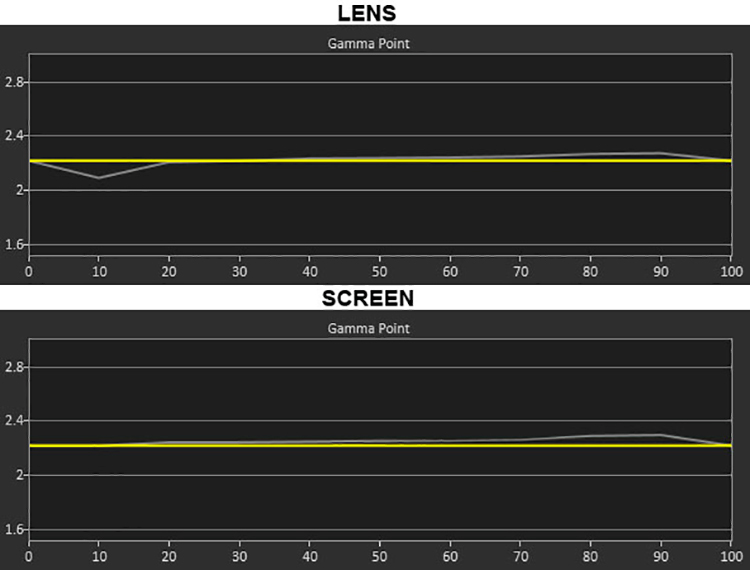
The BenQ HT1070 has excellent gamma tracking and it seems the Enlightor 4K material has managed to make it even better. The slight dip seen at 10% in the lens measurement is gone when measured from the screen. Brighter levels rise just a tad above the line but this is not something you’d see in test patterns or real-world content. The material is looking to be completely neutral for both grayscale and gamma. Let’s check out the color gamut and luminance numbers.
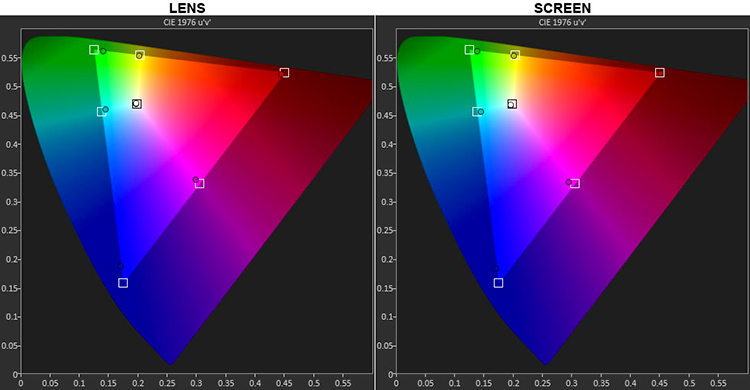
The BenQ HT1070 shows a slight under-saturation in the green and blue primaries. Cyan, magenta, and yellow hues are right on target. The Seymour-Screen Excellence material actually seems to accentuate red a little. It looks a tiny bit more saturated in the chart. Green and blue are unaffected.
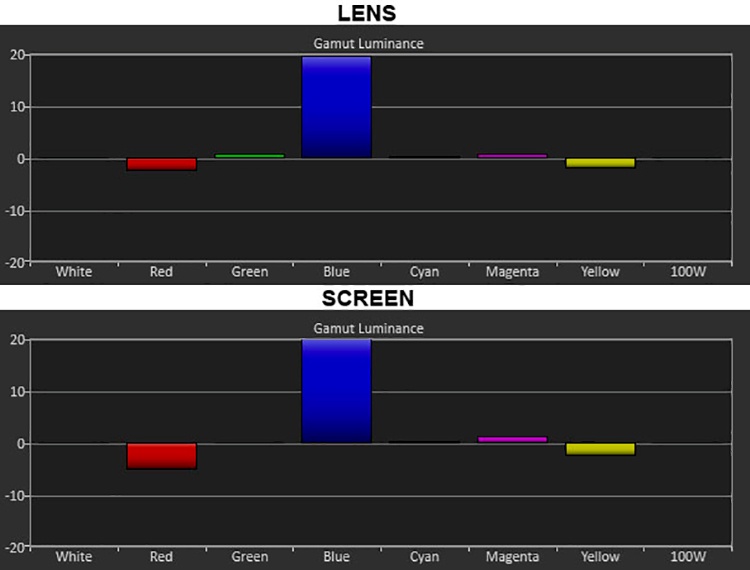
Color luminance levels are pretty much identical across the board. There is a slight drop in red and a slight rise in green while the other colors stay the same. Like the previous results, these differences are well below the visible threshold.
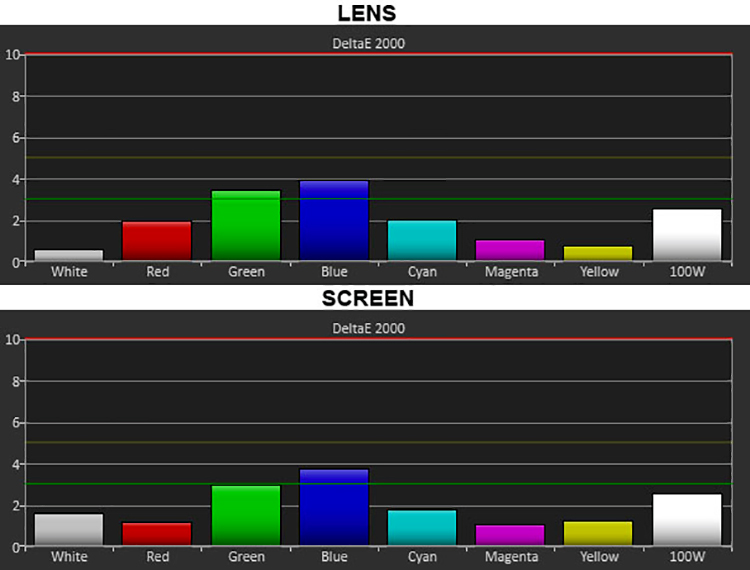
Error levels are nearly identical as well. In fact, green is now below the magic 3dE point. These variations are pretty close to tolerance levels of my i1 Pro meter so I’d call the color tests a wash. Seymour-Screen Excellence’s Enlightor 4K material is completely color-neutral for all intents and purposes. Though I always advise calibrating from the screen, it is possible to adjust a projector from the lens and wind up with a perfectly-accurate image once installed.
I’m testing contrast differently for this review. The Enlightor 4K material bears no resemblance to a typical vinyl projection surface like my reference Stewart Filmscreen StudioTek 130. Therefore, it makes more sense to measure the projector’s native contrast from the lens axis and compare it to the numbers generated when light is reflected from the screen. This shows the material’s effect on the image’s dynamic range.
BenQ HT1070 DLP Projector Native Contrast – Lens Measurement
- Peak White – 372.0689fL
- Minimum Black – .172fL
- Contrast Ratio – 2163.5:1
BenQ HT1070 DLP Projector Native Contrast – Screen Measurement
- Peak White – 58.8805fL
- Minimum Black – .0287
- Contrast Ratio – 2052.8:1
I am impressed to see there is no appreciable contrast loss despite the fact that some light passes through the screen material. My setup is not ideal and I suspect if the speaker cavity were properly treated with duvetyn fabric or flat paint, black levels would be lower and contrast would be higher. Don’t read too much into the peak white numbers. Pointing a meter directly at a projector lens produces super-high levels that have no real-world application. The main takeaway here is that the Enlightor 4K material does not significantly affect the projector’s native contrast. Therefore, it should work well with a wide variety of displays.
An important measure of any projection screen is its ability to display a uniformly bright image from edge to edge. To test this, I measured a 100-percent white field pattern divided into nine zones. The center zone is the baseline brightness value. Then I measure the surrounding zones and express those values as a percentage of the center one, either above or below. The average of that number tells us the screen’s uniformity as it relates to the center zone.
Obviously the projector isn’t perfectly uniform so I measured from the lens first. The BenQ HT1070 displays a uniformity of 92.87% mainly due to a center hotspot. When I took the same series of readings from the Seymour-Screen Excellence Enlightor 4K, I recorded a value of 93.45%. In either case, the hotspot is not visible to the naked eye. And the screen obviously doesn’t affect the projector’s native uniformity to any degree.
An off-axis brightness measurement will tell you how wide you can place your seating in front of the screen. In my theater, each seat represents a 20° departure angle from the center. At that angle, the light reduction (measured from the center of the screen) was 4%. At 40°, as far as I can measure in my room, brightness is reduced by 12%. These are very low numbers which means even those in the seats furthest from the center will see a bright, saturated image.
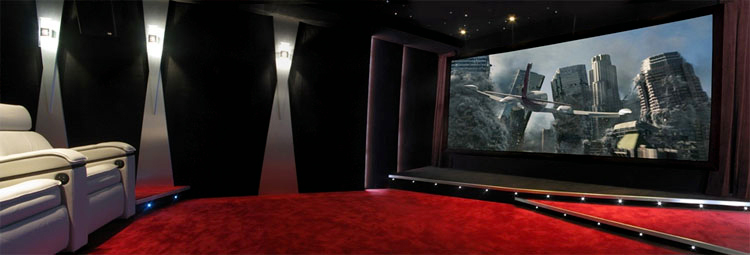
A screen like the SEYMOUR-SCREEN EXCELLENCE TAM-1T is a luxury for sure but nothing enhances the home theater experience better, at any price.
- Color and contrast-neutral material
- Has no effect on sound quality
- Tank-like build quality
- Simple and reliable control system
- I can’t imagine a better product for this purpose
My experience with the Seymour-Screen Excellence TAM-1T system was a bittersweet one. In my opinion, the product has no flaws and if I could accommodate a permanent installation, I’d be buying the review sample. Unfortunately, and here’s the bitter part, I just don’t have the room.
But if you have enough space, and enough cash, an acoustically-transparent screen with masking will transform your home theater experience. For those seeking the best possible presentation, nothing compares with placing speakers behind the screen. It’s an effect that cannot be faked or reproduced with technology.
A masking system is certainly within reach of most DIYers like myself. It adds weight to the screen but not depth. And once you take black bars out of the equation, image quality takes a huge leap forward. Even with a relatively low-contrast projector, the picture has a lot more depth and everything seems to happen in front of the screen rather than on it. If typical HD is like “looking through a window”, the mask makes it seem as though the window has been opened and you’re no longer looking through anything.
The Seymour-Screen Excellence TAM-1T system is a luxury product for sure. But once you’ve experienced it, it’s hard to go back. Perhaps one day, when I no longer need a living room, I’ll be able to install one. For those of you with the means, I can’t recommend this system highly enough.


