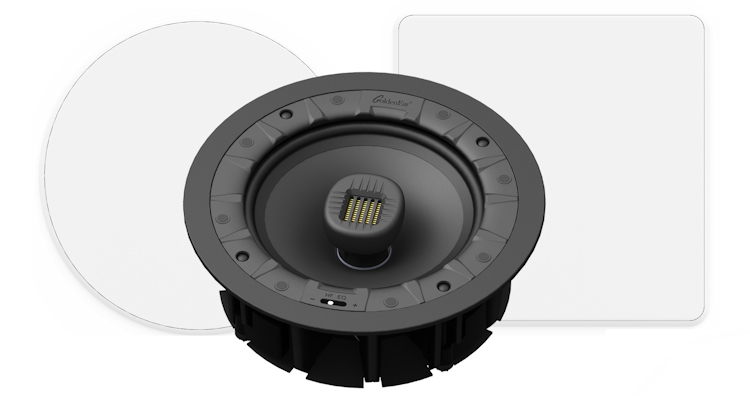
The GoldenEar Invisa-Series (in-wall and in-ceiling) speakers offer outstanding performance and features. Just like their freestanding Triton models, the Invisa offers the HVFR™ High-Velocity Folded Ribbon Tweeter along with their high definition mid-bass drivers. Their high-efficiency rating makes them easy to drive.
Add in the high-achieving SuperSub X and the system offers stellar performance and enjoyment.
GoldenEar Invisa-Series In-wall Speakers with SuperSub X and SuperCenter Reference
- SPS Signature Point Source true reference level performance
- Folded ribbon tweeters
- Rotatable tweeters
- Paintable, magnetic flush grilles
- High Sensitivity
- Easy to install for one person (even on a ladder)
- Excellent dynamic range
- 1400 watt digital amplifier on the SuperSub X
- Compact design subwoofer
- Tabletop Reference Center Channel
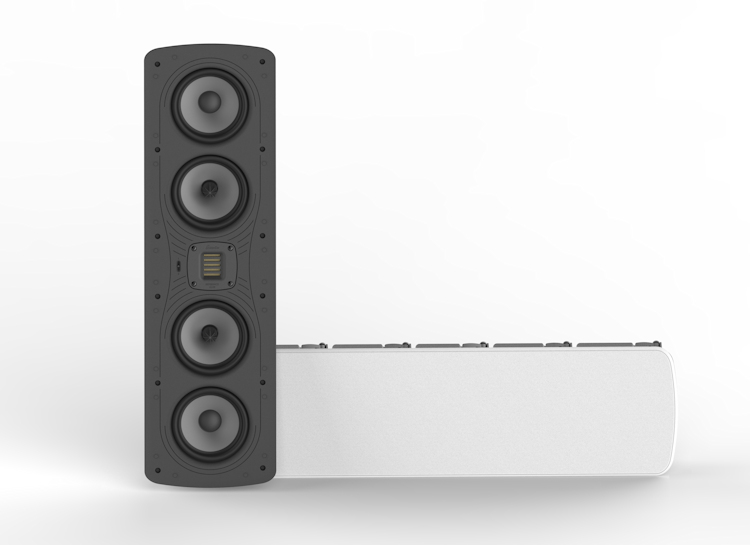
INVISA SPS
Dimensions:
27-9/16” H x 7-15/16″ W x 3-1/4″ D
Weight:
14 lbs
Frequency Response:
25 Hz – 35 kHz
Efficiency:
92 dB
Nominal impedance:
8 ohms
Drivers:
Two 5.25″ (13.33 cm) high-definition cast-basket MVPP™ mid/bass drivers
Two 5.25″ (13.33 cm) high-definition cast-basket lower mid/bass drivers
One High-Gauss HVFR™ High Velocity Folded Ribbon tweeter
MSRP:
$1,099.99 each, add $149.99 for the backbox
INVISA HTR 7000
Dimensions:
10” diameter x 5” deep
Weight:
4.5 lbs
Frequency Response:
25 Hz – 35 kHz
Efficiency:
90 dB
Nominal impedance:
8 ohms
Drivers:
One – 7˝ (17.78 cm) High-Def.
Cast-Basket MVPP™ Mid/Bass Driver
One – HVFR™ High-Velocity Folded Ribbon Tweeter
MSRP:
$549.99 each
INVISA 650
Dimensions:
8-5/8˝diameter x 3-7/16˝depth
Weight:
4 lbs
Frequency Response:
25 Hz – 35 kHz
Efficiency:
90 dB
Nominal impedance:
8 ohms
Drivers:
One – 7˝ (17.78 cm) High-Def.
Cast-Basket MVPP™ Mid/Bass Driver
One – HVFR™ High-Velocity Folded Ribbon Tweeter
MSRP:
$329.99 each
SUPERCENTER REFERENCE
Dimensions:
35˝ W x 5-3⁄4˝ H x 11˝ D
Weight:
31 lbs
Frequency Response
33 Hz – 35 kHz
Efficiency
91 dB
Nominal impedance
8 ohms
Drivers
Four – 5-1/4˝ Cast-Basket Mid/Bass, One – High-Gauss Reference HVFR™ High-Velocity Folded Ribbon High-Frequency Radiator, Two – 6-3/4˝ x 8˝Quadratic Planar Low-Frequency Radiators, One – 7˝ x 10˝ Quadratic Planar Low-Frequency Radiator
MSRP
$1,649.99 each
SUPERSUB X
Dimensions
14” W x 12 ¾” H x 13 ¼” D
Weight
40 lbs
Frequency Response
12 Hz – 250 Hz
Drivers
Two 8˝ long-throw high-output bass drivers
Two 10-1/2˝ x 9-1/2˝ quadratic planar infrasonic radiators
Amplifier
1400 Watt ForceField digital amplifier
MSRP
$1,375.00 each
Company:
SECRETS Tags:
GoldenEar Invisa-Series In-wall Speakers, Speakers, In-wall, GoldenEar, Invisa-Series,SuperSub X, SuperCenter Reference, Speakers Review 2019
Having the living room remodeled and re-arranged presented a “Golden” opportunity to address the TV viewing and audio system in the main living space of the house. Granted I do have a dedicated 2-channel room, for the most part, though our newly enlarged living room is the place we spend most of our time. That includes TV and movie watching, with occasional background music.
In the middle of this expensive renovation, where the estimates from yours truly were let’s say, in the 50% of the actual cost range, I proposed adding a reference-quality “stealthy” audio system. After a bit of discussion, I was given the go-ahead – “Do what makes you happy.”
Sweet!
I had a short window as this was a last-minute decision and walls would be open for a short period of time. My next call (text) for help was to Jack Shafton, GoldenEar Technology’s V.P. of Marketing and Sales and just all-round affable guy.
I needed another approval. Asked and granted.
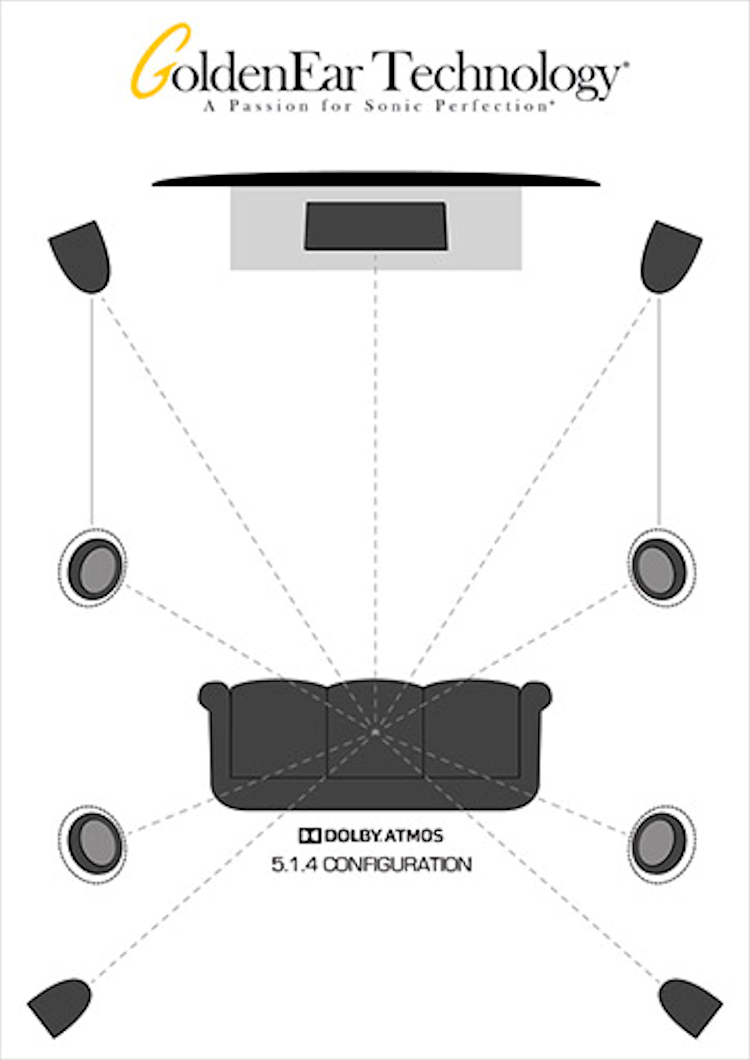
Arranged for me were the GoldenEar Invisa Series speakers for in-walls and ceilings For main left/right channels, the Signature Point Source (SPS). A pair of rear/surrounds Invisa HTR 7000. For the height channels, four-Invisa 650. (Dolby recommends 4). GoldenEar had just released its new SuperCenter Reference for a center channel. Lastly selected was a single, (for now, because a second sub would require additional approval) the SuperSub X.
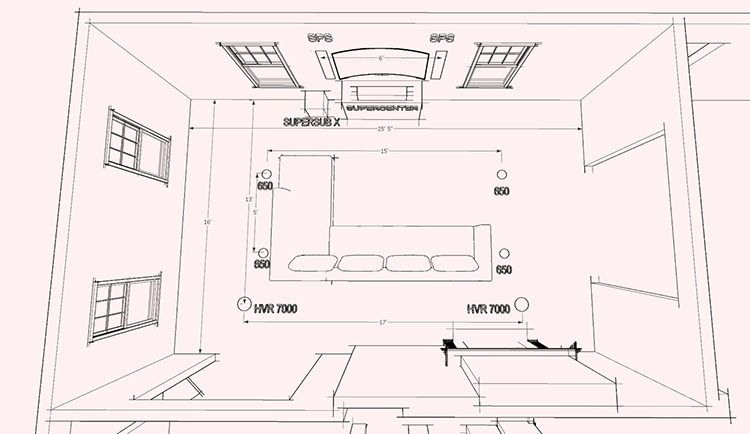
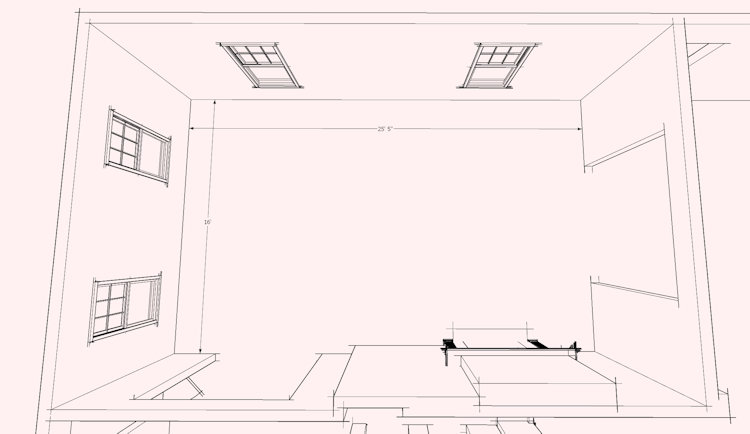
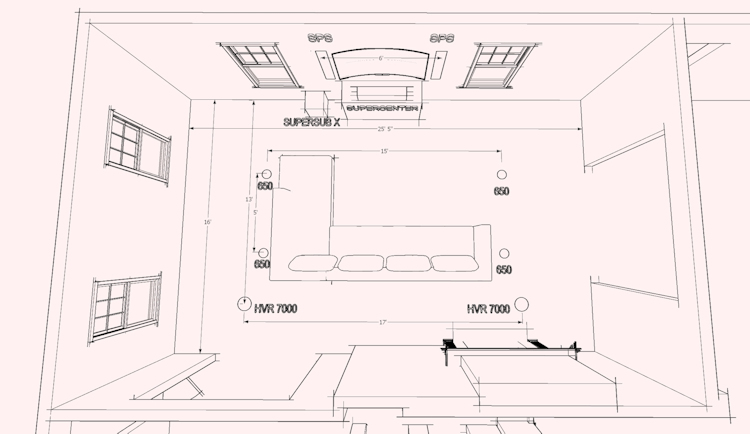
The plan shows the challenges of developing a workable audio solution – large openings on either side of the room, an offset fireplace and 4 windows.
Other than the subwoofer, there is consistency in the design of each of the other Invisa lines including the SuperCenter Reference center channel – the HVFR™ High-Velocity Folded Ribbon Tweeter, pivoting in the Invisa 650. The SPS, Left/Right has the rotatable High-Gauss HVFR™ High-Velocity Folded Ribbon tweeter found in their Triton Reference and One.R tower speakers.
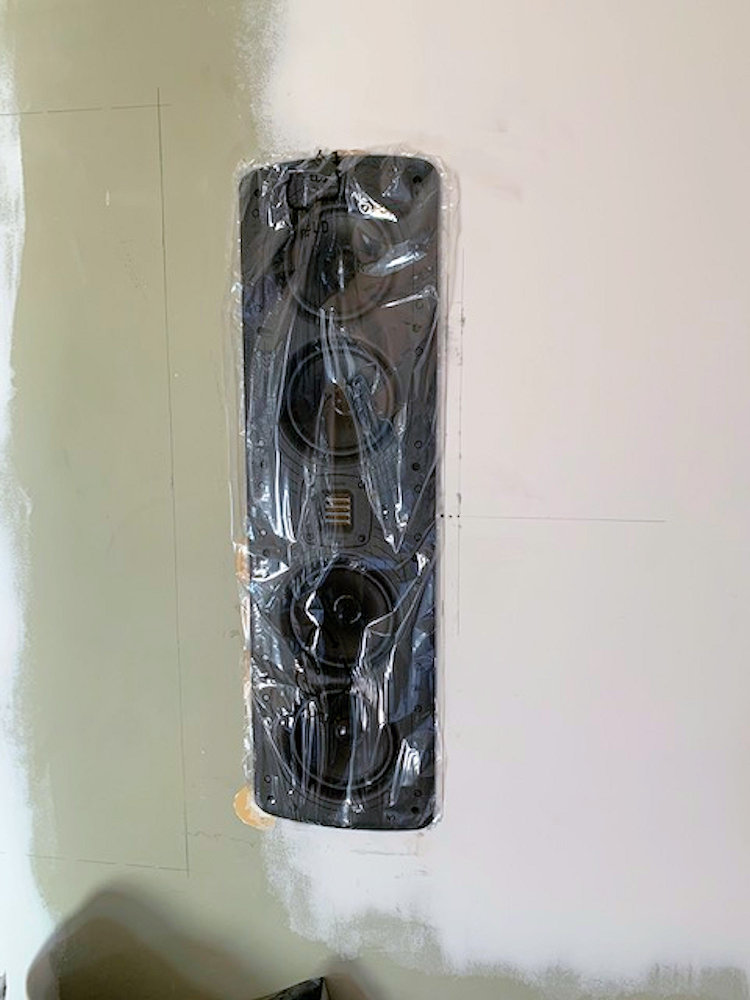
But going through each speaker individually, the impressive Signature Point Source (SPS) is weighty at 14lbs and almost 28” high. At over 7” wide and 3 ½” deep, it’s designed to just fit in a conventional “2X4” framed wall. Although I do have a subwoofer planned, the SPS is said to dip down to 25Hz. The high-efficiency rating is 92 dB makes driving them easy for an amplifier. Two 5.25” high-definition MVPP™ mid/bass drivers flank two 5.25” lower mid/bass drivers.
The Invisa HTR 7000 is also sizably impressive at 10” diameter and 5” deep. That would allow it to fit in floor joists as shallow as 2” x 6” (which is really only 5.5” deep). The 7000 weighs a heavy 4.5 lbs with a 7” high-definition MVPP™ mid/bass driver that compliments the folded ribbon tweeter.
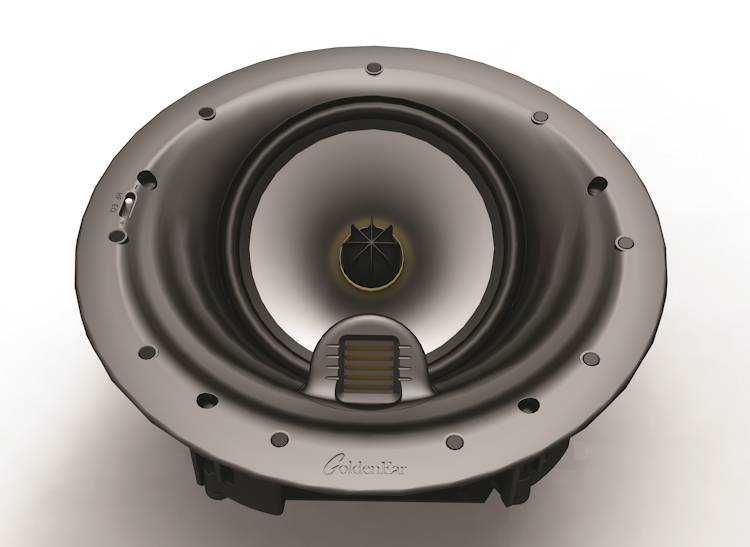
The slightly smaller Invisa 650 I’m using for the height channel is not as large at 8 5/8” diameter with a 6 ½” dual-wound voice-coil mid/bass driver weighing still a heavy 4 lbs. The pivoting HVFR™ folded tweeter allows for “aiming” towards the listening area. In my case with the spacing, this was also an excellent feature.
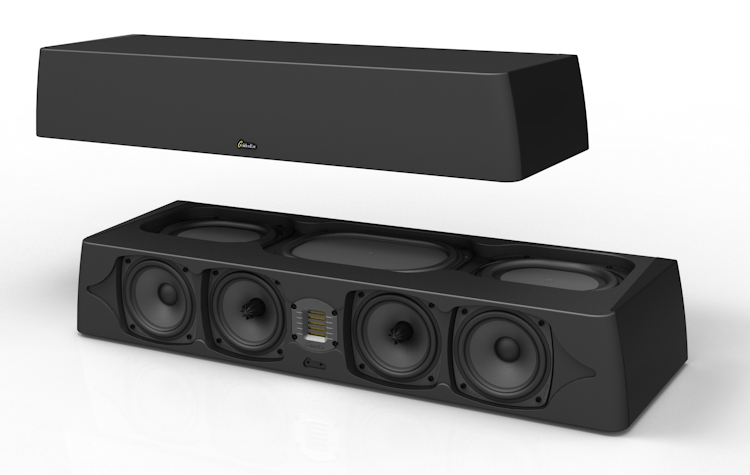
The SuperCenter Reference center channel is very large at 35” long, 5 ¾” high and a depth of 11” and robust at about 31 lbs! A high-efficiency rating of 91 dB is accomplished with up-firing, four, 5.25” mid/bass drivers along with a 7” x 10” Quadratic planar radiator and complimented by two additional 6.75” Quadratic planar radiators. This is the reason for the depth of the speaker for the larger, wider drivers. And as I mentioned earlier, the ribbon tweeter is GoldenEar’s reference, High Gauss HVFR™. The Center channel comes equipped with leveling feet.
I did opt for the smaller of the SuperSubs, given that I’d consider a second in my room at a later date. I’ve never considered the styling of a subwoofer, but the SuperSub Series is very elegant, chamfered and glossy edges doesn’t make you want to hide it. The SuperSub X is substantially smaller than the SuperSub XXL at less than half the weight. The SuperSub X is 2,365 cubic inches whereas the SuperSub XXL is a whopping 5,490 cubic inches. The “X” has two 8” long-throw, high-output bass drivers and two 10.5” x 9.5” “quadratic planar infrasonic radiators”. With 1,400 watts of digital power, the SuperSub X features left/right inputs and a subwoofer level with a lowpass crossover setting between 40-150 Hz.
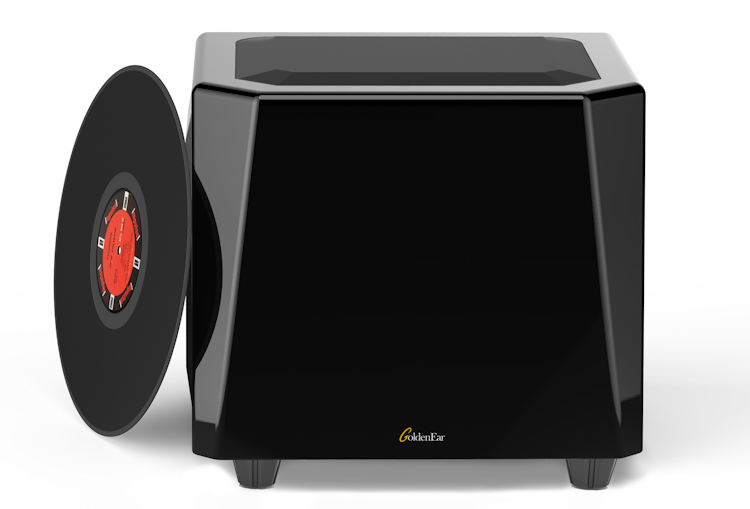
GoldenEar uses patented technology; “360-degree dual-plane inertially-balanced driver and sub-bass radiator topology”. The intent, of course, is to create a smooth and impactful response.
Critical to this installation, or to any of this audio magnitude, is proper planning. In our situation working with a house built almost 100 years ago, there were set conditions I needed to work around; ceiling cavity, joist spacing, piping, windows and on and on.
Ideally, there should be a height channel towards the front (nearest the screen), in front of the listening position and one further back behind the listening position. I did say that was ideal, but not always realistic as I found out, having them slightly closer to each other than I wanted. Pesky pipes.
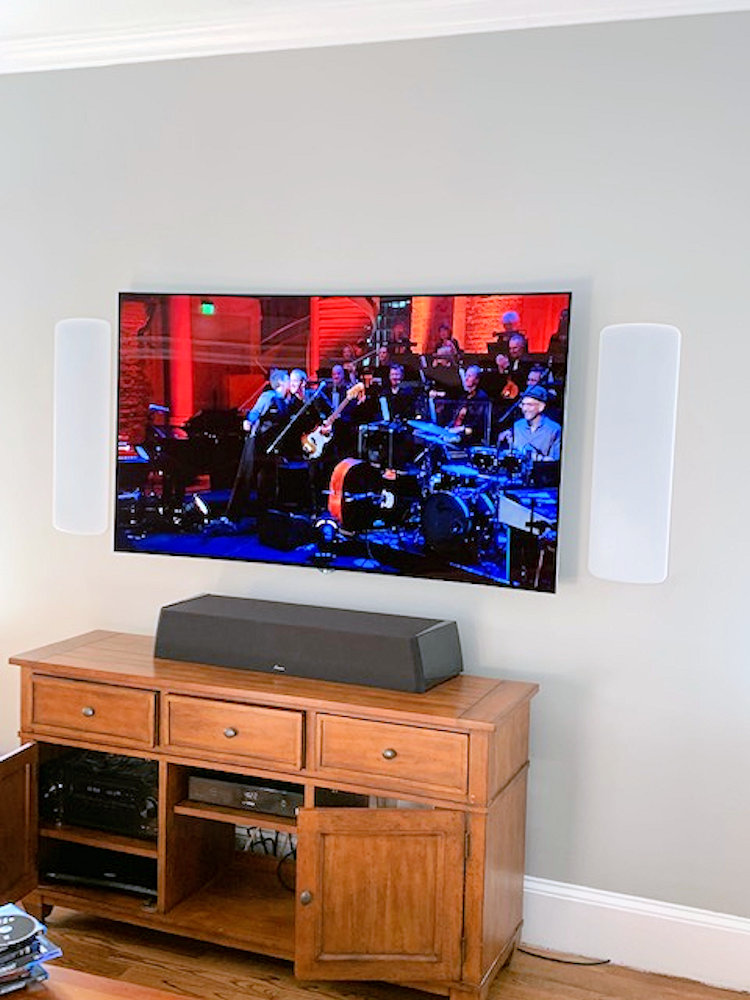
Once we decided on the layout of the space, and furniture orientation I went to work laying out the eight, in-wall and in-ceiling speakers. However, for me, the most important pieces are the Signature Point Source (SPS) on either side of the monitor.
First horrid discovery!
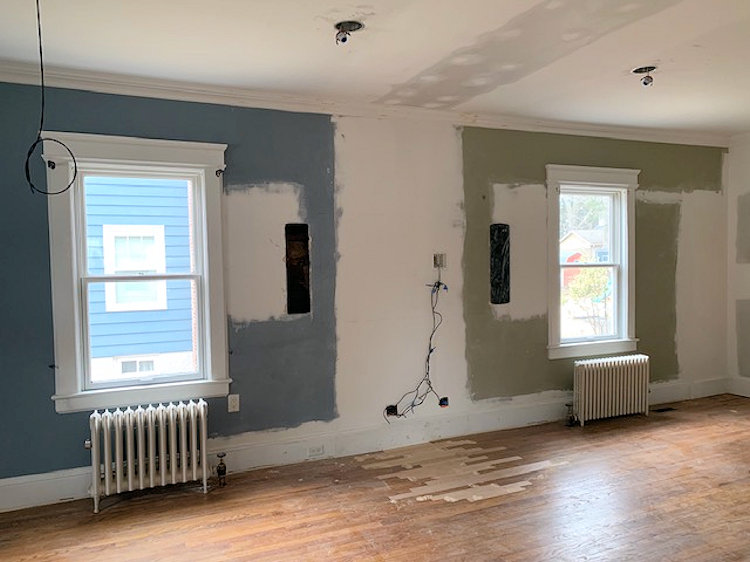
On either side of the windows are vertical steam pipes impossible to move that service the second-floor radiators. With the framing spacing, I was in a quandary – place the speakers closer to the monitor and risk a narrow soundstage? Symmetrically, the pipes exist on both sides. Cutting the openings, uncovering the pipes in the very spot I wanted to place the speakers meant patching the lathe and plaster wall. This discovery was truly upsetting – what I perceived to be the most critical aspect was now a problem.
I quickly sketched two alternative concepts, one was to build off the wall an entire “face” cabinet about 4-5” deep allowing me to move the L/R further apart. This solution seemed just too grand and costly, almost like building a wall unit.
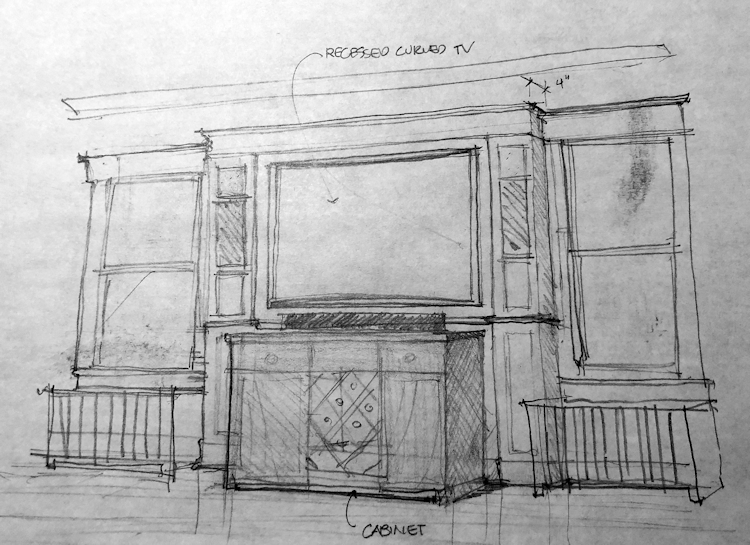
Nixed!
The second sketch was more modest in scope, with perhaps just building an enclosure for the SPS speakers, making them look like stand or wall-mounted speakers, again pulling them off the wall and out of the wall cavity. From an architectural/interior standpoint, it was a compromise and I wasn’t pleased with the design, regardless.
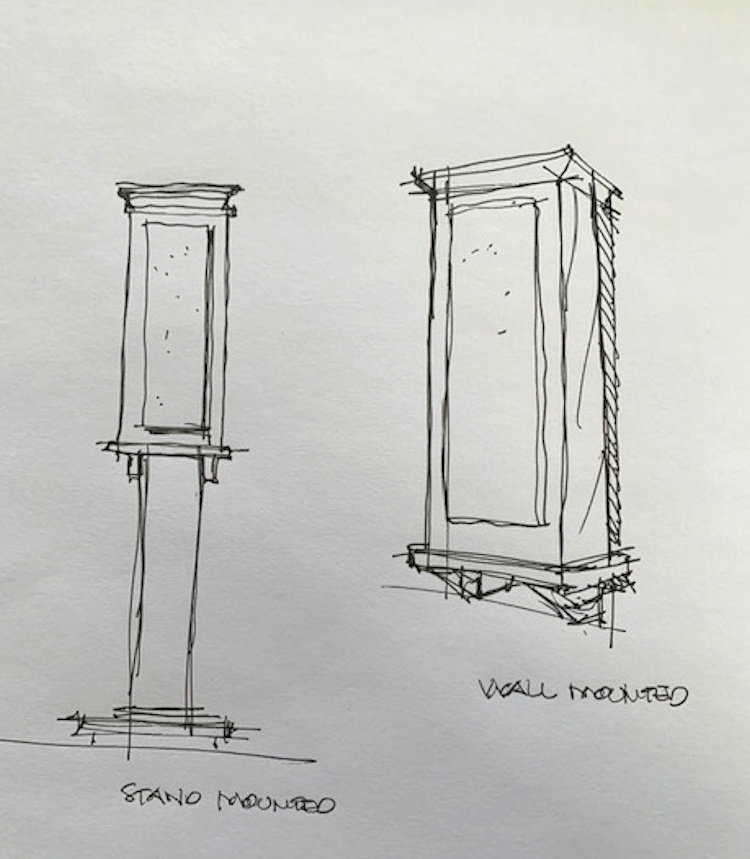
Nixed!
The only solution was to place them as far apart as possible within the cavity as originally planned and live with the slightly narrow soundstage. New cut-outs in the lathe and plaster walls.
Six in-ceiling speakers were planned, with two height channel speakers and one surround speaker on each side. Again, with the floor joist spacing above me, and some piping in the way, I had to settle for the speakers slight outside the seating area and contrary to the Dolby diagram.
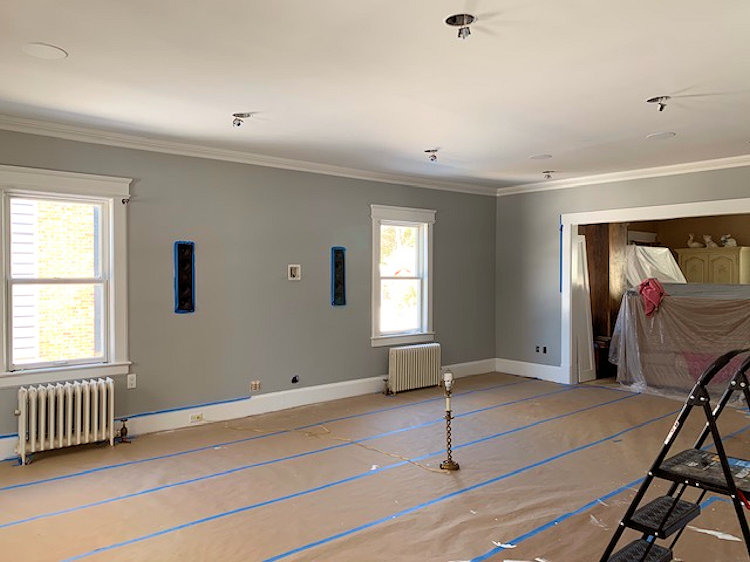
Cutting lathe/plaster, eating most of it, I finally had all six openings cut. What I hadn’t planned was the fact that the Invisa speakers have drywall clamps or also referred to as lock arms, with less than 1” forgiveness.
Don’t get me started on running wires.
The goal was to remove as little plaster as possible meaning I had to make longer runs – including down and under into the basement, or overtop into the floor joists above before terminating at the amplifier source. I used 12-gauge, UL rated in-wall speaker wire; I probably ran in excess of two hundred feet.
I did run an individual line to each height speaker, (instead of “daisy-chaining”) despite having only one channel per side reserved in the receiver, which I wired together at the hub. If in the future I want to switch that speaker from a height channel to a surround and move the current surround to a rear channel, I can do that. I believe the location and spacing will make that work.
Some manufacturers including GoldenEar will offer a backbox, or some will have them built into the speaker. GoldenEar will tell you that the backbox is more for controlling sound from one room to another and that the speaker was designed to take advantage of the larger cavity. I, on the other hand, was concerned about the effects of the cavity on the speaker so I stuffed insulation at the very top and bottom of the cavity. I felt at best, I was taking some of the potential unwanted effects out of the mix.
Once the room was patched and painted and floors finished, I was able to install the speakers. This was relatively easy although tough holding the speaker above your head, making the left/right connection and then setting, drilling the clamps tight hoping the brittle plaster edge wouldn’t crack from the tightening.
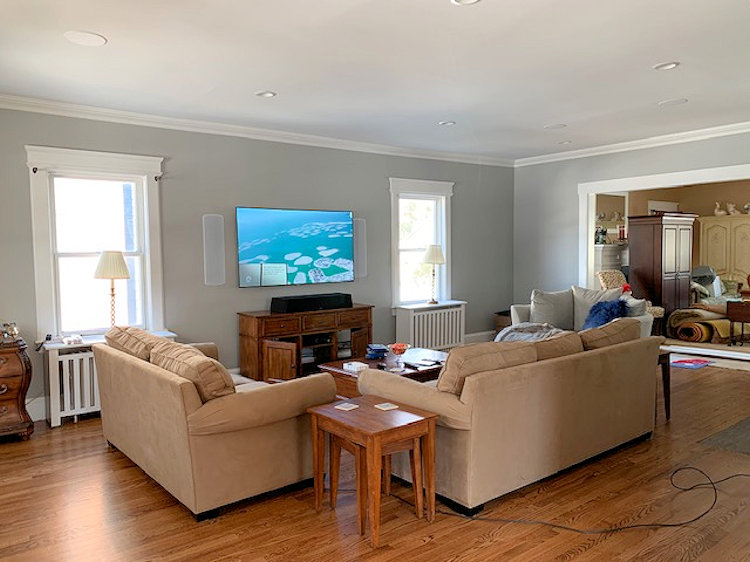
The flush grills for both the wall SPS and the in-ceiling Invisa are very clean looking, magnetically set in place. A thin bezel and no frame, with the slightest protrusion off the surface, making them all but unnoticeable. The grille on the SPS has rounded edges – considering it’s a rectangular speaker, is visually softened and elegant.
I used a Pioneer Elite VSX-1131 receiver, the only receiver/processor I have with Atmos. Although I have considered augmenting the power output with an independent multi-channel amplifier using the pre-outs on the receiver, I was never dissatisfied with the Pioneer’s solid performance.
Each speaker has a High-Frequency EQ switch that allows for some adjustments based on the surfaces near the speaker. A neutral setting can be adjusted by one, +/- in either direction. GoldenEar smartly recommends beginning with the flat or off setting before making the adjustment for an overly dampened room, or a “bright” room caused by many reflective surfaces. I opted to leave it flat and had never gone back to make any changes.
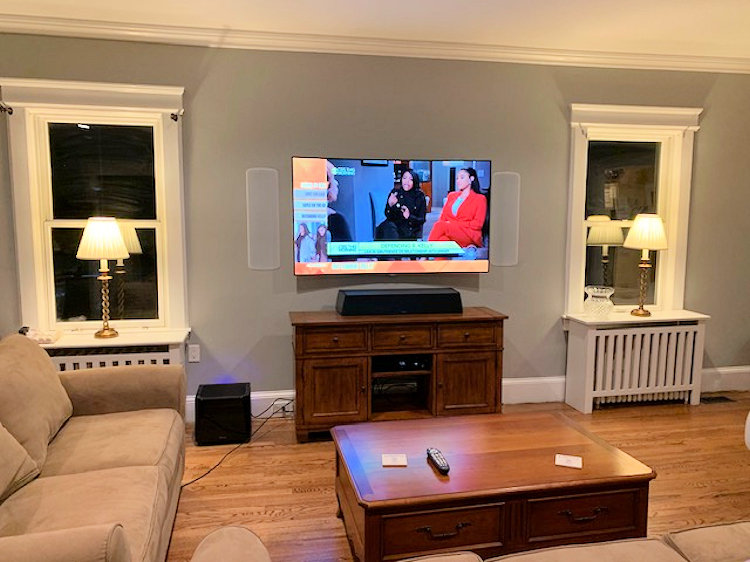
I’m glad it worked out this way, using the SuperCenter Reference – it is my belief that most movies and television shows use the center significantly more than the other channels; I wanted the best performance and opted for the new, larger SuperCenter Reference. It is designed to match the crossovers in the SPS regardless. I placed it on the cabinet housing the equipment and mounted the monitor just above it, keeping them as close together as possible.
The SuperSub X subwoofer was placed to one side of the cabinet far from the room corners. There was some thought to consider a second subwoofer – other than pushing my luck, I found a single subwoofer to be exceptional in itself. More on that in a bit but the choice was made to keep it out of the corners, which I believe has better bass control and accuracy.
I’m including a diagram showing the final configuration with dimensions of the speakers and furniture.
The Pioneer receiver has an excellent room calibration system called, Multi-Channel Acoustic Calibration System (MCACC) which I ran several times, especially since the furniture had been moved and altered to it’s current, if not final, placement. Satisfied with the results, I played music and watched a few concert Blurays to my sore backs delight.
I’ve set up many home theaters, several for myself and several for friends. I’ve reviewed many home theater surround packages from a variety of manufacturers. I will honestly say this one is superb and we couldn’t be happier with the results. Ask my neighbors.
As I was just about complete with the installation that Sandy Gross decided to stop by to see my setup for the Triton One.R reference speakers also in for review. I had just completed the initial setup of the Atmos-enabled system. I know Sandy was very happy with what he heard; in fact, he mentioned it was a bit of a treat for him, considering most of his time is spent setting up two-channel systems. It was a treat for me too, the installation was successful.
Despite the height speakers, as this was not a review entirely about Atmos, the important issue is the Invisa speakers for the system. Admittedly I’m more of an audio reviewer than video/surround sound so my first few auditions were music concerts, I happen to have many concerts on DVD, Blu-Ray and now I hope more content is released in 4K.
Someone kindly sent me the Roger Waters; the Wall, 2010-2013 live concert on Blu-Ray (released in 2015), in DTS- 5.1. The Wall is performed entirely while interviews of Waters are scattered throughout. I could not imagine a fan of Pink Floyd not enjoying this disk and the multi-channel playback. Naturally a lot of the surround features are the audience’s reactions, nevertheless, the GoldenEar Invisa superbly details not only his voice and backup singers but the excellent musicians backing him. Of course with missing bandmate David Gilmour, stepping into his lead-vocal parts is singer Robbie Wyckoff.
I’m struck by the thunderous feel and power of the rock stage; the SuperSub X is an overachieving giant. Clean and controlled, the SuperSub X manages to give depth and width to the stage which is very large and theatrical. Roger’s bass guitar is prevalent and articulate.
Guitars, both acoustic and electric, are rich at times and delicate other times while the SPS speaker shows off their dynamic range. My biggest concern as I mentioned, was the spacing between the main front speakers. Would I love another 12”-18” more between them, yes! Did it detract from my enjoyment of the concert, absolutely not; the audio image was solid around the 65” monitor, open and wide.
I’ve had to purchase K.D. Lang’s Live in London with the BBC Orchestra on Blu-Ray several times because friends ask to borrow the disk after they’ve heard it in my system. This is one of the disks I played for Sandy, we enjoyed her truly amazing voice which is soft at times, raspy others and always powerful. Needless to say, the music is outstandingly recorded and played back in DTS Master Quality. This disk goes back 10 years but sounds refreshingly clean still.
Naturally, this Blu-Ray presentation is mostly the fronts and subwoofer while the surrounds are relegated to background, “room-filling” music and sounds, yet the HTR 7000 does a remarkable job of sounding very full. I could easily see this speaker taking the place of lead front speakers, including a center channel if ceiling speakers were your only option. I wish it were easy to swap, I’d love to hear the HTR 7000 as front mains. Since that wasn’t an option, (already built into the ceiling cavity), I was, however, able to re-arrange the cables and connections and did listen to them as a stereo pair. Of course, that meant turning off the room correction.
I thought playing stereo through just the pair using the SuperSub sounded outstanding. Just tossing in various stereo CD’s in the player to spend a bit of time with the HTR 7000, I came away impressed with their range being deep and rich while listening to classical piano and violin, and classical guitar. Of course if you look at my diagram, you’ll see they are spaced quite far apart so the listening was between them, overhead to each side.
It was time to listen to the height channels and watch/listen to movies. For Sandy, I popped in Fallout, the latest Mission Impossible release with Dolby Atmos. Gunfire to me is one of the best ways to demonstrate how a speaker can portray the weight of the explosion in a gun or rifle, yet maintain a clarity that other car crashes or buildings exploding just cannot. The Invisa Series solidly cracks the air when guns are shot, from moment of the trigger to the force of the hit. I’m sorry to use such a violent act as an audio expression, but the slam felt by this alone, convinces me how the GoldenEar speakers perform throughout.
Gravity is probably one of the best Atmos demo disks out there because it clearly gives you sounds and voices that are not in the picture, but rather behind and over you. I was thrilled to hear the Invisa 650 do its thing rendering either George Clooney or Sandra Bullock’s voices in space or the whirling out of control spacecraft around and over you. I suppose some credit needs to go to the Pioneer Elite and the room-correction, amplifier and solid processing.
I truly love this installation of GoldenEar speakers from so many perspectives. First and foremost the sound quality is superb. Music sounds delicate and full while movies can be thunderous and room-filling. I also like the Invisa for their clean aesthetic – flush grilles, no bezel ring and paintable, they don’t draw attention visually to themselves. I can’t say installing them was any simpler than other in-ceiling speakers I’ve worked with yet had no trouble with the spring-action binding posts or the screw-driven clamping.
The SuperCenter Reference is an excellent choice giving this main channel’s breadth and depth, without the megaphone quality I’ve heard in many center channels. For the fun of it, someday I may add a second SuperSub X but living with the single unit, I still couldn’t be happier with the performance.
In the end, no regrets about the permanent choice of the Invisa Series, and I’ve learned to enjoy the system regardless of my circumstances with the existing construction. I do want to make it clear; this was not a review set of speakers that were offered to me, I selected the GoldenEar package and contacted them. I’ve had Golden Triton speakers in and out of my listening room now for many years and knew that would be my best option. I was dead-on with my decision and will enjoy this package for many years.


