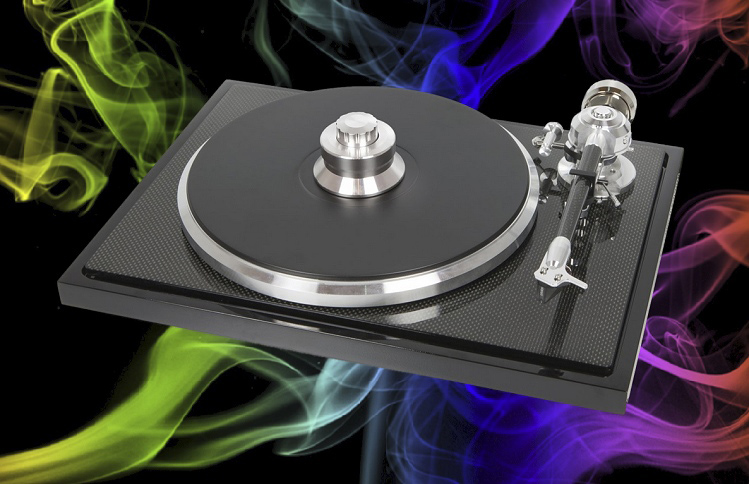

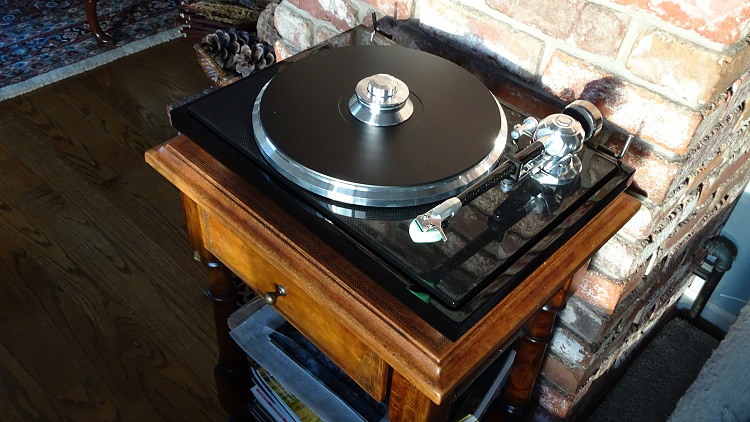
E.A.T. (European Audio Team) is an Austrian firm, located in Wilfersdorf, with manufacturing facilities in Eastern Europe. The CEO is Jozefína Lichtenegger. The C-Major turntable under review here is a new product, based upon the more expensive C-Sharp turntable. The compromises are a lighter weight platter, shorter tonearm, and manual speed control.
E.A.T started out making tubes and then branched out to make turntables. They are a very reputable manufacturer now, recognized for their fine designs.
E.A.T. C-Major Turntable
Design:
Turntable with 9” C-Note Tonearm
Plinth:
MDF, Polymer, and Carbon
Platter:
Main – 1.8 kg (4 pounds), Sub-platter – 0.7 kg (1.5 pounds), Aluminum, Damped with TPE (Thermoplastic Elastomer) Inserts
Bearing:
Bronze, Teflon®, Brass
Feet:
Three, Adjustable
Speed Variation:
33 RPM: ± < 0.09%, 45 RPM: ± < 0.10%
Wow & Flutter:
33 RPM: ± 0.05%; 45 RPM: ± 0.05%
Tonearm:
9” Carbon Fiber
Arm Bearing:
Combination of Cardan for Horizonal Movement and Uni-pivot for Vertical Movement
Arm Mass:
14.5 gm
Counterweight:
110 gm, 148 gm
Overhang:
18 mm
Cable:
Stereo RCA + Ground
Power Supply:
15 Volts DC Wall Wart
Dustcover Included
Dimensions (without dustcover):
352 mm (13.9”) H x 460 mm (18.1”) W x 125 mm (4.9”) D
Weight:
9 kg (19.8 pounds)
MSRP:
$2,545 USA without phono cartridge; $2,795 with Ortofon Quintet Blue phono cartridge
E.A.T. E-Glo Petit Phono Preamplifier
Design:
Hybrid Tube; Dual Triode Output Stage, 2SK209 J-FET Input Transistors in a Quad-setup
Tube Compliment:
Two 12AX7 Dual Triode
Post-Emphasis Curve:
RIAA ± 0.1 dB / 20 Hz – 20 kHz
MC/MM Compatible
Inputs:
One Set Stereo, Gold-plated
Outputs:
One Set Stereo RCA Gold-plated
Input Impedance Loading:
10, 18, 43, 75, 150, 300, 600, 1200 Ohms, 30, 36, 42, 47, 53, 59, 65, 75 kOhms
Input Capacitance Loading:
50, 150, 270, 370, 520, 620 pF
Gain:
40, 45, 50, 60, 65, 70 dB
Output Impedance:
100 Ohms
THD:
0.15%
SNR:
87 dB (A-weighted)
Subsonic Filter:
20 Hz @ 18 dB/Octave
Power Supply:
18 Volts DC Wall Wart
Dimensions:
78 mm (3.1”) H x 226 mm (8.9”) W x 262 mm (10.3”) D
Weight:
2.5 kg (5.5 pounds)
MSRP:
$1,495 USA
E.A.T. Jo No 5 Phono Cartridge
Design:
MC (Moving Coil)
Coil Wire:
4N Copper
Stylus Type:
Nude Fine Line
Stylus Tip Radius:
8/40 μm
Internal Impedance:
5 Ohms
Recommended Load Impedance:
20 Ohms
Frequency Response:
20 – 26.000 Hz ±1.5 dB
Output voltage at 1 kHz, 5 cm/sec:
0.33 mV
Channel Separation:
25 dB @ 1 kHz
Channel Separation:
16 dB @ 15 kHz
Channel Balance:
1.2 dB @ 1 kHz
Compliance:
12 μm/mN
Vertical Tracking Angle:
20°
Tracking Force:
2.2 gm – 2.5 gm
Recommended Tracking Force:
2.4 gm
Cartridge Weight:
15 gm
MSRP:
$1,295 USA
Company:
SECRETS Tags:
EAT, Phono Cartridge, Phono Preamplifier, C-Major Turntable, EAT Product, Turntable Review 2018, Preamplifier Review 2018, Cartridge Review 2018
The platter consists of two pieces, a sub-platter weighing 1.5 pounds and which receives the rubber belt, and an overlying main-platter weighing 4 pounds.
The plinth (base) is a mixture of MDF, polymer, and carbon, having low resonance.
The tonearm is 9” in length and is a combination of a Cardan horizontal bearing and a uni-pivot vertical bearing design, as compared to a gimbal pivot. The uni-pivot cup rests on a sharp-pointed bearing, such that there is minimum contact of metal-on-metal. This results in negligible friction when the tonearm moves vertically.
As with so many turntables these days, an aluminum “puck” is included, which helps hold the LP flush with the platter. This particular one has a knob on top that is used to tighten the grip of the puck on the turntable spindle.
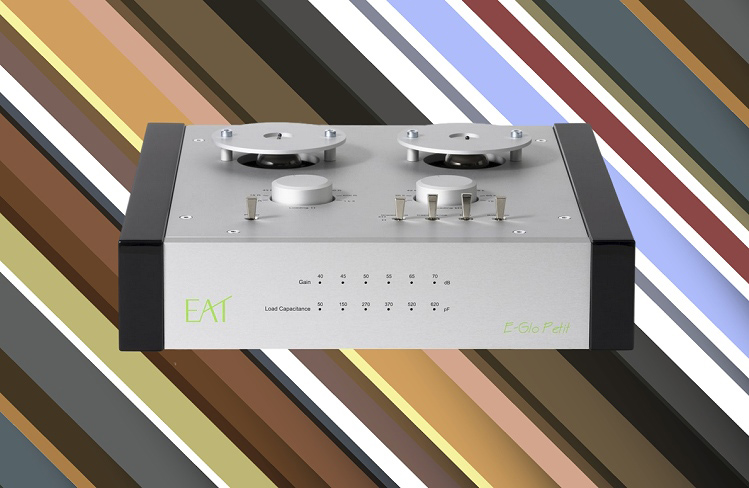
The E.A.T. E-Glo Petit phono preamplifier is their latest entry in the preamp category. It is priced at an entry-level of $1,495.
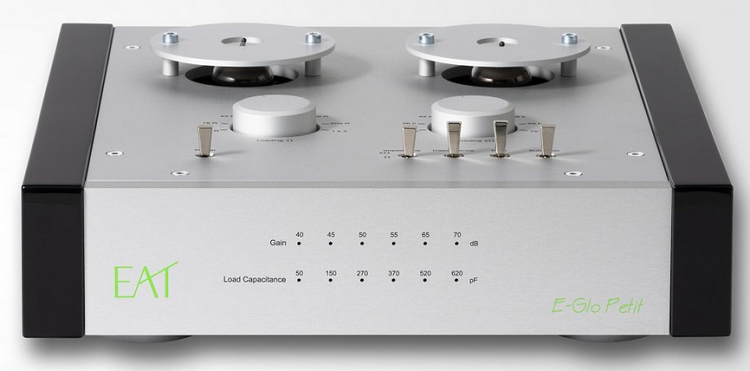
The front panel has indicators for the Gain at 40 – 70 dB (I used a gain of 70 dB with the E.A.T. Jo No 5 phono cartridge) and Load Capacitance at 50 – 620 pF (I used 150 pF).
The top of the preamplifier has the selector switches. On the left is the Power switch. Above that is one of the resistance Loading dials. The other resistance Loading dial is to the right. Each dial has its own range of resistance values, and you select which dial is active by using the Impedance switch at the bottom at the left end of the row of switches (see photo below). I used the low resistance range of selections and chose 18 ohms (the recommended resistance loading for the E.A.T. Jo No 5 phono cartridge is 20 ohms).
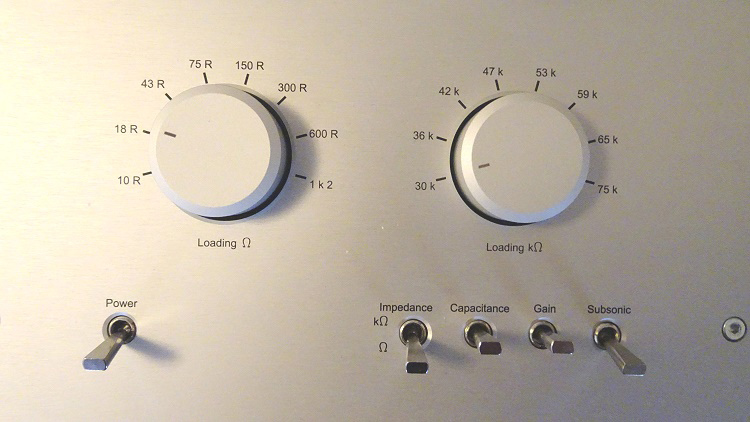
To the right of the Impedance switch is the Capacitance loading switch which changes the LED on the front panel to indicate which capacitance loading you have selected. The Gain switch is next, which changes the gain among the six available gains settings, indicated by LEDs on the front panel. The Subsonic filter switch is last. I used the preamp with the Subsonic filter switch off, as explained later.
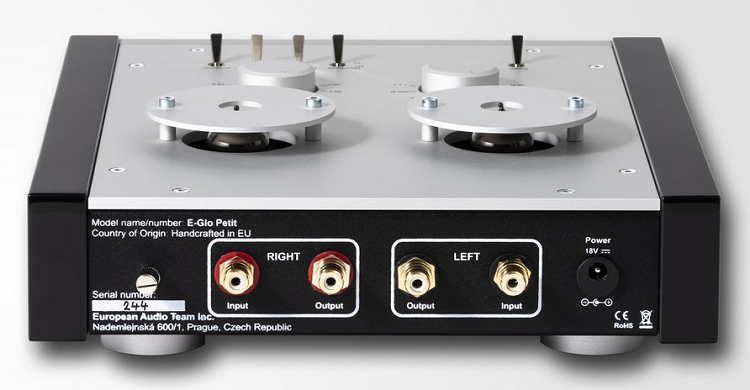
Here is a photo of the rear panel of the preamplifier. It has one set of stereo RCA inputs and one set of stereo RCA outputs. The DC wall wart power supply is 18 volts. There is also a ground terminal to which the ground wire from the turntable is attached. This is very important because the voltage from the cartridge is so low, ground hum interference would otherwise cause a big problem.
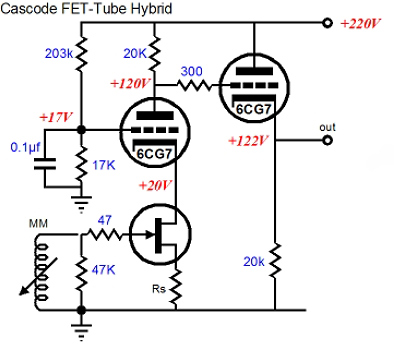
There are two 12AX7 dual triode tubes in the output stage and an FET solid state input stage, configured in cascode. A comparative schematic for this is shown below. The triodes are a different model, but the overall circuit should be similar. You can see that the plate output from one triode is connected to the grid of the second triode. This is characteristic of cascode (schematic Copyright Tubecad.com). The signal goes from the J-FET at the bottom center, to the cathode of the first triode in the center, then from the plate of the first triode to the grid of the second triode in the upper right.
The E.A.T. Jo No 5 phono cartridge is a new product. It is a moving coil design, and the output is 0.33 mV which is low. I used the 70 dB gain setting which produced a phono preamplifier output of nearly 1 volt. (E.A.T. offers the Ortofon Quintet Blue phono cartridge, a low-output MC design, for $250 additional if you purchase it with the turntable. This is a savings of $274 off the MSRP.)

At 15 grams, the cartridge is relatively heavy, so I used the extra counterbalance weight that is supplied with the C-Major turntable. At $1,295, it is not really entry-level, but it is not ultra-high priced either. I would say it is quite appropriate for a turntable in the $2K – $3K range, such as is the C-Major. The E-Glo Petit phono preamplifier is about right for this setup as well, so the overall package that was sent to me for review was excellently balanced.
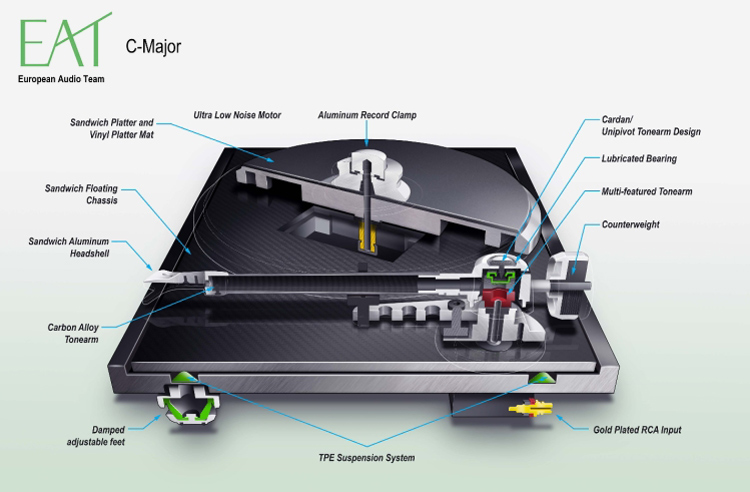
The turntable is designed for those who want some advanced features but who don’t want to spend a fortune. The C-Sharp turntable was used as a model for the C-Major. The platter is lighter, and speed control change is manual rather than electronic. However, the tonearm is really something that would be seen on a more expensive turntable, so that is where E.A.T. put the money, although it is 1” shorter than the tonearm in the C-Sharp.
Here is a cutaway diagram of the entire turntable.
So, begin by attaching the three feet to the base of the plinth by screwing them into the sockets.
A dustcover is included, which is placed on two hinges at the rear of the plinth. It is best to wait until the turntable is assembled before attaching it.
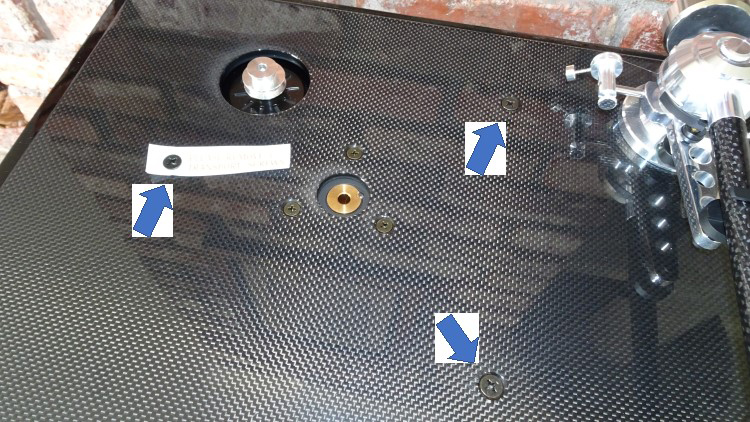
Next, it is very important to first remove the three screws as indicated by the arrows in the photo below. Don’t remove the screws near the spindle socket at the center.
Mount the sub-platter and then attach the rubber belt to one of the motor pulleys and around the perimeter of the sub-platter.
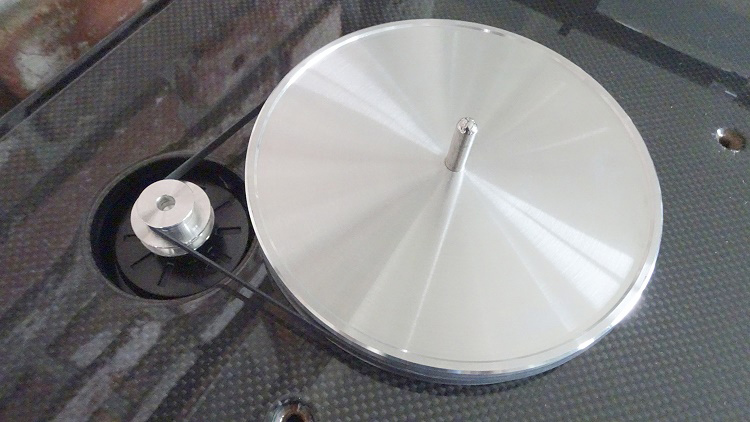
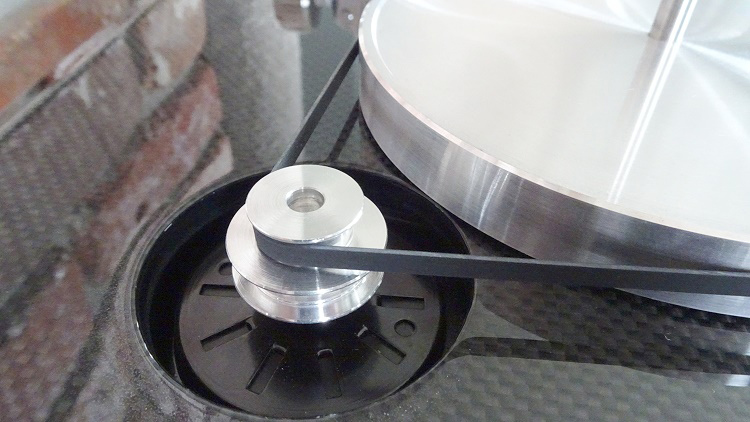
There are two motor pulleys, one for 33-1/3 RPM (the top-most pulley) and one for 45 RPM (the bottom pulley). I attached the belt to the upper pulley (33-1/3 RPM) to start with (photo below). Note that the sub-platter should be mounted with the shorter spindle pointing upward. The longer spindle fits into the platter socket.
When changing platter speed, you remove the main platter and slide the belt onto the other pulley. You can either use your finger to do this (make sure your hands are clean) or the small tool that is supplied. Since this might be considered inconvenient by some users, you can simply listen to your 33-1/3 RPM vinyl LPs and then change to 45 RPM and listen to your 45 RPM vinyl LPs, or vice-versa. The advantage of manual speed control is that, over a period of years, the motor will probably last longer.
After choosing a platter speed with the belt placement, put the main platter on top of the sub-platter.
Using the supplied bubble-level on the surface of the main platter or on the surface of the plinth, level the turntable by adjusting (turning) the feet.
Next is the mounting of the cartridge. It is attached to the tonearm using two screws, and the conductors to the rear, color-coded as usual.
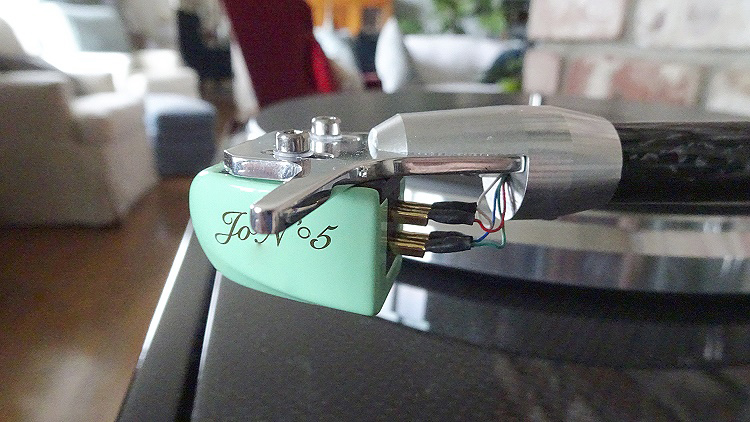
When attaching the cartridge, you don’t allow it to rest on the platter since the counterweight has not been attached yet. Leave it in the tonearm rest.
The counterweight has two pieces, with the second piece being used when the cartridge is relatively heavy, as is the Jo No 5 is (15 grams). It mounts at the rear of the main counterweight.
The counterweight is then screwed onto the rear of the tonearm and adjusted until the desired tracking force is obtained, using a tracking force gauge. I have a digital gauge, which is very desirable as it is precise. For the Jo No 5, I adjusted the tracking force to 2.35 grams. The counterweight is shown below at the rear of the tonearm.
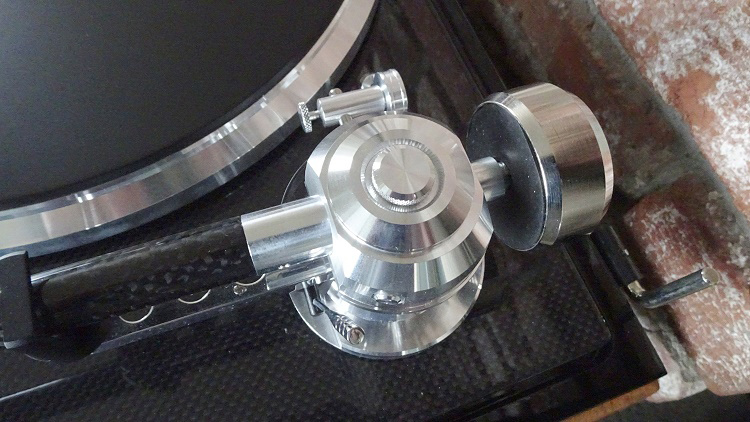
Once the counterweight is attached, you mount the anti-skate mechanism, shown below. It consists of four parts. One is the main spindle permanently attached to the tonearm. You slide the mechanism with the thumb screw onto this spindle and tighten it when it is horizontal. Then, you put the circular mechanism (wheel) onto the end, with a weight on the end of a spindle that is attached to the wheel. The wheel remains loose so that it can rotate. Using the supplied nylon thread, which is attached at one end to the wheel, you pull the other end of the thread around the back end of the tonearm and slide it over the small rod pointed out by the arrow shown in the second photo below.
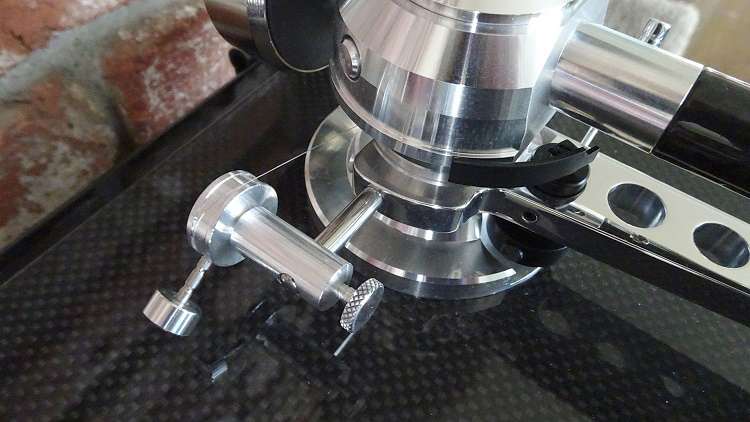
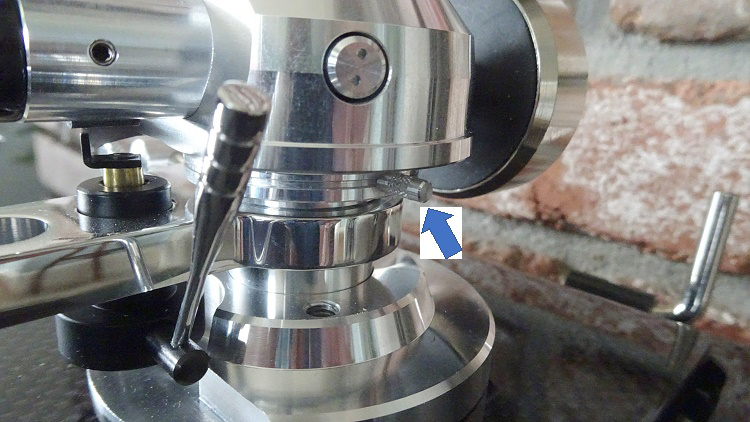
When playing an LP, there is a tendency for the stylus to move towards the center spindle because the grooves near the center are rotating at a lower linear velocity than grooves near the outer edge (the inner grooves are smaller diameter). This is what the anti-skate mechanism corrects.
So, the way the anti-skate mechanism works is that when the tonearm moves across the vinyl LP, the thread pulls on the wheel, which rotates, lifting the weight at the end. The weight serves as the anti-skate. Depending on the tracking force, you move the weight on the end of the wheel towards the end of the rod onto which it is mounted. Since the tracking force of the Jo No 5 is above 2 grams, I moved the weight out to the end of the rod.
Secrets Sponsor
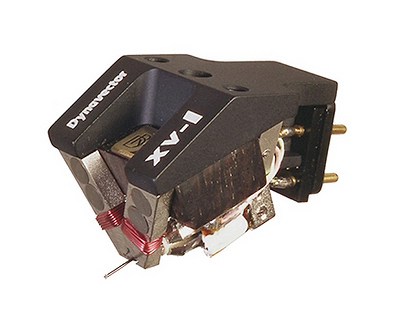
The supplied cartridge, the E.A.T. Jo No 5, is an MC (Moving Coil) cartridge. What this means is that there are two small coils of wire at the top end of the cantilever (the “needle”) arranged at 900 from one another. When the stylus (the diamond tip at the bottom end of the cantilever) moves side-to-side (laterally) or top-to-bottom (vertically) in the LP groove, the coils at the top also move. They are situated in a permanent magnet’s magnetic field, so that when they (the coils) move, an electric current is generated in the coils, one for the left channel and one for the right. This current is fed to the phono preamplifier, which applies a “Post-Emphasis” (“De-Emphasis”) curve, called the RIAA.
Here is an inside view of a Dynavector XV-1 MC phono cartridge. You can see the stylus and cantilever at the bottom, and two copper coils at the upper end of the cantilever, each at 900 to the other, and 450 to the horizontal plane of the LP. A magnet is situated above each coil (image copyright Dynavector).
Basically, the RIAA post-emphasis curve boosts the low frequencies and attenuates (reduces) the high frequencies, before sending the phono pre-amplified output (1 volt) to the main preamplifier. When the LP was manufactured, a pre-emphasis RIAA curve was applied to the musical signal, attenuating the low frequencies and boosting the high frequencies. This is done so that the lateral distance in the groove is the same for all frequencies. If this were not done, the low frequencies would have a large lateral movement in the groove, and the high frequencies would have a very small lateral movement. This, in turn, would cause the stylus to jump out of the groove when loud bass occurred in the music. Secondly, because the lateral movement in the groove would vary a lot, the low frequencies would overlap between grooves.
The RIAA post-emphasis curve restores the original loudness level of all frequencies. The crossover point for the RIAA curve is 1 kHz, meaning that a 1 kHz musical signal is not boosted or attenuated.
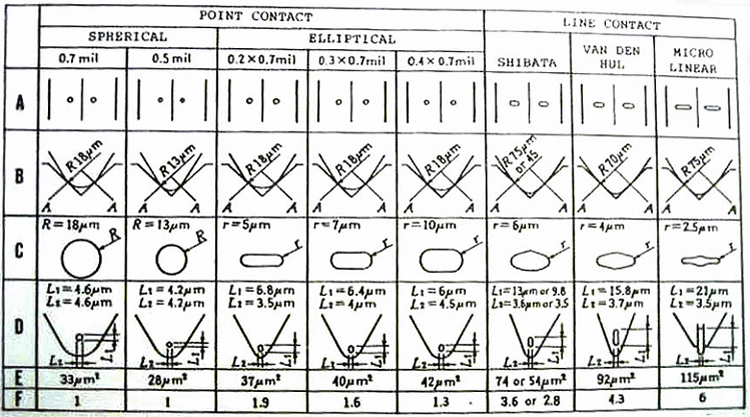
The Jo No 5 has a nude fine line stylus (diamond tip). Here is a diagram of the various types of styli. The Jo No 5 is of the MicroLine variety (diagram copyright Audiokarma.org).

The surface area that contacts the groove is shown in the figure below. You can see that the Line Contact types have about 100 µm2 surface area contact compared to about 35 µm2 of the spherical and elliptical styli from decades ago (see the second row from the bottom, Row E). This means that modern phono cartridges produce a much more accurate sound from the vinyl groove than they used to do. (Diagram copyright Audio-Technica)
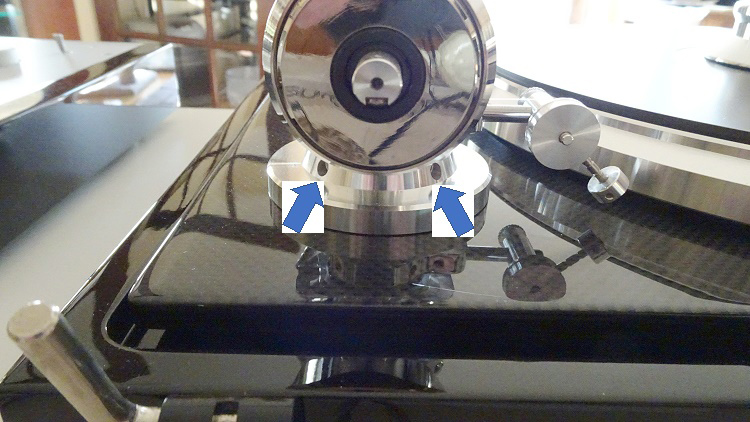
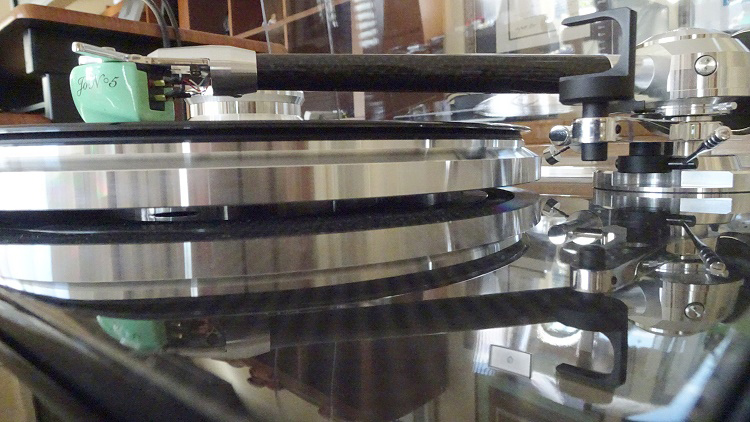
After the cartridge and counterweight are mounted, it is time to adjust the Vertical Tracking Angle (VTA). This is the angle of tilt, nose down or nose up, that the cartridge has when the stylus is in the record groove. It is accomplished by leveling the tonearm through loosening two screws at the rear of the tonearm, pointed out by arrows in the photo below, and moving the tonearm up or down until it is level with respect to the surface of an LP, shown in the second photo below.
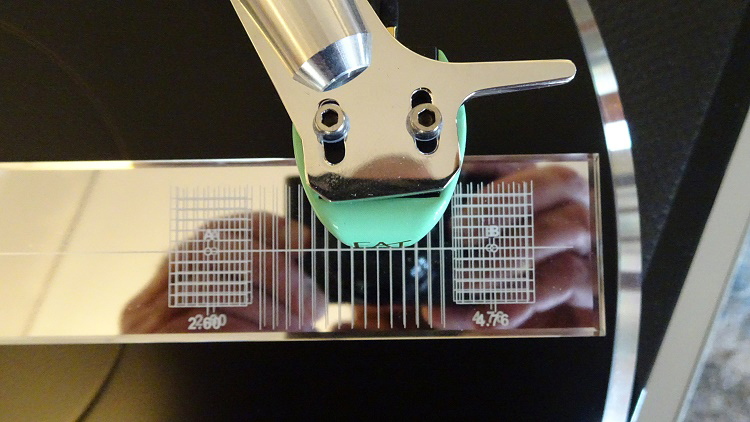
The Horizontal Tracking Angle (HTA), also called the Lateral Tracking Angle, is the tangential angle of the stylus as it sits in a groove on the LP. The front of the cartridge needs to be parallel to a line from the center spindle to the outer edge of the LP. This is accomplished using a protractor guide. One comes with the turntable, but I would advise getting one that has a guide across the entire sweep of the tonearm rather than just two points. This will allow you to adjust the HTA for any part of the tonearm arc.
I used a plastic one shown in the photo below (about $12 from Amazon). It has a guide line across the entire tonearm arc and a mirrored surface so that you can see a reflection of the base of the cartridge for easier alignment (in this case, you can also see a reflection of my hands and my camera). Note that the cartridge is mounted offset quite a bit from the center of the mounting slots because the axis of the cartridge head is not tangential to the LP grooves, so it is important that you use a protractor to align the cartridge.
The Azimuth refers to having the cartridge not tilted to the left or right, i.e., when looking at the front of the cartridge, not having the left side closer or farther from the surface of the LP than the right side, and more specifically, the cantilever is vertical.
To do this on the C-Major turntable, you loosen a hex screw on the side of the tonearm, as shown below by the arrow.
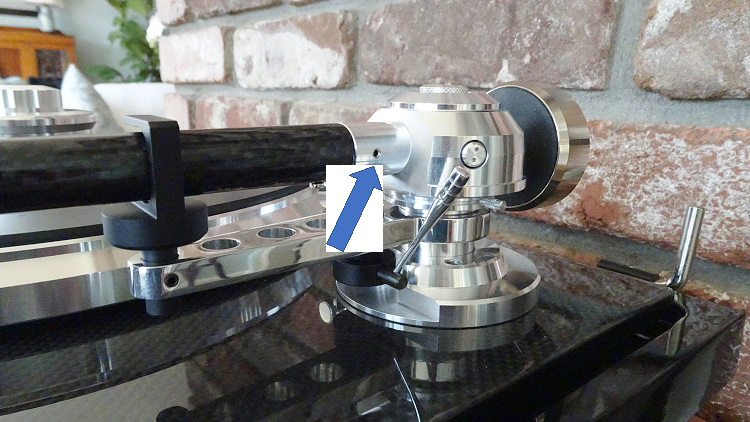
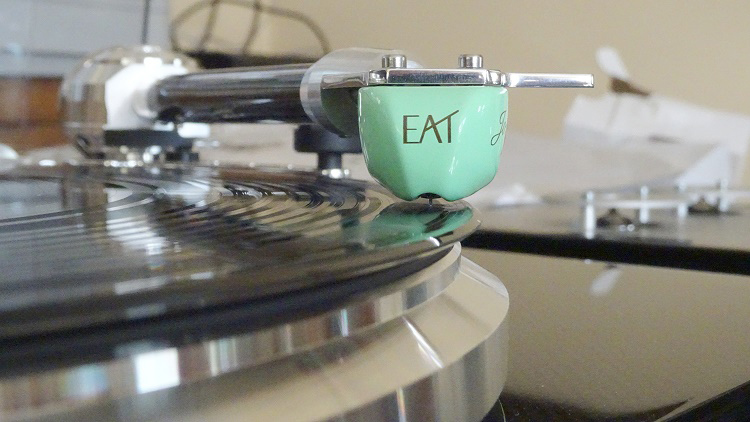
When the screw is loose, you rotate the tonearm until the cartridge cantilever is vertical when resting on an LP. Note: raise the tonearm with one hand and rotate it with the other hand. Do not rotate the tonearm while the stylus is resting on the LP. Once it is vertical, tighten the hex screw (with the tonearm raised). The photo below shows the stylus and cantilever vertical to the surface of the LP.
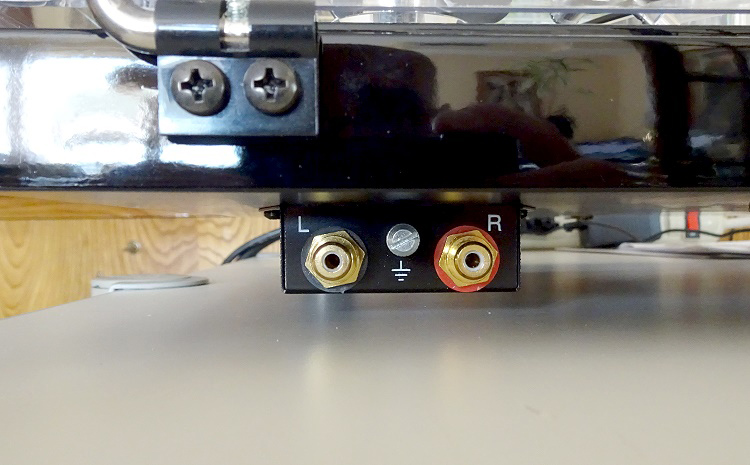
The motor is turned on by use of a rocker switch beneath the front of the turntable. The turntable is connected to the phono preamplifier via a set of stereo RCA jacks and ground terminal beneath the rear of the plinth (photo below).
Besides the E.A.T. C-Major turntable, E.A.T. E-Glo Petit phono preamplifier, and E.A.T. Jo No 5 phono cartridge, I used a Balanced Audio Technology VK-5i Pure Class A Triode Preamplifier (Fully Balanced), Balanced Audio Technology VK-500 Solid State Stereo Power Amplifier (Fully Balanced) (250 Watts per Channel into 8 ohms), and Magnepan 20.7 Planar Magnetic Full-Range Speakers. Cables were Wireworld and Mogami.

John Coltrane was one of the best tenor sax jazz musicians in our country’s history. He recorded many albums, and one that got lost was found (the tapes) recently. It has been released in several formats, including vinyl (AVER 31701; UPC 602567493013). It is not an album organized in a standard way, having tracks labeled, “Untitlted” and with more than one take.
Although the original studio master tapes were not available, Coltrane had a copy (his daughter found them), and those were used for the transcription. Perhaps it is not quite as good as it would have been if the studio masters had been available; but certainly Coltrane’s performance was not altered, and it shines on the E.A.T. turntable system I had here.
There is a realism on vinyl that just does not occur with digital. I am delighted we have such good analog equipment available now to get that feeling back that I had so many decades ago in my youth. In fact, it is much better, so I am truly enjoying myself.

Art Pepper is my favorite jazz sax man. Instead of the more common tenor sax, Art played alto, and I really love the higher frequency range that the alto sax encompasses. This particular album, Art Pepper + Eleven (AOJC 341; 888072359109; S7568) has Pepper on arrangements by Marty Paisch of music by such classic geniuses as Gerry Muliigan, Horace Silver, Dizzy Gillespie, Sonny Rollins, and Charlie Parker.
So, it is a tribute not only to Art Pepper, but several other legendary musicians. It is a great album, and it sounds great on the E.A.T. system. Very clear and musical, with plenty of detail, for something that was recorded six decades ago.

More Coltrane, but this time, with Miles Davis, in their Final Tour album from 1960 (ALEG 98741; 889854987411). Apparently, it had never been officially released, so this is a treasure. Besides Coltrane on sax and Davis on trumpet, it had Wynton Kelly on piano, Paul Chambers on bass, and Jimmy Cobb on drums. It was recorded in Denmark.
One track on the album, So What, is a tune I hear over and over again from several jazz groups. I can see why it is so popular, because it is just one of those compositions that is perfect.
I am continually amazed at how good vinyl music sounds even when taken from recordings of so distant a past, and am thankful I have access to them, especially taking into account that current vinyl lathes are much better than they were back then, and certainly, vinyl reproduction kits, such as the E.A.T. reviewed here, are also much better than they used to be.

Holst’s The Planets is something that everyone is familiar with, even if not particularly interested in classical music, but I don’t know anyone who is not interested in classical music. This Decca release from 1971 (ADEC 6529;4260019710864) is certainly a classic in and of itself. It was performed by the Los Angeles Philharmonic Orchestra, conducted by Zubin Mehta.
Track 1, Mars, the Bringer of War, is my favorite. It thunders from the LP on the E.A.T. system. The Jo No 5 cartridge does its job of staying in the groove, maintaining the flow of the marvelous, and very intense sound. The set was not completed and performed until 1919 in London, but Mars was completed in 1914, just before the outbreak of WWI.

Leonard Bernstein conducted and recorded all nine Beethoven symphonies with the Wiener Philharmoniker (Vienna Philharmonic Orchestra) between 1977 and 1979. This Deutsche Grammophon vinyl collection is available for $180 and is well worth it (ADGR 4798721; 028947987215). My favorite is Symphony No 9, the Choral.
It is beautifully conducted, played, and recorded. The E.A.T. kit made the recording shine in its full glory. I am sure glad that analog tapes of such masterpieces are now being remastered before the tapes become unusable. What is especially nice is that the recording studios are remastering only their best albums, so you don’t really have to worry about being disappointed in the music.
Secrets Sponsor
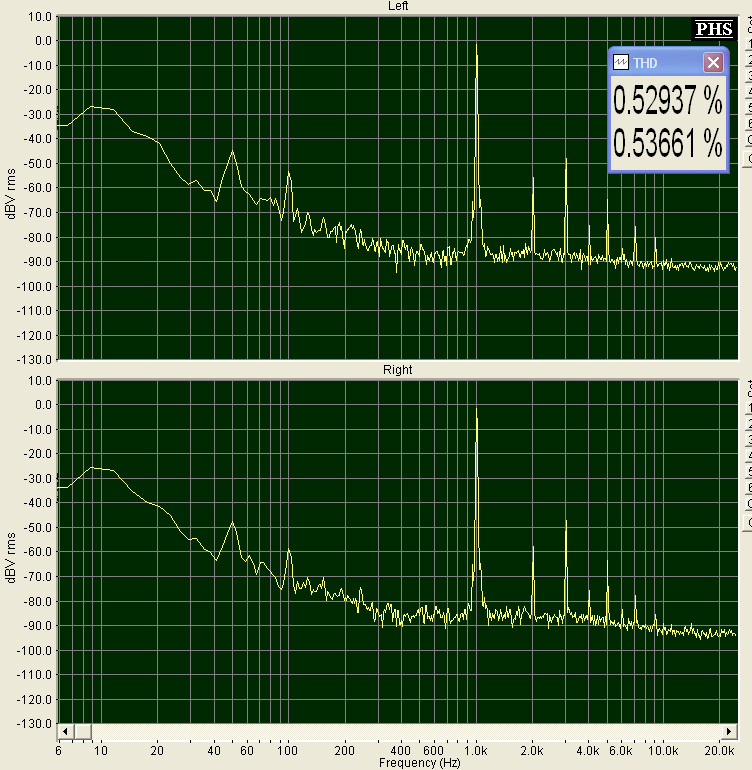
Let’s start with a 1 kHz sine wave, recorded at 0 dBu. The largest harmonic is the third, but the second is also significant. This gives the sound a little more “zip” than if the second harmonic were the largest.
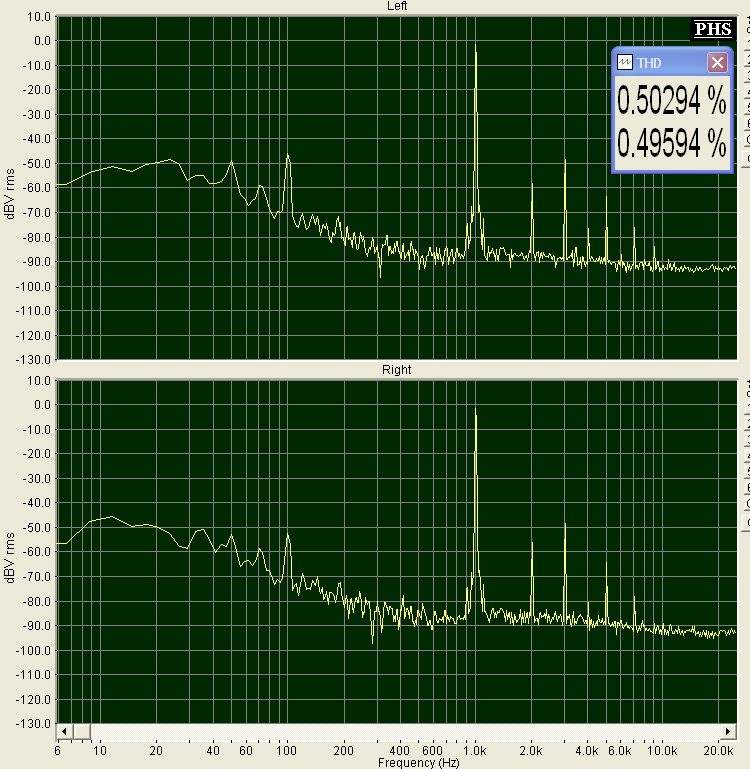
I turned on the subsonic filter for this spectrum (below), which is also a 1 kHz sine wave at 0 dBu. The frequencies at 20 Hz and lower are rolled off. So, I left the subsonic filter off for the rest of the tests.
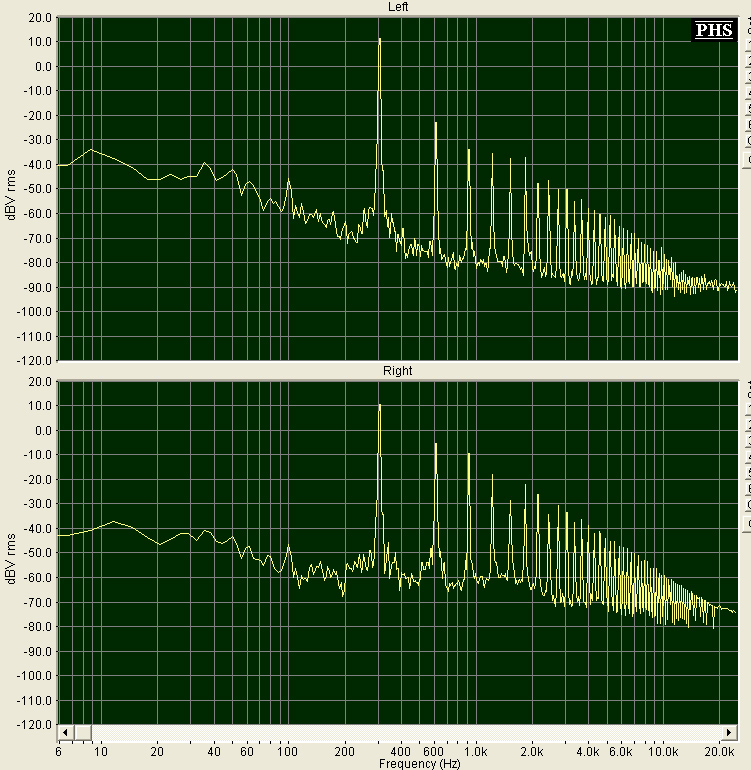
Using a 300 Hz sine wave recorded at + 15 dB, the E.A.T. Jo No 5 had no problems tracking the groove. In this case, the second-ordered harmonic was the largest.
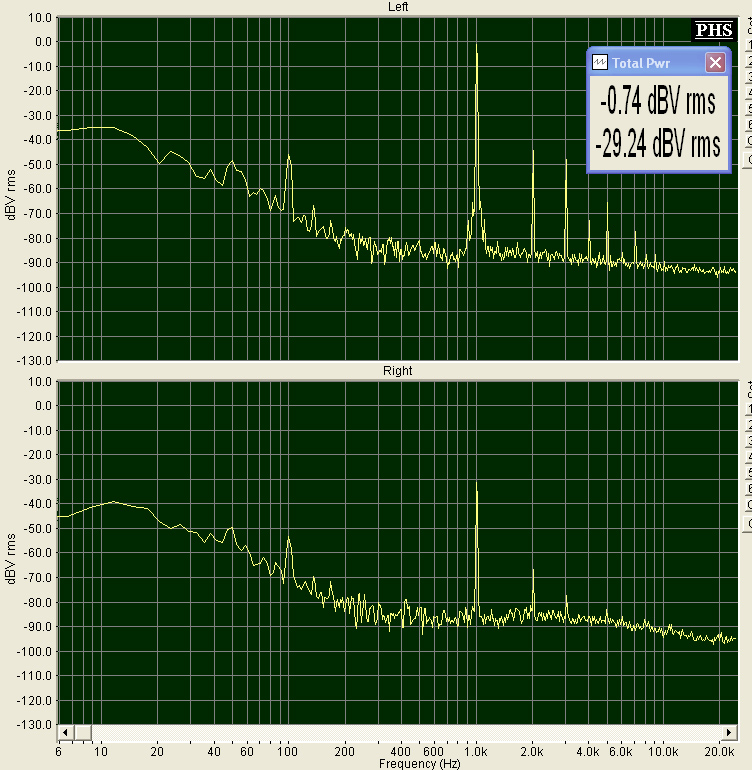
The crosstalk (channel separation) test yielded a signal in the right channel that was 28.5 dBV (30.7 dBu) lower than the signal in the left channel (shown below). So, that represents a 30.7 dBu channel separation, which is excellent. Note that the largest harmonic is second-ordered, which is different than what happened when the signal was present in both channels, shown in the first spectrum above. Therefore, two tracks produced primarily odd-ordered distortion, while a track present in only one channel produced primarily even-ordered distortion in the tracked channel and also in the crosstalked channel.
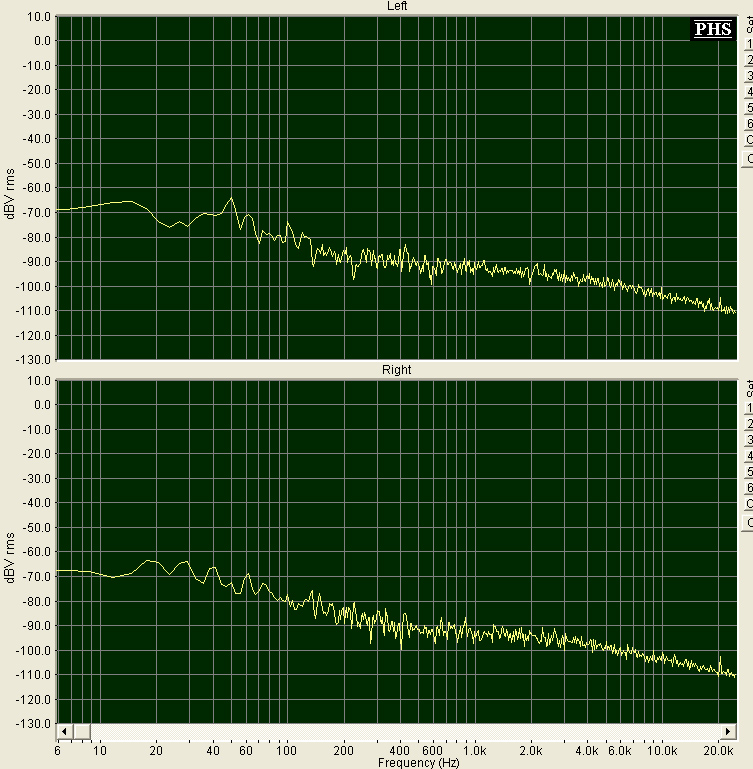
Here is a spectrum with nothing playing (everything connected and powered on, but the stylus in the arm rest, not in a groove). It shows a low frequency noise range at 100 Hz and below, about 30 dB lower than what it is when a track is played. This is surface noise.
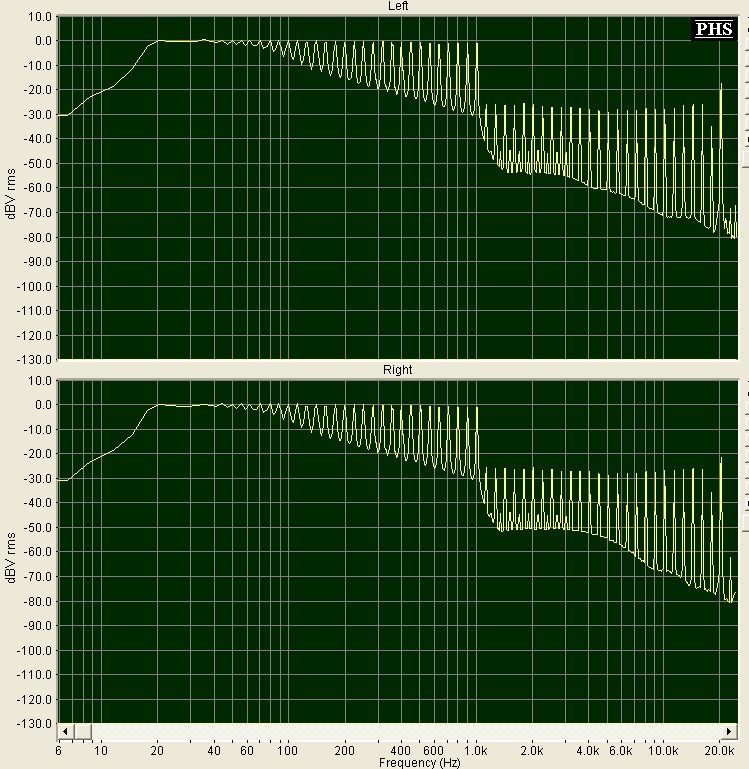
The Frequency Response is shown below. The test tracks are separated into two, one at 1 kHz up to 20 kHz, and the second at 1 kHz down to 20 Hz, with the latter being recorded at a higher level. It indicates a rising response between 1.5 kHz and 1.9 kHz as well as 12 kHz to 17 kHz, and an attenuated response between 4 kHz and 7 kHz. This gives the sound more midrange as well as some additional “presence”. The variability here is about 4 dB. Such variability is very common with phono cartridges and is what gives each cartridge design its own sound “personality”.
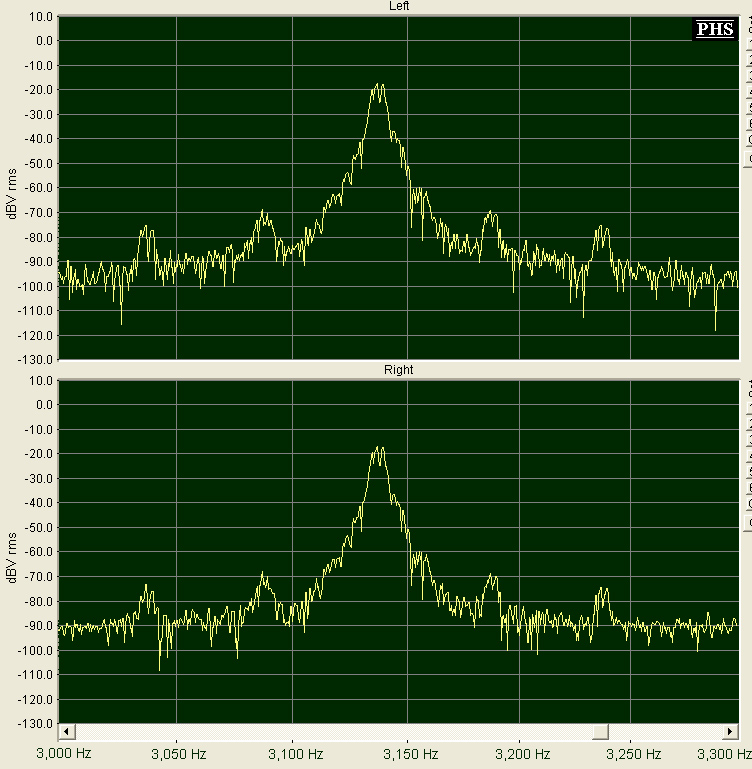
The 33-1/3 RPM Wow & Flutter test, below, shows some flutter at the extreme end of the spectrum which is outside the imaginary diagonal line that would be drawn from the peak down to the 3,050 Hz point and 3,250 Hz point, but it is because there is some speed variation (1/3 of 1% low, using the 33-1/3 RPM pulley). This speed variation is not significant, and I could not hear any evidence of the flutter.
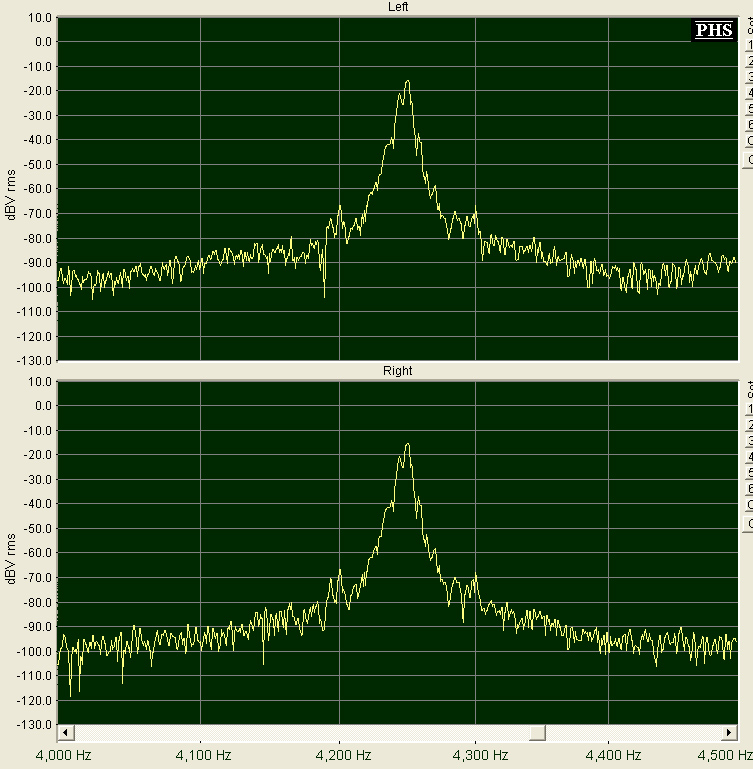
At 45 RPM, there was also a slight speed variation (the 3,150 Hz test signal peak should be at 4,253 Hz because it is being played at 45 RPM). Because this happened at both speeds, I would suggest it is caused by a wall voltage lower than 120 V, which would lower the output voltage of the motor power supply. There appears to be less Wow & Flutter at 45 RPM than at 33-1/3 RPM.

I very much enjoyed my experience with the E.A.T GEAR. It is well made, sounds great – having excellent clarity, detail, and dynamics – and the three-part package is a good value.
E.A.T. C-Major Turntable
- Fabulous tonearm
E.A.T. Jo No 5 Phono Cartridge
- Excellent detail
- Good tracking of high energy signals
E.A.T. E-Glo Petit Phono Preamplifier
- Low noise
- Many load setting choices
E.A.T. C-Major Turntable
- Removable cartridge head
- Snap-lock tonearm rest
- Manual speed change without having to remove the main platter
E.A.T. Jo No 5 Phono Cartridge
- No changes necessary
E.A.T. E-Glo Petit Phono Preamplifier
- No changes necessary


