Introduction to the JVC X30 Projector
After moving last fall, I finally had space for a projection setup and ordered a screen for my basement. When I started to look for a projector for my new home theater, the first recommendation from people was almost always JVC. For years now their D-ILA projectors have been able to produce phenomenal black levels without the use of a dynamic iris, and have presented a very film-like image. At CEDIA last fall they revamped their line of projectors again, including high-end models with a feature to provide an effective 4K resolution. At the bottom of their line they also managed to cut $1,000 from the list price for their base model while adding new features like lens memory. Once it was available, JVC sent over the X30 unit for me to evaluate and see how it performs.
JVC X30 PROJECTOR SPECIFICATIONS
- Design: Three-chip D-ILA 3D Projector
- Native Resolution: 1920x1080p
- Inputs: 2x HDMI 1.4a, 1x Component Video
- Brightness Output: 1300 Lumens
- Contrast Ratio: 50,000:1
- Refresh Rate: 120 Hz Max, 96 Hz for 24p Content
- Control: 12V Trigger, Remote-In, RS-232
- Zoom: 2x Motorized
- Lens Shift: 80% Horizontal, 36% Vertical, Motorized
- Dimensions: 6.8″ H x 18″ W x 18.6″ D
- Weight: 33 Pounds
- MSRP: $3,500 USD
- Glasses: Model PK-AG2B, $179.95/each
- Emitter: Model PK-EM1, $79.95
- JVC
- SECRETS Tags: JVC, Projector, D-ILA
Design and Setup of the JVC X30 Projector
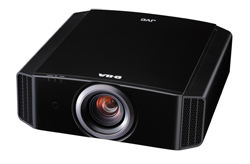
The overall design of the X30 remains very similar to the prior year models. Compared to the older Panasonic AE-900U that I had around, the X30 is much larger in size but it still fit in my rack. The main visible change on the exterior is the lack of a motorized lens cover, one reason they were able to reduce the price. All of the controls and inputs for the X30 are located on the rear of the unit, where you will find dual HDMI inputs, a component video input, Ethernet and RS232 jacks for control, and a trigger input. There is also a connector for the optional 3D emitter, remote control, and then buttons to enable full control of the unit without the remote. The rest of the unit is very clean, with large feet that make it easy to level the unit. The included remote is backlit and has a very nice layout, with one button access to inputs, display modes, and features.
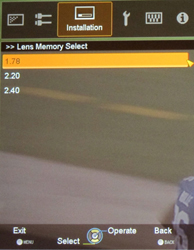
One new feature that is of great interest to me on the X30 is the addition of lens memory modes. More people have started shifting to cinemascope screens for their home theater to fully replicate the movie theater experience. Typically using one of these has required you to either manually zoom your projector or an expensive anamorphic lens system. While some projectors have had zoom memory in the past, it expanded onto projectors from JVC and Sony this year as well. The X30 has three memory positions to save zoom, lens shift, and focus for different ratios, and each can have their own name. This feature worked really well in practice and made it easy to switch between different ratios while filling as much of the screen as possible.
When it came time to setup the projector, I have to give JVC applause for the quality of their manual and their OSD. The manual covered everything in depth with clear explanations and plenty of detail. The OSD was also designed with home theater users and calibrators in mind. The default position is out of the way of meters when making adjustments, and the individual adjustment controls are at the very bottom of the screen. These controls also stay on the screen until you choose to hide them, making setup and calibration much easier than on displays with the settings in the middle of the screen, and that go back to the previous screen too quickly that quickly hide them of use the center of the screen. Other vendors would be wise to copy JVC here.
The JVC X30 Projector In Use
One film I missed in theaters last year and couldn’t wait to see at home was Drive. The film was shot with an Arri Alexa digital camera that has a very high dynamic range that can rival or even best 35mm film. The transfer didn’t disappoint is it was not only a fantastic film, but the transfer was also reference quality and brought to life on the JVC. Nighttime aerial shots of LA really showcased what the JVC does best: amazing native contrast. There were deep blacks and bright lights in the same image, but the black floor didn’t rise as it could with a dynamic iris. This led to a picture with a huge amount of pop from the wonderful contrast, much better than I had seen on a display in my home before. Daytime scenes had wonderful skin tones, with cheeks that were natural and no red push, and a very natural look. Many of the night scenes had lots of dark shadows and this was not a problem for the JVC at all and the film lacked that digital look that many films have.
Though my viewing room is traditionally pitch black, I did have people over to watch the Rose Bowl and the Super Bowl on the X30. For the larger crowd, I setup a high brightness preset that allowed for some ambient light in the room. Driving a 96″ white screen with some lights that reflect onto the screen, I could get over 43 ftL of brightness uncalibrated, and around 33 ftL with the image calibrated. Even with some light in the room, this was plenty. In the high lamp mode fan noise was noticeable when there was nothing else in the room, but wasn’t noticed during the game. Action looked good with or without CMD engaged, and I left it off for the Super Bowl. Paired with something like a Black Diamond screen, the JVC would do great in a bright living room for watching sports.
People seemed to love or hate Tree of Life, but there would be no disagreement on the technical aspects of the Blu-ray. With possibly the single best transfer I’ve ever watched, Tree of Life was a visual feast for two hours that was continually jaw dropping. Shots of people show not smooth skin, but the tiny wrinkles and creases on the foot of a newborn baby. Every single scene came to life through the JVC, revealing textures and details that were captured on film. It’s not a film most people will choose to show off their home theater, but it should be as the picture quality was unbelievable.
Of course the X30 is the second year of JVCs 3D projectors, though it does not ship with either the emitter or the glasses. Hooking up the emitter was easy once I remembered that the IR signal will reflect off the screen, and the glasses charge with a simple USB cable. I watched a variety of 3D content, but mostly watched Tron Legacy and Cars 2. I felt that Cars 2 performed well with it’s punchier palette and style of 3D (into the screen, instead of out of the screen), though crosstalk was clearly visible on the cars eyes and the flyover of Porta Corsa. Tron Legacy also had crosstalk, but the light loss from the 3D glasses caused a duller image and I eventually went back to the 2D version of the film to finish watching it. I didn’t have any sync issues with the glasses, and they were reasonably comfortable for watching a film. If I was going to watch a lot of 3D with the JVC, I would consider something like a High Power screen with a gain of 2.0 or more to deal with the light loss from the glasses. It was fine for occasional use, but I am not a big 3D fan anyway.
The JVC X30 Projector On the Bench
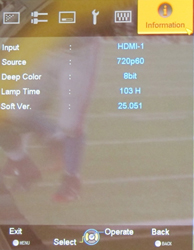
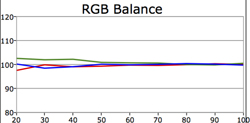
The X30 features a partial CMS, whereas the X70 and X90 models have one an THX/ISF modes. The calibration was performed after 100 hours were put on the bulb, using CalMan 4.5, an i1Pro and i1Display Pro, and a Quantum Data 882E. On my 122″ 2.40 Screen Innovations Solar HD screen, the 6000K temperature preset measured right around 6700K and was the closest mode to start with. The two point grayscale controls in the X30 let me dial in the 80% and 30% values to very close to reference and the rest of the grayscale came into line after that. The dE across the grayscale was under 3 and while it could have been adjusted even more, that was good enough.
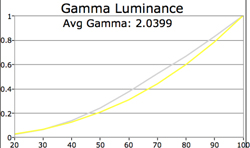
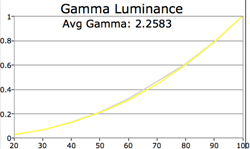
Since I have a totally light controlled room, I aimed for a gamma of 2.3 and used the custom gamma settings on the JVC to get there. I set Custom 1 to a gamma of 2.3 that measured very close to the target, leaving me a gamma of 2.25. You can further tweak the gamma settings with individual point controls, but I found that doing so causes image posterization. The small benefit to gamma is certainly not worth the loss of image quality you would get from doing this so I would leave those adjustments alone.
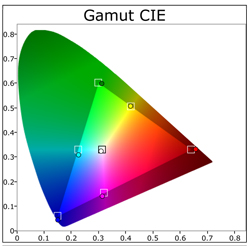
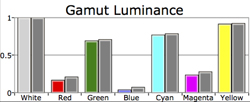
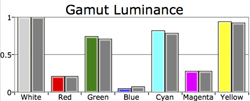
With the lack of a CMS I wasn’t able to get the colors perfect, but the Standard color mode was pretty close to the Rec. 709 color points, and I was able to use the Color control to get the luminance level adjusted. Even with no controls, the only color that showed a dE 1994 over 3 at the end was blue, which is where we want our color error to lie. The JVC gamut is large enough that you can use an external CMS, like a Lumagen Radiance, if you really want to get the image perfect. I did for some viewing and it looked phenomenal.
After calibration, with the iris fully open, the lamp on normal, and a 1.3 gain, 96″ 16:9 screen I had over 22 ftL of light with a full white pattern, which was very bright for watching in darkness. When I used the zoom feature to totally fill the 122″ 2.40 screen the light level dropped down to around 15 ftL, which was still very good for watching a movie in darkness. Later on you could add an anamorphic lens to the JVC, as it supports both anamorphic modes, and avoid this light loss for cinemascope screens.
With the lamp in normal mode and measuring directly off the lens, I measured an on/off contrast after calibration of around 17,000:1. With the lamp on high, that improved to 27,000:1 and it got all the way to 37,000:1 using the smallest lens aperture. Though screen dependent, I did measure the contrast ratio off the screen and my low black reading would shift between unreadable, or 0.001 ftL, giving me a contrast ratio of over 20,000:1 from my screen.
Before
After
After calibration, the only measurement that didn’t fall perfectly in line was the blue dE measurement, which is the least important of all the measurements we take, and leaves the JVC with a near perfect calibrated image. You can see from the test bench results that the JVC handles all colorspaces quite well, and the only issues I found were with component video, which really isn’t much of an issue anymore. Since HDMI syncing took a couple of seconds on the JVC it’s hard to be sure how quickly it locked onto every test pattern, but it had no issues losing that cadence lock with them, and overall performance was excellent.
Conclusions About the JVC X30 Projector
Now that I have the space for a theater, I plan to avoid going to the cinema as much as possible going forward. With the JVC X30, I didn’t miss going to the theater at all as the image it presented let me fall into watching the film and forgetting everything else. The black levels were amazing compared and the contrast, which the ISF finds to be the most important element of an image, was spectacular. My initial worries about the lack of a CMS were unfounded when I saw how well the image calibrated at the end and the lens memory worked wonderfully in my experience. If you are going to watch 3D all the time I might suggest looking at a different projector, likely a DLP, to avoid ghosting, but for watching films the JVC is a wonderful projector and one that might find a place in my own theater on a permanent basis.
{tortags,1445,1}


