DIY Project # 4 - Tactile Transducers - June, 1997 Design by Chad Gray
(If you would like to have your DIY project
published in Secrets, please E-Mail Ralph Calabria at [email protected].)
About the Designer by Ralph Calabria
Chad Gray is a commercial photographer (you can tell by the quality of the photos in his article). His hobbies include homebrewing beer, computers, racing his 1991 Talon Tsi, and of course, speaker building. Chad has been involved in speaker building for about two years, and like a lot of newcomers to the hobby, he has utilized the Internet as a learning resource. His DIY projects include a pair of Vifa MTMs, a Madisound design - The Sledgling, and a subwoofer based on the NHT 1259 (with a full description of this subwoofer soon to be published here in Secrets).
The tactile transducer can be catagorized as the "touchy-feely" part of home theater. For those of you who enjoy the thunderous bass found on movie soundtracks, or the cannons of the 1812 Overture, you'll find the tactile transducer to be a lot of fun! Little or no speaker-building experience is needed to construct a very successful tactile transducer. The key to making the tactile perform properly is attention to the setup, i.e., tuning the tactile and selecting the proper crossover point with respect to the rest of your system. For all you "movers and shakers" out there, this is all explained in the article. Enjoy!
Table of Contents (you can click on the list to go to
specific item)
Introduction
The testing gear
The driver
The materials
Final thoughts

Introduction
Have you ever noticed yourself turning up the level of your bass during movies because you want to feel that thermonuclear explosion in T2, or the footstomps of the T-Rex in Jurassic Park? Wouldn't it be nice to have something in your home theater setup that would reproduce the low frequencies that you want to feel more than hear, rather than constantly turning up the volume on your sub? That's where the Tactile Transducer comes in. You can keep your sub at a normal level, and have the Transducer handle the movie effects that you want to feel.
I read an article about Clark Synthesis' Absolute Tactile Transducers (TT), and after reading the article, I just had to learn more about Tactile Transducers. When I saw the price tag on the TTs, I knew I'd be able to build a much cheaper TT. So I turned to one of the more valuable DIY audio resources available: the Internet. After a little searching, I found Stan Marcewicz ([email protected]). Stan has 4 Aura TTs mounted to his couch, and one DIY TT mounted to his floor joists. He helped me come up with my plan for a DIY TT, and the following article is based on his original work. Copyright is acknowledged to his previously published ideas where applicable.
Now, I know what you are thinking. I was skeptical about TTs as well . . . especially DIY TTs! They are UGLY, and very basic, but it only took one movie to change my entire outlook on the concept. Once I experienced "the force" of the TT, I went back through my entire movie collection to see what other effects I could feel. TTs are one of those upgrades that, once you watch a movie with them, the movie seems BORING without them.
The testing gear
My current system consists of a very old Technics receiver with the very first version of Dolby Surround (no center channel). Plans are underway for upgrading to a Marantz as soon as I can scrape up the fundage. I have DIY Vifa MTMs for my fronts, Madisound Sledgelings for surrounds, and a DIY NHT-1259 for a sub. I am now powering my NHT sub and the TTs by running the REC outs from the Technics to another inexpensive receiver. This works well, because I have the sub on the left channel, and the TTs on the right channel. By adjusting the left/right control, I can select the sub/TT ratio that I like for different movies. If I want to listen to music, I can easily (and preferrably) turn the TTs off. There are many different ways to hook up TTs to a home theater system. Personally, I think the best way to run a TT is to split the sub output (an RCA line output jack) on your receiver/amp. You can use an RCA plug "Y" splitter (one RCA plug connected to two RCA jacks). Run one RCA line of the splitter to an inexpensive receiver. This receiver will power the TTs. Then run the other RCA line to your powered sub.
The driver
The type of driver that works best for a TT is one with a long throw, high-temperature voice coil. I am presently using old Pioneer drivers that I salvaged out of some old speakers. They are model #A25FU20-53F 8ohm, and I am pretty sure Pioneer does not make them any more. The specs for the driver are given below:
Fs=35 Hz
QTS=0.27
QMS=2.8
QES=0.3
VAS=4.41ft3
XMAX=2.4mm (the larger the number, the better)
20 oz magnet (the heavier the better)
60watts rms (the higher the better)
10" driver
They are not really the ideal driver for a TT, but just old drivers that I had lying around. As I mentioned before, any driver with a long throw and high-temperature voice coil is acceptable. I do not recommend using a driver larger than 10", however, just because it's easier to assemble and install smaller-sized drivers in your couch or floor.
One thing that you must do is make sure you are not vibrating your hiney with voices (unless you're into that kind of thing :-). I have found that using a 70 Hz low pass crossover seems to work the best. I also recommend having the TT on a separate power amp. The more control you have over the amount and type of vibrations, the better the TT will perform.
The materials
The materials that you will need to make a TT are as follows:
An Exacto Knife.
3-4 tubes of 5-minute epoxy.
A piece of steel (I used 1 3/8" wide, 14 gauge (which is about 1/16" thick).
Weight that can be adjusted during tuning (I used a slab of lead that I cut into strips).
Zip ties, or hose clamps to attach the weight to the steel.
A test CD that goes from 20 Hz - 200 Hz is nice to have for the purpose of "tuning".
Assembly of the TT is quite easy.
Step one: Cut the cone away from the dust cap, and frame. Be careful not to cut the wires that connect to the base of the dust cap (they conduct the signal to the voice coil). The cone is removed because you do not want the TT to produce sound by itself. This allows you feel only vibrations that are produced by the voice coil, and which are transmitted to the fabric in your couch, and thence to thine rear end.
Step two: Put several thin layers of epoxy on the dust cap. Take your time here, and do several thin layers, not a single heavy one. The epoxy strengthens the dust cap so it does not tear apart from the strain that will be placed on it.
Step three: Cut your steel to the appropriate length. The steel that you choose must be stiff enough to keep the lead weight from sagging. The thickness of steel that I used at a 10 inch length would be able to hold about 4 lbs before sagging. I was lucky enough to be able to mount my steel to the lip of the basket. Depending on the driver you use, you may have to attach the steel to the basket arms. If you have to do this, bend the ends of the steel up to comform to the angle of the arms. You want the steel to hover just over the dust cap. You do not want the steel to press down on, or rest too far above the dust cap. Make a mark on the steel that is directly above the dust cap. Drill a hole approximately 1/2 inch in diameter through the steel. This hole will be used in step five to drip epoxy through to the dust cap, and to glue the steel strip to it.
Step four: Attach the steel to the basket by drilling holes through the steel, and basket. Then use nuts and bolts to secure. My TTs vibrated the nuts right off the first couple times I tried them, so make sure you use lock washers. Do not overtighten the nuts. This will result in bending the basket, causing it to change shape. [click here to see photo.]
Step five: Make sure you are on a level surface so the dust cap centers itself. Drip epoxy through the holes of the steel so the steel attaches itself to the dust cap. MAKE SURE THE DUST CAP DOES NOT MOVE. If the dust cap gets out of alignment, the voice coil will rub, causing it to make an aweful noise. Make sure you are generous with the epoxy. The stronger you make the connection to the dust cap, the better the TT will perform.
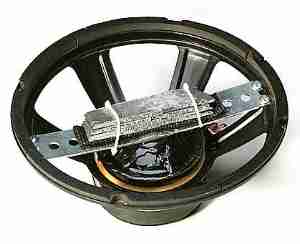
Step six: Apply about 2 pounds of lead weight to the center of the steel. You can use lead sinkers from a fishing shop. I found slabs of lead at a Mom-and-Pop hardware store, and I was able to cut them up with a hack saw (the lead, not Mom and Pop). If you use lead sinkers, place them in a old sock, then use duct tape to wrap them up tightly so they do not rattle. If you look at the close-up shot of the lead, you'll notice that I placed a piece of rubber between the lead and the steel. If you don't do this you will experience a rattling noise. I used zip ties to attach the weight to the steel. [Click here to see photo.]
By adding weight, you are essencially lowering the Fs, and "tuning" the TT. I do not have the equipment necessary to measure the Fs of my TTs. I just used a test CD until I got the best vibes at approximately 30 Hz (sort of like tuning by the seat of your pants!) Weights can be added or deleted until the TT is "tuned". [Click here to see photo.]
Step seven: Mount them to whatever you want to vibrate. I mounted mine to the wood frame of my couch. I wired them in parallel so I would achieve a 4 Ohm load, and used a piece of rubber to cushion each of the mounting points on the couch. If you don't use a piece of rubber in between the wood and the TT, you will experience a rattling noise.
Final thoughts
I am sure that my design can be improved upon. This kind of DIY project offers many opportunities to use your imagination to make it better. You will find your bass will seem much tighter, and well defined. The spousal acceptance factor (SAF) will also be through the roof! I think you will find that this will be about the biggest bang-for-the-buck improvement for your home theater. You will have to tweak the setup until you get the desired effect, but once you have it dialed in, you WILL love them as much as I do.
Chad Gray
Click here to reach Chad by E-Mail.
![]()
� Copyright 1997
Secrets of Home Theater & High Fidelity
Return to Table of Contents for this Issue.
Magazine Publishing Solutions by