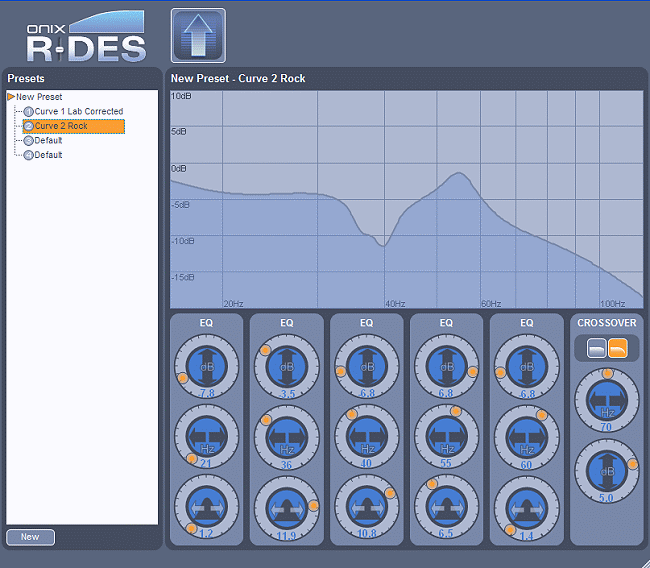
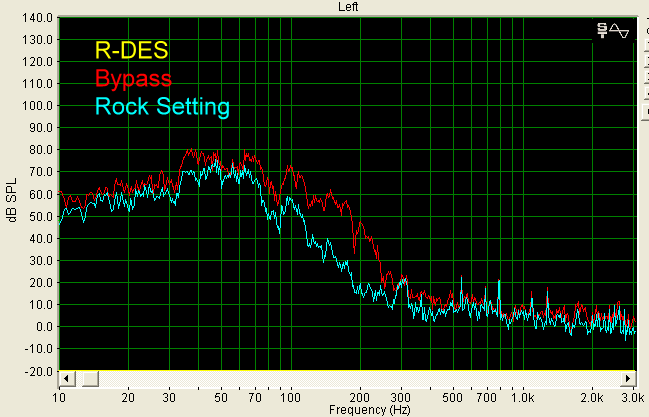
I also made a curve called "Curve 2 Rock", shown below,
first, in the R-DES program, and then the resulting room response.


What I was looking for here was a flat response between
about 35 Hz and 70 Hz, with a roll-off below 30 Hz.
Now, you will have to be patient. This process is slow,
because you have to create the EQ curve, then click the up arrow at the top
of the R-DES program, which uploads the curve to the R-DES box (watch to see
that the LEDs will blink on and off to indicate a successful upload), make
sure the correct memory bank LED on the R-DES box is selected (representing
the curve you just uploaded), and then go through the test tone procedure
again, to see how the EQ curve has flattened out your room response.
You will find - unless you are incredibly lucky - that
the room response still has some dips and peaks. That is because the EQ
bands overlap to a certain extent, and making the EQ curve is a best guess
procedure.
OK, I am a very impatient guy. So, here is what
I suggest:
You can use the graph paper technique if you like, and
it does work, but to save time, download an RTA (Real Time Analyzer)
software program that will let you view the entire audio spectrum, which
will change in live time, as you adjust the EQ curve. Yes, that's right. Instead of
measuring one frequency at a time, you can look at them all, and watch the
response curve change as you adjust the EQ bands. This will save you mucho
on the clocko.
There are plenty of commercial RTA instruments out
there, and most are quite expensive. Many of the RTA software programs that
you can run on your computer are expensive too.
Well, besides being impatient, I am also frugal. So,
how about FREE?
I did a search, and found a freeware program that is
incredibly good. If it were $100, I would still say it was an excellent
value. But at a price of $00.00, it is really an excellent value.
The program is called Visual Analyser Version 8, and is
available at
http://digilander.libero.it/hsoft/
You will also need a decent microphone, and what you
spend is up to you. But, it doesn't have to be terribly expensive. My
suggestion is to spend about $100 for a microphone setup (microphone and
phantom 48 volt power supply). Something like a Behringer ECM8000
Measurement Microphone (http://www.zzounds.com/prodsearch?q=&cat=2821&cat2=3526&ob=p91&button=Filter+Results&form=search)
at $50, plus the 48 volt power supply, such as this one at $40 (http://www.zzounds.com/item--ARTPHANIII).
Then, you need an adapter that mates the XLR output of the microphone to
whatever input jack you have on your computer sound card. Note that you will
also be able to measure a room response for the entire audio spectrum with a
microphone and RTA program, as well as measure THD of your speakers and
subwoofer. So, it is a good investment if you plan to tweak your listening
environment.
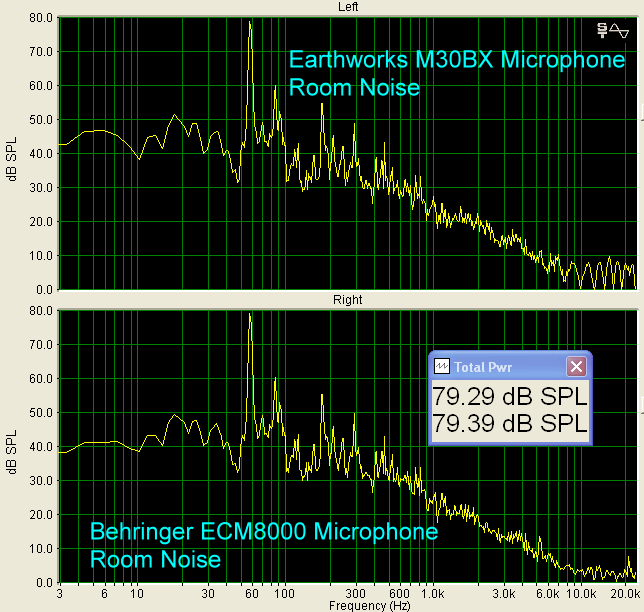
I measured the Behringer microphone against one of my
calibrated microphones (placed close together on a chair), using the sound of an air conditioner running in the
room, and it appears to be very close in frequency response, as shown below
in the graphs.
Below 30 Hz, the Behringer has a 2 dB attenuation compared to the calibrated
microphone, so by adding 2 dB to the Behringer SPL at frequencies between 20
Hz and 30 Hz, it should be accurate.

Here is the frequency response chart for the Behringer ECM8000 microphone
that is published on the Behringer website. Data are not provided for the
response below 60 Hz.

Click Here to Go to Part IV.