|
Module Forgotten
Ok so shame on me. So let’s talk about why the DTR 10.5 is a perfect receiver
for me. When I first went through my requirements for features, I had no need
for HDMI, I had neither a monitor nor component with HDMI.
You know where I’m
going with this already. I customized the Integra and ordered all but the HDMI
module. Now the good news is I can get online and order the HDMI module if I
so desire. Thank you Integra.
 Set-up Set-up
The DTR 10.5 takes you through the typical yet thorough set-up menus. The first
set-up is for hardware, specifically the remote control. If by chance you’ve
placed this receiver in a room with other Onkyo/Integra products, you may
select an alternate ID in case of interference.
I have already discussed the speaker options afforded to you with the 10.5. However, one excellent feature is the ability to set speaker impedance
differently for each; fronts, center, and surrounds from 4 to 8 ohms.
Speaker crossover can be set differently for both Speaker A and Speaker B
setups. You’re reminded that THX is set for 80 Hz, but you can also use 40 Hz to 150 Hz at
10 Hz increments including full band if you're either not using a subwoofer or if
you just prefer all speakers to receive the entire bandwidth. Also you may
specify the low pass filter for LFE signals in a similar fashion.
A notch filter for low frequencies allows you to make adjustments to your room
response if need be. You specify the frequency Depth in 0.5 increments from
0 dB to -15 dB. The Width (the Q) can also be selected in the range you’d prefer, say
for example between 95 Hz-105 Hz.
The built-in test tones for calibration are fixed at the THX-required 82 dB. In
other words, don’t be calibrating late at night, the master volume control is
inactive. Adjustments for all channels in 0.5dB increments from -15 dB to +12
dB are available.
THX audio set-up is predominately a subwoofer issue. Ultra2 requires
subwoofers to perform down to 20 Hz, if your subwoofer is not down to the
challenge, choose No and disregard the Boundary Gain compensation for
excessive room bass. This can be set for either speaker A or B setups.
Finally in this set of menus, are the audio and video output assignments. You
are afforded a lot of options for assigning both analog and digital audio
sources, and likewise for video, including HDMI (if you chose that module).
This is the opportunity for you to take advantage of the outputs for all three
zones.
The input setup menu is extremely involved. You may choose a different
configuration for each of the 14 sources from DVD to Net Audio. For each
source there are seven menus including Audio, Video, Listening Mode, Character
Edit (changing the name on the OSD), Volume Control, Delay (Global, for A/V sync), and
12V trigger assignment.
Audio assignment consists of choosing: the analog audio, multi-channel (5.1 or
7.1), subwoofer sensitivity from 0 dB to +15 dB, the digital audio assignment
(choose one of the six coax, or six optical), and whether you want it
automatically detected, and finally if you’re using the i.Link for your
connection.
The video mode is self-explanatory, assigning the right connection for each
source,
while the listening mode allows you to preset your preferences for the
specific source playback mode. For example, you may choose to play back DTS
material as THX, or analog material as PLII/Neo:6. These are just presets and
can be altered during the actual performance. Of course the benefits of this
feature are huge. Once every source is set to your liking, you never have to
fumble to set your preferences.
I cannot begin to describe the options for the Listening Mode set-up. Source
material such as DTS, Dolby Digital, or i.Link (for both DVD-Audio or SACD
independently), have numerous preset options. You may choose to
play back Analog/PCM sources in Pure Audio or Direct mode (which has no
processing associated). Needless to say, each listening mode, such as mono or
stereo can each be altered for Re-EQ, channel inputs, etc., each with specific
options for LFE levels and Re-EQ (Re-EQ is described as adjusting the treble in soundtracks for home theater
so that they are not harsh, since the high frequencies can be boosted at the
theater so that they are heard by viewers who may be 50 feet away from the
speakers).
There are a dozen listening modes, including; Mono, Stereo, Direct/Pure Audio,
Multi-channel, i.Link for DVD-Audio and SACD, Dolby Digital, Pro Logic, THX,
and even Dolby Headphone. Each has a set-up sub-menu for your preferences. For
example, THX has modes for EX, 5-channel, 2-channel and how you want each set
of speakers (fronts, center, rear, and subwoofer) to perform, and both THX Cinema for
large spaces and Ultra2 Cinema for playing 5.1 sources as a 7.1 setup.
I think you get the picture . . . . plenty of features to suit your
individual tastes.
Audio adjustments allow for tone control: bass, mid, treble for each channel
from -12 dB to +12 dB in 1 dB increments, including bass EQ for the subwoofer.
This can come in very handy when working with speakers that are very
different from one another in the front vs. the rear of your room.
A preference menu gives you options for volume control, headphone level set-up,
the OSD set-up and position on your screen. Speaking of the display, you may
also change the character display for each input, to remind you which input
you are working with.
Noteworthy is the network set-up feature for manually interfacing with your PC
network. If the DTR 10.5 is connected to a broadband router, no set-up is
really required because the receiver is defaulted to Enabled, or Automatic.
Setting it to Disabled requires manual inputs for the IP address.
Lastly, you may lock your selections, and also, like a computer, see the master
firmware version, including i.Link, Net-tune, and HDMI, so you will know if
you have the latest version when you check the Onkyo website.
What is conspicuously missing is an Auto Room EQ, common in receivers even
half this price. I’m not sure that is a criticism rather than an observation.
Most would subscribe to room EQ as still somewhat controversial. I suspect
Integra has catered to the professional installers who certainly handles EQ in
their own way.
Operations
The operations of the DTR 10.5 must begin with the remote control, which is a
significant piece of equipment. Many high end receiver manufacturers subscribe
to the theory that no matter what they include, the end user will undoubtedly
replace it with an after market universal remote, while other manufacturers
prefer including a substantial learning remote out of the box. Integra is one
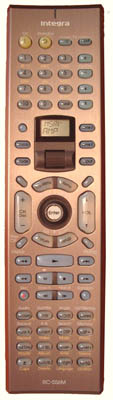
of the latter. This remote truly has everything. It is a good size, with plenty of
controls. This polished grey metal-faced unit is about 9 inches long and
although rectangular, the bottom is contoured to your hand.
Here are my issues with the remote:
Firstly, it’s very complicated and actually over-featured. The amount of
information on the remote forced Integra to make the buttons too small.
Other than the volume/channel buttons, all other buttons are the same size.
The unit is somewhat ergonomic, and when placed in your hand, your thumb
is right on the volume, channel controls, and the rocker set-up Enter
button.
Secondly, the main LCD display (about 1 cm x 2 cm) indicates which component
and which input are controlled, but the letters are small and hard to read. The entire unit is
backlit, but very softly, and even with fresh batteries, is in no way
understandable in the dark. The demanding remote is a battery eater and forced
me to replace them several times in the four months I’ve operated the DTR-10.5.
Functionally on the other hand, it is a remarkable unit in its content and
controls. The scrolling-roller under the small display can be pushed to access
the amplifier and thus choose the correct input. Once the input is chosen, the unit reverts
to the controls for that particular input. If you decide to switch inputs
again, you push down on the roller.
Click Here to Go to Part IV.
Terms and Conditions of Use
|

