|
Introduction
Recently
I found there was literally no more floor space for the components scattered
across my floor. In fact, I began to tiptoe through the space like there were
mousetraps everywhere. Cables and speaker wires, remotes, manuals, it was
outrageous.
The answer of course was that I needed a rack. I move equipment around all the time, and if I’m
not moving them, I’m constantly switching wires and cables from unit to unit.
I needed a rack flexible enough to have access from all sides, sturdy yet
lightweight enough to move around and still look good.
Searching websites, local dealers, and shops just didn’t quite give me what I
was looking for. Most were monstrous: glass and steel, glossy cherry-wood, all
quite heavy, over-designed, or just plain too expensive. I realized my only
option was to build one myself.
Having said that with the criteria as stated, I decided I wanted it to be
entirely of wood, because it would make it much easier to work with and shape,
as well as lightweight. And of course sonically I like the nature of wood under my
components.
Selecting the Materials
The material I chose was plywood, and the one I was thinking about was called
Baltic, or Russian plywood. It’s used for furniture and comes in a
variety of thicknesses. Made of odd number of layers 5, 7, or 9, its thickness
is in millimeters. The layers are tight and visually appealing allowing me to
finish the edges without applying another edge-cap. The outer finish layer is
birch veneer.
Contacting a carpenter friend of mine about the project, I was surprised one
day as he dropped off a sheet 5’x5’ square and 7 layers thick, about 25mm, or
not quite ½”. He said anything thicker would have required special order and
certainly increased the price accordingly.
 He
became quite fascinated and asked me for a sketch. I envisioned four shelves with
plenty of airspace on four legs. The idea became then to make use of every bit
of the sheet yet not have to buy any more. For under $30, this was quite a
challenge. He
became quite fascinated and asked me for a sketch. I envisioned four shelves with
plenty of airspace on four legs. The idea became then to make use of every bit
of the sheet yet not have to buy any more. For under $30, this was quite a
challenge.
Further it was my thought to construct the unit without fasteners, purely
relying on joinery and glue.
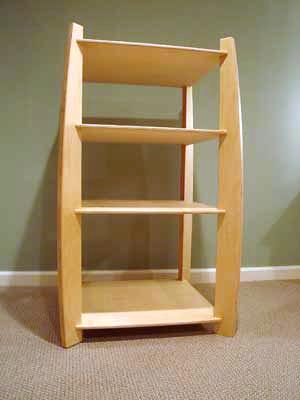
The design is simple, with four legs and four fixed shelves. I turned the legs
diagonal to keep the unit visually slender and yet give it more rigidity. We
decided for strength to double up the legs making them 50 mm thick. We kept the
22”x22” shelves the original thickness of 25mm. Since it would be about 4 fee tall, I was
concerned over the shape of the legs making the unit visually bulky. With the
legs already turned 45 degrees to the shelves, the decision was to taper them
so that they would be
more slender at the top than the bottom. Aesthetically and functionally, this
would
suggest putting the heaviest unit on the bottom, while the lightest on top. Shaped
like a tall sail, the legs are nicely proportioned.
Construction
The tools required include a table saw, a jigsaw or bandsaw for shaping, a
router for easing the edges, large pipe-clamps, wood glue, and polyurethane for
finishing.
 Making
the most efficient use of the one sheet, I laid out the pattern in sketch form
first and then full scale on the sheet of plywood. Very little was wasted. I
do recommend using scraps to practice making the joints, critical to the
design. I also suggest leaving extra material especially on the legs if you
decide to shape them as I did. Making
the most efficient use of the one sheet, I laid out the pattern in sketch form
first and then full scale on the sheet of plywood. Very little was wasted. I
do recommend using scraps to practice making the joints, critical to the
design. I also suggest leaving extra material especially on the legs if you
decide to shape them as I did.
Once the eight legs are cut, glue two pieces together making note of the grain
direction. I decided to alternate vertical with horizontal. After the glue has
dried, gang all four legs together tightly in a vice and belt sand the curve
desired.
With the legs turned 45 degrees, you must clip the shelf edges, the diagonal
measuring the thickness of the legs. The idea of course is once the legs are
slid into the notched legs, it sits tightly.
I used a preferred 1/8” round-over router bit on all the edges, shelves, and
legs. However, avoid the corners of the shelves where they are to intersect
with the legs.
Notch the legs while they are still ganged on your table saw where the shelves
will be inserted.
Lightly sand all the pieces prior to assembly; it’s much easier and you’ll get
a better finish.
Assembly is a matter of gluing one to four shelves to one leg, applying a
pipe-clamp, and letting it dry before gluing the other legs.
Wood is not perfect to work with, specifically it warps. You may find upon
assembly that one leg doesn’t sit flat on the floor like the other three. Also
if by chance your joints aren’t as tight as you need to keep the unit rigid,
you could apply diagonal bracing, I’d recommend for this design, 1/8”
stainless steel cable. This would surely add significant stiffness and
maintain the nature of the design.
 We
finished the unit with two coats (sanding between each) of clear polyurethane.
Consider whether you’re using a water-based or an oil-based finish.
Water-based will achieve a more blonde appearance, while an oil-based will be
somewhat more yellow. Of course you could also stain to any color you
desire. We
finished the unit with two coats (sanding between each) of clear polyurethane.
Consider whether you’re using a water-based or an oil-based finish.
Water-based will achieve a more blonde appearance, while an oil-based will be
somewhat more yellow. Of course you could also stain to any color you
desire.
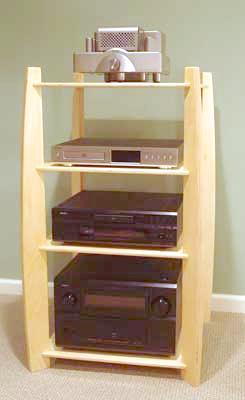
As you can see from the photos, it turned out wonderfully and functions
exactly as I’d hoped. My concern about the unit being able to support the load
diminished as I put four components on the rack, including a 97 pound Denon
AVR-5805. In addition to the 5805 (bottom), are the Denon DVD-3910, the Onyx
CD88 CD player, and beautifully sitting on top, the Onyx Melody integrated
tube amp. I can easily move components in and out, as well as access the
entire rear of each unit, saving my back and eyes.
Not bad for $30.
I share this with you because I was very pleased with the results, and hope it
inspires you to try one yourself. I humbly thank Sean Gibbons for his help.
- Piero Gabucci -
Terms and Conditions of Use
|

