|
|||||||||
|
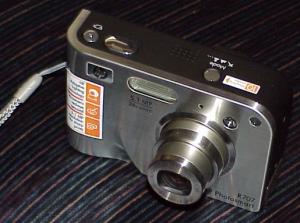
Introduction Everyone seems to be getting into selling digital cameras these days, including computer manufacturers like HP (Hewlett-Packard). HP has announced its new line of point-and-shoot models, including the PhotoSmart R707 reviewed here. It is a 5.1 megapixel camera with 3x optical zoom, macro capabillty (7"), and other unique features like Adaptive Lighting (processes the image internally to bring out detail in the shadows without clipping the highlights), Instant Share (automatically sends photos to your friends when you download them from the camera into your computer - not necessarily a great idea :>0), and built-in panorama orientation (I love this feature, more about it below). At $349, the R707 has just about anything you would want in a point-and-shoot camera. It is made in China, like just about every point-and-shoot camera. All such cameras are probably built in one or two factories over there. Each company who "OEMs" them to China simply contracts their own specifications, and the cameras are built to those specs, and would obviously include special proprietary features that are kept secret from the other companies who also have their cameras built there. This can have real benefits, because the factory obviously has tremendous experience building all sorts of features, and has solved many problems through trial and error as new digital camera technology comes out. They can apply this experience to the OEM cameras for any new client, and it saves tremendous R&D expenses that each company new to the digital camera market would otherwise have to go through themselves, all over again. The result is tremendous value to consumers in low camera prices. The Design The HP PhotoSmart R707 is not unusual looking on the outside. It's small, the lens extends when you power it on, and it's loaded with features. All modern digital point-and-shoot cameras are like that. What differentiates the various cameras are the features they have. The HP has some unique ones. From the photo at the top of this review, you can see the flash to the left of the lens, a microphone above the lens, the viewfinder port just above the right edge of the lens, and an indicator LED for the self timer. The top of the camera, shown below, has a button on the left to scroll through 10 Shooting Modes, which include Auto, Action, Landscape, Portrait, Beach & Snow, Sunset, Aperture Priority, Panorama, Document, and My Mode (saves the settings you like the most). The large button on the right is the shutter release, and next to that is a button to begin taking videos. Most of the controls are on the rear of the camera.
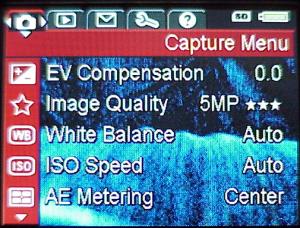
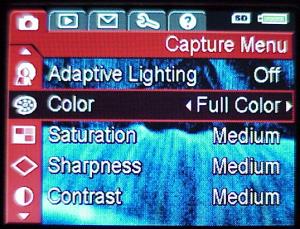
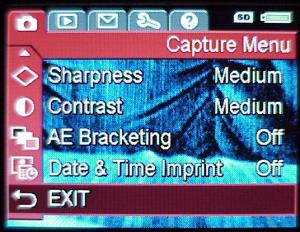
Starting at the top left are the eyepiece for the viewfinder and small indicator lights to let you know a video is in progress, or the camera is ready to take a snapshot (active when you start depressing the shutter button). To the right of the eyepiece is the on/off slider switch. The bottom left has the LCD screen, which shows all the menus and camera status. Above the screen are, beginning from the left, the Macro Button, Flash Activation Button, Self Timer and Burst Mode Button, Live View Button, Photo Review Button, Instant Share Button (earmarks a photo to be sent to your friends), and the Photo Print Button. The curved button at the top right zooms the picture, and the round button at the bottom right is for selecting various options in the menu. Menus are quite extensive. The first one is the Capture Menu, shown below. There are three screens to scroll through, and the selections are self explanatory, except for Adaptive Lighting. This option is for taking pictures that have bright areas and deep shadows. When the photo is taken, the DSP chip in the camera brings out the shadows without destroying the highlights. If you are taking a photo of someone in strong backlighting, it is better to use fill flash, because this process adds some noise to the shadows. However, there are some situations where you can't do that, such as taking a photo of the Grand Canyon where there are areas flooded with sunlight, and areas in dark shadows. So, just try it out.
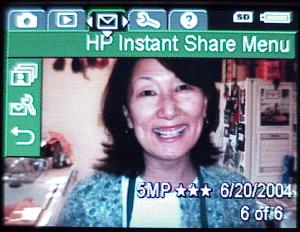
The next menu is shown below, the Playback Menu. This gives you a number of options including previewing a video or panorama photo that you took ,but also lets you see an analysis of your photos (a critique), telling you about the focus and exposure. Of course, you can also delete photos from here. The subject is Ms. Tami Callaway, one of my neighbors, who makes some of the best tamale pie in the world, and this was the first photo I took with the camera. It came out perfect, with no reading of instructions (a bad habit that all of us consumers tend to have), and needed no touchup in PhotoImpact. I used the camera mostly in the 5 MP *** mode, which is the highest quality mode. You can lower the quality in the menu options, as you can with any digital camera, but memory cards (Secure Digital - SD and MultiMediaCard - MMC in this case) are cheap, so I always use the highest quality setting for my own cameras. There is 32 MB of built-in memory, but that won't last long on vacation. Get at least one 512 MB card (around $100 now) for use. I did take some photos in the VGA (640x480) mode, and these are fine for putting on web pages, but if you like to print out a lot of your photos, you should always use the best mode.
The Instant Share Menu is next, shown below. Here you set up which images you want to be sent to your friends when you load them into your computer.
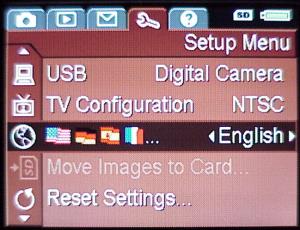
The Setup Menu is next, shown below, which has two screens to scroll through. They are all self-explanatory.
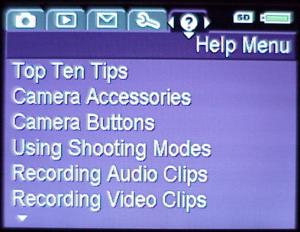
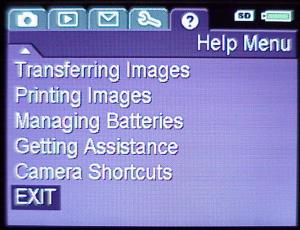
Finally, there is a Help Menu, which has instructions for using the various features. This is a great idea, because how many of us take the instruction manual on vacation, or when we get there, out on the boat for the tour? There are three screens, so there is a ton of info here. Score 1 for HP with this feature.
Click HERE to go to Part II - In Use, On the Bench, and Conclusions
|
|||||||||


Magazine Publishing Solutions by