|
|
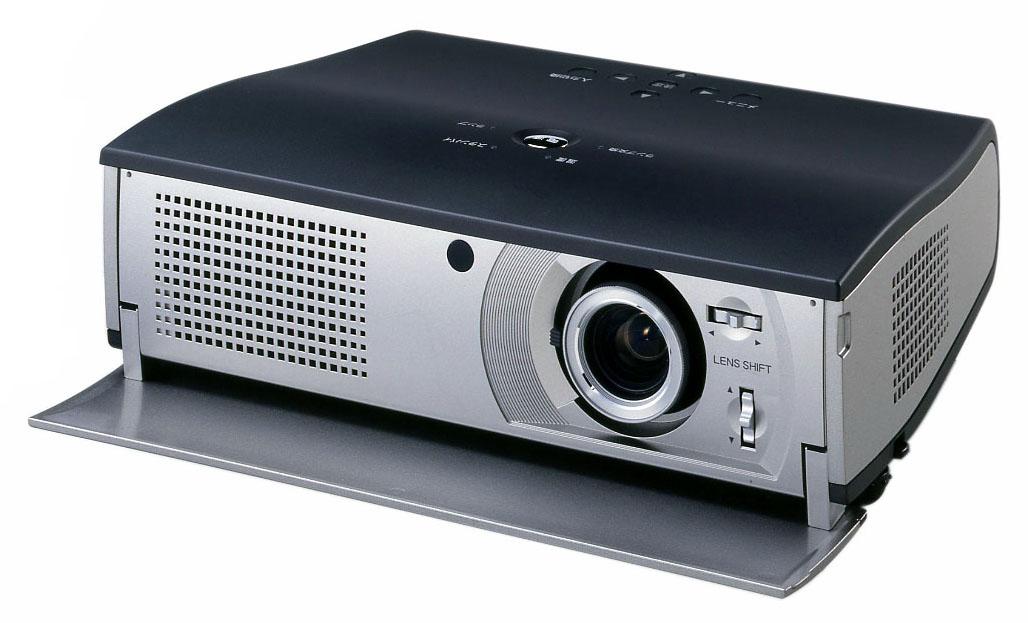
Click on the photo above to see a larger version. |
|
Specifications:
1/4 HD (964x544) Resolution
True 16:9 Aspect Ratio
800:1 Contrast Ratio
Standard Short Zoom Lens
Digital Keystone Correction
X-Y Lens shift (manual)
Selectable Color Temperature feature
10-bit Digital Gamma Correction
Whisper Quiet Fan System – 29 dBA (theater black mode)
Backlit I/R Remote Control
http://www.sanyo.com
Available from Projector People for $1495
|
Introduction
The PLV-Z1 is a “1/4HD” Resolution Wide-screen (16:9)
three-panel LCD-based projector aimed at the Home Theater (HT) market. “1/4 HD” means that the
resolution along both axes is 1/2 the resolution of 1080i, the most common
High Definition (HD) format. The Z1 therefore has a resolution of 960 x 540,
less than XGA (1024 x 768), but with a 16x9 aspect ratio so that it is
convenient to use with a 16x9 screen. The other specifications of the Z1
important to the HT enthusiast are 700 ANSI lumens and 800:1 contrast ratio,
as well as the ability to easily connect to a variety of HT related video
sources.
The relatively low resolution of the Z1 raises the obvious issue of the
“screen door effect," the bane of many digital projectors, especially those
that use LCD technology. Not surprisingly, the Z1 does have significant
screen door effect if too large an image is projected. On the other hand,
the contrast ratio performance of the Z1 is the best I have yet seen from an
LCD-based projector and certainly shows how far that technology has come
from my first Sony 10HT experience. The black levels on the Z1 are also
remarkably good.
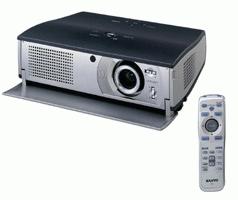
The PLV-Z1 is a very small projector, and, combined with several nice
setup features, such as vertical and horizontal lens shift, it will easily
fit into many multipurpose rooms that are used as an HT. The
Z1 has a front panel door (shown open in the picture above) that can be
closed when the projector is not in use, thus protecting the lens,
etc. from dust and sticky fingers. Most remarkably, it can be purchased for
less than $1500, an amazing value given the image quality.
 |
Inputs and Connectivity
The PLV-Z1 can probably connect to and sync with most common HT related
sources, including computer (VGA) composite, S-Video and RCA-based component
connections. The Z1 does not support DVI which makes it somewhat more
vulnerable to future obsolescence than those projectors that do support DVI
with HD copy protection, if the industry fully implements a digital copy
protection scheme. Today, it is not a big deal, but it may well be in the
future.
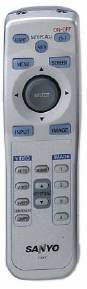 |
Controls
The remote control is well designed and allows easy selection of inputs and
video memories (labeled ‘Image'), and aspect ratios (‘Screen'); it reminded
me very much of the remote supplied with its big brother, the PLV-70. The
major keys are illuminated for 10 seconds when a button on the side is
pressed. Navigation through menus is accomplished via rocking the big button
in the top center or by pressing it to select the desired item.
Lens Shift and Keystone Correction
The Z1 features vertical and horizontal lens shift, manually adjusted on the
front of the projector, along with vertical keystone correction (±
20°).
Lens shift is a physical movement of the lens up or down, or left and right, as opposed to in
or out for focusing. These features, and a short zoom lens (100” diagonal image at 9.8'-11.8'),
make the PLV-Z1 easy to set up for most applications. I put the Z1 on a 21
inch high coffee table and tried to use the lens shift to place the bottom
of the image at the bottom of my screen which is 39 inches off the floor.
The range of the vertical lens shift was not enough to handle this
difference, so I tilted the projector up slightly, using the adjustable feet,
and used just a bit of keystone correction. If you want to avoid keystone
correction, you will want to situate the projector within about 10 inches of the
height of the bottom of your screen (or the top of the screen, for a ceiling
mount).
First impressions
I first saw the Z1 at CES, 2003 in a small darkened alcove at the Sanyo booth.
They were showing "Spiderman" using a fairly small screen. The image looked
good.
I initially tried the Z1 I received for review with guests present – they were
interested in HT and projectors and I just had received the Z1 the day
before. After watching my Sony 11HT for a year or two now, my first
impressions of the Z1 were the same as everyone else in the room - Wow! The
black levels and contrast ratio looked great. The picture was also nice and
bright. A quick set of measurements suggested that out of the box – no
tweaking – the Z1 had a contrast ratio above 900:1 and an output above 800
ANSI lumens. To my eyes, the colors looked a bit too red in some scenes, and
the screen door was more noticeable than with my reference projector – not
surprising given the difference in resolution: 964x544 vs. 1364x1024. But
all in all, it is fair to say that first impression were very positive
indeed.
Measurements, Tweaking, and Viewing
I used Avia to set brightness and contrast, as well as color and hue and
sharpness before further measurements. Contrast and brightness seemed
properly set at 32 and 32 with my progressive component DVD player, a Denon
DVD-1600. The proper adjustment of color was 33 with Hue at 32. A check of the
Color Decoder Accuracy, using the appropriate Avia display, suggested that
the color decoder was right on, with no “push” of red, green, or blue. This
represents a significant improvement in color decoder performance over the
Sanyo PLV-70 I had previously tested.
I also selected the “Theater Black Mode” as this reduced fan noise
considerably while still providing a bright enough image for HT usage in a
darkened room.
Measurements
When I evaluate a projector, I not only look at images, I measure the color
balance of the projector at various light intensity levels and determine the
quality of what is called "grayscale tracking". The idea is that black,
white, and all shades of gray, should have the correct ratio of the three
primary colors used in video projection – Red, Green, and Blue. You can read
more about the testing method in my past projector reviews here at Secrets, or at
http://www.smartavtweaks.com.
|
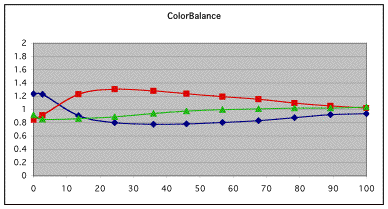 |
For my starting measurements, the color setting in the user menu was "Low"
and the gamma was set to 8. The Color Balance data from the un-tweaked
PLV-Z1 as a function the video input signal or IRE level is shown in the
chart above. In the Color Balance chart, all three curves would ideally stay
very close to 1 at all IRE levels, indicating that the color balance was not
only correct, but that it did not change as a function of IRE level. While
the color balance was about right at IRE 100, it was clearly too red through
much of the IRE range. At this point in the projector's bulb life, and with
the Theater Black Mode selected for quiet operation, the output was measured
at 400 lumens. The contrast ratio was 750:1, an incredible number for
an LCD projector!
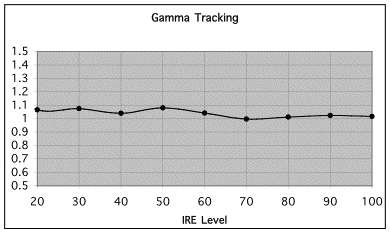
The other thing I measured with the starting settings was gamma tracking, or
how the light output of the projector responds to the input signal. If the
projector's gamma tracking is off, then details in the image will either be
lost, or the image may look flat and have little contrast. The Gamma Tracking
graph above shows the combined light intensity at the various IRE level
relative to a theoretical level. If the projector is accurately producing
the intended light intensity level as a function of input or IRE level, all
values should be close to 1 in the Gamma Tracking graph.
In the Gamma Tracking graph above we can see that the PLV-Z1, with a user
gamma setting of 8, has quite accurate gamma tracking that is well described
with an overall gamma of 2.5 – excellent performance.
Advanced Tweaking the PLV-Z1
One of the real advantages of accurately characterizing a projector's
performance is that you can then use the same measurement system as a guide
for tweaking or improving the projected image. Tweaking typically involves
changing various control parameters in the projector, such as those that
allow adjustment of drive or gain levels, offsets and gamma controls for the
individual primary colors. With the PLV-Z1, some of the relevant controls are
in the user menu (e.g., RGB levels), but like the PLV-70, changing the white
balance at IRE 100 or the bias settings that affect the low IRE levels,
requires use of the service mode.
|
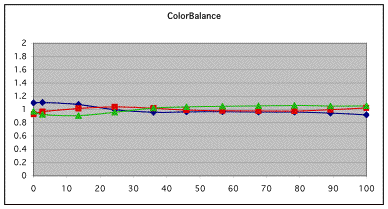 |
After user and service mode tweaking, the Color Balance became remarkably
flat, even at the low IRE levels. As tweaked, the color balance was not
perfect, as there was just a bit too much green at some of the IRE levels,
but the tweaked settings represented a considerable improvement in image
quality over the un-tweaked projector. I did try using a CC filter as a
tweaking aid, but found that using one did not lead to an overall
improvement in picture quality.
The contrast ratio after correcting the color balance was still well above
700:1 and the light level at the screen (80 inches wide) was at 16 ft Lamberts, a
reasonably good level for viewing movies.
Deinterlacer and Scaler
Before general viewing, I checked the performance of the deinterlacer using
the montage on the Video Essentials disc, and with the interlaced component
output from my Denon 1600 DVD player. The pan by the various buildings and
bridges looked fine, but the waving US flag definitely showed jaggies
(jagged diagonal lines), and the pan over the bleachers in the stadium did
show a somewhat jerky motion. Using the progressive output of the DVD
player, I saw no jaggies on the waving flag and a smoother pan over the
bleachers. I therefore did the rest of my viewing using the progressive
component output from the DVD player and I would suggest that you do the
same if you own a Z1.
Viewing
Before tweaking, the color balance seemed a bit red with many images, and
measurements certainly confirmed this. Once tweaked, I began by watching a
bit of "The Lord of the Rings, Fellowship of the Rings", (LOTR) which for all
practical purposes has become my reference DVD, and the DISH Demo loop in HTDV. I also watched many parts of
"Spiderman". Overall, the color balance of
the tweaked projector seemed right on and the black levels were great,
certainly the best I had ever seen from an LCD-based projector.
The Screen Door Effect (SDE) was another matter – it was a distraction. I started
with a 90-inch wide image, which is essentially how I use my reference
projector. With an image this big, and from my normal viewing position of 13
ft, I found the SDE to be problematic with the Z1.
With all digital or fixed panel projectors (non CRT), the grid between the
individual pixels is static, wasted space and can be a source of what is
known as Fixed Pattern Noise (“FPN”). FPN is most commonly referred to as
the “Screen Door Effect,” and many viewers find FPN to be objectionable when
it is noticeable. I certainly do, and I consider FPN to be one of the major
reasons that I may someday replace my reference 11HT.
Generally, the better the projector's resolution, the less likely FPN will be
an issue. Other technologies (e.g., DLP) have less FPN because they have
a higher fill factor – more space used for the image and less space in
between each pixel. All projector technologies however have their own set of pros and
cons, so make sure you test the type of projector you are planning to buy
and see how well that technology works for you.
Since I am sensitive to FPN, and since the Z1 has considerably less
resolution than my reference projector, 964x544 vs. 1364x1024, it is not at
all surprising that FPN is worse on the Z1, and that I would find it
objectionable. There was an easy solution to this problem: make the image
smaller. With an 80 inch image or smaller, FPN was much less of an issue, so
I did the remainder of my viewing using the smaller 80 inch wide image.
With the smaller image, DVDs looked very nice and bright and crisp, as the Z1
has more than enough resolution to handle all the information DVDs have to
offer. Black levels and contrast were very good and LOTR looked great,
especially the darker scenes. Colors looked very natural and well saturated,
pointing out the benefits of having a good contrast ratio, as well as nice gamma tracking
combined with good color balance.
The demo loop on DISH's HD feed also looked remarkably good for all the same
reasons, but the Z1 did not have the apparent sharpness or 3D quality
obtainable from a projector with higher resolution such as my reference
projector. On the other hand, I kept reminding myself that this projector
cost a fraction of what I paid for my 11HT.
1/4 HD (16x9) . . . Does it Make Sense?
Given the importance of resolution for HT usage, does a 1/4 HD resolution
16x9 projector make sense? After all, there are many XGA projectors with
1024x768 resolution and they use 1024x576 pixels when projecting 16x9
images. So what, if any is the advantage of a 16x9 projector with a
resolution of 964x544? It's a good question, but I think that there is an
equally good answer. It has to do with the choice of screen formats.
16x9 screens are a real advantage for HT usage. With a 16x9 screen and a
16x9 projector, widescreen images use the whole width of the screen, while
4x3 images use the smaller central (horizontal) region. Given that
widescreen images are becoming increasingly common and generally are from
higher resolution sources than 4x3 images, most people prefer the 16x9 format
for HT projection screens. I certainly do. The wider 16x9 format also makes
it easier to place a center speaker under the screen, than with the taller
4x3 format.
With a 4x3 fixed panel projector, one typically needs to use a 4x3 screen, and
it will be filled with 4x3 images. With a 4x3 setup, the smaller central
(vertical) portion of the screen is used for 16x9 images. With most 4x3
projectors, it is not really practical to use a 16x9 screen and conveniently
display both 16x9 and 4x3 images. (There are however, exceptions to
this rule.)
So, the 1/4HD format does make sense because it supports the 16x9 format and a
16x9 screen, and does so while using pretty much the same resolution as one
could get from an XGA projector showing widescreen images. Obviously, more
resolution would be better, but it would seem that by limiting the
resolution, Sanyo has managed to offer the Z1 at a very attractive price
point.
Conclusions
Available for less than $1500, having a 16x9 native widescreen format, exceptional contrast
ratios and black levels, good grayscale and gamma tracking, the Sanyo Z1
has a lot of very positive things going for it. It is also small and easy to
set up with vertical and horizontal lens shift. The Z1 has excellent performance and
an amazing set of features that one might not have thought possible a year
ago at anything near this price. The only thing “wrong” with the Z1 is its
resolution. This is not a flaw, because that is the way it was designed. But
if you keep in mind the price, it is a design that makes a lot of sense.
There are other low cost HT oriented projectors out
there and you should look at those as well. They are all different in terms
of features, performance, and reliability. Figure out what might work best
for you. If you choose the Z1, keep the screen size small (80"), sit back
(not too close), and you will be very happy with what you see.
- Steve
Smallcombe -
Reference Equipment:
Denon 1600 DVD player B&K Ref 30 preamplifier
Theta Dreadnaught amplifier, 3x225 and 4x100
Adcom Power Center
KimberCable interconnects and speaker wire
DISH 6000 HDTV receiver
Velodyne DF-661 front speakers (modified crossover) - 3
Definitive Technology surround speakers - 4
Velodyne 15" subwoofers - 2
Sony VLP-VW11HT video projector (reference projector, tweaked with CC40R filter)
|
Related to the article above, we
recommend the following: |
|
Primer - TVs |
|
|
|
|
Terms and Conditions of Use

|