

Introduction
Dream Vision, an emerging brand in America, has been developing and marketing high-end models in Europe since 1996. In 1999, they became available on this side of the Atlantic when they introduced, with the help of Audio Plus Services, the world’s first consumer-targeted DLP projector, the DL500. Today their DLP and LCoS designs offer cutting-edge features and most importantly, high performance. They’ve also made some of the most stylish projectors I’ve ever seen. Created by leading French industrial designers; their chassis’ make a bold statement as a centerpiece in a modern media room. With unique options like fixed anamorphic lenses, Dream Vision has projection systems to suit a wide variety of home theater installations.
Of the three major technologies, LCoS, DLP, and LCD, LCoS still remains my favorite for small to medium-sized theaters. DLP is great for large spaces since it offers high powered and even dual bulb configurations for lots of light output. In a small room though, contrast is king. The newest LCoS projectors boast CRT-level contrast and extremely accurate film-like imaging.
The newest choice among LCoS projectors for 2010 is Dream Vision’s Starlight series. There are three models; all equipped with the same three imaging chips and 200-watt UHP lamp. The Starlight1, reviewed here, is the entry-level unit. It offers every feature of its siblings, the Starlight2 & 3, except for a color management system and THX certification. Though I do prefer full control of color with any display, I found very quickly that I didn’t miss this feature too much with the Starlight1. Like all LCoS and LCD projectors, the Starlight1 has tremendous installation flexibility with a large zoom range and lens shift capability. Dream Vision also offers a generous two year warranty for the projector and six months or 500 hours for the lamp. After completing a recent string of DLP reviews, I was happy to return to my old friend, LCoS.

Specifications
- Design: Digital Projector
- Panels: Three 0.7″ LCoS
- Native Aspect Ratio: 16:9
- Anamorphic Lens Support: Yes
- Native Resolution: 1920×1080 at 60, 96, or 120 Hz
- Throw Ratio: 1.4 – 2.8
- Lens Shift: Vertical +/- 80%, Horizontal +/- 34%
- Light Output: 1,000 Lumens
- Contrast Ratio: 32,000:1
- Iris Control: Manual Fixed, Three Apertures
- Inputs: 2-HDMI 1.3, 1 Component Video, 1 S-Video, 1 Composite Video, 1-PC (D-sub)
- Control: RS-232, 12v Trigger
- Lamp Power: 200 watts
- Dimensions: 7.8″ H x 15.2″ W x 19.7″ D
- Weight: 28.7 Pounds
- MSRP: $6,995 USA
- Optional Schneider Anamorphic Lens: $7,995 USA
- Audio Plus Services
Design
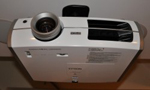
As with all Dream Vision projectors, the Starlight1 drips with style. It is quite common in European homes to set up the projector on a coffee table in front of the seating. This is certainly the choice to make if you’re looking for a unit that will complement a modern décor. The case was created by French designer Antoine Beon whose firm is renowned throughout Europe. He also styled the previous DreamBee and DreamWeaver series models and is responsible for many of the luscious-looking loudspeakers from Focal. The Starlight1 is available in dark gray or white. The Starlight3 is available in other colors including a fiery red that reminds me of a certain Italian sports car.
Both European and US-compatible power cords are included which mate with the dual-voltage power supply. The lens is prominently displayed on the front in a wide recessed opening which is flanked by an IR sensor and an air intake. The control panel at the rear has buttons for power, input, hide (screen blanking), and menu navigation. Status LEDs include power, lamp status and warning. There is also an additional IR sensor. At the base of the projector’s left side are the inputs. Two HDMI 1.3, one each of composite, S-video, and component and a VGA port make up the video options. Control jacks include RS-232 and a 12-volt trigger which can be used to activate a motorized screen or an anamorphic lens sled.
The Starlight1 will support both fixed and moveable anamorphic lenses by using its Aspect and V-Stretch options. The V-Stretch control can be linked with the 12v trigger output to swing the lens into position if you use a sled. With the fixed lens, you simply leave V-Stretch on and toggle between 16:9 and 4:3 modes to achieve either a 1.78:1 or 2.35:1 aspect ratio with correct geometry.
The remote is a nicely sized wand with direct-access keys for all important functions. It also has excellent range and response to commands. Bouncing IR signals off the screen or even the side walls was no problem. At the top are discreet power buttons followed by keys for the five inputs and Signal Info. Next are controls for lens functions, aspect ratio and screen blanking. In the center is menu navigation, test patterns and backlight. Below that are eight discreets for the Starlight’s picture modes. Lastly there are keys for direct access to Gamma, Color Temp, Lens Aperture and a button that brings up the basic picture controls. They appear in a small bar at the bottom of the screen. You can use the up and down arrows to select a function and left/right to change the value.

Menu System & Options
The Starlight1’s menu system is efficiently laid out with every conceivable option needed to achieve a great image save a color management system. The first sub-menu, Picture Adjust, has all the calibration controls. There are six picture modes (Cinema 1, 2 and 3, Natural, Stage and Dynamic) and two User modes which offer full adjustment of all parameters. Following the Contrast, Brightness, Color and Tint controls is the Color Temp selector. You can choose from five presets (5800K, 6500K, 7500K, 9300K and High Bright) or use one of the Custom modes for a calibrated white balance. The preset modes do offer adjustments for the RGB offsets but not the gains. Custom allows control of both. Next is the Advanced sub-menu which contains Sharpness, Detail Enhancement and Noise Reduction options. You can turn on CTI (Color Transient Improvement) for SD signals. Here also is the control for Crystal Motion. The options are Low, High or Off. The Picture Adjust menu ends with Lens Aperture (three settings) and Reset Profile which returns all controls to the factory defaults.
The second sub-menu is called Input Signal. The first option is HDMI where you can set the dynamic range (Auto, Standard (16-235) or Enhanced (0-255)). For most sources, you can leave this on Auto. If you find below black and above white are clipped, change this setting to Enhanced. If you use the Starlight’s component input, you can select a color matrix conversion of YCbCr, RGB or SCART. For the composite and S-video inputs, you can choose a black level of 0 or 7.5 IRE and a color system of NTSC, PAL, SECAM or Auto. Auto will work fine in most cases. You can adjust the picture position in both axes though it is better to do this with the generous lens shift control. Following that are the Aspect options for video and computer inputs. Video has 4:3, 16:9 and Zoom. 16:9 is a pixel-perfect setting that maps every pixel from source to screen. Computer aspect options are Auto, Just and Full. Next is the V-stretch (On or Off) for use with an anamorphic lens. The Overscan control (2.5%) is for SD signals only. The Mask control is for HD signals and will frame either 2.5% or 5% of the image. This is preferable to overscan since it does not resample the image. Finally there is a Film Mode setting which has Auto, Film and Video options. Auto will work fine in most cases. If you want to force inverse-telecine deinterlacing from 480i or 1080i signals, you’ll have to set this to Film.
The Installation sub-menu has the lens controls (shift, zoom and focus). If you want to use something other than the internal test patterns for this, you can turn them off here. You can also lock these settings so they can’t be accessed from the Lens key on the remote. Next is the Pixel Adjust convergence control. Since the adjustment is in full pixels, it isn’t all that useful. I doubt a Starlight with more than a pixel of mis-convergence would make it past the quality control inspection. The installation orientation can be selected here. The options are Ceiling Front or Rear and Shelf Front or Rear. There is also a keystone adjustment for both the horizontal and vertical axes. I always recommend avoiding this control as it introduces artifacts and reduces resolution. The final control is called Screen Adjust. This selects a color bias, red, green or blue, to compensate for different screen materials. While this might be helpful in a pinch, you’re far better off calibrating the projector by measuring off the screen for ultimate accuracy.
The Display setup sub-menu lets you choose the screen Back Color (blue or black), the Menu Position, the Menu Display (15 seconds or On), Line Display (signal info), Source Display (input info), Startup Logo (On or Off) and the language (12 choices). Setting Menu Display to On means menus will stay on the screen until you turn them off. This is really handy when you want to take your time with calibration. The Function sub-menu contains the Lamp Power options (Normal or High) Trigger (Off, On Power, On V-Stretch), six test patterns, an Off Timer (1-4 hours) and High Altitude mode which increases the fan speed. The final sub-menu is Information which reports all the input signal parameters and the lamp hours.
Setup
With a tremendous vertical lens shift of +/- 80% and horizontal shift of +/- 34%, the Starlight was a breeze to set up on my high shelf. Inversion was not necessary. If you do wish to ceiling-mount, there are four points on the projector’s belly for a universal mount or you can source one from DreamVision. Dialing in the geometry and focus was equally painless using the fully-motorized lens controls. It’s so much easier to stand right by the screen when making focus adjustments. Once set, the lens showed excellent sharpness on all test patterns. With its 2x zoom range the Starlight will accommodate a wide variety of screen sizes and throw distances.
Calibration was a typical affair. After adjusting Brightness and Contrast to the correct levels, I paid a visit to the gamma menu. Here you can choose between several fixed curves or create your own using one of the presets as a starting point. The flattest choice was Gamma A. Once I copied this to the Custom memory slot, I simply raised the correction factor to 2.4. This translated to a nice curve of 2.2 across the entire luminance range.
For white balance, I chose the Custom grayscale memory and made my changes. Fortunately, the color temp starts pretty close to D65 so massive adjustments are not necessary. In fact, as you’ll see in the benchmarks, you could almost skip the calibration if you have a color neutral screen. Since there is no color management system, I was ready to watch content at this point. The Starlight 2 and 3 models do offer a full CMS with Hue, Saturation and Brightness adjustments for all six colors.
The Starlight1 has plenty of light output for all but the largest theaters. I never needed to select the High lamp setting. On Normal, I had to stop the aperture down to the smallest of its three settings to get my usual 12 foot-Lamberts. Don’t take this measurement as gospel. Different rooms and different screens will require a different peak setting for optimal contrast and image fidelity. 12fL is what works best in my room.
The remainder of my system consisted of an Integra DHC-80.1 processor, an Emotiva XPA-5 amplifier and an Oppo BDP-83 Blu-ray player. As always, benchmark testing was done with the Oppo connected directly to the projector. Content was viewed using the Integra in passthrough mode to utilize the player’s video processing.
In Use
For all viewing, I sampled the effects of Crystal Motion during portions of some films. Like other frame interpolation systems I’ve tried, the effect was subtle on the Low setting and soap-opera-video-like on the High setting. I saw no artifacts on Low which ranks it a little higher than some others. High showed occasional frame tears and image breakup. Now that this feature is common on many projectors, you’ll be hard pressed to find a model without it. I still have no use for it in movie watching. It does have a positive effect on sports content however. If you want to use your projector to watch the big game, Crystal Motion will enhance that experience.

I started my movie-watching with a few catalog titles, the first being the thriller Spy Game. This 2001 film was recently re-released on Blu-ray. The transfer shows moments of greatness but sometimes goes soft or shows excessive edge enhancement. The Starlight showed the bad with the good as it presented a very accurate picture. Fast motion was nice and smooth with no apparent motion lag. Color looked superb throughout and I never saw any indication of the over-saturated green primary. Like any good LCoS, design, the Starlight was truly film-like. I also wanted to try some less-than-stellar content so I put in The Edge and Marked for Death. Both Blu-rays are somewhat grainy and soft; Marked for Death especially so. They also lack the pop of more modern films. Despite this, the Starlight’s deep contrast brought these films up to a very watchable state. The expanded color gamut might have actually made a slight improvement here as the picture looked fairly vivid despite the lack of fine detail and digital scrubbing in evidence.

I had seen Avatar in 3D IMAX and was dying to make the comparison to traditional 2D. This review was my first viewing of the film at home. I must say first this is a reference-quality Blu-ray. I expect it will make almost any display look good. That being said, it was truly breathtaking on the Starlight. I experienced far more color fidelity and clarity in my home theater than I did on the big screen. The film had a far greater impact on me in this setting. Again the superb contrast performance gave the image such a sense of depth and realism I literally wanted to reach out and touch what I was seeing. You’ll believe Pandora is a real place after watching a presentation like this.
The 2009 film Tetro presented an interesting challenge for the Starlight as it is shot almost entirely in black & white. When you take color out of the equation, image quality hinges on contrast and film’s lighting. Fortunately Tetro is lit quite beautifully. Every scene is exquisitely crafted to the height of cinematic art. The Starlight’s extremely high contrast showed me a deep and rich image full of detailed blacks and bright but never overblown whites. I wanted to switch to the 5800K color temp as I prefer the warmer look for black & white content. I was thwarted however as Tetro contains some scenes in color. They were so golden-toned; I had to switch back to my calibrated 6500K preset.
Spider-Man 2 was the only title that had me wishing for a color management system. The image on this Blu-ray is very saturated; almost cartoon-like at times. The Starlight’s oversized gamut accentuated this, especially in the all-important flesh tones. Faces looked ruddy and red and sometimes a bit too orange. Detail was preserved nicely with very sharply defined textures. On a projector with this level of optical quality, it was easy to see the crude-by-today’s-standards CGI effects in this 2004 film.

A feature I was anxious to try on the Starlight1 was its inverse-telecine ability. With this process, you send an interlaced signal from your player (480i or 1080i) and allow the projector to remove the extra field bypassing the 3:2 pulldown. In theory this will give a 24p cadence from film-based DVDs. In the Starlight’s case, the output refresh rate is 96Hz. Often this is the only way to achieve this since most disc players cannot output 24p from DVD. To activate this feature, the Film Mode control must be set to Film, not Auto. I tried out various scenes from Star Wars Episode IV: A New Hope and A Beautiful Mind. In particular I viewed excerpts that contained horizontal and vertical pans or objects moving against a static background. Results were mixed. For the most part, it worked well but there were occasions when a bad edit broke the cadence lock and a second or two of judder ensued. The Star Wars DVD showed more of this behavior than A Beautiful Mind. Success will depend on the mastering quality of the original transfer.
On The Bench
Equipment used: EyeOne Pro spectrophotometer, CalMAN Professional 3.7 analysis software, Accupel HDG-3000 signal generator, Spears & Munsil Benchmark Blu-ray disc.
All measurements were taken off the screen (Carada Brilliant White, gain 1.4) from the seating position (10 feet back). Video processing tests were performed using an Oppo BDP-83 connected directly to the projector and set to Source Direct mode.
The Cinema 2 preset offered the most accurate out-of-the-box color performance. If you don’t want to calibrate any further, this is the mode to use. The color gamut is the same regardless of mode. Only the luminances change. Without a color management system, the only modes offering correct color luminance are Cinema 2 and User. Since I wanted maximum control, I chose User as my starting point.
You can see below the color points are pretty close for red and blue but green is more over-saturated. Luminances however are nearly perfect; less than .1 foot-Lambert off target for every color. This is excellent performance.

Pre-calibration grayscale isn’t too bad. This would be a perfectly watchable image if left un-adjusted. Only the gamma is visibly off at 1.98 but tracking is decent except for a little slide downward at 80 and 90 percent stimulus. This is also excellent performance especially with regards to grayscale accuracy.

Post-calibration color measures the same since there is no CMS. Fortunately the luminances are spot-on. This has a greater impact on picture quality than accurate color points. You can also see when the secondaries are calculated to the measured primaries, their positions line up perfectly.

Grayscale is pretty much dead-on after calibration of the custom color temp memory. There are three slots available if you want to create other white balance presets. I like to have a 5500K setting for black & white movies. Gamma was adjusted simply by choosing the A curve and raising the correction factor. There is a multi-point adjustment available but the tracking was flat enough that I didn’t need to use it.

Video processing performance was excellent thanks to the HQV Reon VX chip utilized by the Starlight1. All the Spears & Munsil source adaptive tests were passed with the exception of 2:2. Edge adaptive tests were handled well with minimal pixilation or line twitter in either the horizontal or vertical axes. With Crystal Motion set to Off, 24Hz signals are frame-quadrupled for a refresh rate of 96Hz and 60Hz signals are left unchanged. When Crystal Motion is turned on, all content is displayed at 120Hz with frame interpolation.
I tested the Crystal Motion on a moving resolution wedge pattern. This is the most extreme test of moving-object resolution I know of. On the Low setting artifacts were minimal; just a hint of breakup in the higher frequency portions of the pattern. On High, the breakup artifacts were more severe and there was tearing of the wedges. As I noted earlier, the High setting showed artifacts in actual content while the Low setting did not.
Optical performance was superb as every image and test pattern was rendered with maximum resolution. Sharpness was very good edge to edge. This projector also had near-perfect panel alignment. I observed no color shift on any part of the screen in a full-field white pattern. Contrast performance was literally off the chart. I was unable to record a measurement for minimum black. I adjusted the iris to its smallest opening for a peak white level of 12.8 foot-Lamberts. Since I had no minimum reading, I could not compute the contrast ratio. Let’s just say the image easily competed with my Pioneer Kuro plasma TV. This is no small feat. The only other projector I’ve worked with that offers this kind of image depth is my reference Anthem LTX-500, also an LCoS design.
Conclusions
Last year I reviewed the Dream’E, another LCoS model. The Starlight1 is a significant upgrade from that projector in terms of contrast and color accuracy. While the Dream’E offers a ton of light output, it isn’t as comfortable in a small theater as the Starlight. No aspect of video performance has a greater impact on image depth than contrast. The range of darkest to lightest is so wide on the Starlight, I was unable to measure it. Few projectors can truly boast Kuro plasma-like contrast but this one can. I guess that’s why I stick with LCoS, it’s the only technology that looks as good as my TV!
With its slick Euro-design and quality workmanship, it fits easily into the category of high-end without carrying a huge price tag. Video performance is first-rate and image quality is simply stunning. For ultimate accuracy, choose the Starlight2 or 3 with THX certification and a full CMS. If you want to save the extra dough for a good screen or an anamorphic lens setup, the Starlight1 will more than satisfy. Highly recommended.