
Introduction
JVC’s GZ-HM1 follows on the HM550, but adds a few more features, such as external microphone inputs. JVC’s latest series of consumer high definition video cameras continue to set standards in resolution and image quality.
Specifications
- Design: High Definition Video Camera
- Sensor: One 1/2.3″ CMOS (0.435″ Diagonal), 10.6 Megapixels
- Native Resolution: 1920 x 1080
- Lens: f/2.8 – f/4.5; 6.7mm – 67mm Zoom, Made by Konica-Minolta
- Recording Format: AVCHD, 1080i60
- Memory: 64 GB SD Card Built-In
- Recording Time: 5 Hr 54 min (UXP – 24 Mbps), 8 Hr 21 min (XP), 11 Hr 49 min (SP), 29 Hr 34 min (EP)
- High Speed Recording for Slow Motion Playback
- Time Lapse Recording (1 to 80 Second Intervals)
- Face Recognition
- Image Stabilizer
- Still Image Resolution: 9.29 Megapixels
- Connections: HDMI, USB-2.0, Composite Video/Audio, Component Video, External Stereo Microphone, Battery Recharging Jack
- Dimensions: 2.9″ H x 2.7 W x 5.4″ D
- Weight: 1.1 Pounds with Battery
- MSRP: $1,199.95 USA
- JVC
The Design
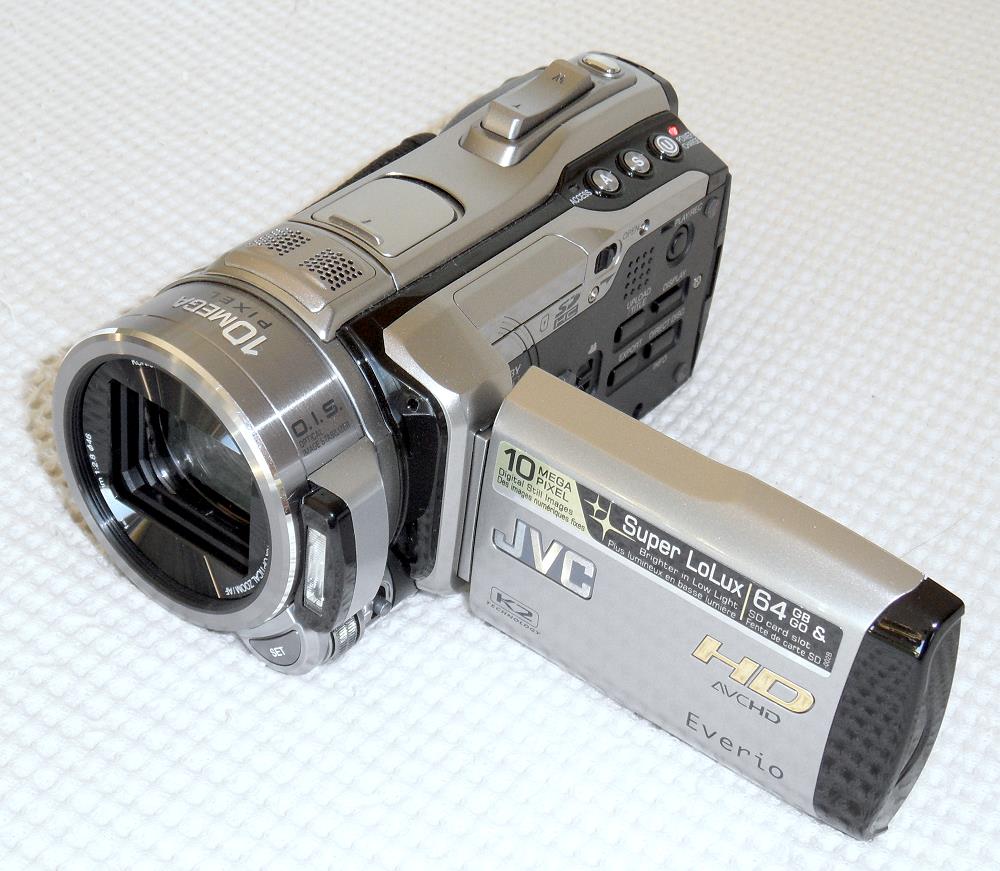
The HM1 uses the same 0.435″ CMOS sensor that is in the GZ-HM550 we reviewed in June, 2010. It is one of the largest sensors in consumer high definition video cameras, and has a mirror behind it to increase the light sensitivity. An earlier model, the GZ-HM400, is the same size as the HM1, but did not have the new sensor with the mirror behind it. The GZ-HM550 is much smaller than the HM1 and did not have an external microphone input. So, it appears that the HM400 and HM1 are the same, except for the sensor with the mirror.
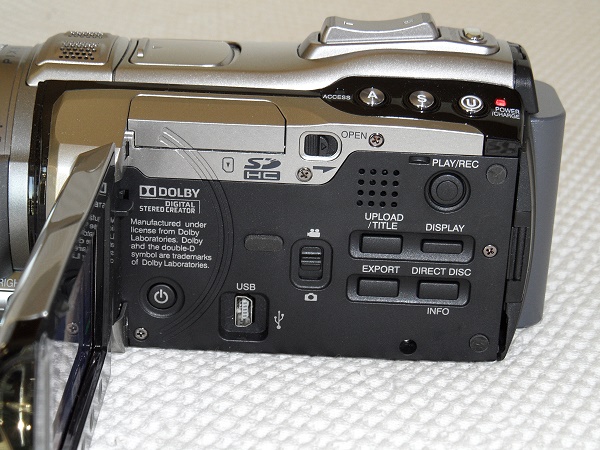
The controls are mostly on the panel that is exposed when the LCD monitor is folded out. At the bottom left is an on/off button. The camera turns on by itself when you open the LCD screen, but in case you want to power it off without closing the screen, that button is there. At the bottom center is a USB 2.0 port for uploading the AVCHD video files to your computer. A slider for switching between video mode and snapshot mode is in the center, and above that is the slider for opening a slot that will hold another SD memory card. The camera has 64 GB of memory built in, but you never know when you might want extra storage. If you purchase an SD card, make sure it is rated for high speed video.
On the right is a Play/Record button that you use to choose whether the camera will be recording a scene or playing back a recorded scene. Underneath that are various functional buttons, such as turning the display (shows which features are active on the LCD screen) on or off.
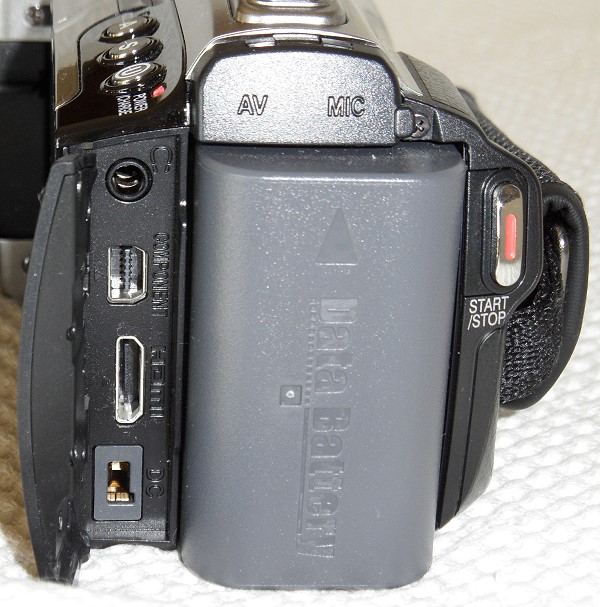
The rear panel has the battery, and two covered control panels. The one that is open shows the headphone jack, component video output jack, HDMI output jack, and the battery charger connector jack (you charge the battery while it is still in the camera, which is handy). At the top is a panel that has an AV output (composite video plus stereo analog audio) and an external stereo microphone jack. The record button can be seen at the far right, and there is an additional record button on the LCD panel.
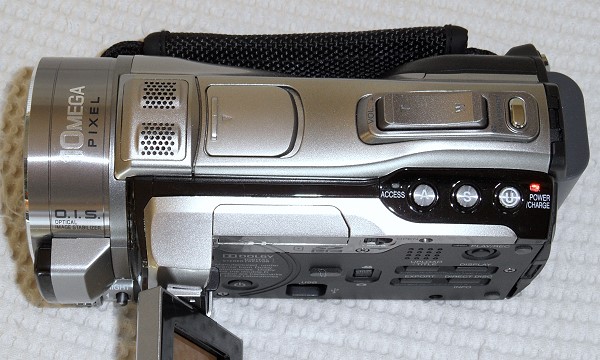
On the top of the camera, from left to right, are the stereo microphones, a panel that covers a connector for a shoe adapter should you want to mount a light on the camera. The zoom toggle (you can also use a slider on the LCD panel to zoom) and snapshot button are at the right. When in Manual mode, you can adjust the aperture (button A) and the shutter speed (button S). There is a Brightness/Focus slider on the front near the lens that is also accessible in Manual mode.
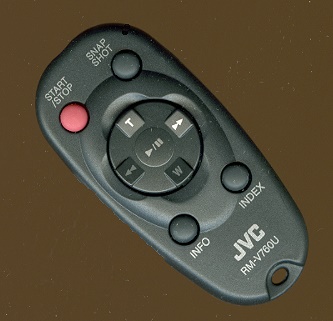
The remote control is very small (the photo is about twice the size of the remote), with all the necessary basic functions.
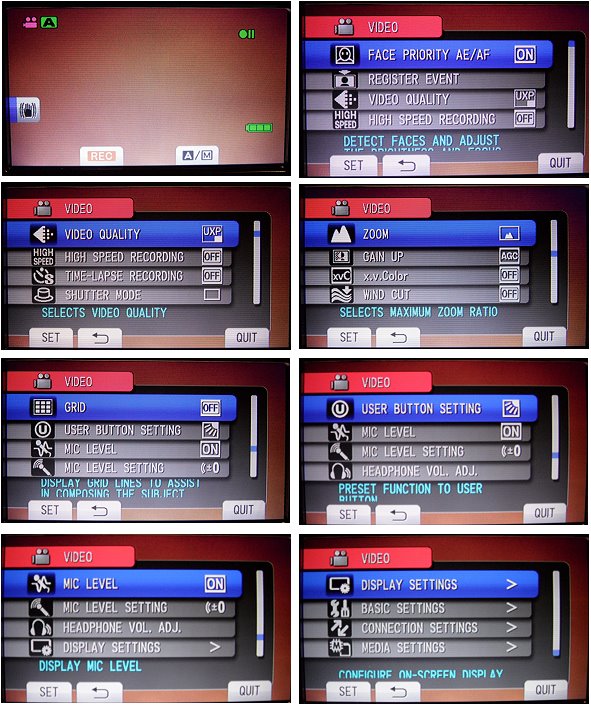
The menus are controlled on the LCD screen using a slider on the left side and buttons at the bottom. Here are some screenshots of the main display (top left) and main menu options. You scroll through them using a slider on the left side.
Note the A/M indicator at the bottom right on the first menu screen. The camera operates either entirely in Auto mode, where the camera sets everything, including focus, white balance, exposure, etc., or entirely Manual, where you have to set the aperture, shutter speed, focus, and white balance. If you want auto focus in the manual mode, you need to activate the Face recognition feature. But, you can’t set the aperture and have the camera automatically adjust the shutter to compensate. You have to set both aperture and shutter manually. This is an odd omission of features. Usually, you have aperture priority, where you set the aperture and the camera sets the shutter, or shutter speed priority, where you set the shutter and the camera adjusts the aperture.
When you want to transfer your video files to your computer, you connect the included USB cable to the camera and your computer, and you will see the following screen on the LCD monitor. Scroll to the UPLOAD selection, press SET, and the UPLOAD screen will be shown. At that point, you can look on your computer for hard drives and the camera will show up as a drive. Go to AVCHD/BDMV/STREAM and you will find the video files as *.mts. You can copy or move them to a directory on your computer for editing. If you move them, then also go into the PLAYLIST and CLIPINF directories and delete what is there. When you detach the camera, you will see a screen on the LCD monitor that says the Video Management File is Damaged, Recovery is Required to Record/Playback, Recover? Press the SET button, and a second screen will say Recovery Completed. Press the SET button again, and you are ready to record more videos.

In Use
High definition video cameras have certainly improved over the past couple of years not only in image quality, but in ease of use. The GZ-HM1 is a delight to work with. The Auto mode sets everything for you, so you just open the LCD panel, wait a second or two for the circuits to boot up, and start shooting. I used the Auto mode for all of the test shots in the review, and most of them only required one take. Everything was in focus, good color, very sharp image, the sound recorded well. What else can I say? Now let’s take a look at some screen shots.
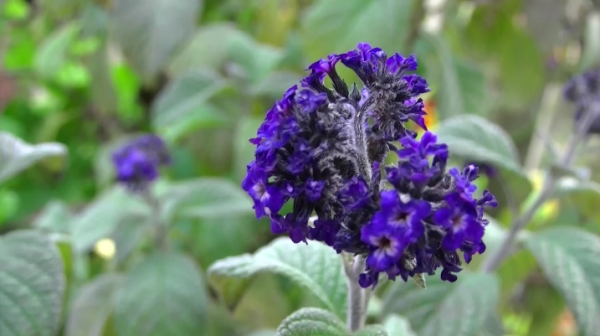
This is a vanilla pie blossum (my wife is a gardener, and I never thought to ask what this flower is until I took the shot and showed it to her on the editing screen), and it shows how well the camera selects the main subject to focus on. It also shows that with larger sensors, such as the HM1 has, the depth of field is shallower, so that objects in the background will be out of focus. Of course this is exaggerated with close-up photography. The deep violet and green leaves were rendered in a very natural color.
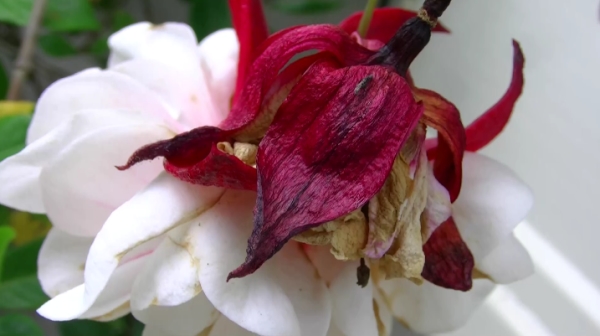
This fuschia blossum is past its prime but still retains some of the beautiful reds from its fresher days (I shot this in late November). The white base of the flower is properly white balanced.
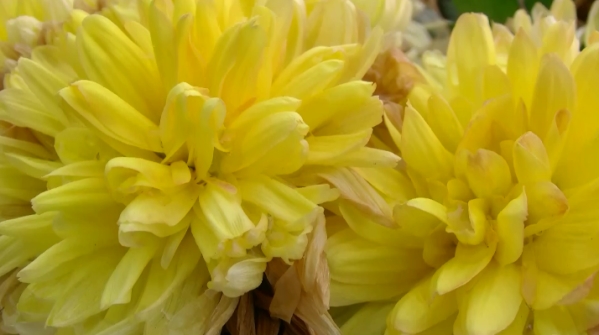
These yellow chrysanthemums were holding up a bit better in the November weather. Yellow used to be a big problem with digital cameras. Not so much anymore, but bright reds can still be difficult as shown in the second photo below. Just a little too much saturation.

Here is my standard grocery store vegetable rack shot. Everything is sharp, but there is some oversaturation of the colors.

The HM1 is capable of high-speed recording (for slow-motion playback). Depending on the speed you choose, the image is not full size, but rather, a smaller rectangle within the normal screen. This is because the current technology limits how many frames can be captured per second at various resolutions.
This camera uses a lot of power, so I would suggest purchasing an additional battery to have on hand in the field (be sure to charge it before you leave on your trip). They cost about $90.
On the Bench
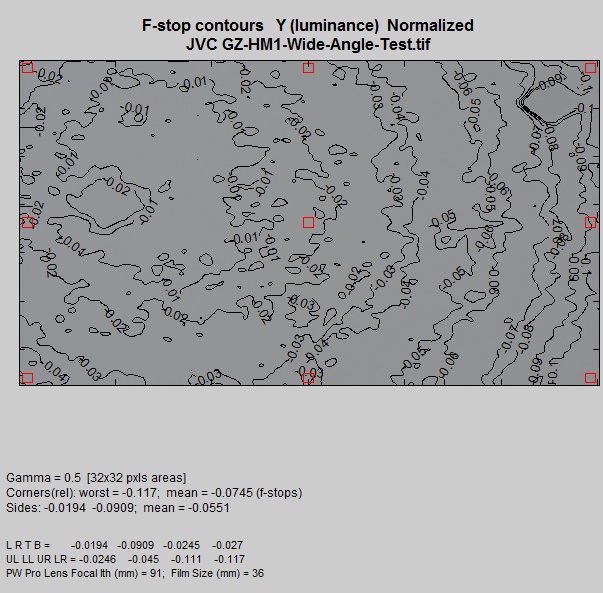
The f-stop contour plot for the lens set to its widest angle position is shown below. It varied from about 0.01 to 0.08. The right side of the field tended to have the higher numbers, meaning that it was darker. However, the variation across the field was less than 1/10th of an f-stop, so it was not noticeable in any of the videos.
The same tendency for the right side to be darker was present at the longest telephoto setting, with it being about 0.3 f-stops darker than the left side.

The MTF-50 measurement (an estimation of resolution) was 1005 LW/PH, which is excellent, since full HD is 1080 pixels high.
Chromatic aberration was 0.368 pixels.
The gray scale test shows that the GZ-HM1 attenuates the pure white just a bit. This helps to keep hightlights from blowing out. Color noise was generally low, with blue having the most.
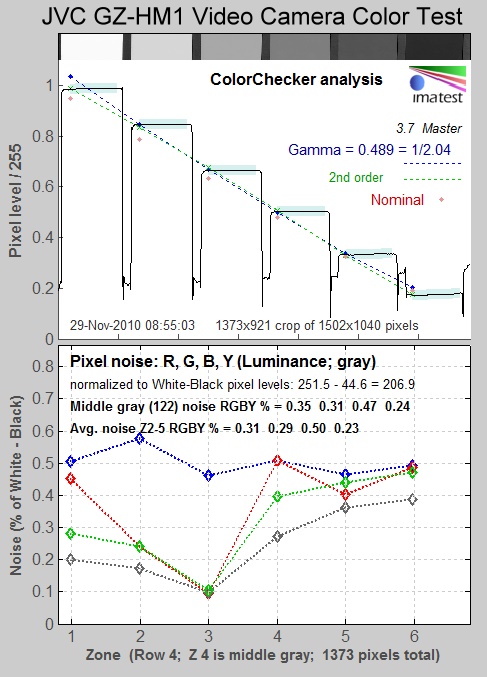
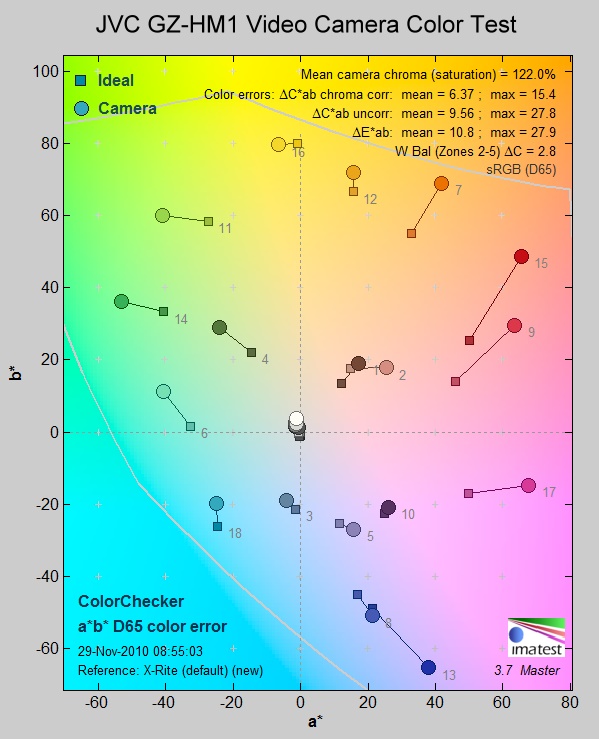
Colors tended to be oversaturated, but generally of the correct tint.
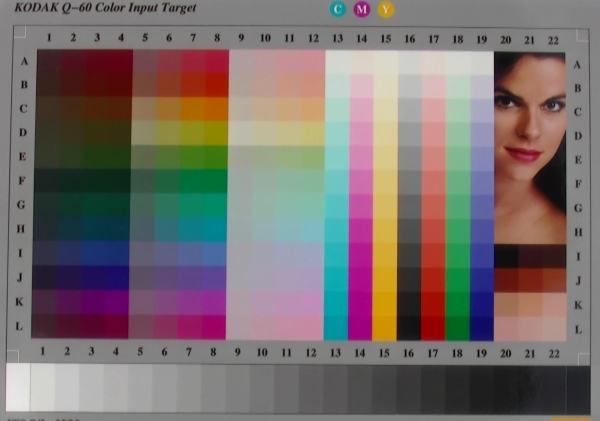
With the Kodak Q-60 color chart, there is a slight tendency for underexposure (the blacks at 19 and darker are not visibly separable), which could partly explain the oversaturation results shown above.
Conclusions
JVC hits another one out of the ballpark with the GZ-HM1. It has very good sharpness, proper color, and is a snap to use. The next phase of HD video cameras will probably be in the sensor size, making them the same dimensions as sensors in some D-SLR cameras. This will give greater sensitivity, better color, and the ability to have your subject in sharp focus with foreground and background contents out of focus, which concentrates the image on the subject.