

Introduction
My favorite reviews are those of flagship products so I was understandably excited when the opportunity came to test Optoma’s new HD8600 DLP projector. The HD8600 includes all of Optoma’s latest features and advances. Topping the list is a special set of controls called PureEngine which include enhancements for detail, color and motion. This projector has joined its competitors in offering smoothing technology to eliminate the judder and motion blur inherent in 24 frames-per-second film content. Coupled with Pure Detail and Pure Color, you have at the call of the remote the means to add extra vividness and sharpness to picture if you wish. If accuracy is your goal, as it is mine, the HD8600 offers extensive adjustments for gamma, grayscale and a color management system.
At $7999, the HD8600 invites comparison to similarly-priced models from Sony and JVC. Feature-wise, it’s a tossup. All offer full calibration options, frame interpolation, excellent contrast performance and sharp lenses. The differences crop up in light output and screen uniformity with DLP having an advantage in both areas. The Optoma with its 280-watt lamp will fill a larger screen from a greater distance. With its single imaging chip, as opposed to LCoS’s three chips, convergence errors are not possible. Great white field uniformity is a given with one-chip DLP. With LCoS it can vary from unit to unit. Let’s dive in, shall we?

Specifications
- Design: Single-Chip 0.65″ DMD Texas Instruments DarkChip 3
- Native Resolution: 1080p, at 48 Hz or 60 Hz
- Anamorphic Lens Support
- Throw Ratio: 1.54-1.93 (Standard Lens), 1.93-2.90 (Long Throw Lens), 0.77 fixed (Short Throw Lens)
- Lens Shift: Vertical 30-110%, Horizontal ± 5%
- Light output: 1600 Lumens
- Contrast Ratio: 50,000:1 (Dynamic)
- Iris Control: Off, Auto (2 settings), 9-step Manual
- Inputs: 3 HDMI, 1 Component, 1 S-Video, 1 Composite, 1 PC (D-sub)
- Fan Noise: 29 dB
- Control: RS-232, 2-12v trigger
- Lamp Power: 280 Watts
- Rated Lamp Life: 2,000 Hours
- Dimensions: 6.5″ H x 16.9″ W x 13.4″ D
- Weight: 22 Pounds
- MSRP: $7,999 (Standard Lens), $8,499 (Long Throw Lens), $8,999 (Short Throw Lens)
- Optoma USA
Design
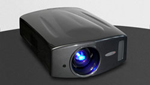
The HD8600 is a single-chip projector utilizing Texas Instruments’ DarkChip 3 DMD. The interchangeable lens system includes three options all manufactured with extra-low dispersion glass. The standard lens which came on my review unit covers a throw ratio of 1.54 to 1.93. The long throw lens, which costs $500 more, covers 1.93 to 2.90, and the short throw lens, for an extra $1000, is fixed at .77. This would be the lens of choice for a rear-projection or close-up tabletop installation. The case is simply styled with a piano-black top panel and horizontal grill slats around the front and sides. The lens is dead-center with rings for focus and zoom adjustments. Installing it was a snap with its camera-like bayonet mount. A flip-up panel on top reveals the lens shift dials. The rear panel has three HDMI 1.3 inputs with deep color support. Analog inputs include one each of component, S-Video, composite and VGA. Control options consist of two 12V triggers and an RS-232 port. This is also where you’ll find the power switch and LED indicators for power, lamp and temp.

The remote is small and efficiently laid out. Discreet power controls are at the top followed by keys for brightness, contrast, Dynamic Black (iris), PureEngine, Brite Mode (lamp power) and direct access to the Color and Advanced menus. In the center is menu navigation and picture mode selection. Next are the overscan and edge mask buttons. The final block has trigger controls and discreets for the different aspect ratios and direct selection of inputs. The handset is fully backlit though most of the buttons have icons rather than text on them. The text labels are printed on the plastic face of the remote and therefore unreadable in the dark. The remote worked well, bouncing its commands off the screen reliably. Also included is a tiny secondary remote with power buttons, menu navigation and an input toggle. This half-credit card sized unit snaps into the HD8600’s back panel and is designed as a backup.
Menu System & Options
The menu system is one of the better designs I’ve worked with and is very similar to that of Optoma’s other projectors. Of course since the HD8600 is a top-line model, every feature Optoma has to offer is included. The first sub-menu is labeled Image and contains everything you’ll need to perform a thorough and accurate calibration. There are seven picture modes labeled Cinema 1 & 2, Reference, Photo, Bright, Graphic and User. An ISF technician can also enable Day and Night modes which are locked after adjustment to prevent further changes. After the brightness, contrast, color, tint, and sharpness controls is the Advanced page. Here we have 10-step noise reduction for interlaced signals, gamma with four presets (all adjustable), PureEngine (detail, color and motion), Dynamic Black (auto iris, two settings), 9-step manual iris, and color settings which takes you to a third page. This page accesses the color temp presets, gamut selection (Native, DLP Cinema, HDTV (Rec 709), EBU or SMPTE-C), the color management system (CMS), RGB gain and bias, color decoder matrix (RGB or YPbPr), and RGB Channel which gates the individual primary colors for decoder adjustments.
The PureEngine menu, which is accessed from the Advanced page or directly from the remote, contains a set of Optoma-specific image enhancements that include choices for Detail, Color and Motion. PureDetail adds edge enhancement which I found excessive. Even on the lowest setting, there was obvious ringing in a sharpness test pattern. The effect was more subtle on actual content. PureColor manipulates the brightness, contrast, color and tint to pump up the image’s vividness and saturation. The effect was pleasing on the first couple of settings but on 5, the maximum, the color looked overblown. PureMotion is Optoma’s take on frame interpolation with choices of Low, Medium or High. The different options govern how much of each frame is de-blurred. The Low setting was still noticeable and really increased the perceived resolution. Motion was much smoother as well. There were no artifacts that I could detect. Finally there is a PureEngine Demo option that lets you set up a split screen to compare the effects of the various PureEngine adjustments.
The Display sub-menu has all the options for aspect ratio to include 16:9 with no overscan, 4:3, Native (no scaling) and LBX for anamorphic lenses. Following that are controls for Overscan and Edge Mask. There are controls for Vertical Image Shift (digital, not actual lens shift) and Vertical Keystone. I always recommend avoiding the keystone correction as it does degrade image quality. The final control is called SuperWide. This is a zoom function that stretches the image proportionally to fill a 2.0:1 aspect screen. SuperWide can be set to Off, On or Auto in which the zoom is adapted to the different aspect ratios used in film content.
The System sub-menu lets you specify the menu location, the installation type, bring up focus grid and white-field test patterns, specify the no-signal background color, and control the two 12V triggers. The B trigger can be set to fire when a 2.35:1 aspect signal is shown in order to activate an anamorphic lens sled, very cool! There is also a sub-menu for Lamp Settings which lets you choose the Bright Mode, view and reset the lamp hours and turn on a lamp replacement reminder. This will warn you up to 30 hours before lamp replacement is needed. You can also specify whether or not to display the Optoma logo on projector startup, or choose one of your own from a screen capture.
The final sub-menu is called Setup. Here you can choose the menu language, disable unused inputs, set the High Altitude mode to increase fan speed, set an Auto Power Off timer, change phase and timing and other options for PC and analog signals, and choose the black level setup for HDMI signals. Finally there is a factory reset that will return the HD8600 to its default settings.
Setup
I had hoped since the HD8600 allows shift below the lens axis I would be able to install the projector on my high shelf. Unfortunately it was a little too high so I was forced to invert. In this configuration, the image can be shifted up to 110% above the lens axis. If you want to use a shelf it must be at least 20% below the top of the screen. Getting the projector aligned and focused was made more difficult due to the all-manual controls for focus, zoom and shift. A motorized system offers more precision and convenience. In the end I had a very sharp image that filled my 92-inch screen nicely.
After 50 hours of burn in to settle the bulb, I spent an afternoon exploring the large set of calibration options available. I took particular note of the color management system which allows adjustment of the five color space options individually. The HD8600’s picture modes can all be independently calibrated. The two ISF modes contain all the same controls as the other picture presets. I started in the User mode for my adjustments. After adjusting the brightness and contrast levels, I turned to the Optoma’s unique gamma control system. There are four presets all of which can be modified. I chose the Film option and worked the curve and offset sliders until I had flat tracking of 2.2. White balance was equally simple to adjust and when I was done, I had superb grayscale tracking with errors all below 1 Delta E. I also set the manual iris to 4 out of 9 steps (9 being the maximum opening). A nice feature of the iris controls is you can set the peak output with the manual iris then turn on the auto iris for greater contrast and lower black levels.
I wrapped up the calibration with the Optoma’s unique color management system. Rather than the saturation and hue controls I’m accustomed to, you can move the six color points along the x and y axes of the CIE triangle. This is a very slick and easy way to adjust the gamut. The only thing missing is a luminance or brightness control. For me, correct color brightness is as important as correct color points and I was sorry to see this adjustment omitted. I was able to get all the colors spot-on except cyan. I ran out of room before it hit the mark. This appeared to be due to the under-luminance of the green primary. If I’d had the ability to tweak this, I believe cyan would have been more accurate. I was glad to see the different color gamuts could be independently calibrated. Having the SMPTE-C option means you can watch DVDs in the color space they were mastered in. I calibrated this in addition to the HD (Rec 709) preset.
In Use
During all my viewing I tried out the various Pure Engine options. Pure Detail looked to me like a variation of the sharpness control. When I tested it out on a sharpness pattern (50% gray with 0% black horizontal and vertical lines), it produced obvious ringing even on its mildest setting. Its effect on film content was too harsh for my taste. Pure Color looked decent on the lower settings but increasing it caused color to look overblown. Pure Motion, even on the Low setting, had quite a dramatic effect. The perception of added resolution is very strong. Motion is much smoother with no hint of judder. Optoma has implemented this processing very well. I’m just not sure it’s my cup of tea. I feel the motion looks unnatural; probably because I’m so hard-wired to 24fps film. This feature is only now being implemented on new-model projectors. I may feel differently the more I’m exposed to it.

The 1998 release of Godzilla is a somewhat under-appreciated film. It really is a barrel of fun and cleverly imparts the feel of Japanese monster movies of yore with modern production quality, killer sound, CGI effects and decent acting. The color palette is quite natural with lots of dark grays and greens. The HD8600 provided a very accurate rendering of all content including the all-important flesh tones. Textures were reproduced well even in the darker scenes by the Optoma’s above average lens. Aside from some bright scenes early on, the bulk of the movie is quite dark. I watched the first half without the auto iris and the second half with. I preferred the Cinema 1 setting. Cinema 2 is much more aggressive and really darkened and flattened the mid-tones too much for my taste. I didn’t see any brightness pumping in this film but as you’ll read below; the pumping was visible in other content.

Since I had recently watched Star Wars Episodes IV and V it was only natural to finish the cycle with Episode VI: Return of the Jedi. As with the other DVDs in this set, the transfer is decent with a bit of added edge enhancement and very natural color. Since the HD8600 has multiple color space choices, I switched to SMPTE-C to match the native gamut of this (and every other) DVD. The result was quite pleasing as previously red-tinted flesh tones were much more accurate with clear differences in skin color between the various characters. Despite the softer resolution of DVD, I could clearly see when an actor was more heavily made-up. I could also see fabric textures and other details I had not seen before. I engaged the Pure Motion on level 1 for about 30 minutes of this film. I’m still trying to put my finger on the reaction I have to the smoothed motion and increase in perceived resolution. Certainly the added sharpness of moving objects adds to the 3D look. I’ve boiled it down to the two kinds of motion in film; that of moving objects or a moving camera. The enhanced detail of moving objects is something I do like. However the smoother camera movements seem to lower the suspension of disbelief. Even though the image looks better, I enjoy it less. All I can say is your mileage may vary. Optoma has an excellent implementation of this technology. Whether you’ll want to use this feature is a matter of personal preference.

To really give the HD8600 a workout, I turned to Ron Fricke’s visual tour de force, Baraka. This film was originally shot on 65mm (that’s really wide) and scanned at 8k resolution for its restoration on Blu-ray. The scanning process was so painstaking it took three weeks of 24/7 operation for the scanner to digitize the film. Needless to say this is as good as HD video gets. The movie itself has mostly stationary cameras with little object movement. There is virtually no motion-induced blur or softness. The level of detail present is simply astounding. It takes a top display to flesh out all Baraka has to offer and the Optoma was up to the task. Skin textures, animal hair, surfaces, weather, lighting effects and of course rich color were all rendered beautifully. Shadow detail was handled extremely well too. There was never a moment when I thought anything was being crushed either light or dark. Baraka demands an accurate display and the HD8600 delivered.

I finished my viewing with Extract, a comedy, and the thriller A Perfect Getaway. Both films feature a lot of static camera work. Because of this, I was able to see the iris in action. Even on the Cinema 1 setting I could see it closing and opening when camera angles and average picture level changed. Unless there is camera movement to cover up the action of the iris, it can be distracting so I turned it off. During a dark sequence in A Perfect Getaway the iris closed so far it affected the screen uniformity. The center of the image was noticeably darker than the edges. It also made the scenes muddy and flat. Luckily, changing the iris setting only requires a couple of key presses. There is content where it makes an improvement but you won’t want to use it all the time.
On The Bench
Equipment used: EyeOne Pro spectrophotometer, CalMAN Professional 3.3 analysis software, Accupel HDG-3000 signal generator, Spears & Munsil Benchmark Blu-ray disc.
All measurements were taken off the screen (Carada Brilliant White, gain 1.4) from the seating position (10 feet back).
Pre-calibration color measurements in the User mode showed good accuracy in the primaries with all errors below the perceivable threshold of 3 Delta E. My only complaint was the under-brightness of green. This was visible to the eye in color bar patterns.

Out-of-box measurements for grayscale were also good at the D65 preset with only slightly visible errors above 50% stimulus. The Film gamma preset measured too low at a 1.95 average. This translates to lower perceived contrast in the mid-tones.

After calibration with the CMS, all color points except cyan were dead-on the targets with Delta E errors all below 1. The cyan error was due to the under-brightness of the green primary which I could not fix. Normally the color control would be the answer but since red and blue had correct luminance, raising it simply over-saturated these colors. Leaving color and tint on their defaults produced the best image. Actual content did look excellent despite this.

Post calibration grayscale and gamma tracking were top-notch with all errors below 1 Delta E and a nearly perfect gamma average of 2.23. These measurements were taken with the auto iris turned off and the manual iris set to 4 out of 9 steps.

Contrast performance was quite good with a minimum black level measurement of .002 foot-Lamberts and a peak white value of 13.8898 fL for an on/off ratio of 6944.9:1. This was with the auto iris turned off and the manual iris set to 4, a bit more than halfway open. Dynamic contrast was perceivably higher with the auto iris set to Cinema 1. Shadow detail was excellent with every bar of a 0-10 percent step pattern showing clearly without any crushing. The top end of the luminance scale was also excellent with proper rendering of above-white information without a color shift.
Video processing is handled by a proprietary solution unique to Optoma products. I tested the HD8600 using an Oppo BDP-83 in source direct mode. Performance on source adaptive tests was good with the only failure being the 2:2 clip. Edge adaptive performance was excellent with above-average handling of jaggies tests. The HD8600 correctly handles a 24p signal displaying it at 48Hz. When PureMotion is off, frames are doubled. Turning on PureMotion increases the area of each frame that is interpolated. 60Hz signals are displayed unaltered at an output refresh rate of 60Hz.
Conclusions
I always enjoy reviewing flagship products. The manufacturer puts all they have to offer in one place for the user to enjoy. Optoma has certainly pulled out all the stops with the HD8600. It offers tremendous installation flexibility thanks to its lens shift and interchangeable optics. A color management system like the HD8600’s is not often found on any display, much less a projector costing under $10,000. The excellent color accuracy and sharp glass produces an image that is very film-like and natural. Contrast is also better than nearly every other DLP projector I’ve experienced. In fact it’s only bested by the Samsung SP-A900B which will set you back an extra $5,500.
Many people prefer DLP for its advantages in screen uniformity and overall sharpness. If you’re shopping for a high-end model in the $8,000 price range the Optoma HD8600 offers more than many projectors of higher cost. I give it a very high recommendation.