Introduction
Recently, I was asked to review a stand alone iPods stereo system. This device allows an Ipod to be connected directly to the unit, charge it, and extract the music through the docking port (which is potentially superior to the head phone outputs). Great idea . . . only it requires a working iPod. Strangely enough my iPod worked flawlessly until I decided to use it to review the device. Turns out my iPod spent the night outside during a rather chilly evening and subsequently would freeze while playing. Further testing revealed my 30y gigabyte iPod video was now down to two usable gigabytes. This presented me with two obvious problems, no iPod to review the iPod music device, and worse yet, my music collection was stuck on my computer. I needed to either replace the iPod with a new one, or fix my iPod myself (the warranty expired two months ago).
The first option led me to look at the new ‘classic’ iPods with either 80 gigabytes or 160 gigabytes of storage. These currently start at $249.00 usd. One major problem with the classic iPod is that it cannot and most probably will not be able to utilize the excellent Rockbox software. This software allows you to use your iPod as a storage device (iTunes not needed to add music) and play FLAC files. This is important for me, as 90% of my music collection is stored as lossless FLAC and I also prefer the highly customizable Rockbox user interface. Option two would allow me to fix my current iPod, utilize Rockbox, and keep at least one piece of electronics out of the landfill. This is the approach I took.
Do It
There are many places online where you can purchase replacement hard drives and other components. American users have many choices, such as iPodSolutions, and in Canada I found three prominent sources of iPod repair parts, iRepair, D&M Depot, and iDemiGods. After reviewing all the possible drives and options, I chose iDemigods, as they offered the 80 gig drives at the best price. Darren at idemigods.com was helpful and ensured I had all the components needed for a proper repair.
When you change your hard drive, you are not limited to the same size hard drive. A 30 gigabyte hard drive can be upgrade to a 60, 80, or 100 gig drive. However if you upgrade to a larger hard drive, you will need to upgrade the back plate, the headphone connector, and the battery. If you have a sixty or eighty gigabyte iPod you will only need the new hard drive. However as the battery will fail on you at some point it is not a bad idea to replace it at the same time. This article will focus on the hard drive swap only.
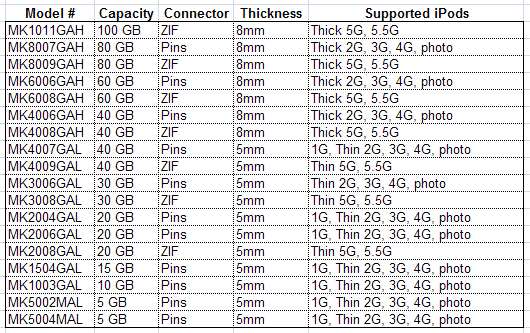
The following chart shows which hard drive models work with which iPods:

Note that these hard drives are Toshiba mobile drives. The stock iPods have the same Toshiba drives, only with Apple logos, protective foam, and rubber bumpers. It is important to transfer the foam and bumpers from the old drive to the new one if the new one does not have any. Also note, the ZIF (Zero Insertion Force) connector is used on the iPods video. This connector uses a small plastic clamp to secure the thin cable. You must use a hard drive with the ZIF connector.
Now onto the hard drive swap. Take my word for it, this is much easier than you would think. The hardest part was opening up the iPod case. The actual hard drive swap took less than ten seconds.
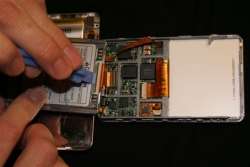
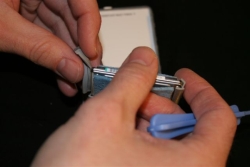
Included with most hard drives is the vinyl pry tool. This allows you to open the iPod case without marking up the sides. If you do not have the tool, you can carefully use a razor blade. The seam is where the shiny back plate meets the clear acrylic on the side of the iPod. Start near the hold switch and work your way around, prying open a little bit at a time. Once you get one side open, you can start to see the plastic tabs and how they hold the unit together. Use caution with those tabs, as you do not want to break them. If you cannot get in between the back plate and frony plate with the pry tool, you can use a razor blade and very carefully open up part of the case. Once you have it open enough to insert the pry tool, proceed with that tool.
Step 2: Remove the existing hard drive.
There is a thin ribbon cable connecting the hard drive to the circuit board. This cable is inserted into the ZIF connector on the hard drive and clamped down with a thin black plastic clamp. Lift up this clamp, and the cable should release easily. Now if your new hard drive does not have the foam or rubber bumpers, remove them from the old drive and attach them to the new drive.
Step 3: Insert the new hard drive.
First, you need to pop up the plastic clamp on the new hard drive. Then push the ribbon cable into the ZIF connector on the new hard drive; lightly push the clamp back down. Now the cable should be secure. Place the drive back onto the circuit board, and put the back plate back on top. To snap the back plate back onto the front plate, start at the bottom, and then both sides at the same time. The headphone jack area should be the last part to be connected.
Step 4: Initialize the new hard drive.
Press any button on your iPod, and you should see an error telling you the drive is not formatted, or you will see a sad face icon (unless the hard drive was already initialized). Now connect the iPod to your computer and run iTunes. You will see an error telling you to restore the iPod if the hard drive has never been initialized. Go to the summary tab, choose Restore and let iTunes do it stuff. Do not disconnect the Ipod until the process is complete. Now your iPod will be ready for use.


