

Introduction to the Home Theater Build Project
We all have a spare room. Well, many of us do. And those of us bitten by the A/V bug often dream about what we would do with that room. I have such a room, and six years ago embarked on a wild odyssey to build a dedicated A/V room from scratch. How could someone with limited construction skills, moderate budget, and even more limited tool selection, go about making a clean, professional looking dedicated home theater?
Over the next few weeks I’m going to walk readers through the process that I went through to construct my dedicated home theater. We’ll start with a somewhat historical perspective, looking back at the room evaluations, initial construction concerns, and finally the equipment that went into the room to start. I’ll then talk about upgrade considerations and about how the various parts of the system have changed since this original configuration. We’ll close the piece by talking about the various upgrades that anyone with a basic system can start to address once the equipment begins to stabilize.

Our goal with this article is to try and take some of the mystery and intimidation out of constructing a dedicated A/V room from a DIY perspective. We’d also like to give some insight into the thought process behind various upgrades and how someone goes about constructing a true high-end system, part by part, within the constraints of space, budget and time.

Going Front Projection (can this be done?)
Before I started this project, back in 2003, I already had a “home theater†by the classical definition. I had a 51†CRT rear-projection TV and 5.1 surround sound. I had a decent receiver, an excellent DVD player, and a high-definition signal. My set was calibrated and tweaked by ISF technician Greg Loewen for the best picture possible. I sat 9 feet away and with the lights off, it was a pretty darn good experience.
Like many who are just starting to get into this hobby, I eventually stumbled across the AVS Forum. A mountain of information and links, it was there that I first found myself in thinking about the idea of front projection.
A front projection setup had always been in the back of my mind. No matter how much we try, the experience provided by a conventional TV will never be a truly cinematic – a cinematic experience can only really come with a projection setup and a large screen. I had a study that contained a desk, bookshelf and couch. Besides the dog, and the occasional house guest, nobody used that room ever.
So there I was, with a perfectly respectable system, clicking away in the AVS “Front-Projector†forum and on various commercial websites. Was this really doable? People were chatting about projectors from names I recognized like Panasonic, Sanyo and Infocus. Wait? Not just Runco, Sharp and Maratnz? Projectors with real world pricing that produced competitively good images? But would these more reasonably priced projectors work for me? There was only one way to find out. I placed a posting in the forum in the fall of 2003 with a shameless solicitation for people in my area: would anyone with one of these lower cost projectors be willing to have me come over and look at their setup? I was interested in two projectors that had been generating a ton of buzz: the Infocus X1 and the Panasonic 300U. To my great surprise I had several generous forum members invite me into their homes to see their front projection setups. I quickly discovered one thing: the technology wasn’t there.
I learned two terms very quickly in that initial outing: screen-door effect and rainbows – terms discussed at great length in the projector reviews here at Secrets and the projectors that I saw that were in my approximate budget suffered from one or both of these negatives. I left this experience quite happy with my current setup, confident that performance like that which I was hoping to achieve, was unattainable at a reasonable price.
In the winter of 2003, that easiness began to abate with the release of two new projectors: the Panasonic 500 and the Sanyo Z2. For the first time, true high definition (1280×720) was being offered at the right price point. Another projector, the Infocus 4805 also popped up around this time promising DLP performance in a 480p configuration. Another posting, and several trips around and I realized I was ready to make a purchase. The two LCD projectors produced great pictures, little noticeable screen door effect and a surprisingly pleasing image. I decided it was time…what other considerations were there?
Room Considerations and Setup
The first thing I had to ask was: is the room actually appropriate for front projection?
Front projection is very different from conventional video displays for one primary reason: light. Light is the enemy of any projection setup. Why? Well, in order to produce an image, any screen must reflect the light being shined on it…otherwise we’d see nothing from our display. However, the screen is unbiased. It reflects any light that is present in the room. When there is ambient light in the room, it most likely affects parts of the image that are supposed to have no projected light – or blacks. So when we have extraneous light in the room, we lose the black level of our picture and it looks washed out. Therefore any front projection setup must have some sort of control of light. Most projectors are capable of dealing with some light and material that doesn’t have a lot of blacks in it can be viewed adequately in these situations (like a sporting event). There are also advanced screen technologies that compensate for ambient light – but in the end one moniker is important: too much light is bad for front projectors.
Because my room was not in a basement, I did have light to deal with. Advanced screen technologies like those from Stewart were prohibitively expensive; my screen would cost more than the projector. Luckily the room had very thick blinds, and I also made a decision that this room was going to be used mostly at night. Light issues – check.
The Setup
Next thing to look at was the room itself. I had a few constraints regarding the room. This was not first time construction: I wasn’t going to have open access behind dry wall to run wires. This could not involve major alterations to the structure of the room: at some point we will be moving on from this house and major, irreversible (without significant cost and construction) changes were not wanted. Lastly and most importantly, this was not going to take place with an unlimited budget: I had to figure out a way to maximize both the equipment I had as well as the budget available. At the same time, I wanted the installation to look clean, presentable and professional.
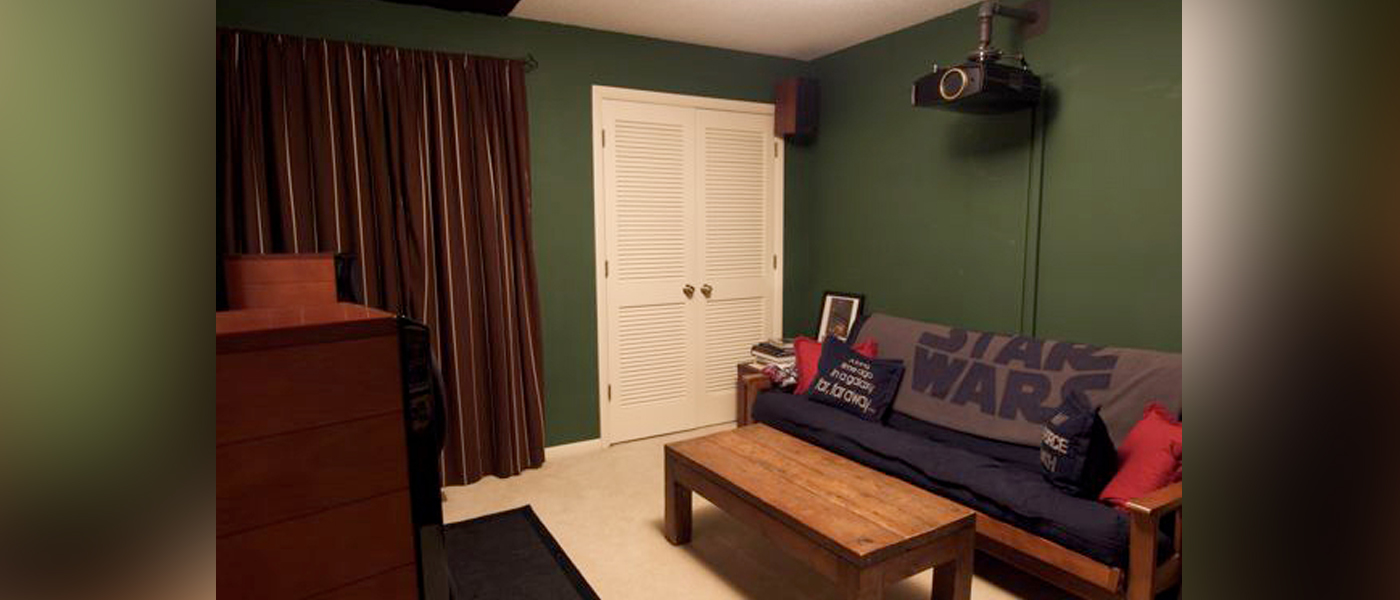
The room itself was on my first floor, off of the hallway between my living room and kitchen, measuring 12 x 12 feet. As mentioned above, there was a window in the room, but I chose to deal with stray light by adding thick curtains to the heavy wooden blinds that were already in place. There was also a closet that would be perfect for storing all of the gear out of sight. The closet had extensive shelving that would be great for the equipment.

I also wanted to make sure my time without a working “theater†was minimal. Because I would be relocating equipment from my living room to the dedicated room, I had to make sure that everything in the new location was as prepped as possible so I could so minimize my time without a 5.1 setup.
The first step in prepping the room was to run speaker wire – this way I could keep the speakers in my living room and drop them in as soon as I was ready. As I have a crawlspace this task wasn’t a terribly difficult project. I chose to buy bulk from a company called ProFlex. This company, similar to more familiar names like Belkin and Canare, manufactures broadcast quality cabling that was more than adequate for my use.

I purchased 14/4 cabling so that I wouldn’t be limited in any distances and could potentially bi-amp my speakers in the future. I had to drop three cables down the front wall for front, left and right speakers. There was no insulation on this wall so it was pretty easy. I purchased a long, flexible drill bit and purchased wall plates intended for coax cable outlets that just fit my speaker wire for a nice, clean look.

All of the equipment was going to be located in a closet in the room to preserve the clean look I was going for. I ran the three speaker cables for the front sound stage through the crawl space and up into the closet. Because my main water intake is in that closet, I had easy reference for where to drill holes for the speaker wire.

The rear surround speaker wire and sub wires were out of the closet and hidden pretty easily in the room by the furniture. I modified various wall plates from Home Depot as necessary to maintain a clean look.

My next step was cabling for the video. Cabling was going to be run from the closet to the back wall where the projector was going to be mounted, so I needed interconnects that were longer than I had been using in the past (around 15 feet total). I ran a DVI and component cable from the closet up to the ceiling that were both purchased from an Internet direct company that manufacturing cables using bulk cable from Canare and Belkin. I used the same hole that the sub cable and speaker wire were running through for the video.
The standard wall conduits available from Home Depot were unfortunately too small for the DVI, component and power cables. A quick trip to Graybar yielded extra wide surface raceway from a company called Panduit (www.panduit.com) that could accommodate all of the video cabling. I ran a second smaller conduit so that power and video could be run independently. Both of these were painted to match the wall.

Moving Equipment – Making Use of What You Have
The projector and screen were going to be significant purchases so I wanted to make sure I utilized as much as I could from my existing setup. I made the decision to move all of the equipment over to the theater except for my rear-projection CRT TV. When watching TV on a day to day basis, I’d make due with the speakers in the CRT and preserve the full surround experience for movies in the theater.
The existing setup had decent enough components to make the audio and video very respectable. I had a good receiver (Denon 3802) and a very good progressive scan DVD player (Denon 1600). My existing speakers would provide the surround sound (PSB Stratus C6i center, Stratus Silver i towers and Image 1B surrounds). The PSB system was an impulse purchases but one that had worked out very well. I was even able to reuse the surround sound speaker mounts for the 1B’s in the theater.

To fill out the PSB system, I had a PSB Subsonic 7 subwoofer. All of the interconnects from the existing system (coax and optical digital, component, and RCA’s) could easily be reused – I didn’t need to procure anything other than a longer subwoofer cable and the video cables to run to the projector. Even though I was not going to be using my best components on a daily basis, being able to use all of this equipment significantly reduced the cost and time in getting up and running in the theater and allowed me to focus on the next big step: the projector and screen.
Which Projector to Choose? A Few Key Attributes
As stated above, I made the decision to jump into the projector game mainly because of the release of two specific projectors from Sanyo and Panasonic. These two units represented the first time that true HD (albeit 720p) was available at real world prices. The vast majority of constraints that were placed on projectors of a reasonable price point then are no longer as much of a concern now as technology has advanced, but I still think one point remains relevant.
Of the two low cost options that were available at the end of 2002, one proved to be far more attractive: the Sanyo Z2. While offering many similar features as its closest competitor, the Sanyo offered one key attribute that I still believe is one of the most important someone can look for in a projector – especially someone attempting their first installalation: lens shift. Lens shift – not to be confused with key stone correction – allows the installer to physically shift the placement of an image. The most flexible projectors allow you to do this in both the vertical and horizontal direction, while some allow only vertical lens shift. The level of error that these allow for is indispensable. I never recommend projectors that don’t have this feature. Luckily it is a quite common attribute these days in many low to mid priced projectors.
Now that I had settled on a projector, the next thing was to get it onto the wall. Because of my room constraints I was limited to mounting on the back wall (I didn’t want to ruin the popcorn ceilings in the room by mounting a ceiling plate). Procuring a mount is much easier now than it was in 2003. As the prevalence of projectors has increased, we now see low cost mounts popping up everywhere from eBay to Monoprice (http://www.monoprice.com). My only recommendations are to make sure that your mount is universal (so that it can accommodate the various upgrades that will undoubtedly happen), and that it takes some sort of standardized tubing so that you can custom make the mount with standard metal tubing from Home Depot. My current mount is from Premier Mounts (http://www.premiermounts.com/). Because the mount is compatible with standard 1.5†NPT piping, I was able to purchase parts at Home Depot that allowed me to modify it for rear wall mounting.

If you aren’t limited in placement, there are a few things to consider as placement of the projector will impact its performance. Look at your projectors manual. In there you’ll see a diagram that will illustrate how big of a screen size can be projected from different distances. You’ll have to make sure that your desired screen size is attainable from the distance that you choose. Any projector is capable of projecting a given size from a range of positions: that which represents its maximum zoom and its minimum zoom. Which to choose if you have an option? There are several considerations that play into this. As I’ve stated before, the AVS Forum provides a wealth of information so I would like to reference an extremely detailed and well-written post by AVS Forum Member Bob Sorel. http://www.avsforum.com/avs-vb/showthread.php?t=753497
We’ll get back to this article in a second, but first we need to introduce the concept of the screen.
The Screen and Equipment
There are two basic considerations to make when looking at a screen: the material its made of and the size. The factors that go into this decision can be intricately dissected – there are three parts to the video in a front projection setup different from a standard TV: the room, the projector and the screen and each of these variable interact with one another.
The size of a screen, like many things, starts with preference. Do you like to sit in the front of the theater or the back? If you like the front, then you’ll be looking for a generally bigger screen; back, smaller. If you want some more guidance, there are a few places to start. First, try firing up the projector on a sheet or piece of blackout cloth (available from most fabric stores) or even the wall. Play with different sizes and see what you’re comfortable with over the course of a couple of days or weeks, then measure where you settled in on. Additionally, THX has made recommendations on what they feel is the optimal viewing angle – maximizing the immersive quality of movies, but not making the screen so big that you can’t see all of the action. Their recommendation is a 360 viewing angle (180 off axis).
A handy calculator to you can be found at:
http://myhometheater.homestead.com/viewingdistancecalculator.html
This will give you a ballpark of where to start.
The size of an image isn’t just dictated by the ideals, but also the room and your projector. The projector needs to not only be able to zoom to the correct size, but also be able to produce adequate light to fill the screen. In addition, the screen material that actually reflects the light coming from the projector has variables that will also play a role in the overall picture quality of the image.
I don’t want to make this overly complicated – I’ll freely admit that I was ignorant of many if not all of the variable that go into these choices when I was undertaking my project. My room was small (12 feet x 12 feet) and my projector selection and placement options were limited, so many of the potential variables had to be ignored. I opted to let THX be my guide. With the couch along the back wall, my viewing distance was about 11 feet, yielding an optimum THX screen size of 92†diagonal (16:9 aspect ratio).
If you do have the flexibility on placement of the projector, some simple analysis can allow you to maximize the performance of the video that you’ll have in your room. Again, I enthusiastically refer you again to Bob Sorels post at the AVS Forum. Before you choose a projector, where it’ll be placed, the screen size and screen material, it will serve you well to walk through some of the basic calculations to make sure that you will achieving the best image that you can and that your projector and screen pair well.
In terms of my specific decision: When I undertook this project, we were at the beginning of the Internet direct phenomenon with high quality gear being marketed directly to the consumer. Screens were one of the areas that benefited from this trend. Home theater screen were traditionally fairly expensive – however new companies, like Carada, began offering well built screens direct to consumers at substantially discounted prices versus the more traditional names.

I opted for one of these and have been extremely happy with the product – the build quality is exceptional. Now, there are literally dozens of screen manufacturers out there marketing very nice screens at fractions of the cost of the more traditional Stewarts, Da-lits, and Drapers. Home theater projectors at this time were significantly lacking in their ability to produce blacks and I chose a screen material that was designed to try and compensate for these problems. You can read about Carada’s approach to this problem on their website – http://carada.com/Projection-Screen-Surface-Material.aspx – other companies had taken different approaches to address mediocre black levels. This is far less of a concern now as projector manufacturers have made enormous strides in black level performance.
At the end of this process, my room consisted of the following equipment:
- DVD Player: Denon DVD-1600
- Receiver: Denon AVR-3802
- Projector: Sanyo PLV-Z2
- Screen: Carada Precision Series 92†High Contrast Grey
- Speakers: PSB Stratus Silveri (R/L), PSB Stratus C5i (C), PSB Image 1B (SL/SR)
- Interconnects: Blue Jeans Cable
Next Steps
In the next part of this series I’ll start talking about upgrades, specifically focusing on the thought process that went into each decision I made. We’ll end that section with a discussion of the current video and audio chain. Let me know your questions so that we can add relevant commentary.