

Introduction: Home Theater Upgrade Path – Bringing it forward
In this installment I am discussing my upgrade paths and the decisions that went into each change: Video, Audio and Other cconsiderations, including power conditioners. I’ve presented the changes that I decided on in a chronological manner, as I think that many of us approach our decisions in this way…..at least I did. It is the nature of this hobby that we are always striving to make improvements in our equipment and subsequent experience. I had a good set-up, but was always watching, waiting and wondering where the improvements would come and what would happen next.
A New Projector?
While the Sanyo was an excellent first unit, it fell short in many categories and a new projector was very high on my list. Any projector improvement can basically be boiled down to a few things: increases in resolution, increases in brightness, increases in contrast, increase in accuracy. From 2003 we have moved closer to each of these and each of the projector moves that I’ve made have addressed one or more of these factors. The Sanyo was really the first reasonably priced HD capable projector to be released, and while fantastic, was lacking in many attributes: the black levels really weren’t great and it wasn’t a very bright unit. Given these, I was eager to upgrade as new models became available.
I knew from early on that DLP didn’t “agree” with me. Besides being consistently more expensive than their LCD counterparts (circa 2003-5), they offered far less installation flexibility and I had always suffered from color separation artifacts (rainbows). I am a firm believer that upgrades in consecutive generations rarely gives you significant improvements vs cost, so I sat tight watching trends.
In 2005, I finally decided enough improvements had been made over my current unit and pulled the trigger on the new Panasonic 720p projector: the AE-900U. This unit significant step-up in black level performance due to effective incorporation of a “dynamic iris”, which changes the amount of light that is produced in real time based on the black content of the image. The Panasonic 900 stayed in the unit for several years while I tackled other parts of the room.

Because my screen material was targeted towards a projector that had significant problems producing black, it was not entirely suitable for my new projector. This grey screen succeeded in reducing black level, but at the expense of brightness. Now that my projector had significantly improved blacks (both as a result of the dynamic iris as well as improvements in LCD technology), I no longer needed this screen. Carada offers two additional screen materials: a 1.0 and 1.3 gain. I chose the 1.3 gain screen material to replace my grey material. 1.3 provide a little extra punch to the images than the 1.0. Any positive gain screen achieves this by focusing light. While this can produce “hot-spotting”, my room was small enough, and the gain improvement minimal enough, that this wasn’t a problem.
I stuck with the Panasonic for several years, until 2007, when I replaced it with a JVC RS1. I’ll discuss this upgrade a bit later in the feature.
Video: From Progressive Scan to Video Processors
After a couple of months of very happy watching I started getting a bit antsy…it was around March of ’07. I had some money to throw at the theater and I started considering some sort of video upgrade. I had already upgraded the screen material from HC Gray to Brilliant White…but my sources needed some work. I had been happily using a Denon 1600, but wanted to see what digital had to offer.
I picked up a first generation Oppo to try out and was moderately satisfied with its performance, but I decided to look at other options. A local dealer friend, suggested I start looking at a video processor so I began weighing different options on that front.
I had been toying with the idea of a video processor for many years. Optimal video performance circa 2007 was not easily achievable in most standard video displays. De-interlacing was spotty and scaling (the process of changing the resolution of a picture to fit the native resolution of the panel displaying it) was even more suspect. There were traditionally two ways to achieve superior de-interlacing and scaling – a high end DVD player or a video processor.
What I liked about the Video Processor approach, was that my processing power wouldn’t be limited to DVD’s – I could also feed in a signal from cable TV, laserdisc, or any other video source to be cleaned up. Not only would a video processor allow me to handle various resolutions with ease, it would give great flexibility over calibration settings for all of my inputs. I selected a unit from a somewhat lesser known (at the time anyway) company called Lumagen. Lumagen offered a set of DVI based video processors that had a terrific reputation for performance and service. The Lumagen HDQ that I settled on had plenty of inputs and reference level deinterlacing, deinterlacing and noise reduction.

In addition, the VP was going to be capable of working with next generation video formats in the form of HD-DVD and Blu-ray. The Lumagen might have been overkill for the Panasonic 900, but I was starting to think again about my next projector upgrade and I knew I would get quite a bit of use out of this piece.
For my next DVD player I selected a Oppo 980. I selected this unit because it was recommended as a prime unit to pair with a video processor. At the time, it was one of the new players capable of outputting 480i digitally, unaltered from the disc. This way the video processor could handle everything from de-interlacing to scaling.
While the Lumagen wasn’t the easiest piece to work with, once I had it mastered, I truly loved having a VP in the system. We will discuss VP’s later again in this series. Paired with the Denon 2910 (via SDI) I had about the best picture that you could get from a standard DVD source – and I was really happy – happy until we started hearing about this whole 1080p thing.
1080p – to Full-HD and Beyond
The rumblings about 1080p started in the 2006-2007 time frame. Some initial offerings had been made at stratospheric prices from companies like Sony, Runco and Faroudja, but it wasn’t until late 2006 that word started to spread of 1080p coming to us at real world pricing. Concurrent advances significant advances were also being made in the technology of projectors, with significant advances coming not only in resolution, but also in contrast ratio in several technologies.
As the dust settled I ended up with a JVC RS-1. In my 5 years on the forums up to that point, no other projector had resulted in level of buzz that they JVC had up to its release. The JVC represented a monumental advancement in contrast ratio. Without the help of a dynamic iris, the JVC engineers had figured out a way to get their LCOS (liquid crystal on silicon) panels to produce contrast ratios in excess of 10,000:1 without the aid of any manipulation to the image like a dynamic iris.

Upgrade Path Considerations
At this point I want to step back and comment on upgrade paths and how someone can start with a fairly basic system, but by upgrading one component at a time, in an order that makes sense, you can end up with something far more advanced. I started with a fairy basic set-up. The Sanyo Z2 cost me about the same as a new wide-screen set would have at the time. I worked with existing gear and made judgement calls as to where to put money at the time when it made sense to make an investment or change. As budget allowed, I was able to move into higher end pieces.
In the context of all of the other things that needed to be done, some of the more pricey equipment would have been unreasonable at the beginning of the project. However, by making us small changes to my system over time, selling my used gear, and incrementally moving more high-end, you can end up with far more superior a system than might have been feasible at the beginning. The point I’m trying to drive home: you don’t have to start with a high-end system to eventually end up with one.
Because the dawn of 1080p displays was happening at the same time as the various HD based disc formats, it was logical to pair this projector with one or both of these systems. When the dust settled, I ended up with a Sony Playstation 3 – multi-faceted, fast, and very capable – I felt that at the infancy of the formats, this represented the most robust choice.

The only knock on the RS-1 was that its colors were “oversaturated”. Each of the primary and secondary colors fell outside of the 3-dimensional color definitions as outlined by the HD color specifications. While a discussion of what this actually means is beyond the scope of this article, the simplest way to summarize would be that the JVC was incapable of prot were conforming to the established standards that govern the reproduction of video material. While I still had a video processor in my chain, this particular unit was incapable of correcting these types of color errors. Given this I swapped out the Lumagen HDQ for a Lumagen Radiance XD. This video processor was far more advanced than the HDQ and allowed for correction of both primary and secondary colors in 3 dimensions.

Of course, this all needed to be calibrated in order to work properly. I’ll talk about DIY calibration in later in this series. This combination (PS3 ->Radiance -> RS1) produced an exceptionally nice image. I’ll deal with the last few tweaks to the video chain when I talk about the present day set-up.
Audio Considerations
The upgrades in audio that I’ve made have mirrored advances in video and audio delivery technology as well as advances in processing technology. The advent of HDMI significantly changed the landscape of both video and audio delivery. In order to take advantage of not only advances in resolution, but also advances in new audio compression formats, a move to an HDMI based solution is warranted.
I used the Denon 3802 receiver for many years, but when I upgraded to the PS3 and a 1080p projector it was time to take the plunge into an HDMI based solution. Because of brand loyalty and really nothing else, my next to receivers were both Denons: 3806 and 3808. I very much like the “38” series of Denon’s (though they have abandoned this naming convention). They represented what I considered a great price to performance point: solidly built, good sounding, sufficiently featured, but not so high priced and filled with features that I felt I was paying for something that I wasn’t going to use. I used the Denon 3808 up until just a few months ago, when I made the decision to tackle external amplification.
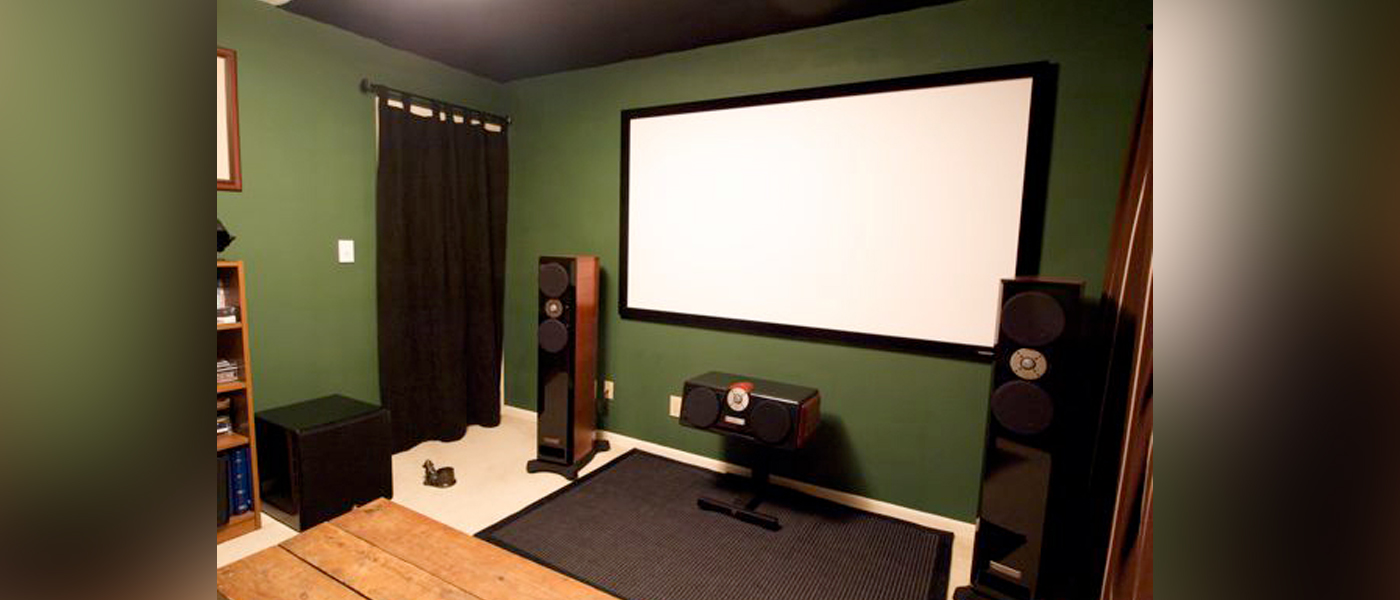
The Current System: Video Chain, Audio, Other Equipment

Video Chain
My current video chain is fairly streamlined. I moved about a year ago from the PS3 to an Oppo BDP-83. This decision was made not from dissatisfaction with the PS3 necessarily, but more ease of use. Being based on IR protocols vs Blutooth, the Oppo integrated more easily into my remote control system. In addition, it ran cooler and quieter than the PS3.

The Denon does absolutely nothing to the video signal. From the Denon, video is passed, unaltered, via a 25 foor Blue Jeans Cables Series F2 HDMI cable to a JVC RS-25 projector. This cable is the thinnest, most robust cable that I’m aware of. Its low guage makes running of the cable exceptionally easy – especially with side inputs on the RS-25.

The RS-25 is three generations past the RS-1 that I originally had and is an exceptional unit. Because the RS-25 has an integrated Color Management System and I am only using one main source, I no longer had use for a video processor as sophisticated as the Lumagen RadianceXD. The implementation of capable video processing in displays over the last few years has lessened the need for video processors in the video chain. Displays with sophisticated and extensive calibration can achieve essentially perfect calibration results without the aid of an external box. Paired with the exceptional de-interlacing and upscaling capabilities of high-end players such as the Oppo BDP-83, I simply couldn’t justify the cost of having an external video processing. For more reflections on video processing in today’s home theater, please see my review of the SpectraCal “Calibration Bootcamp” class as well as my “CalMAN 4” review in our “DIY Calibration Software Article”. I am still using a Carada Criterion Brilliant White Screen.
Audio
Audio is passed via HDMI from the Oppo to the Denon 3808 which no longer as a receiver, but as a pre-amp and processor. Audio is decoded and room correction and Dynamic EQ’ing are applied to the signal.

I use two old sets of component video cables, also from Blue Jeans, to transmit the audio to a Wyred4Sound MMC-5 five channel amplifier. This amplifier is a Class D, 220 WPC unit, exhibiting a nice low profile and cool operation that makes sense for my current configuration. The same speaker cables that I originally ran (ProFlex 14/4) are still used to distribute the amplified audio to my speakers.

I had always heard that moving from a traditional receiver to separate components, or more specifically a stand-alone amplifier, was one of the most significant steps anyone could take to improving the overall sound quality in their room because amplifier sections in receivers are often lacking. Because space and heat were a concern, I opted to look specifically at Class D amplifiers. An internet direct company called Wyred4Sound had been generating a lot of positive buzz with their Class D amps – I opted for one of their smaller “mini” 5 channel amps – the 225 wpc MMC-5.
I recently said goodbye to my original PSB front sound stage and upgraded to Usher Audio Mini Dancer 2’s (L/R) and BE-616 (C).

I was turned onto Usher by a local dealer/friend. I will be doing a review of these speakers for Secrets. I am still using the same surround sound speakers. Matching surround isn’t nearly as critical as having fronts matched. The PSB Image 1B’s are sufficient for this room and my current needs.
For a subwoofer, I recently upgraded the PSB Subsonic 7 to a JL Audio Fathom F113 subwoofer. What I liked about the JL was the performance it was able to bring in a small package. There are literally dozens of excellent subwoofer options available now from numerous outlets that I readily recommend to friends. However, I don’t know of any other sub that has the capabilities of the JL, without taking up a ton of space.

My room isn’t large and this was an important consideration. The audio to the sub is fed through an Audyssey SubEQ Sub Equalizer. I was first introduced to the concept of subwoofer equalization by Secrets senior editor Chris Heinonen. He brought over a bunch of gear and helped me set-up a Behringer Feedback Destroyer to see if my room would benefit from some subwoofer equalization. Lower frequencies are easily corrupted in many rooms, and my small room was no exception. The addition of some dedicated subwoofer equalization smoothed out my bass response considerably, making for a much tighter, more pleasing experience.
![]()
Because the Behringer required quite a bit of infrastructure to function (mic, external sound card), I opted to switch it out for the Audyssey AS-EQ1 to make re-calibration a little more streamlined.
Other Equipment
The only other piece of the puzzle equipment wise is power management and surge protection. I currently have 6 pieces of gear in my set-up and only two outlets in the gear closet. Much can be said about “power conditioning”, filtering and its necessity. Those discussions are better suited to other venues. What is not arguable is that we often have more equipment than outlets and that surge damage is a very real problem. I have owned a bevy of different power management solutions over the years but am currently using a piece from PS Audio. I know that the power coming into my house is often below the standard 120V that it is supposed to be so I opted for a PS Audio Power Plant Premier which rectifies this problem in a fairly compact package. You can read a terrific review of this product by Jason Serinus here at Secrets

Next Steps – Room Upgrades
In the next section I’ll be discussing upgrades one can make to any room to improve their performance independent of directly changing equipment. I’ll talk about various upgrades that I did to the room to try and improve the video as well as discuss remote control and basic automation. I’ll also address more advanced audio and video calibration options that are available to enthusiasts.